Oki ML3320 Help Manual
Hide thumbs
Also See for ML3320:
- User manual (9 pages) ,
- User manual (57 pages) ,
- Read me first (42 pages)
Table of Contents
Advertisement
Advertisement
Table of Contents

Related Manuals for Oki ML3320


Summary of Contents for Oki ML3320
- Page 1 ML 3320/3321...
- Page 2 Every effort has been made to ensure that the information in Oki and Microline are registered trademarks of Oki Electric this document is complete, accurate, and up-to-date. Oki Industry Company, Ltd. assumes no responsibility for the results of errors beyond its control.
- Page 3 Safety Your Oki printer has been carefully designed to give you years of • Do not use your printer near water, or spill liquid of any kind safe, reliable performance. As with all electrical equipment, there into it. are a few basic precautions you should take to avoid hurting •...
- Page 4 • Do not poke anything into the ventilation slots on the sides of the printer; you could get a shock or cause a fire. • Aside from the routine maintenance described in this handbook, do not try to service the printer yourself; opening the cover may expose you to shocks or other hazards.
-
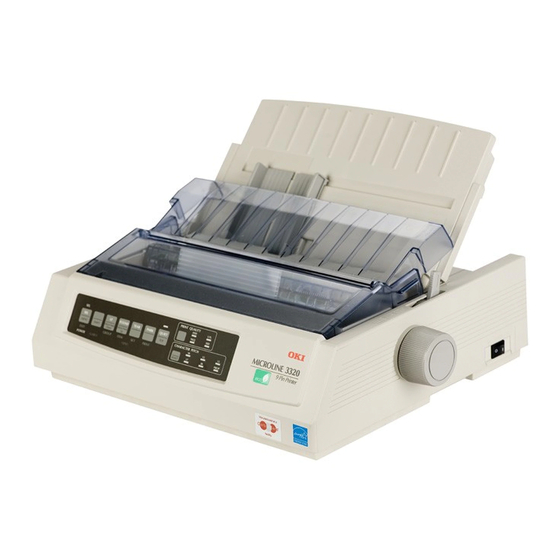
Page 5: Getting To Know Your Printer
Getting to Know Your Printer Carriage Cover Open Paper Guides Carriage Cover Access Cover Paper Separator Access Cover Paper Separator On-Off Switch Control Panel On-Off Switch Control Panel Platen Knob Paper Lever Platen Knob Paper Lever Set up for Rear Feed of Continuous Forms Set up for Single-Sheet Feed... -
Page 6: Loading Paper
Loading Paper Loading Continuous Forms (Rear Feed) We recommend the rear-feed path for printing reports, etc., on single-thickness, continuous-form paper. For graphics or charts, it's best to use the single-sheet path (top feed). Note: If you have paper in the paper path, be sure to remove it before installing rear-feed paper. - Page 7 1. Move the paper lever to the position marked “REAR.” 3. Pull up on the lock levers and open the tractor covers. 2. Grasp the paper separator, lift it slightly, pull back on it, then swing it forward. 4. Move the right tractor over to fit the width of the paper.
- Page 8 5. Place the first two holes in the paper over the tractor pins 7. Adjust the right tractor to centre the paper holes on the on either side and close the tractor covers. pins, and push back the lock lever. 8.
- Page 9 Loading Single Sheets (Top Feed) 3. Open the carriage cover and lift the paper separator to the single-sheet position. Use the single-sheet path for letterhead stationery, memos, and individual envelopes. It is recommended for printing graphs and charts because it provides the most accurate control of the paper.
- Page 10 Setting the Top of Form (TOF) 5. Adjust the paper feed guides ( ) for the width of the paper and place a sheet of paper in the separator. The When setting the Top of Form, use the red line ( ) on the paper will feed into the printer.
- Page 11 Resetting the Top of Form to the Standard Setting 3. Press SEL to re-select the printer. 1. Turn the printer off. MENU 2. Hold PARK + QUIET/TOF while turning the printer EX T back on. Temporarily Changing the Top of Form Setting To set the Top of Form position lower for one page only: 1.
-
Page 12: Switching Paper Paths
Switching Paper Paths Setting the Printhead Gap To switch from continuous-forms to single-sheet feed: The printhead gap is the distance between the printhead and the platen. To adjust the gap, open the access cover and move 1. Tear off any printed pages. the blue lever ( ) to the recommended setting from the table 2. -
Page 13: Running The Self Tests
Running the Self Tests Selecting an Emulation Font Sample Test Your printer has three emulations: ® • Epson ® • Proprinter III To run the test: Turn the printer off, then press and hold ® • MICROLINE Standard LF while turning the printer on. The printer comes set for the IBM Proprinter III emulation. -
Page 14: Selecting A Printer Driver
6. Press SHIFT + SEL to save your setting and exit the Menu Mode. IBM Proprinter III Epson FX Microline Standard ML3320/1 IBM ML3320/1 Epson Microline 320/321 IBM Proprinter III Epson FX286e Microline 320/321... -
Page 15: Maintenance
Maintenance Replacing the Ribbon Cartridge 3. Remove and discard the used ribbon cartridge. Note: For the best results, use genuine Oki ribbons. 1. Make sure the printer is turned OFF. 2. Centre the printhead ( ). Caution! The printhead may be HOT! -
Page 16: Clearing Paper Jams
5. Install the new ribbon cartridge. Clearing Paper Jams Rear-Feed Jams 1. Turn the printer OFF and use the platen knob to back the paper all the way out. 6. Turn the knob ( ) in the direction of the arrow to take up any ribbon slack. - Page 17 3. Remove any torn pieces of paper. 6. Turn the printer on. 4. Replace the pull-up roller assembly, and close the access cover. 7. Press FF/LOAD. 5. Reload paper. FF/LOAD Micro Feed ITEM...
-
Page 18: Correcting Repetitive Rear-Feed Jams
Correcting Repetitive Rear-Feed Jams If the paper keeps jamming, you probably have bits of paper 3. Fold some continuous-form paper over three times to stuck in the paper path. make a page four sheets thick, load it on the tractors and close the covers. - Page 19 5. Remove the paper pieces, and use the platen knob to 7. Replace the pull-up roller assembly, and close the access back the paper out. cover. 8. Turn the printer on. 6. Swing the paper separator over, reload regular paper, and lower the paper separator back into place.
- Page 20 Single-Sheet Jams 4. Remove any torn pieces from around the carriage. 5. Reinstall the pull-up roller assembly, and close the access 1. Turn the printer off. cover. 2. Use the platen knob to back the jammed paper out. 6. Turn the printer on, and reload paper. 3.
-
Page 21: Cleaning The Housing
Cleaning the Housing You should clean the printer every six months (or after about 4. Reinstall the pull-up roller assembly, and close the access 300 hours of operation). cover. Note: Never use solvents or strong detergents on the cabi- net: they could damage the housing. 1. -
Page 22: Troubleshooting
Troubleshooting Problem: I'm getting strange symbols, incorrect fonts, etc., when I try to print a document. Problem: Nothing happens when I turn on the printer. Solution: (1) Check to be sure that the printer driver you have selected in your software matches the Solution: Check the power cable connection and power printer emulation. - Page 23 Problem: The ALARM light is on and the Character Pitch Problem: My word processor files don’t print the way I 15 light is flashing. have the menu and front panel set. Solution: This indicates a paper jam. Press the SEL key and Solution: Before sending a file to the printer, many word correct the paper jam situation ( see “Clearing processors send either an “initialisation string”...
- Page 24 Problem: The Print Quality and Character Pitch keys on the front panel won’t work. Solution: The Operator Panel Function in the printer menu can be used to disable these buttons. If the printer is part of a customised system or if it is used by a number of people, the system manager may have used this option to make sure the printer is always set properly.
-
Page 25: Using Your Printer
Using Your Printer Print Mode: Indicator Lights PRINT QUALITY FF/LOAD TEAR PARK QUIET Micro Feed Micro Feed MENU SHIFT CHARACTER PITCH Down PRINT EXIT GROUP ITEM PROP POWER ALARM MENU SEL ....Glows = printer selected, ready to receive data ALARM ...... -
Page 26: Print Mode: Control Panel Keys
Print Mode: Control Panel Keys PRINT QUALITY FF/LOAD TEAR PARK QUIET Micro Feed Micro Feed SHIFT MENU CHARACTER PITCH Down ITEM PRINT EXIT GROUP PROP POWER ALARM MENU SEL ..Selects/deselects printer. When held on power up, PRINT QUALITY ... Selects the print quality. engages the Menu Mode. -
Page 27: Selecting The Print Quality
Selecting the Print Quality Important! Front panel settings for print quality and SSD: Super Speed Draft character pitch can be overridden by software • Lowest quality (12 cpi only), fastest speed commands. The lights will always reflect the • Gothic font only printer’s state. -
Page 28: Selecting The Character Pitch
Selecting the Character Pitch Menu Mode: Control Panel Press CHARACTER PITCH to select the width of characters in characters per inch: 10 cpi FF/LOAD TEAR PARK QUIET • Recommended for standard text Micro Feed Micro Feed SHIFT MENU Down • Not available for SSD PRINT ITEM... -
Page 29: Entering And Exiting The Menu Mode
Entering and Exiting the Menu Mode Changing the Menu Settings To enter or exit the Menu Mode, hold SHIFT while pressing 1. Press SHIFT + SEL to enter the Menu Mode. SEL. 2. Use the GROUP, ITEM and SET keys to make your changes: Resetting the Menu Press GROUP successively until the Group you... -
Page 30: Summary Of Menu Settings
Summary of Menu Settings The table below shows the items which may appear in the menu. Settings which are engaged at the factory (defaults) are set in bold italic. Some groups or entries will only appear when a specific emulation is engaged, as noted. Group Item Setting... - Page 31 Group Item Settings Rear Feed Line Spacing 6 LPI, 8 LPI Form Tear-Off Off, 500 mS, 1 sec, 2 sec Skip Over Perforation No, Yes Page Width (ML3321 only) 13.6", 8" Page Length 11", 11-2/3", 12", 14", 17", 3", 3.5", 4", 5.5", 6", 7", 8", 8.5" Bottom Feed Line Spacing 6 LPI, 8 LPI...
- Page 32 Group Item Settings Set-Up Operator Panel Function Full Operation, Limited Operation continued Reset Inhibit No, Yes Print Suppress Effective Yes, No Auto LF No, Yes Auto CR No, Yes Print DEL Code* No, Yes SI Select Pitch (10 cpi) 17.1 cpi, 15 cpi SI Select Pitch (12 cpi) 20 cpi, 12 cpi Time Out Print...
-
Page 33: Explanations Of Menu Items
Explanations of Menu Items Character Set. Choose IBM Set I or IBM Set II. Code Page. Choose the Code Page character set you wish to 7 or 8 Bits Data Word (ML). If your computer system uses use: USA (IBM 437), Canada French (IBM 863), seven bits to make up each unit of data, change this setting to 7. - Page 34 Print Registration. Change the setting as required to obtain Language Set. Replaces certain standard symbols with special characters used in foreign languages. the best registration for bidirectional printing. Line Spacing. Change to 8 lpi to print more lines on a page. Print Suppress Effective.
-
Page 35: Using The Printer's Features
Using the Printer's Features Skip Over Perforation. Change to Yes if you want the printer to go to the next page when it comes within 1" (25 mm) of the bottom of the page. Keep it set to No if your software has Tear Feature its own page formatting controls. - Page 36 This feature is normally turned off. To activate it: Note: Some programs pause occasionally while sending data. If the pause is too long, the paper will advance 1. Press SHIFT ( ) + SEL ( ). to the tear-off position until more data is received. This extra paper movement can cause uneven print registration in graphics.
-
Page 37: Specifications
Emulations Epson FX, IBM Proprinter III, and Specifications Oki Microline Standard co-resident Print Method Impact dot matrix Interface Standard: Centronics parallel Printhead 9 pins, 0.34mm diameter, thermal protection Optional: RS-232C serial Print Speed Mode Characters per second Graphics Resolution Super Speed Draft (SSD) - Page 38 (3" - 10") 10 cpi utility) forms ML3321: 76.2-406.4 (3" - 16") Paper Width Minimum: 76.2mm (3") Interleaf Rear, Paper 38 - 45 g/m² ML3320: 76.2-254mm Maximum, : 254mm (10") ML3320 continuous Bottom (10 - 12 lb.) (76.2 - 254mm) Maximum, : 406.4mm (16")
- Page 39 Directive 89/336/EEC on the approximation of the laws of Dimensions (W x D x H) the member states relating to electromagnetic compatibility. : 389 x 345 x 116 mm ML3320 : 430 x 345 x 116 mm ML3321 Specifications subject to change without notice.
-
Page 40: System Requirements
You will need to obtain a certified USB cable from a reputable PC equipped with a USB port; a shielded USB interface cable supplier or your Oki dealer. long enough to reach from Series A 4-pin location (computer) to Series B 4-pin (printer), not supplied. Microsoft Windows... -
Page 41: Connecting The Usb Cable
Connecting the USB Cable 2. With the printer facing front, the USB port is situated on the left hand side at the rear of the printer. The small round Due to the number of possible variants of operating systems connector on the top of the printer is for use by the cut it is not possible to describe every combination. - Page 42 7. Check that the default paper size has been correctly set 8. If the printer had formerly been used as a parallel or serial by looking at the settings in the Settings > Printers folder. device and there is no output from the printer once a USB Under the printer's Properties >...
-
Page 43: Installing The Usb Driver
3. Insert the printer software CD-ROM disk into drive. Make sure the CD-ROM drive is checked and click on [Next]. Note: Installation of the Oki USB driver is only required for After Windows finds the USB driver, click on [Next]. - Page 44 Oki Systems Company Oki Systems (UK) Limited 550 Dundee Road Slough Trading Estate Slough Berks. SL1 4LE Tel: 01753-819819 Fax: 01753-819899...
Need help?
Do you have a question about the ML3320 and is the answer not in the manual?
Questions and answers