Table of Contents
Advertisement
INSTRUCTION MANUAL
Model #: STC-U840IRS1
Toll Free 1-877-269-8490
Version 6.0
TABLE OF CONTENTS
Camera overview
Moon Phase chart
Frequently Asked Questions (FAQs)
WWW.STEALTHCAM.COM
Toll Free 877-269-8490
WWW.STEALTHCAM.COM
08/11
4
7
8
9
10
13
22
26
29
30
32
33
34
36
First, congratulations on purchasing one of the finest scouting cameras on
the market today. We appreciate your business and want to prove to you we
are committed to providing you the best product and support in the field.
By giving our customers a new state of the art web interface, which provides
you with video tutorials and instruction on how to use the product in the
TECHNICAL SUPPORT
EMAIL: stealthcam@gsmorg.com
Please allow 48hrs for response.
Stealth Cam, LLC
P.O. Box 539504
Grand Prairie, TX 75053-9504
Your Stealth Cam scouting camera is covered by a One Year Limited Warranty on parts
and labor from the date of original purchase, and purchases must be made through an
authorized dealer. The warranty covers defects in workmanship and materials. The
warranty does not apply to units, which have been damaged or abused intentionally or
unintentionally. A purchase from individuals or unauthorized internet sites such as eBay
voids the warranty.
Tampering with or altering the unit will void the warranty. Any unauthorized service will
void warranty. A copy of your original sales receipt must be produced for any warranty
service and a Return Authorization (RA) number must be obtained from customer
service at 877-269-8490 prior to returning product.
WWW.STEALTHCAM.COM
Toll Free 877-269-8490
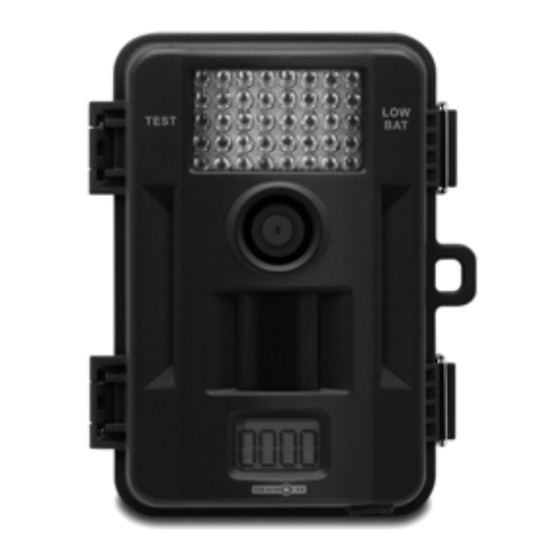
CAMERA OVERVIEW
WWW.STEALTHCAM.COM
3
Toll Free 877-269-8490
** IMPORTANT NOTE **
most effective way.
CUSTOMER SERVICE
CONTACT & HOURS
Toll Free: 1-877-269-8490
Call Center Hours:
Mon - Fri / 8 AM - 6 PM (CST)
www.stealthcam.com
Stealth Cam Limited Warranty
Front
2
4
Advertisement
Table of Contents

Related Manuals for Stealth Cam STC-U840IRS1


Summary of Contents for Stealth Cam STC-U840IRS1
-
Page 1: Table Of Contents
** IMPORTANT NOTE ** First, congratulations on purchasing one of the finest scouting cameras on the market today. We appreciate your business and want to prove to you we are committed to providing you the best product and support in the field. By giving our customers a new state of the art web interface, which provides you with video tutorials and instruction on how to use the product in the most effective way. TECHNICAL SUPPORT CUSTOMER SERVICE EMAIL: stealthcam@gsmorg.com CONTACT & HOURS Please allow 48hrs for response. Toll Free: 1‐877‐269‐8490 Stealth Cam, LLC Call Center Hours: P.O. Box 539504 Mon ‐ Fri / 8 AM – 6 PM (CST) Grand Prairie, TX 75053‐9504 www.stealthcam.com Stealth Cam Limited Warranty Your Stealth Cam scouting camera is covered by a One Year Limited Warranty on parts and labor from the date of original purchase, and purchases must be made through an authorized dealer. The warranty covers defects in workmanship and materials. The warranty does not apply to units, which have been damaged or abused intentionally or ... -
Page 2: Camera Kit Contents
Inside Side & Bottom view Side view with major parts indicated WWW.STEALTHCAM.COM WWW.STEALTHCAM.COM Toll Free 877-269-8490 Toll Free 877-269-8490 CAMERA KIT CONTENT GENERAL INFORMATION Storing conditions • Model STC‐U840IRS1 Digital Scouting Camera • Operating Environment: 14 to 104 deg F (‐10 to 40 deg C). 20‐85% • User manual ... -
Page 3: Quick Start Guide
QUICK START GUIDE BATTERY AND MEMORY INSTALLATION This guide is designed to get you up and running in a matter of moments. To get the most out of this advanced scouting tools, please read the manual WARNING: Do not use different Voltage lead acid battery other than thoroughly before operating the camera. If you would like to modify any of the one specified in this section. -
Page 4: Setup And Programming
SETUP AND PROGRAMMING 1 Star (1.3Mp): Select this option to capture a 1.3M When the camera is first turned on, the internal LCD screen displays pixels image. (Base image quality) (Default) the camera status. The following information is present on this screen. • Resolution for Video: Color Daytime / Black & White Nighttime VGA: 640x480 *ONLY resolution* • Time out: To set the amount of time in seconds / minutes the camera will sleep between PIR triggering. • Temp stamp: Temperature stamp will display on still images and first frame only on video files. If no buttons are pressed after 30 seconds the LCD screen will power • down to conserve battery life and enter 1 minute count down to enter Moon phase: Displays the moon phases. PIR detection mode. To re‐power the display screen, press and hold • Zoom: Digital enhancement to different zoom level. the UP or DOWN button until you see the status screen. 1X: Normal – the word “ZOOM” will not display. Definition 2X: Two times zoom – the word “ZOOM” will display. • Day and Time: Displays the date and time that you have set. 4X: Four times zoom – The word “ZOOM” will blink. • Capturing Sequence mode: • Battery Status: Shows the battery status. 1P ‐ 9P: 1 to 9 burst mode image capturing per PIR trigger. ... - Page 5 Setting the Video Mode: Set the Digital Zoom: Your Stealth Cam can be programmed to record 10‐180 seconds of Your Stealth Cam can be programmed to have 3 different zoom levels. video per triggering. • Switch the camera to the ON position. • Switch the camera to the ON position. LCD screen will display the camera status screen. LCD screen will display the camera status screen. • Press the [MENU] button once within 30 seconds to enter the • Press the [MENU] button once within 30 seconds to enter the programming mode. programming mode. • Press [UP] button THREE times to enter Zoom setting mode. • Press [UP] button TWO times to enter Video setting mode. • The word ZOOM will be blinking. • The word VIDEO will be blinking. • Press [OK] button and the zoom level number will now blink. • Press [OK] button and the video length in seconds will be blinking. • Press the [UP] or [DN] button to select the desired zoom level • setting 1 (1X Normal) /2 (2X Zoom) / 4 (4X Zoom). Press [UP] or [DN] button to select the desired video length from 10 to 180 seconds in 5 second increments. • Press [OK] to confirm your selection • Press [OK] to save your selection. • Press [MENU] button to exit. ...
-
Page 6: Using The Camera
• Press [UP] or [DN] to increase or decrease the month value. (01 ‐ 12). USING THE CAMERA • Press [OK] to save your selection and enter Day setting. Once all program settings have been setup properly, your Stealth Cam • is ready for field use. The Day digits will be blinking. • Press [UP] or [DN] to increase or decrease the day value. (01 – 31). Getting started • Press [OK] to confirm the month setting and enter Date setting. Listed below are some helpful pointers on how to use your camera to • The YEAR digits will be blinking. get the best results. • Press [UP] or [DN] to increase or decrease the year value. (00 – 99). • Mount the camera about 4‐5 feet high with the camera pointed at • Once this is all done, press [OK]. a slight downward angle. • You’ll then see the word ‐ dEL ‐ blinking. • Mount the camera facing north or south NOT east or west due to • Press [MENU] button to exit the program setting and back to the the rising and setting of the sun could produce false triggers and status screen. overexposed images. • If you’re covering a trail, face the camera down or up the trail. ... -
Page 7: Viewing & Deleting Files
• 30 seconds after you’ve made your adjustments, the camera’s VIEWING AND DELETING FILES green LED light will begin blinking and enter count down mode. Viewing Images & Videos This is your indication to leave the coverage area within one Your Stealth Cam Digital Scouting Camera is a plug and play USB minute. ... -
Page 8: Memory Compatibility Chart
MEMORY COMPATIBILITY CHART TECHNICAL SPECIFICATIONS The following cards have been tested and approved for use with the System Requirements and Compatibility STC‐U840IRS1 model. • Windows Me/2000/XP/Vista/Windows 7 • Pentium 4, 2GHz or above • Kingmax 2G 1GB RAM (2GB recommended) • 32 bits color, Resolution 800x600 or above w/ 256MB Sandisk 2G, 4G, 8G, 16G • 2GB free hard disc space Toshiba 2G • An available USB 1.1 port (USB 2.0 recommended) PNY 2G, 4G, 8G, 16G • Direct X 9.0 or above – Should come with your operating system Kingston 2G, 4G, 8G, 16G already. First Champion 1G, 2G, 4G, 8G, 16G • Optional: Windows compatible sound card and speaker. Digilux 1G, 2G Lexar 4G, 8G, 16G NOTE: If you have any questions regarding your PC specifications ... -
Page 9: Fcc Compliance
SD Card Capacity and Compatibility FREQUENTLY ASKED QUESTIONS Due to the rapidly changing memory card market please consult Q: What does it mean when I have all 8’s on my LCD screen? www.stealthcam.com for the most up to date information regarding A: This usually refers to an incompatible memory card or memory card memory cards. damaged. Make sure your card has been properly formatted. MOON PHASE SYMBOL CHART Q: Is the infrared flash invisible? A: The infrared flash will give off a low glow red light it is not invisible. Q: Is my game camera Mac compatible? A: This camera model is not compatible with Mac computers. Q: Can I use rechargeable batteries in the camera? A: Rechargeable batteries are fine for the unit, regular alkaline ...
Need help?
Do you have a question about the STC-U840IRS1 and is the answer not in the manual?
Questions and answers