Table of Contents
Advertisement
DREMEE
owner's manual
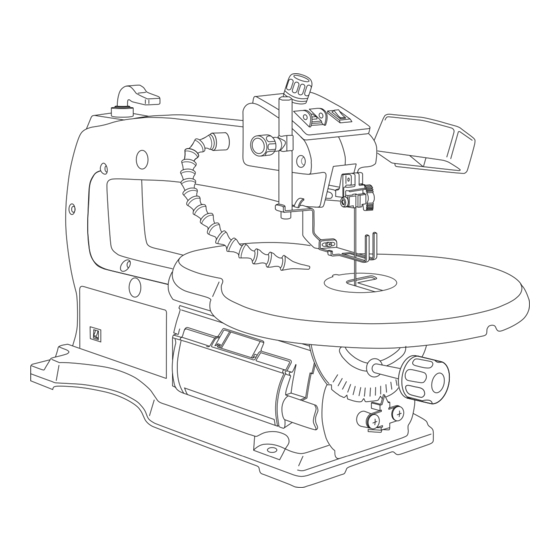
MODEL 1680, VARIABLE SPEED
16" SCROLL SAW
©
I
Parlez-vous frangais? Voir page
&Habla espaSol? Ver pagina 41
21
Voltage
rating
Amperage
rating
No load speed
Throat
Blade
Blade stroke
Cutting
capacity
120 V _
50 - 60Hz
1.4A
n O 500-1,600/min
16"
5" Plain and pin-end
3/4"
2" at 0°; 1" at 45 °
assembly • operation • safety instructions
OREMEL
P.O. Box 1468
Racine,
Wisconsin
1 -800-437-3635
http://www.dremel.com
Form No. 2610914195
7/01
Printed in Taiwan
Advertisement
Table of Contents

Related Manuals for Dremel 1680


Summary of Contents for Dremel 1680
- Page 1 DREMEE owner's manual MODEL 1680, VARIABLE SPEED 16" SCROLL SAW © 120 V _ 50 - 60Hz Voltage rating Parlez-vous frangais? Voir page 1.4A Amperage rating &Habla espaSol? Ver pagina 41 No load speed n O 500-1,600/min Throat 16" Blade 5"...
-
Page 2: General Safety Rules
The use of any other accessories not spec- Everyday eyeglasses have only impact resistant lenses, they are NOT safety glasses. ified in the current Dremel catalog, may cre- ate a hazard. GUARD AGAINST ELECTRIC SHOCK Prevent body contact with grounded surfaces. For exam- ple: pipes, radiators, ranges, refrigerator enclosures. -
Page 3: Additional Safety Rules
Tool Use For your own safety, do not operate your Scroll Saw until it is completely assembled and installed according to the instructions...and until you DON'T FORCE TOOL have read and understood the following: It will do the job better and safer at the rate for which it was designed. - Page 4 d. Avoid awkward hand positions where a sudden slip i. Quick Release Tension Lever should be in down position could cause a hand to move into the blade. before operating. • ALWAYS adjust the drop foot to just clear the work- 11.
-
Page 5: Requirements
Motor Specifications Electrical Requirements prong in the attachment plug at the other end. Motor Specifications This plug requires a mating 3-conductor grounded type outlet In the event of a malfunction or breakdown, grounding provides as shown. It must be grounded in accordance with all local a path of least resistance for electric current to reduce the risk of codes and ordinances. -
Page 6: Table Of Contents
Aligning the Degree Scale Pointer ........Recommended Accessories ........Basic Scroll Saw Operations ........11-14 Removing and Installing Pin-End Blades ......12 Trouble Shooting ............Removing and Installing Plain-End Blades ....12 Dremel Limited Warranty ..........Service Parts List ............61-64 Adjusting the Lamp ............ -
Page 7: Unpacking And Checking Contents
Item Description Qty. power source when tool is not in use. 16" Scroll Saw ............Model 1680 Motorized Scroll Saw is shipped complete Owner's Manual ............one carton. Loose Parts Bag (containing) ........Allen Wrench (3 mm) .......... -
Page 8: Glossary Of Terms
of Terms Glossary BLADE TOOTH SET KERF The slot cut by the blade. The distance that the edge of the sawblade tooth is bent LEADING EDGE (onset) outward from the side of the blade. The edge of the workpiece which is pushed into the TRAILING EDGE blade first. -
Page 9: Getting To Know Your Scroll Saw
Getting to Know Your Scroll I=[_i QUICK RELEASE TENSION LEVER VARIABLE SPEED DIAL POWER ON/OFF DROP FOOT LIGHT SWITCH LOCK KNOB SWITCH LIGHT DROPFOOT TABLE INSERT TABLE BLOWER LOCK KNOB CIRCUIT BREAKER BLADE & WRENCH STORAGE CASE VACUUM TABLE EASY ACCESS DEGREE TILT DOOR... -
Page 10: Operating Adjustments
Operating Adjustments NOTE: When cutting at extreme angles, the drop foot Setting the Table for should be lifted off the workpiece, as it will impede cutting. Hold the workpiece against the table. The drop foot may Horizontal or Bevel Cutting be disassembled when thick materials are cut at extreme 1. -
Page 11: Basic Scroll Saw Operations
Basic Scroll Operations Follow these instructions for operating your Scroll Saw to Best results are achieved when cutting wood less than get the best results and to minimize the likelihood of per- one inch thick. sonal injury. • When cutting wood thicker than one inch the user must feed the wood very slowly into the blade, increase blade ALWAYS OBSERVE THE SAFETY... -
Page 12: Removing And Installing Pin-End Blades
Basic Scroll Operations Removing and Installing Blades Plain-End Blades Your new Scroll Saw accepts 5 inch Pin-End blades or 5 inch Plain-End blades (See Accessories on page 18). 1. Release blade tension by lifting up the Quick Release Tension Lever (Fig. 7). To prevent personal injury always disconnect the plug from power source before changing 2. -
Page 13: Adjusting The Lamp
asic Scroll Operations Adjusting the Lamp LOCK KNOB 1. Position the lamp as needed to illiminate the workpiece. 2. Loosen lock knob, slide lamp to desired position OUTER SHADE tighten lock knob (Fig. 9). COVER Note: Lamp shade angle is fixed and cannot be adjusted. Replacing the Bulb 1. -
Page 14: Making Interior Scroll Cuts Pin-End Blades And Plain-End Blades
Basic Scroll Operations Making Interior Scroll Cuts (Pin-End Blades and Plain-End Blades) AVOID ACCIDENTAL STARTING, ALWAYS TURN SWITCH "OFF" REMOVE PLUG FROM POWER SOURCE BEFORE REMOVING OR REPLACING THE BLADE. A main benefit of this saw is the ability to perform intricate interior cuts quickly and easily. -
Page 15: Mounting The Scroll Saw
Mounting Scroll Mounting the Scroll Saw to a Bench 1. The Scroll Saw should be fastened securely to a firm supporting surface such as a stand or workbench, using 5/16" the four mounting holes. Dia. Note: When mounting this saw to a workbench, a solid bench is preferable to a plywood bench where noise and... -
Page 16: Mounting The Scroll Saw To Plywood
(Available as Accessory) If you prefer to mount your Scroll Saw to a leg set we rec- ommend the leg set for benchtop tools which is available through Dremel. The model number is 16500. This leg set is an optional accessory... -
Page 17: Maintaining Your Scroll Saw
Contact the nearest Dremel Factory Service Center, other competent repair service. Use only Dremel replace- TO LUBRICATE ment parts, any others may create a hazard. 1. Turn saw on its side (Fig. 18). -
Page 18: Recommended Accessories
Use of improper accessories may cause haz- ards. LEG SET Cat. No. 16500 Scroll Saw Stand Blades Dremel offers both Plain and Pin-End 5 inch blades. PIN-END Pin-End blades permit relatively tight radius cutting in hard and soft wood. Cat. No. Suggested Usage... -
Page 19: Troubleshooting
Motor will not run. 1. Defective cord or plug. again. 2. Defective motor. 2. & 3. Consult Dremel Service. Any attempt to repair this motor may create a HAZARD 3. Defective wire connections. unless repair is done by a qualified service technician. -
Page 20: Dremel Limited Warranty
Warranty Your Dremel product is warranted against defective material or workmanship for a period of two years from date of purchase. In the event of a failure of a product to conform to this written warranty, please take the following action: 1. - Page 21 ORDER BY PART NUMBER, NOT CODE NUMBER PART PART CODE CODE PART CODE DESCRIPTION DESCRIPTION DESCRIPTION 2615303033 Screw (7) 2610914358 Light Assembly (1) 2610907536 Rocker Switch (2) 2615302998 Bellow (1) 2610914362 Light Bulb 25 W (1) 2615303007 Cord 120V (1) 58/4 2615296164 Retainer (2)
Need help?
Do you have a question about the 1680 and is the answer not in the manual?
Questions and answers