Table of Contents
Advertisement
Quick Links
Advertisement
Table of Contents

Related Manuals for Axis P8221


Summary of Contents for Axis P8221
- Page 1 USER’S MANUAL AXIS P8221 Network I/O Audio Module...
- Page 2 AXIS P8221 User’s Manual Notices This manual is intended for administrators and users of the AXIS P8221 Network I/O Audio Module, and is applicable for firmware release 5.10 and later. It includes instructions for using and managing the product on your network. Previous experience of networking will be of use when using this product.
-
Page 3: Table Of Contents
AXIS P8221 - Table of contents Contents Overview ................... 4 Key features . -
Page 4: Overview
Superb audio quality • AXIS P8221 provides high-quality audio in simplex, half and full duplex. For improved quality, audio can be encoded in AAC at up to 128 kbit/s with 32 kHz sampling. G.711 and G.726 are also supported. •... -
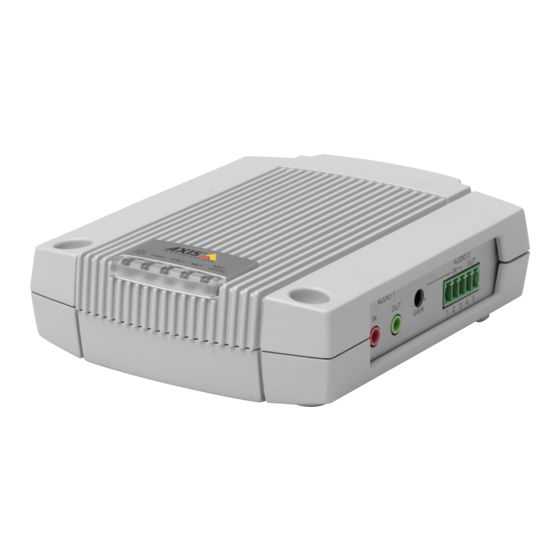
Page 5: Hardware Overview
AXIS P8221 - Overview Hardware overview Mounting hole LED indicators for: microphone power, power, status, network, microphone level Mounting hole Gain control Audio 1: Audio in/out Audio 2: terminal connector Control button RS-232/485/422 terminal connector Network connector (PoE) I/O terminal connectors A & B Power connector For descriptions of the connectors, please refer to Unit connectors, on page 32. -
Page 6: Accessing The Product
1. Start a browser (Internet Explorer, Firefox, Safari). 2. Enter the device’s IP address or host name in the Location/Address field of your browser. To access the device from a Macintosh computer (Mac OSX), click on the Bonjour tab and select AXIS P8221 from the drop-down list. -
Page 7: Setting The Root Password
• If prompted, click Yes to install AXIS Media Control, which gives access to the audio stream in Internet Explorer. You will need administrator rights on the computer to do this. If using Windows Vista you must also run Internet Explorer as administrator;... -
Page 8: The Live View Page
Audio Clips, on page 16, for more information. AXIS Media Control toolbar The AXIS Media Control viewer toolbar is available in Internet Explorer only. See AXIS Media Control (AMC), on page 10 for more information. The toolbar displays the following buttons: The Play button connects to the Axis product and starts playing a media stream. - Page 9 AXIS P8221 - Accessing the product AMC Audio controls AMC audio buttons control the speakers and microphone connected to the client computer. Speaker button – Click to switch the sound on or off. Microphone button – Click to switch the sound on or off.
-
Page 10: Audio Streams
AXIS P8221 - Audio Streams Audio Streams AXIS P8221 provides several audio stream formats. Your requirements and the properties of your network will determine the type you use. The Live View page provides access to audio streams. Other applications and clients can access audio streams directly, without going via the Live View page. -
Page 11: Alternative Methods Of Accessing Audio
Simplex audio can be accessed via QuickTime and Windows Media Player by using the paths below. QuickTime supports G.711 and AAC audio encoding. • Windows Media Player. This requires AXIS Media Control to be installed. The paths that can be used are listed below in the order of preference: •... -
Page 12: Setup Tools
AXIS P8221 - Setup Tools Setup Tools AXIS P8221 can be configured by users with administrator or operator rights: Administrators have unrestricted access to all settings. • Operators have access to Audio, Live View Config and Events. • To configure the product, click Setup in the top right-hand corner of the Live View page. Click to access the online help that explains the setup tools. -
Page 13: Audio
Audio Audio equipment AXIS P8221 has two connectors, Audio 1 and Audio 2, for external audio equipment. See table below for examples of supported audio equipment. The Audio 2 terminal connector can power microphones requiring 48 V phantom power and has a built-in amplifier enabling direct connection of passive speakers. -
Page 14: Audio Settings
The mic level LED can be enabled and disabled by the Enable microphone level LED option. If the sound input is too low or too high, adjust the input gain for the microphone attached to AXIS P8221. See also Input... - Page 15 Changing the Bit rate changes the audio compression level and hence audio quality. A higher bit rate can improve audio quality but requires more bandwidth. AXIS P8221 can be configured to trigger an event if the incoming sound level rises above, falls below, or passes the set Alarm level.
-
Page 16: Audio Clips
8, 16, 32 Automatic audio announcements AXIS P8221 can be configured to play automated audio announcements when triggered by a signal. 1. Go to Setup > Audio > Audio Clips and record or upload the audio clip containing the announcement. See above. -
Page 17: Ports & Devices
AXIS P8221 - Ports & Devices Ports & Devices I/O Ports AXIS P8221 has eight configurable input and output ports for connection of external devices. • Output ports - For connecting external devices such as relays and switches. Devices connected to an output port can for example be used to remotely control devices such as lights and doors. -
Page 18: Com Port
To control output ports via VAPIX®, please refer to the VAPIX® specification on the Developer pages at www.axis.com/developer COM Port AXIS P8221 has a RS-232/RS-485/RS-422 serial port for connection of auxiliary external equipment. See Unit connectors, on page 32, for information on how to connect external equipment. To configure the serial port: 1. -
Page 19: Live View Config
Layout Viewer Settings The administrator can disable the installation of the AAC decoder included with AXIS Media Control. This is used to prevent the installation of unlicensed copies. Further decoder licenses can be purchased from your Axis dealer. Check Enable recording button to enable recording from the Live View page. The recordings are saved to the location specified in the AMC Control Panel, see AXIS Media Control (AMC), on page 10. - Page 20 • View an external video source Audio from AXIS P8221 can be combined with live video from Axis network cameras and video encoders. When enabled, live video is displayed on the Live View page (Internet Explorer only). 1. Go to Setup > Live View Config.
-
Page 21: Events
Events An event or Event Type in AXIS P8221 triggers certain actions when activated. The event is a set of parameters that defines these actions. A common event type is an alarm that causes AXIS P8221 to activate output ports. -
Page 22: Event Actions
6. Select the desired trigger from the Triggered by... drop-down list. 7. Set the When Triggered... parameters, that is, define what AXIS P8221 will do when the event is triggered. 8. Click OK to save the event in the Event Types list. -
Page 23: System Options
When the signed certificate is returned, click the Install signed certificate button to import the certificate. The properties of any certificate request currently resident in AXIS P8221 or installed can also be viewed by clicking the Properties... button. The HTTPS Connection Policy must also be set in the drop-down lists to enable HTTPS in the device. -
Page 24: Date & Time
Axis implementation is EAPOL using EAP-TLS (EAP-Transport Layer Security). The Axis network product presents its certificate to the network switch, which in turn forwards this to the RADIUS server. The RADIUS server validates or rejects the certificate and responds to the switch, and sends its own certificate to the client for validation. -
Page 25: Network
AXIS IP Utility to search the network for connected Axis products or reset the unit to factory default settings and then perform the installation again. Use the following IP address - To use a static IP address for AXIS P8221, check the radio button and then make the following settings: IP address –... -
Page 26: Dns Configuration
Use the following NTP server address - To create manual settings, check this radio button and enter the host name or IP address of the NTP server. Host Name Configuration AXIS P8221 can be accessed using a host name, instead of an IP address. The host name is usually the same as the assigned DNS Name. Link-Local IPv4 Address This is enabled by default and assigns the device an additional IP address for use with UPnP . - Page 27 When the port is selected automatically it is displayed in this field. To change this enter a new port number and click Save. The FTP server running in AXIS P8221 enables the upload of new firmware and user applications. Check the box to enable the service.
- Page 28 AXIS P8221 - System Options QoS Settings - For each type of network traffic supported by your Axis network video product, enter a DSCP (Differentiated Services Codepoint) value. This value is used to mark the traffic’s IP header. When the marked traffic reaches a network router or switch, the DSCP value in the IP header tells the router or switch the type of treatment to apply to this type of traffic, for example, how much bandwidth to reserve for it.
-
Page 29: Maintenance
IP address, security, event settings and recent log items. Many of the captions are also links to the proper Setup page to conveniently make adjustments in the device’s settings. Logs & Reports When contacting Axis support, please be sure to provide a valid Server Report with your query. The Access Log is automatically included in the server report. -
Page 30: Advanced
For more information, please visit the Video developer pages at www.axis.com/developer File Upload Files (e.g. web pages and images) can be upload to AXIS P8221 and used as custom settings. Uploaded files are accessed through http;//<ip address>/local/<user>/<file name> where <user> is the selected user access group (viewer, operator or administrator) for the uploaded file. -
Page 31: Resetting To Factory Default Settings
AXIS P8221 - Resetting to Factory Default Settings Resetting to Factory Default Settings To reset the unit to the original factory default settings, go to the System Options > Maintenance web page (as described in Maintenance, on page 29) or use the Control button on the side of the unit (see page 5) as described below:... -
Page 32: Unit Connectors
AXIS P8221 - Unit connectors Unit connectors RS-232/485/422 connector - 5-pin terminal block for the RS-232/485/422 serial interface used to control auxiliary equipment. The port can be used in the following modes: • 2TX/2RX RS-232 interface (RD, TD, RTS, CTS) •... - Page 33 AXIS P8221 - Unit connectors Power connector - 3-pin terminal block used for power input. DC power input AC power input 8-34 V DC, max 8.2 W 20-24 V AC, max 13.7 VA I/O terminal connectors A and B - Used in applications for e.g. event triggering and alarm notifications.
-
Page 34: Led Indicators
AXIS P8221 - Unit connectors Connection diagram The following connection diagram gives an example of how to connect an auxiliary device to the I/O terminal connectors. AXIS P8221 E.g. push button 3.3 V max 250 mA 3.3 V I/O configured as input... -
Page 35: Troubleshooting
Emergency Recovery Procedure If power or the network connection to AXIS P8221 is lost during the upgrade, the process fails and the unit becomes unresponsive. A flashing red Status LED indicates a failed upgrade. To recover the unit, follow the steps below. The serial number is found on the label attached to the bottom of the unit. - Page 36 AXIS P8221 - Troubleshooting Axis Support If you contact Axis support, please help us resolve your problem expediently by providing a Server Report and a detailed description of the problem. The Server Report contains important information about the product and its software, as well as a list of the current parameters.
-
Page 37: Symptoms, Possible Causes, And Remedial Action
You may need to manually type http or https in the browser’s address field. The IP address has been changed by If the device and client are on the same network, Run AXIS IP Utility to locate the device. Iden- DHCP... - Page 38 Limited space There is only limited space available for the upload of your own files. Try deleting existing files to free up space. For further assistance, please contact your reseller or see the support pages on Axis website at www.axis.com/techsup...
-
Page 39: Technical Specifications
• For other operating systems and browers see www.axis.com/techsup Installation, • AXIS Camera Management tool on CD and web-based configuration management and • Configuration of backup and restore maintenance • Firmware upgrades over HTTP or FTP, firmware available at www.axis.com... - Page 40 Power supply, mounting and connector kits, Installation Guide, CD with installation tools, recording software and User’s Manual, Windows decoder 1-user license Video management AXIS Camera Station - Video management software for viewing and software recording up to 50 cameras (not included) See www.axis.com/products/video/software/ for more software applications...
-
Page 41: Index
AXIS P8221 - Index Index NTP Server 24 Output 33 Output Buttons 20 Active/Inactive 18, 20 Output port 17 Administrator 12, 23 Alarm 33 AMC 6 ARP/Ping 25 Pulse 18, 20 Audio input 14 Audio output 15 Audio Settings 14...
Need help?
Do you have a question about the P8221 and is the answer not in the manual?
Questions and answers