Table of Contents
Advertisement
Advertisement
Table of Contents

Related Manuals for Audio Note ONGAKU


Summary of Contents for Audio Note ONGAKU
- Page 1 ONGAKU INTEGRATED AMPLIFIER OWNER’S INFORMATION...
- Page 2 CONTENTS 1) IMPORTANT SAFETY INFORMATION 2) CE DECLARATION OF CONFORMITY DISPOSAL POWER REQUIREMENTS 3) INTRODUCTION 4) OVERVIEW 5) UNPACKING AND INSTALLATION 6) VALVE INSTALLATION 9) CONNECTION 10) OPERATION 11) TECHNICAL SPECIFICATIONS 12) WARRANTY INFORMATION CONTACT INFORMATION...
-
Page 3: Important Safety Information
! IMPORTANT SAFETY INFORMATION ! RISK OF SHOCK OR ELECTROCUTION! INTERNAL OPERATING VOLTAGES ARE LETHAL! Do not remove top cover, unless specifically instructed to do so in the user manual. This unit contains fuses and other safety components in accordance with BS60065 requirements. -
Page 4: Ce Declaration Of Conformity
BS EN 60065 in accordance with the regulations 73/23/EEC, 89/336/EEC (from 1 January 1997) CE 94 Peter Qvortrup, Director Audio Note (UK) Limited 25 Montefiore Road Hove East Sussex BN3 1RD United Kingdom... - Page 5 INTRODUCTION Thank you for purchasing this Audio Note (UK) product. With the correct care it should give you many years of pleasure and enjoyment. Please take the time to read all of the information in this manual before connecting your new component to an electrical supply or your system, to ensure both your safety and satisfaction.
- Page 6 Congratulations on your purchase of the Audio Note (UK) ONGAKU Integrated Amplifier. The ONGAKU has rightly earned a place in history; its name is synonymous with the finest possible audio reproduction, and for once the reality is equal to the Legend!
-
Page 7: Unpacking And Installation
UNPACKING AND INSTALLATION Please take care when unpacking your ONGAKU Integrated Amplifier. Choose a clean, clear location to unpack your unit. Be aware that the amplifier is very heavy; before attempting to unpack or lift the unit, check the weight and if necessary use more than one person so that it can be moved safely and easily. - Page 8 VALVE INSTALLATION The amplifier is shipped without its 6 valves installed. It is necessary to install the valves before the amplifier can be operated. It is essential that the valves are installed correctly or serious damage that is not covered by the warranty will result. We recommend that your dealer perform this procedure for you if you are in any way unsure.
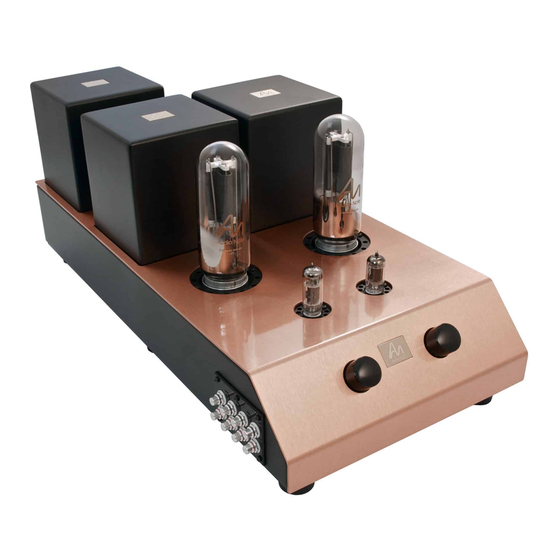
- Page 9 VALVE INSTALLATION continued… Inspect a 211 valve and you will notice that there is a small ‘pin’ protruding from one side of the valve base; this locating pin ensures that the valve can only be correctly inserted into the amplifier in one way. Also examine the two large apertures in the top plate of the amplifier, located...
- Page 10 VALVE INSTALLATION continued… Please make sure that steps (1), (2) and (3) are correct. Check again that both valves are fully inserted correctly in to their respective valve sockets Looking from the back of the amplifier, insert the 5R4WGB valves into the two empty sockets located on the left, situated between the black rectangular transformer covers and the loudspeaker connection binding posts.
- Page 11 For sonic purity, it was decided to not offer any tape / pre outputs on the ONGAKU. All four inputs are line level, and can be connected to a suitable line level source of your choice, such as CD / DAC, phonostage, etc.
-
Page 12: Operation
Valve Life The valves supplied with your amplifier should provide approximately 6000 hours of operation. They are specially selected by us, and should only be replaced with matched pairs. Please consult your Audio Note (UK) dealer should your valves need replacing. -
Page 13: Technical Specifications
TECHNICAL SPECIFICATIONS 100k ohm, line level INPUT IMPEDANCE 450mV for full output INPUT SENSITIVITY 20 watts (approximate) RMS per channel MAXIMUM OUTPUT into 4 or 8 Ohm loads +/- 0.3dB CHANNEL BALANCE 2 x 5R4WGB VALVE COMPLIMENT 2 x 211 / GE VT-4C 1 x CV4068 1 x 6463 UNIT WEIGHT... -
Page 14: Warranty Information
Audio Note (UK) warrants this product to be free from defects in materials and workmanship for two years from the original date of purchase from an appointed Audio Note (UK) dealer, and agrees to cover the cost of parts and associated labour required to correct such defects, subject to terms & conditions. -
Page 15: Contact Information
CONTACT INFORMATION If in the future your Audio Note (UK) product requires servicing, or if you require technical support or have any questions regarding this or any of our other products, please contact your local Audio Note (UK) dealer. Alternatively, please feel free to contact us directly: -...
Need help?
Do you have a question about the ONGAKU and is the answer not in the manual?
Questions and answers