DSC Impassa User Manual
Self-contained wireless alarm system
Hide thumbs
Also See for Impassa:
- User manual (28 pages) ,
- Quick start installation manual (2 pages) ,
- Programming manual (5 pages)
Table of Contents
Advertisement
Advertisement
Table of Contents

Subscribe to Our Youtube Channel
Related Manuals for DSC Impassa


Summary of Contents for DSC Impassa
- Page 1 Self-Contained Wireless Alarm System v1.2 User Manual This manual contains information on limitations regarding product use and WARNING: function and information on the limitations as to liability of the manufacturer. The entire manual should be carefully read...
-
Page 3: Table Of Contents
Table of Contents 1. About Your Security System 1.1 Fire Detection (must be enabled by Installer) ....... . 2 1.2 Carbon Monoxide Detection (must be enabled by Installer) . - Page 4 If You do not 6. ARBITRATION - All disputes arising in connection with this agree to the terms of this EULA, DSC is unwilling to license the SOFT- Agreement shall be determined by final and binding arbitration in WARE PRODUCT to You, and You have no right to use it.
- Page 5 Always ensure you obtain the latest version of the User Guide. Updated versions of this User Guide are available by contacting your distributor. IMPORTANT SAFETY INSTRUCTIONS To reduce the risk of fire, electric shock and/or injury, observe the following: • Do not spill any type of liquid on the equipment. •...
-
Page 6: About Your Security System
1. About Your Security System Read this manual carefully and have your installer instruct you on your system's operation and on which features have been implemented in your system. All users of this system should be fully instructed in its use. Fill out the “System Information” page with all of your zone information and access codes, and store this manual in a safe place for future reference. -
Page 7: Keypad Controls & Indicators
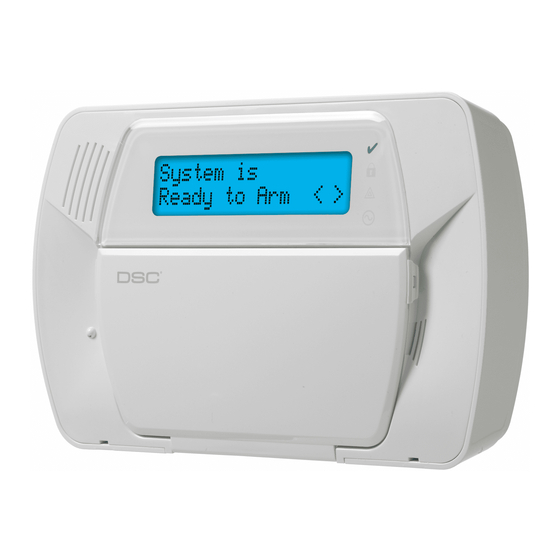
2. Keypad Controls & Indicators < > indicates user can scroll through options LED Indicators 2x16 LCD Ready Armed Trouble System is Power Ready to Arm <> Scroll Keys Function Keys: Stay Emergency Keys: Away Fire Chime Auxiliary Bypass Zones Panic Quick Exit Select Option... -
Page 8: Night Arming (Setting)
4.2 Night Arming (Setting) To night arm/set the system when it has been armed/set in Stay mode, press [ ][1] at the keypad. All interior zones will now be armed/set except for devices programmed as Night zones. NOTE: Your installer can also program a function key on the keypad that allows you to arm/set the system in Night mode. -
Page 9: Remote Arming And Disarming (Setting/Unsetting)
your code within ___ seconds to avoid an alarm condition. Check with your installer to program this time. Disarming Error If your code is invalid, the system will not disarm and a 2-second error tone will sound. If this hap- pens, press [#] and try again. -
Page 10: Intrusion (Burglary) Alarm Continuous Siren
7.1 Intrusion (Burglary) Alarm Continuous Siren If you are unsure of the source of the alarm, proceed with caution! If the alarm was accidental, enter your access code to silence the alarm. If the alarm system is dis- armed within the programmed Abort Window (check with the installer if this option has been enabled on your system and what is the transmitter delay time programmed), no alarm transmission to the Central Station will occur. -
Page 11: Bypassing Zones
10. Bypassing Zones Use the zone bypassing feature when you need access to a protected area while the system is armed/ set, or when a zone is temporarily out of service but you need to arm/set the system. Bypassed zones will not be able to sound an alarm. -
Page 12: Trouble Conditions
11. Trouble Conditions When a trouble condition is detected, the Trouble ( ) indicator will turn on and the keypad will beep every 10 seconds. Press the [#] button to silence the beeps. Press [ ][2] to view the trouble condition. The Trouble ( ) indicator will flash. -
Page 13: Access Code Programming
15. Access Code Programming In addition to the master code, you can program up to 16 additional user access codes. To program User Access Codes: 1. Disarm your system, if it is armed/set. 2. Press [ ][5][Master Access Code (i.e., 4- or 6-digit code)]; the armed ( ) indicator will turn on. 3. -
Page 14: Bell/Siren Squawk Attribute
Next, scroll to the attribute you want to program and press [ ] (or enter the attribute #) to enable/dis- able the attribute. Attribute Attribute Supervisor Code For Future Use Duress Code Bell/Siren Squawk upon Away Arming/Disarming Zone Bypassing Enabled One-Time Use Code Phone Access 15.4 Zone Bypassing Attribute... -
Page 15: User Function Commands
NOTE: User 40 for the master code cannot be deleted; an attempt to delete this user code will delete the prox tag only. The prox tag must be re-enrolled before it can be used again. Proximity Tag Operation 6. Place the prox tag near the tag reader ( ) at the left side of the display to arm/disarm (set/unset) your system. -
Page 16: Changing The Buzzer Level
17.2 Changing the Buzzer Level When this option is selected, the keypad will allow you to scroll through 21 different buzzer levels. A level of 00 disables the buzzer. 1. Press [ ][6] [Master Code]. 2. Use the [<][>] buttons to scroll to Buzzer Control, then press [ ] to select. -
Page 17: Late To Open
19. Late to Open This feature allows a user to be notified if their alarm system is not disarmed by a programmed time of day. NOTE: The Late-to-Open feature requires the monitoring station to forward calls to the user. Verify with the installer whether this function is active. -
Page 18: On-Board Lcd Display Sms Messages
NOTE: The default text (see SMS Reference card) used to perform each action can be changed for you by your installer. 2. Compose an SMS message that consists of the function text, a space, and your 4-digit or 6-digit access code (e.g., “stay arm 2234”) then send it to your panel’s cellular phone number. 3. -
Page 19: Buzzer
21.3 Buzzer Provides an audible confirmation of a pressed button or that a command to the panel has been exe- cuted. 21.4 Keylock Mode Ensures that the system is not accidently armed or disarmed by the wireless key. To lock the keys: 1. -
Page 20: Walk Test
NOTE: Only use Energizer (4) 1.5V AA alkaline batteries (WT5500, WT4901/WT8901). DO NOT RECHARGE THESE BATTERIES. DISPOSAL OF USED BATTERIES MUST BE MADE IN ACCORDANCE WITH THE WASTE RECOVERY AND RECYCLING REGULATIONS IN YOUR AREA. 22.2 Walk Test Walk Test mode allows you to test the operation of each detector in the system. While in Walk Test mode, the Ready, Armed, and Trouble LED's will flash to indicate that the Walk Test is active. -
Page 21: Reference Sheets
23. Reference Sheets Fill out the following information for future reference and store this guide in a safe place. System Information Enabled? FIRE AUXILIARY PANIC The Exit Delay Time is _______ seconds. The Entry Delay Time is _______ seconds. For Service Central Station Information: Account#: ___________________ Telephone#: __________________ Installer Information:... -
Page 22: Sms Telephone Numbers
23.2 Sensor / Zone Information Sensor Protected Area Sensor Type Sensor Protected Area Sensor Type 23.3 SMS Telephone Numbers Phone Number Phone Number Site Identification Message: ___________________________________ Panel’s Cellular Phone Number: ___________________________________... -
Page 23: Keypad Quick Guide
24. Keypad Quick Guide The following table summarizes the keys, indicators, and most often used commands of the keypad. Keypad Keys, Indicators, and Commands Status Lights Ready - Must be on to arm /set the system. All zones must be secured or bypassed and the system disarmed for this light to activate. -
Page 24: Guidelines For Locating Smoke & Co Detectors
Keypad Keys, Indicators, and Commands (Continued) Program User Codes Press [<][>]buttons to scroll to user code. Enter Change Attributes [Master Code][9][xx] to enter the user code (xx = 1-16). [1] Supervisor’s Code [2] Duress Code [3] Zone Bypassing [4] Remote Access [5]-[6] Future Use [7] Bell/Siren Squawk Output [8] One Time Use Code... -
Page 25: Household Fire Safety Audit
Smoke detectors should always be installed in USA in accordance with Chapter 11 of NFPA 72, the National Fire Alarm Code: 11.5.1.1 Where required by applicable laws, codes, or standards for a specific type of occupancy, approved single- and multiple-station smoke alarms shall be installed as follows: (1) In all sleeping rooms and guest rooms. - Page 26 4. Are furnaces and wood-burning appliances properly installed, clean and in good working order? Have a professional evaluate these appliances. 27. Fire Escape Planning There is often very little time between the detection of a fire and the time it becomes deadly. It is thus very important that a family escape plan be developed and rehearsed.
-
Page 27: Warning Please Read Carefully
WARNING Please Read Carefully N o t e to I n s ta ll er s provide volumetric area protection. They have multiple beams of detec- This warning contains vital information. As the only individual in contact tion and motion can only be detected in unobstructed areas covered by with system users, it is your responsibility to bring each item in this warn- these beams. - Page 28 © 2012 Tyco International Ltd. and its Respective Companies. All Rights Reserved. Toronto, Canada • www.dsc.com • Printed in Canada The trademarks, logos, and service marks displayed on this document are registered in the United States [or other countries]. Any misuse of the trademarks is strictly prohibited and Tyco International Ltd.
Need help?
Do you have a question about the Impassa and is the answer not in the manual?
Questions and answers
how do you change date and time
To change the date and time on a DSC Impassa Alarm System, follow these steps:
1. Access the Menu
- Ensure the system is disarmed.
- Enter `[*] [6] [Master Code]` (default Master Code is `1234`).
- Use the right arrow to navigate to "Time and Date".
- Press `[*]` to enter the Time and Date sub-menu.
2. Set the Time
- Enter the two-digit hour followed by the two-digit minute.
3. Set the Date
- Enter the two-digit month, two-digit day, and four-digit year.
4. Save and Exit
- Press `[*]` to confirm.
- Press `[#]` to exit the menu.
This should update the date and time, removing any related system errors.
This answer is automatically generated
How opened
To open the DSC Impassa, use a small flathead screwdriver to push in the two tabs on the front of the system. Then, pull the front plate away from the rest of the panel.
This answer is automatically generated
how do I delete a zone
On my adt impasse control panel display light is out? How do I get it to light up?