Table of Contents
Advertisement
Advertisement
Table of Contents

Related Manuals for Steinberg MIDEX-8

Summary of Contents for Steinberg MIDEX-8
- Page 1 MIDEX-8 Operation Manual MIDEX-8 English – 1...
-
Page 2: Declaration Of Conformity
The information in this document is subject to change without notice and does not represent a commitment on the part of Steinberg Media Technologies AG. No part of this publication may be copied, reproduced or otherwise transmitted or recorded, for any purpose, without prior written permission by Steinberg Media Technologies AG. -
Page 3: Table Of Contents
Contents of the Package..................5 System Requirements – PC................6 System Requirements – Apple Computer............ 6 The MIDEX-8 Features ..................7 MIDEX-8 – Controls and Sockets ..............8 Connecting and Setting Up................10 Software Installation – PC ................13 Software Installation – Macintosh..............15 Setting up your MIDI Program ...............28... -
Page 4: Introduction
128 separate MIDI channels. The MIDI out socket number 8 is available twice and both sockets can simultaneously be used. The USB port is used to connect your computer and the MIDEX-8. USB is a powerful technology that simultaneously lets you connect up to 127 peripheral devices to your computer, if it is USB-compatible. -
Page 5: Contents Of The Package
CD-ROM with driver software for all supported computer operating systems. Since newer driver software might be available when you read this, we recom- mend that you visit the Steinberg web site ( http://www.steinberg.net) and download the latest versions. Please take the time to read any ReadMe files that you might get with this product or when downloading driver software! These files contain impor- tant late-breaking information. -
Page 6: System Requirements - Pc
If necessary, consult an ex- perienced technician. • To use MIDEX-8 in connection with a PC, please make sure that your computer runs a Windows 98 SE, Windows ME, Windows 2000 or Windows XP operating system. -
Page 7: The Midex-8 Features
Compatible with Mac OS 8.6 (or higher). OMS 2.3.8 or higher required. • At the time of writing of this manual, Mac OS X compatible drivers were not yet available. If you are a user of Mac OS X, please visit www.steinberg.net to find the latest information on available drivers. •... -
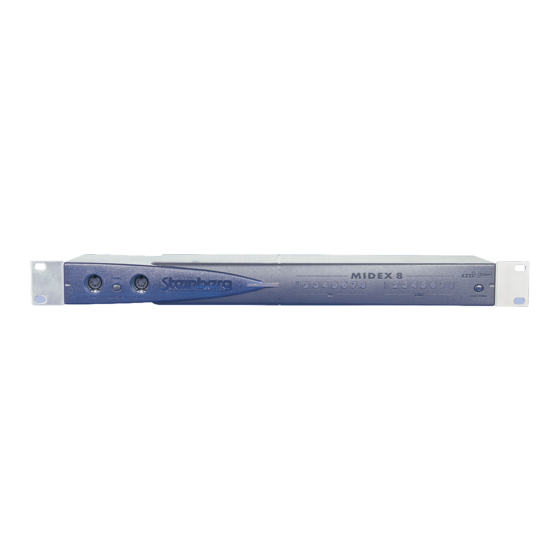
Page 8: Midex-8 - Controls And Sockets
Out 8 socket – The last of the available eight MIDI outputs. Power LED – the blue Power LED indicates that the MIDEX-8 is ready for use. This lights up a few seconds after the connection has been made. - Page 9 The eight Out sockets represent the MIDI outputs of the MIDEX-8. A second Output 8 socket is available on the front panel. Both outputs are connected in parallel. The seven In sockets represent the MIDI inputs 1 to 7 of the MIDEX-8. The eighth MIDI input is available on the MIDEX-8 front panel.
-
Page 10: Connecting And Setting Up
• Position the MIDEX-8 interface in a convenient spot near your computer. If you have a 19" rack, you can of course also install your MIDEX-8 in that. The MIDEX-8 provides the necessary holes for the mounting screws. If the distance between the MIDEX-8 and the computer is too big, you might need to buy a USB extension cable. - Page 11 The MIDI output on your Master keyboard is e.g. connected to the first input on the MIDEX-8 (In 1). • The first MIDI output (Out 1) on your MIDEX-8 interface is connected to the MIDI input of a sound module (this can also be your Master keyboard, if it can generate sound).
- Page 12 MIDEX-8 English – 12...
-
Page 13: Software Installation - Pc
Software Installation – PC Once you have connected the MIDEX-8 to your computer, Windows recognizes that a new USB device has been connected and automati- cally starts the “Add New Hardware Wizard”. The “Add New Hardware Wizard” 1. Click on the “Next” button. - Page 14 4. Click the “Next” button to install the drivers. When that has successfully happened, Windows displays a corresponding message. The firmware driver is now automatically transferred into the MIDEX-8 and Win- dows might ask you to insert the Windows CD, if it needs any additional Win- dows drivers previously not installed.
-
Page 15: Software Installation - Macintosh
If you are not familiar with OMS, please do definitely read the following sections. If OMS 2.3.8 or higher is installed on your computer and if you are familiar with OMS, you can immediately start to install the MIDEX-8 drivers, as de- scribed under “Installing the MIDEX-8 Driver Software” on page MIDEX-8 English –... - Page 16 MIDI applications communicate with each other and share re- sources (like patch names and timing information). OMS Version To be able to use MIDEX-8, you must have installed and activated OMS version 2.3.8 or higher on your computer. Older OMS versions do not suf- ficiently support USB interfaces.
- Page 17 Installing or Updating OMS 1. Open the folder “OMS 2.3.8” on the MIDEX-8 CD-ROM and start the pro- gram “Install OMS 2.3.8”. This loads the OMS Installer program. In the first dialog that appears, click “Con- tinue”. This will open the Installer dialog.
- Page 18 Installing the MIDEX-8 Driver Software 1. Insert the MIDEX-8 Driver CD into the corresponding drive on your computer. Information on new versions of the driver software is available on the Internet. For more information see the description in the section “Downloading a new...
- Page 19 MIDEX-8 to the USB socket on your computer, as described on page 6. If your MIDEX-8 is already connected, remove the USB cable for a brief mo- ment and connect it again or press the Panic/Cablecheck button to force a device reset.
- Page 20 Setting up OMS You must now make the necessary settings in the “OMS Setup” program to make sure that OMS properly recognizes MIDEX-8 and that its MIDI ports are made available to the system. The “OMS Setup” program is located in the “OMS Applications” folder which can be found in the “Opcode”...
- Page 21 The program will now automatically search for usable MIDI drivers and the cor- responding devices connected to your computer. One of these – maybe the only one currently – is the MIDEX-8 interface. If the search result resembles the one depicted below and if the MIDEX-8 has been recognized, you can confirm the successful search by clicking “OK”.
- Page 22 4. If your MIDEX-8 has not been recognized, do again check whether the MIDEX-8 is properly connected to the computer and that it is operational. • When you click “OK”, OMS will initialize all available inputs and outputs of your MIDEX-8. The corresponding MIDEX-8 output ports should light up in succession and OMS should display a message that resembles the one dis- played below.
- Page 23 There is a check box to the left of each listed port. If you click on it, a cross will appear in it to indicate that the corresponding MIDEX-8 port is activated. We recommend that you activate all MIDEX-8 ports, even if you do not wish to use all at first.
- Page 24 Instead, you can select the devices by name (e.g. "JV 1080-3"). • Please note the small arrows that are visible in the OMS setup next to the listed ports. These indicate the available transfer directions for MIDI data to and from the MIDEX-8. MIDEX-8 English – 24...
- Page 25 To prevent unnecessarily wasting processing power, it is a good idea to only use those MIDI devices as inputs (arrow pointing to the left – towards the MIDEX-8 port) that you really intend to use for MIDI input (e.g. the MIDI key- board that is used to play notes into the sequencer).
- Page 26 This is not necessarry if you work with Nuendo, as here OMS is always active if it has been installed. 2. If you now (re)start Cubase VST or Nuendo, the MIDEX-8 interface is avail- able as a MIDI input and output device. From now on, you can select your MIDEX-8 outputs directly in the output column of your program.
- Page 27 Nuendo to make sure that the corresponding devices are selected and activated for the MIDI inputs of your system. More information about setting up the MIDI inputs and outputs of your program can be found in the corresponding sections of the program documentation. MIDEX-8 English – 27...
-
Page 28: Setting Up Your Midi Program
MIDI data to the keyboard or sound module that is connected to this port. If the MIDEX-8 interface driver has been installed correctly, you can e.g. select the MIDEX-8 inputs In 1 to In 8 in the Cubase “Inputs” column and select the outputs Out 1 to 8 in the “Outputs” column. -
Page 29: The Linear Time Base Method
The Linear Time Base Method To achieve the best possible Timing, the MIDEX-8 uses the Linear Time Base method. This new approach to optimize time-critical MIDI data transfer is the result of a close co-operation between Steinberg and Access Music. -
Page 30: The Buttons
MIDEX-8 from a Master keyboard, even when no software program is active. This mode can also be used if the MIDEX-8 is not connected to the com- puter via the USB cable. However, you need an additional standard power supply (not included) to supply the MIDEX-8 with the necessary power. - Page 31 How it works The MIDEX-8 supports two MIDI Thru modes and you can toggle be- tween the two by pressing the MIDI Thru button. • Mode 1: MIDI input 1 is routed to all MIDI outputs. The MIDI input LED 1 lights up continuously.
-
Page 32: Windows Problems With The Usb Reset
Until these problems are fixed by a newer operating system version, you should avoid to interrupt the USB connection during operation by unplug- ging the USB cable or simultaneously pressing the MIDEX-8 buttons “Panic/Cablecheck” and “MIDI Thru” for 3 seconds. -
Page 33: Practical Tips
• To enable you to address many different devices separately on 16 channels each and to also receive data from many different devices, the MIDEX-8 pro- vides eight separate MIDI inputs and eight MIDI outputs. More detailed information about MIDI for the novice and the advanced user can be found on the Steinberg product “MIDI Xplained”, a Multi-... - Page 34 As a result, delays occur between receiving a MIDI command and its execution, which can cause noticeable timing problems. In spite of its LTB processing, the MIDEX-8 can of course not compen- sate for this kind of delay, which is caused by the technical characteris- tics of the corresponding sound module.
- Page 35 USB hubs” (i.e. hubs that get their power from the USB bus of the computer). If you wish to connect one or several MIDEX-8 to a hub, it must at least be able to supply 500 mA per USB port.
- Page 36 Using several MIDEX-8 simultaneously If the eight MIDI inputs and the eight MIDI outputs of one MIDEX-8 are not enough, you can combine several MIDEX-8 and thus adapt the num- ber of inputs and outputs to your needs. Theoretically (i.e. according to the specification) each USB bus should let you address up to 127 USB devices.
- Page 37 USB sockets. The operating The current MIDEX-8 driver versions let you use up to 8 MIDEX-8 system used (PC) devices on one computer (provided that the rest of the system can cope with this number of units, see above).
- Page 38 Please note that “low voltage plugs” are also available with an inner diam- eter of 2.5 mm. These can also be used in connection with the MIDEX-8, but the plug will easily fall out of the socket. We therefore recommend that you do not use plugs with this inner diameter.
-
Page 39: Questions And Answers
Note: The MIDEX-8 driver has been developed based upon Microsoft’s latest driver model. This has the advantage that the MIDEX-8 driver can both be used under Windows 9x and under Windows 2000. Normally, Windows 98 SE and Windows 2000 do not support more than 10 MIDI ports which are provided by WDM- drivers (Windows Driver Model). - Page 40 MIDI Thru and Panic buttons for ca. 3 seconds. Note: The MIDEX-8 should never be separated from the USB bus if you still use it in an application, as this would cause a Windows system crash. How is MIDEX-8 supported by Cubase VST? Starting with version 5.0, Cubase VST supports all MIDEX-8 capabilities.
- Page 41 2. The warranty includes the removal of defects of production and material as well as the exchange of parts by Steinberg. It does not include damage caused by poor means of transport, external force or damage caused by non-obser- vance of the instructions in the operation manual.
- Page 42 MIDEX-8 English – 42...
Need help?
Do you have a question about the MIDEX-8 and is the answer not in the manual?
Questions and answers