Table of Contents
Advertisement
Quick Links
Download this manual
See also:
User Manual
Advertisement
Table of Contents

Related Manuals for Logitech 890 Harmony


Summary of Contents for Logitech 890 Harmony
-
Page 1: Harmony Remote
890 Harmony Remote User Manual version1.1... -
Page 2: Table Of Contents
User Manual Harmony 890 Table of Contents INTRODUCTION............................1 ....................2 ETTING TO ARMONY EMOTE ......................... 3 EGINNING THE ETUP ROCESS USING YOUR HARMONY REMOTE ......................4 RF W ................4 SING THE EMOTE WITH THE IRELESS XTENDER Installing the RF Wireless Extender....................... 5 Adding the RF Wireless Extender to the Z-Wave Network.............. -
Page 3: Introduction
If in doubt about how to set up your Harmony remote, follow the information and instructions using the Logitech Harmony remote software (also referred to as Harmony remote software). The Harmony remote is an Internet-powered universal remote control. Your Harmony remote can control most devices that understand infrared (IR) signals. -
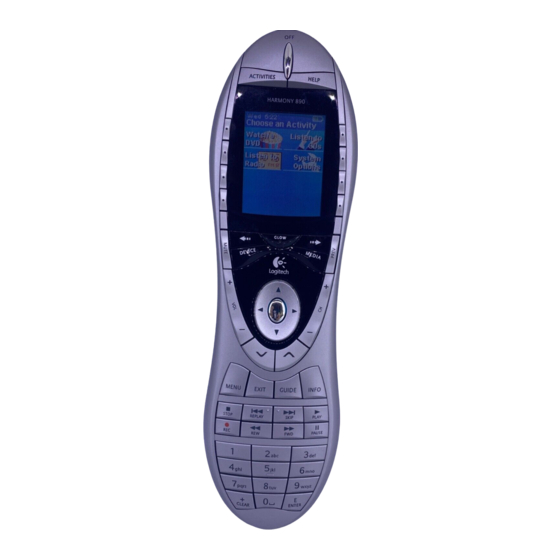
Page 4: Getting To Know Your Harmony Remote
User Manual Harmony 890 Getting to Know Your Harmony Remote Many of the Harmony remote's buttons are standard remote buttons. However, there are buttons and other hardware that may not be so familiar to you. The extra buttons and hardware give you access to the special features of the Harmony remote. -
Page 5: Beginning The Setup Process
Harmony 890 Beginning the Setup Process Once you have installed the Logitech Harmony remote software, connect your remote and you will be guided through a series of question-and-answer steps to complete each of the five main steps of the online setup process: 1. -
Page 6: Using Your Harmony Remote
User Manual Harmony 890 Using Your Harmony Remote This section provides you with information that will help you use your remote. Using the Remote with the RF Wireless Extender The Harmony RF Wireless Extender allows you to use the Harmony remote to control devices that are out of view (e.g. -
Page 7: User Manual Harmony
User Manual Harmony 890 Installing the RF Wireless Extender The extender can be wall-mounted or installed inside the cabinet where you devices are located. Wall-Mounted Cabinet Adding the RF Wireless Extender to the Z-Wave Network Anytime you update the remote, you must add the RF Wireless Extender to your Z-Wave network again. To add the extender to your Z-Wave network: 1. -
Page 8: Assigning Devices To The Harmony Remote And The Rf Wireless Extender
User Manual Harmony 890 2. Press Add on the remote when you see a message reminding you to add an RF Wireless Extender to your network. 3. Press Connect on the RF Wireless Extender. By pressing Connect you will add the extender to your Z-Wave network. -
Page 9: Using The Glow Button
User Manual Harmony 890 Using the Glow Button Press the Glow button to light up or turn off the display backlight. To determine the length of time the backlight stays on: 1. From Home in the Harmony software, click Remote Preferences. 2. -
Page 10: Viewing The Status And Navigation Bars
User Manual Harmony 890 Viewing the Status and Navigation Bars The status bar provides users with important information such as: • A: Date and time To set the time-display format click Remote Preferences (from home in the Harmony software) and then click Settings. •... -
Page 11: Types Of Help Available
User Manual Harmony 890 2. Answer the questions on the remote’s display by selecting Yes or No. If you answer no to any question, the Harmony remote will resend the necessary command and ask you the same question again. When you are done, the Harmony remote will be "in sync" with your devices again. Types of Help Available You can customize the Help button on your Harmony remote to provide one of the following types of help: •... -
Page 12: Using The Smart Buttons
User Manual Harmony 890 Example If you choose Television as the device, the number, volume and channel buttons will all control your television. Press DEVICE again to return to exit Device mode. Using the Smart Buttons While there is a default setting for the buttons in most Activities, you can customize these buttons to send different commands. -
Page 13: Customizing Your Harmony Remote
User Manual Harmony 890 Customizing Your Harmony Remote All customization of your Harmony remote is done from Home in the Harmony remote software: Use the Harmony remote software to: Troubleshoot • Click Troubleshoot when your Harmony remote isn’t controlling your system correctly. view Activities •... -
Page 14: Customizing The Display On The Harmony Remote
User Manual Harmony 890 Customizing the Display on the Harmony Remote This section provides information that will help you to customize the commands and options listed on the Harmony remote’s display. The LCD screen resolution on the Harmony Remote is 160 x 128 pixels. The Harmony remote comes with a set of defaults, which you can change to make the display look the way you want it to: •... -
Page 15: Changing The Behavior Of Buttons Within An Activity
User Manual Harmony 890 Changing the Behavior of Buttons Within an Activity When you select an Activity, the Harmony remote will: • Turn on all the correct entertainment devices • Set the device inputs correctly • Set up the remote’s buttons to control the Activity Based on our knowledge of how each of your devices is controlled, the Harmony remote will make its best effort to match all the buttons you need to control an Activity. -
Page 16: Changing The Settings For Your Harmony Remote
User Manual Harmony 890 To add a custom-labeled button for an Activity: 1. From Home in the Harmony software, click Activities. 2. Click an Activity. 3. Select Change the Behavior of Buttons. 4. Under the Custom Button Label column, type the name for the button label you would like to appear on the display. -
Page 17: Using The Infrared Sensor
User Manual Harmony 890 Using the Infrared Sensor The Harmony remote has an infrared sensor at the end opposite to the USB connector. The Harmony remote uses this sensor to learn commands from original device remotes. • A: Your original remote •... -
Page 18: Getting Additional Help
User Manual Harmony 890 Getting Additional Help The Harmony remote provides you with several features to assist you with: • finding answers to your questions quickly and easily • troubleshooting the setup and customization process Finding Answers to Your Questions The help you find answers to your questions quickly and easily, consult any of the following tools: Feature Description...
Need help?
Do you have a question about the 890 Harmony and is the answer not in the manual?
Questions and answers