Table of Contents
Advertisement
Advertisement
Table of Contents

Related Manuals for Roland Cakewalk UA-25 EX


Summary of Contents for Roland Cakewalk UA-25 EX
- Page 2 Owner’s manual should be read in its entirety. The manual should be saved and kept on hand as a convenient reference. Copyright © 2009 ROLAND CORPORATION All rights reserved. No part of this publication may be reproduced in any form without the...
-
Page 3: Using The Unit Safely
Refer all wet floors); or are servicing to your retailer, the nearest Roland Service Center, or an autho- • Exposed to steam or smoke; or are rized Roland distributor, as listed on • Subject to salt exposure; or are the “Information”... - Page 4 ........................• Immediately turn the power off, and ........................request servicing by your retailer, the nearest Roland Service Center, or an • Disconnect all cords coming from authorized Roland distributor, as external devices before moving the listed on the “Information” page unit.
-
Page 5: Important Notes
IMPORTANT NOTES Power Supply Maintenance • Before connecting this unit to other devices, turn • For everyday cleaning wipe the unit with a soft, off the power to all units. This will help prevent dry cloth or one that has been slightly dampened malfunctions and/or damage to speakers or with water. - Page 6 Technology Properties Limited (TPL). be concerned about those around you (especially Roland has licensed this technology from the TPL when it is late at night). Group. • When you need to transport the unit, package it...
-
Page 7: Table Of Contents
Contents USING THE UNIT SAFELY ................3 IMPORTANT NOTES ..................5 Contents of the Package ................8 Panel Descriptions ..................10 Front panel ............................10 Rear panel .............................13 Driver Installation and Settings ..............15 Windows Vista users .........................16 Windows XP users..........................20 Macintosh users..........................24 Verifying that you hear sound.......................28 Basic Connections and Settings..............30 Basic connections ..........................31... -
Page 8: Contents Of The Package
Contents of the Package After you open the package, please check that all items are present. If anything is missing, contact your dealer. ■ UA-25EX fig.ua-25ex.eps ■ Owner’s manual This is the document you’re reading. Keep it at hand for reference when needed. ■... -
Page 9: License Agreement
Roland Service Center, or an authorized Roland distributor, as listed on the “Information” page. ■ License agreement This agreement allows you to use certain software whose copyright is the property of Roland Corporation. You must read this before opening the CD-ROMs. You’ll need to provide the following items External amplifier, speakers, headphones, and microphone are not included. -
Page 10: Panel Descriptions
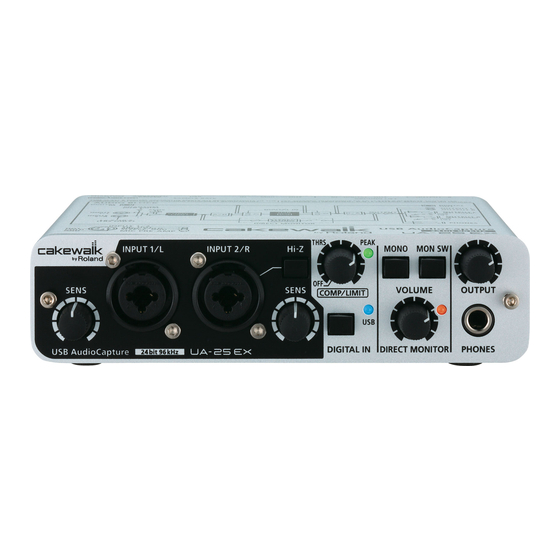
Panel Descriptions You must install the driver before you connect the UA-25EX to your computer for the first time. Install the driver as described in “Driver Installation and Settings” (p. 15). Front panel fig. front.eps 10 11 Combo input jacks These are analog audio input jacks with microphone preamps. - Page 11 Panel Descriptions fig. front.eps 10 11 Compressor/Limiter threshold knob This adjusts the threshold of the compressor/limiter. Turning the knob toward the right will lower the level at which the compressor/limiter begins to be applied. If the rear panel compressor/limiter type switch (22) is set to compressor 1 (or 2), the gain (makeup gain) will rise as the threshold level is lowered, producing a fat sound.
- Page 12 Panel Descriptions USB indicator This will light blue if the UA-25EX is connected to your computer via the USB cable and the computer has correctly recognized the UA-25EX. STEREO/MONO select switch (direct monitor section) This selects whether the input signal from the combo input jacks (1) will be monitored in stereo (STEREO) or in monaural (MONO).
-
Page 13: Rear Panel
Panel Descriptions Rear panel fig.rear.eps 14. Master output jacks (TRS balanced type, RCA phono type) These are output jacks for analog audio signals. The phone jacks and RCA phono jacks output the same signal. You may use whichever type of jack is appropriate for the connected device or the type of cable. - Page 14 Panel Descriptions 20. USB connector Use a USB cable to connect this to your computer. 21. Advanced driver switch This switches the operating mode between Advanced mode (ON) and Standard mode (OFF). Normally, you can leave this set to Advanced mode (ON). * If you change this setting, you must disconnect the UA-25EX’s USB cable from your computer, and then re-connect it.
-
Page 15: Driver Installation And Settings
Driver Installation and Settings The installation procedure and the settings will differ depending on your system. To perform the installation and make settings, follow the three steps listed below for your system. H_install_e.eps_95 Windows Windows XP Mac OS X Vista Install the p. -
Page 16: Windows Vista Users
Driver Installation and Settings Windows Vista users Steps to be performed on the UA-25EX itself are marked by a symbol. Operation of the UA-25EX Do not connect the UA-25EX to your computer until you are directed to do so. Installing the driver Start up Windows without the UA-25EX connected. - Page 17 Driver Installation and Settings To begin the installation, click [Next] once again. Installation will begin. If a dialog box related to Windows Security appears, click [Install]. fig.vista-7e.eps The screen will indicate “Ready to install the driver.” * If any other message appears, proceed as directed by the message. Set the UA-25EX’s Advanced driver switch to the ON position.
- Page 18 Driver Installation and Settings Input/output device settings In order to use the UA-25EX with your software, you’ll need to select the UA-25EX as the audio and MIDI input/output device. For details on how to do this, refer to the documentation for your software.
- Page 19 Driver Installation and Settings Caution when recording or playing back with your software Check the following points before you use the UA-25EX to record or play back. • Connect the UA-25EX to your computer before you start up the software you’re using. •...
-
Page 20: Windows Xp Users
Driver Installation and Settings Windows XP users Steps to be performed on the UA-25EX itself are marked by a symbol. Operation of the UA-25EX Do not connect the UA-25EX to your computer until you are directed to do so. Installing the driver Start up Windows without the UA-25EX connected. - Page 21 Driver Installation and Settings Set the UA-25EX’s Advanced driver switch to the ON position. Operation of the UA-25EX * If the Advanced driver switch is set to OFF, the installation won’t take place as described in the following procedure. Use a USB cable to connect the UA-25EX to your computer. Operation of the UA-25EX * This unit is equipped with a protection circuit.
- Page 22 Driver Installation and Settings Input/output device settings In order to use the UA-25EX with your software, you must select the UA-25EX as the audio and MIDI input/output device. For details on how to make this setting, refer to the documentation for the software you’re using.
- Page 23 Driver Installation and Settings Caution when recording or playing back with your software Check the following points before you use the UA-25EX to record or play back. • Connect the UA-25EX to your computer before you start up the software you’re using. •...
-
Page 24: Macintosh Users
Driver Installation and Settings Macintosh users Steps to be performed on the UA-25EX itself are marked by a symbol. Operation of the UA-25EX Do not connect the UA-25EX to your computer until you are directed to do so. Installing the driver * If the Authenticate dialog box or the dialog that indicates “Installer requires that you type your password”... - Page 25 Driver Installation and Settings When your computer has started up, use a USB cable to connect the Operation of the UA-25EX UA-25EX to your computer. Turn the UA-25EX’s Advanced driver switch ON, and use a USB cable to connect the UA-25EX to your computer.
- Page 26 Driver Installation and Settings MIDI input/output device settings In the Applications – Utilities folder, double-click Audio MIDI Setup to start it up. Click the MIDI Devices tab. Verify that the UA-25EX is shown in the Audio MIDI Setup dialog box. * If the UA-25EX is not shown, or if it is grayed-out, the UA-25EX has not been recognized correctly.
- Page 27 Driver Installation and Settings Caution when recording or playing back with your software Check the following points before you use the UA-25EX to record or play back. • Connect the UA-25EX to your Macintosh before you start up the software you’re using. •...
-
Page 28: Verifying That You Hear Sound
Driver Installation and Settings Verifying that you hear sound Now let’s play back some sample data to verify that the connections and settings are correct. * Before connecting the UA-25EX to other equipment, you must turn the UA-25EX’s output volume and the volume controls of all devices to which the UA-25EX is connected to their minimum settings to avoid malfunctions or speaker damage. - Page 29 Driver Installation and Settings From the Sample folder of the CD-ROM, copy the file TTears(.mp3) to your desktop. Set the UA-25EX’s Sample rate select switch (p. 13) to the 44.1 kHz position. * After changing the sample rate, you must close all software that is using the UA-25EX, disconnect the UA-25EX’s USB cable from your computer, and then reconnect it.
-
Page 30: Basic Connections And Settings
Basic Connections and Settings This section explains the basic connections and data flow for the UA-25EX. Refer to the block diagram printed on the front cover of the manual as you read this section. * To prevent malfunction and/or damage to speakers or other devices, always turn down the volume, and turn off the power on all devices before making any connections. -
Page 31: Basic Connections
Basic Connections and Settings Basic connections Use the USB cable to connect the UA-25EX to your computer. MIDI data and audio data are transferred in both directions via the USB cable. By connecting headphones or monitor speakers as shown in the illustration, you can monitor the playback from your software or the sound from an instrument or audio device connected to the UA-25EX. -
Page 32: Connecting A Microphone Or A Guitar
Basic Connections and Settings Connecting a microphone or a guitar With the connections and settings described here, you can listen to audio data play back from your computer while you record just your vocal or guitar performance into your sequencer. fig.mic-guitar.eps Guitar/Bass Specify the... - Page 33 Basic Connections and Settings Input sensitivity knob Use the input sensitivity knob to adjust the input level. You can obtain the best recording quality by turning the input sensitivity knobs as high as possible without causing the peak indicators to light.
-
Page 34: Connecting A Microphone And Applying The Compressor
Basic Connections and Settings Connecting a microphone and applying the compressor You can obtain a fatter sound by applying a compressor to the input signal from the microphone. fig.mic-guitar.eps Turn to COMP1 when vocal sound is input. Turn to COMP2 when instruments sound Adjust the (such as acoustic guitar or percussion) is Compressor... - Page 35 Basic Connections and Settings Sample rate select switch Set this to the same sample rate as selected in your recording software. If you change the UA-25EX’s sample rate, you must disconnect the USB cable that connects the UA-25EX to your computer, and then reconnect the USB cable in order for the new setting to take effect.
-
Page 36: Recording A Digital Signal Into Your Computer
Basic Connections and Settings Recording a digital signal into your computer fig.digital.eps MD/CD/DAT Player, HDD Recorder, etc. Specify the Sample Rate: Set this to match the sample rate of your digital playback device. Connections Connect your digital device to the digital input connector. Sample rate select switch Set this to match the sample rate of the software you’re using to record your digital playback device. -
Page 37: Recording To An Md Or Other Digital Device
Basic Connections and Settings Recording to an MD or other digital device fig.digital2.eps MD/DAT Recorder, HDD Recorder, etc. Specify the Sample Rate: Select a sample rate that your recording device is able to record. Choose the same sample rate as your software or the audio data you are playing back. -
Page 38: Appendices
Appendices Driver settings The UA-25EX’s dedicated driver allows you to view or change the settings. * You cannot change the settings of the standard driver provided by the operating system ( “About standard driver mode” p. 45). Viewing or changing the settings (Windows) Use a USB cable to connect the UA-25EX to your computer. -
Page 39: Driver Signing Option Settings (Windows Xp)
Appendices Viewing or changing the settings (Macintosh) Use a USB cable to connect the UA-25EX to your computer. In System Preferences, click UA-25EX. The Driver Settings screen will appear. Audio Buffer Size This adjusts the driver’s audio input/output buffer size. If you experience dropouts or noise when playing or recording even after you have adjusted the audio buffer size in your software, try increasing this buffer size setting. -
Page 40: Reinstalling The Driver
Appendices Reinstalling the driver If a problem occurred while installing the driver, use the following procedure to reinstall it. Uninstall the UA-25EX driver as described in Removing the driver (p. 40). Install the driver once again as described in Driver Installation and Settings (p. 15). Removing the driver Your computer may fail to correctly recognize the UA-25EX if the driver could not be installed according to the specified procedure. - Page 41 Appendices Macintosh users * The displayed content may differ depending on your system. Start up your Macintosh with all USB cables disconnected. Make sure that all USB cables other than those for a USB keyboard and USB mouse are disconnected. Insert the included UA-25EX Driver CD-ROM into the CD-ROM drive of your Macintosh.
-
Page 42: Power Management Settings
Appendices Power management settings If you experience problems such as interrupted notes or dropouts in the sound, you may be able to solve the problem by changing your computer’s power management settings. Windows Vista users Open the Control Panel, click System and Maintenance, and then click Power Options. * If you’re using the Classic view, double-click the Power Options icon. -
Page 43: System "Performance" Settings (Windows)
Appendices System “Performance” settings (Windows) You may be able to solve the problem by changing the “Performance” setting of the system as described below. Windows Vista users Open the Control Panel, click System and Maintenance, and click System. * If you’re using the Classic view, double-click the System icon. In the list of tasks shown at the left, click Advanced System Settings. -
Page 44: System Volume Settings
Appendices System volume settings Windows Vista users Open the Control Panel, and click Hardware and Sound. * If you’re using the Classic View, click Control Panel Home to exit the Classic View. In Sound, click Adjust system volume. The Volume Mixer will appear. From the Device menu, select the UA-25EX’s OUT and adjust the volume. -
Page 45: About Standard Driver Mode
Appendices About standard driver mode Use this mode if you want to use the standard driver provided by your operating system. * The UA-25EX will operate at 44.1 kHz/16-bit, regardless of the setting of the sample rate select switch (p. 13). * This mode does not support ASIO drivers. -
Page 46: Troubleshooting
Troubleshooting If you experience problems, read this chapter first. It contains information that will help you solve the problem. * For help with Windows or Macintosh operation, refer to the documentation for your computer or operating system. Problems when installing the driver Can’t start up the installer Is the CD-ROM inserted correctly in your CD-ROM drive? Make sure that the CD-ROM is correctly inserted in the CD-ROM drive. - Page 47 Troubleshooting Can’t install the driver according to the procedure Did you log on to Windows with the appropriate user privileges? You must log onto Windows using one of the following user names. • A user name belonging to the Administrators group, such as Administrator •...
-
Page 48: Windows Vista
Troubleshooting Does your computer meet the requirements of the USB specification? Operation may be unstable if your computer does not meet the electrical requirements of the USB specification. In this case, you may be able to solve the problem by connecting a self-powered USB hub (a USB hub that has an internal power supply or an AC adaptor). -
Page 49: Problems With Settings
Troubleshooting Problems with settings Can’t select/use the UA-25EX within software or in system settings Could the UA-25EX be in use by other software? Close all software that’s currently running, disconnect the UA-25EX’s USB cable, and then reconnect it. If this does not solve the problem, reinstall the driver. ➝... -
Page 50: Problems With Playback Or Recording
Troubleshooting Problems with playback or recording No sound from your computer’s speakers If you connect the UA-25EX to your computer, sound will not be heard from your computer’s speakers. This is not a malfunction. Connect your headphones or audio playback system (external monitors) to the UA-25EX. Sound played by your computer is inaudible or too soft Can you hear sound by connecting headphones? If you can hear sound through headphones connected to the UA-25EX’s headphone jack, check... - Page 51 Could you be using a cable that contains a resistor? Make connections using a cable that does not contain an internal resistor (such as one from the Roland PCS series). Distorted sound from a device connected to the combo input jack Is the peak indicator lit? Try turning the UA-25EX’s input sensitivity knob toward the left to decrease the input level.
- Page 52 Troubleshooting Have you set the system’s “Performance” setting? (Windows) You may be able to solve the problem by changing the “Performance” setting of the system. ➝ “System “Performance” settings (Windows)” (p. 43) Do the sample rate settings match? The sample rate setting of your software must match the sample rate setting of the UA-25EX itself. * After changing the sample rate setting of the UA-25EX itself, you must close all software that uses the UA-25EX, disconnect the UA-25EX’s USB cable from your computer, and then reconnect it.
- Page 53 Troubleshooting Check the setting of the ground lift switch. See whether moving the UA-25EX’s ground lift switch to LIFT will eliminate the noise. If you’ve used USB to connect a MIDI sound module to the same computer as the UA-25EX, and have connected the MIDI sound module’s output to the UA-25EX’s combo input jacks, noise from the computer may be heard from the UA-25EX.
- Page 54 Troubleshooting Could the UA-25EX be in use by other software? Close all software that’s currently running, disconnect the UA-25EX’s USB cable, and then reconnect it. If this does not solve the problem, reinstall the driver. ➝ “Reinstalling the driver” (p. 40) Could the computer to which the UA-25EX is connected have entered standby (suspend) mode, hibernate mode, or sleep mode? Close all software that uses the UA-25EX, disconnect the UA-25EX’s USB cable, and then reconnect it.
-
Page 55: Specifications
Specifications UA-25EX: USB Audio Interface Record: 1 pair of stereo Number of Audio Record/ Playback: 1 pair of stereo Playback Channels DIGITAL IN SWITCH = OFF: Full duplex (except for 96 kHz setting) DIGITAL IN SWITCH = ON: Recording only PC interface: 24 bits (Advanced driver switch=ON) Signal Processing... - Page 56 Specifications <Front Panel> Input Jack L, R XLR type (balanced, phantom power +48 V) 1/4 inch TRS phone type (balanced) * Input Jack R: high impedance is supported. Headphones Jack Stereo 1/4 inch phone type Connectors <Rear Panel> Digital Input Connector (Optical type) Digital Output Connector (Optical type) Output Jack L, R 1/4 inch TRS phone type (balanced)
-
Page 57: Index
Index ..........Macintosh ................Advanced driver switch Windows Vista ......................... ASIO Windows XP ............... iTunes ............. Balance ............Bass guitar ..............LIFT ............. BYPASS ............... Limiter ........... Limiter type switch ..........LoopBack mode ......Cakewalk Production Plus Pack .......... - Page 58 Index ..........Threshold knob ............. TRS jack ............TRS type ............Unbalance Uninstall the driver ..........Macintosh ............ Windows ............USB cable ..........USB connector ............ USB indicator ..............Vocal Windows Media Player ........... Windows Vista ..........Windows XP ..........Windows Vista ............
- Page 59 MEMO...
- Page 60 MEMO...
- Page 61 MEMO...
- Page 62 For EU Countries For China...
-
Page 63: Declaration Of Conformity
fig.09B-17.eps For EU Countries This product complies with the requirements of EMC Directive 2004/108/EC. For the USA FEDERAL COMMUNICATIONS COMMISSION RADIO FREQUENCY INTERFERENCE STATEMENT This equipment has been tested and found to comply with the limits for a Class B digital device, pursuant to Part 15 of the FCC Rules. These limits are designed to provide reasonable protection against harmful interference in a residential installation.
Need help?
Do you have a question about the Cakewalk UA-25 EX and is the answer not in the manual?
Questions and answers