Table of Contents
Advertisement
Advertisement
Table of Contents

Related Manuals for Roland OCTA-CAPTURE


Summary of Contents for Roland OCTA-CAPTURE
- Page 2 Roland Service Center, device. or an authorized Roland distributor, as listed on the “Information” page. • Do not excessively twist or bend the power cord, nor • Never install the unit in any of the following locations.
- Page 3 • Whenever you suspect the possibility of lightning in with your retailer, the nearest Roland Service Center, your area, disconnect the AC adaptor from the outlet. or an authorized Roland distributor, as listed on the “Information” page. 118a • DO NOT play a CD-ROM disc on a conventional audio CD • Should you remove screws, keep them in a safe place...
-
Page 4: Important Notes
Placement not be possible to restore the data, and Roland assumes no liability concerning such loss of data. • Using the unit near power amplifiers (or other equipment containing large power transformers) may induce hum. - Page 5 Copyright • Unfortunately, it may be impossible to restore the contents of data that was stored in the unit’s memory once it has been lost. Roland • Recording, duplication, distribution, sale, lease, performance, or Corporation assumes no liability concerning such loss of data.
-
Page 6: Table Of Contents
Contents Contents of the Package . . . . . . . . . . . . . . . . . . . . . . . . . . . . . . . . . . . . . . . . . . . . . . . . . . . Panel Descriptions . - Page 7 Operations in the OCTA-CAPTURE’s Panel ........
-
Page 8: Contents Of The Package
This is the dedicated AC adaptor for the OCTA-CAPTURE. Use only the supplied AC adaptor. * If, due to damage, you need to acquire a dedicated AC adaptor, please contact the nearest Roland service center, as listed on the “Information” page (p . 97), or an authorized Roland dealer . Owner’s manual This is the document you’re reading. -
Page 9: Rack Mount Angle
Roland Service Center, or an authorized Roland distributor, as listed on the separate sheet titled “Information . ” License agreement This is a license agreement allowing you to use certain software that is copyrighted by Roland Corporation. You must read this before opening the envelope containing the included CD-ROM. -
Page 10: Panel Descriptions
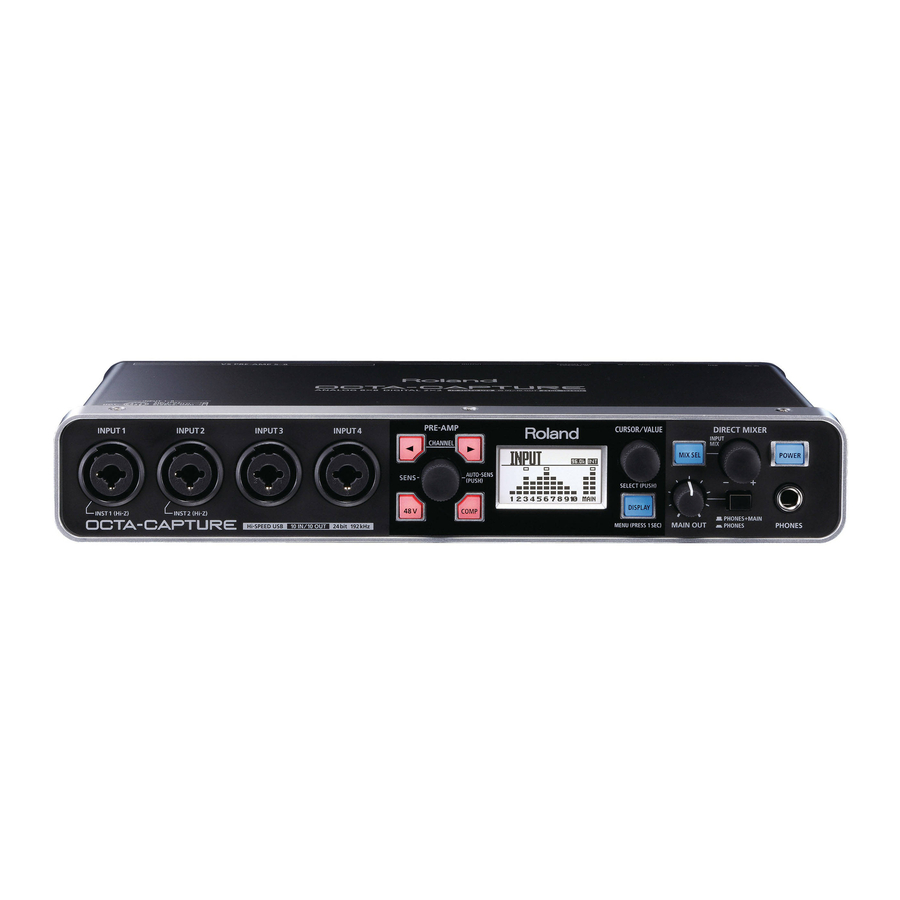
Panel Descriptions You must install the driver before you connect the OCTA-CAPTURE to your computer for the first time. Install the driver as described in “Driver Installation and Settings” (p. 14). Front panel 1. Combo input jacks (INPUT 1–4) These are analog audio signal input jacks with microphone preamps. - Page 11 2. Preamp control section (p . 33) The OCTA-CAPTURE provides preamps for eight audio inputs (INPUT 1–8). You can adjust the parameters of these preamps. 3. Display (p . 54)/utility section (p . 59) The LCD shows the status of the OCTA-CAPTURE’s input jacks.
-
Page 12: Rear Panel
When the unit is grounded, a slight hum may occur, depending on the particulars of your installation. If you are unsure of the connection method, contact the nearest Roland Service Center, or an authorized Roland distributor, as listed on the “Information” page. - Page 13 . 16. USB connector Connect this to a computer. Before connecting the OCTA-CAPTURE for the first time, you must install the driver as described in “Driver Installation and Settings” (p. 14). 17. MIDI connectors MIDI IN connector This is a MIDI input connector.
-
Page 14: Driver Installation And Settings
Driver Installation and Settings A driver is software that transfers data between the OCTA-CAPTURE and the application software on your computer when the OCTA-CAPTURE is connected to your computer. The procedure for installation and checking will depend on your system. -
Page 15: Windows 7/Windows Vista Users
Windows 7/Windows Vista Users Installing the Driver Steps to be performed on the OCTA-CAPTURE keyboard itself are marked by a Operation of the OCTA-CAPTURE symbol. Don’t connect the OCTA-CAPTURE to your computer until you are told to do so. * The example screen shots included here are taken from Windows 7 . - Page 16 Click [Yes] if you’re using Windows 7, or click [Continue] if you’re using Windows Vista 6. The screen will indicate “OCTA-CAPTURE Driver will be installed on your computer . ” Click [Next] . If any other message appears, proceed as directed by the message.
-
Page 17: Input/Output Device Settings
Windows will automatically restart. Input/Output Device Settings In order to use the OCTA-CAPTURE with your software, you’ll need to select the OCTA-CAPTURE as the audio and MIDI input/output device. For details on how to do this, refer to the documentation for your software. - Page 18 Settings when using the OCTA-CAPTURE in Windows Media Player Here’s how to specify the OCTA-CAPTURE as the system default playback device so that it can be used with Windows Media Player. * In “Verifying That You Hear Sound” (p . 27), you’ll use Windows Media Player to play back sample data .
-
Page 19: Windows Xp Users
If the “Install Program As Other User” dialog box appears, click [Cancel] to terminate the installation, log on to Windows using an administrator account, and perform the installation once again. 5. The screen will indicate “OCTA-CAPTURE Driver will be installed on your computer . ” Click [Next] . - Page 20 Operation of the OCTA-CAPTURE Switch on the OCTA-CAPTURE’s power (p . 31) . The indication “Found New Hardware” will appear in the lower right corner of your screen. * It may take between ten seconds to several minutes for the “Found New Hardware Wizard” to appear .
-
Page 21: Input/Output Device Settings
If the “System Settings Change” dialog box appears, click [Yes] to restart Windows. Input/Output Device Settings In order to use the OCTA-CAPTURE with your software, you must select the OCTA-CAPTURE as the audio input/output device. For details on how to make this setting, refer to the documentation for the software you’re using. - Page 22 Settings when using the OCTA-CAPTURE in Windows Media Player Here’s how to specify the OCTA-CAPTURE as the system default playback device so that it can be used with Windows Media Player. * In “Verifying That You Hear Sound” (p . 27), you’ll use Windows Media Player to play back sample data .
-
Page 23: Mac Os X Users
If a message indicating that installation is not possible appears, check the operating system you’re using, and perform step 4. 5. The screen will indicate “Welcome to the OCTA-CAPTURE Driver Installer . ” Click [Continue] . 6. If the screen asks you to select a destination, click your start-up disk to select it, and then click [Continue] . -
Page 24: Audio Input/Output Device Settings
. Using the OCTA-CAPTURE with iTunes Here’s how to specify the OCTA-CAPTURE as the sound output device so that it can be used with iTunes. In “Verifying That You Hear Sound” (p. 38), you’ll use iTunes to play back sample data. Be sure to make the settings described below. -
Page 25: Midi Input/Output Device Settings
Mac OS X 10 .5 or earlier Click the [MIDI Devices] tab. 3. Verify that [OCTA-CAPTURE] is shown in the “MIDI Studio” or “Audio MIDI Setup” dialog box . If the OCTA-CAPTURE is not shown or is grayed-out, the OCTA-CAPTURE has not been recognized correctly. - Page 26 Click “Test Setup . ” * If you have a sound module connected to the OCTA-CAPTURE’s MIDI OUT connector, the following step will cause it to produce a fairly loud sound, so please reduce the volume of your sound module before continuing .
-
Page 27: Verifying That You Hear Sound
As shown in the illustration, connect your headphones or monitor speakers so that you can hear the sound played back from the computer. * When you connect the OCTA-CAPTURE to your computer, sound will no longer be output from your computer’s speakers or headphone jack . -
Page 28: Playing Back The Sample Data
Proceed to one of the following sections, depending on what you want to do next. For details on settings and operation, refer to “Basic Operation” (p. 29). If you’ll be using the OCTA-CAPTURE with your DAW software, make the appropriate settings for the audio port names listed on page “Device Name (Windows)” (p. 81). -
Page 29: Basic Operation
2. Relocating microphone(s) at a greater distance from speakers. 3. Lowering volume levels. * When you connect the OCTA-CAPTURE to your computer, sound will no longer be output from your computer’s speakers or headphone jack . • Connect your headphones or audio playback system (external monitors) to the OCTA-CAPTURE. -
Page 30: Basic Connections
* The indicator will light when you plug the AC adaptor into an AC outlet . Use a USB cable to connect the OCTA-CAPTURE to your computer. Both MIDI data and audio data are transferred over the USB cable. -
Page 31: Turning The Power On/Off
• Minimize the volume of all connected equipment 1. Switch off the power to your amp or powered monitor speakers . 2. Press and hold the OCTA-CAPTURE’s [POWER] button for one second, and then release it . Settings will be saved when you turn off the power. When you turn on the power, the OCTA- CAPTURE will start up with the saved settings. -
Page 32: Auto Power Off
The power is turned off automatically after a predetermined amount of time has passed since you’ve operated anything on the panel. * Auto Power Off will not function if the OCTA-CAPTURE is connected to your computer, or if a microphone/instrument is connected . -
Page 33: Controlling The Preamp
When you turn the [SENS] knob, the amount of gain is shown in the LCD. Signal Status Indicator Clip indicator SIG indicator This shows the status of the signals being input to the OCTA-CAPTURE. SIG indicator This will light when a signal is input. This will light when the input signal reaches -2 dB. -
Page 34: Phantom Button
Please carefully read the owner’s manual of your dynamic microphone, audio playback device, or other device that does not require phantom power, for details on its specifications . The OCTA-CAPTURE’s phantom power supply: +48 V DC, 6 mA COMP [ ] Button This turns the compressor of the currently selected input channel on/off. -
Page 35: Recording A Microphone Or Guitar
Connect to INPUT 2. Connect to The following items can be adjusted INPUT 1. from the control panel or from the OCTA-CAPTURE itself. • Input sensitivity • Input impedance • Compressor on/off • Sampling rate • Direct monitor volume • Phantom power on/off Microphone * You must turn the phantom power off unless you’ve connected a condenser microphone that... - Page 36 Input impedance setting (CH 1 and CH 2 only) 1. Press the CHANNEL [ ] or [ ] button . The CHANNEL [ ] buttons will light, and the preamp setting screen will appear. 2. Use the CHANNEL [ ] buttons to select the channel that you want to adjust . 3. Turn the [CURSOR/VALUE] knob to move the cursor to “Hi-Z .
-
Page 37: Input Sensitivity Setting
Input sensitivity setting To record at the highest quality, raise the input sensitivity until it is as high as you can get it without causing the SIG indicator (p. 33) to reach the rightmost position. 1. Press the CHANNEL [ ] or [ ] button . - Page 38 Press the [AUTO-SENS] button . Auto Sens setting will begin. Play the loudest section of the song. If you decide to cancel the operation, press the [DISPLAY] Button. While the Auto Sens setting is taking place, the sensitivity will temporarily be set to the minimum. 6. Press the [AUTO-SENS] button once again .
- Page 39 Direct monitor volume adjustment Here’s how to adjust the balance between the monitor sound and the volume of the audio playback from your computer. Using the direct monitor volume to adjust the volume won’t affect the recording level. 1. Turn the [INPUT MIX] knob to adjust the overall volume of input mixer section . Volume +12 dB INPUT MONITOR...
-
Page 40: Simultaneously Recording Multiple Inputs (Multi Recording)
Simultaneously Recording Multiple Inputs (Multi Recording) When recording your band’s performance on your DAW software, you can record each instrument on its own track. Connections Connect your microphone, guitar, and keyboard to INPUT 1–4. Connect four microphones to INPUT 5–8 and place them around your drum set. Microphone Guitar Effects... - Page 41 Input sensitivity adjustments To record at the highest quality, raise the input sensitivity until it is as high as you can get it without causing the SIG indicator (p. 33) to reach the rightmost position. 1. Use the CHANNEL [ ] buttons to select the channel that you want to adjust .
-
Page 42: Advanced Operation
In addition to its audio interface, the OCTA-CAPTURE internally provides four direct mixers (p. 46) and a patch bay (p. 50). Settings for these can be made using the OCTA-CAPTURE’s own knobs and buttons (p. 54), as well as from your computer using a dedicated control panel (p. 43). -
Page 43: Control Panel
Access the OCTA-CAPTURE control panel as follows. Windows Users Open the Windows Control Panel and double-click the [OCTA-CAPTURE] icon. If you don’t see the OCTA-CAPTURE icon, open the control panel and switch to Icon view (Windows 7) or Classic view (Windows Vista/Windows XP). Macintosh Users... -
Page 44: Screen Items And What They Do
Screen Items and what They Do Main Window Preamp Control screen Screen switching buttons Reverb Patch bay Preamp Control Device Panel Direct Mixer Control screen Screen switching buttons Reverb Patch bay Direct Mixer Control Device Panel Screen switching buttons Use these buttons to switch between the Preamp Control screen and the Direct Mixer Control screen. -
Page 45: Preamp Section
Inverts the phase of the input signal. Low cut Enables the low-cut filter for the input. The cutoff frequency is 100 Hz. Compressor section The compressor section can also be controlled from the OCTA-CAPTURE itself (p. 58). Screen Setting Explanation... -
Page 46: Direct Mixer Control
Here you can control the monitor level and balance of the audio data being input via input jacks 1–10. The four input mixers can be controlled separately. Click a mixer select tab to switch between mixers A–D. The input mixer can also be controlled from the OCTA-CAPTURE itself (p. 55). Screen Setting Explanation... - Page 47 Output Mixer A–D Here you can control the balance of the five stereo channels of audio data sent from the computer, and send it to the headphones or the monitoring section. You can control the four output mixers independently. Click a mixer select tab to switch among mixers A–D. Screen Setting Explanation...
-
Page 48: Device Panel
Here you can view the status of the OCTA-CAPTURE’s settings. Item Explanation Selects which unit’s mixer will be shown when two OCTA-CAPTURE units are connected. When you click this button, the display of the OCTA-CAPTURE unit itself will be highlighted. Indicates the sampling frequency. Indicates the clock source. CLOCK INTERNAL: The OCTA-CAPTURE’s internal clock is used. - Page 49 * Reverb is not available when operating at a sampling frequency of 192 kHz . * Reverb features are only available on Input Mixer A . The reverb can also be controlled from the OCTA-CAPTURE itself (p. 59). Setting Explanation ECHO: Echo will be applied.
-
Page 50: Patch Bay
* The patch bay is not available when operating at a sampling frequency of 192 kHz . The patch bay can also be controlled from the OCTA-CAPTURE itself (p. 59). Patch Bay Direct Mixer A Output Jacks 1–2... - Page 51 If you click the [Multi-Monitor] button, Direct Mixer A–D will be output directly to output jacks 1–8. Patch Bay Direct Mixer A Output Jacks 1–2 OUTPUT 1-2 /Headphone Jack OUTPUT 3-4 Output Jacks 3–8 OUTPUT 5-6 WAVE OUT 1-2 OUTPUT 7-8 OUTPUT 9-10 COAXIAL output jack 9-10...
-
Page 52: Saving And Loading Your Settings
Saving and Loading Your Settings From the OCTA-CAPTURE’s control panel, you can save the current settings as a file, or load previously saved settings from a file. The following settings are saved. • Compressor settings (p. 45) • Preamp settings (p. 45) • Direct mixer A–D settings (p. -
Page 53: Checking The Signal Flow
From the “OCTA-CAPTURE Control Panel” menu, choose [Driver Settings]. For details, refer to “Driver Settings” (p. 69). View in foreground Windows users From the “Driver” menu, choose [Always on top]. Mac OS X users From the “OCTA-CAPTURE Control Panel” menu, choose [Always on top]. -
Page 54: Operations In The Octa-Capture's Panel
As you turn the [CURSOR/VALUE] knob toward the right, you’ll move successively through the screens “INPUT” (the input levels), “DAW” (the output levels from the computer), and “OUTPUT” (the output levels from the OCTA-CAPTURE’s OUTPUT jacks). Input Level meter DAW Playback Level meter... -
Page 55: Input Mixer
Input Mixer [MIX SEL] Button Press the [MIX SEL] button to access the INPUT MIXER screen. INPUT MIXER screen Name of the selected mixer Output destination Output level meter of the Level input mixer Channel Number Input mixer master volume If Mixer B, C, or D is assigned as the output destination in the patch bay (p. -
Page 56: Input Mix Knob
[INPUT MIX] Knob Turn the [INPUT MIX] knob to adjust the input mixer’s master volume. Editing the parameters of each channel 1. Turn the [CURSOR/VALUE] knob to select the channel that you want to edit . 2. Press the [CURSOR/VALUE] knob . The channel parameter screen will appear. - Page 57 3. Use the [CURSOR/VALUE] knob to move the cursor . 4. Press the [CURSOR/VALUE] knob to select the parameter . Now the parameter can be edited. 5. Turn the [CURSOR/VALUE] knob to edit the value . 6. Press the [CURSOR/VALUE] knob to confirm the value . 7. Press the [DISPLAY] button to return to the previous screen .
- Page 58 Compressor parameter settings Input level Gain Reduction 1. Use the CHANNEL [ ] or [ ] buttons to select a channel, and then press the [ button to access the COMP screen for the channel you want to edit . 2. Turn the [CURSOR/VALUE] knob to move the cursor to the parameter that you want to edit .
-
Page 59: Utility Section
Utility section In the utility section you can edit the OCTA-CAPTURE’s system settings. 1. Press and hold the [DISPLAY] button for one second . The SYSTEM screen will appear. 2. Turn the [CURSOR/VALUE] knob to move the cursor to the parameter that you want to edit . - Page 60 If you decide not to clear the settings, choose “No, ” and then press the [CURSOR/VALUE] knob. Specifies the time after which power to the OCTA-CAPTURE will automatically be turned off, following the last time it was operated. POWER OFF Range: OFF, 4HOURS Initializes the system settings.
- Page 61 4. Turn the [CURSOR/VALUE] knob to edit the value . 5. Press the [CURSOR/VALUE] knob to finalize the setting . 6. Press the [DISPLAY] button . You will return to the previous screen.
-
Page 62: Live Set-Up With Four Stage Monitors
Live Set-up with Four Stage Monitors The sounds being input to INPUT 1–8 can be mixed independently by the four direct mixers, and sent from each mixer to a different output destination. For example, this is convenient when you want to provide each member of a band with their own monitor mix. -
Page 63: Connecting Two Octa-Capture Units
Connecting Two OCTA-CAPTURE Units If you connect two OCTA-CAPTURE units, you’ll be able to use them as a 24-in/20-out audio interface with ASIO on Windows or with Core Audio on Mac OS X. In order to connect two OCTA-CAPTURE units and use them, you must turn on the VS EXPAND setting of the second unit, and set both units to digitally synchronize at the same sampling frequency. - Page 64 4. Connect each OCTA-CAPTURE unit to the same USB port. If VS EXPAND is grayed out: Disconnect both USB cables from the computer, turn off the power of both OCTA-CAPTURE units, and start again from step 1.
- Page 65 Mac OS X users Make “MIDI Input/Output Device Settings” (p. 25) for the second OCTA-CAPTURE unit. In step 5, enter the following names. New Device Device Name First [new external device] EXP MIDI Second [new external device] EXP CTRL Mac OS X 10.5 or earlier After making connections, start up “Audio MIDI Setup”...
- Page 66 10. Make sure that “DIRECT MIX A” is selected in the OUTPUT 1–2 field . If something else is selected, change it to “DIRECT MIX A. ” All input signals of the second OCTA-CAPTURE unit will be output from the PHONES jack of the first unit.
- Page 67 3. Change the sampling frequency of the two units . Set both units to the same sampling frequency. 4. In order to digitally synchronize the two OCTA-CAPTURE units, use a coaxial cable to connect the second unit’s COAXIAL OUT (9/10) jack to the first unit’s COAXIAL IN (9/10) jack .
-
Page 68: Appendices
Appendices Sampling Frequency Setting If you want to connect the OCTA-CAPTURE to your computer via USB and use it as a USB audio interface, you’ll need to set the OCTA-CAPTURE’s sampling frequency to match your software’s sampling frequency, as follows. -
Page 69: Restoring The Factory Settings (Factory Reset)
OCTA-CAPTURE’s power . 2. Open the Windows Control Panel and double-click the OCTA-CAPTURE icon . If you don’t see the OCTA-CAPTURE icon, open the control panel and change the view to the Icon view (Windows 7) or Classic view (Windows Vista/Windows XP). - Page 70 * If you’ve changed the buffer size, you must restart the software that’s using the OCTA-CAPTURE . Alternatively, if you’re using software that has an audio device test function, execute the software’s test function .
- Page 71 * If you’ve changed the buffer size, you must restart the software that’s using the OCTA-CAPTURE . Alternatively, if you’re using software that has an audio device test function, execute the software’s test function .
-
Page 72: Driver Signing Option Settings (Windows Xp)
Driver Signing Option Settings (Windows XP) Driver installation may not be possible due to your settings for “Driver Signing Options. ” Refer to the following, and make the appropriate settings. 1. Open the “Control Panel,” click [Performance and Maintenance], and then click the [System] icon . -
Page 73: Reinstalling The Driver
2. Install the driver once again as described in “Driver Installation and Settings” (p . 14) . Removing the Driver Your computer may fail to correctly recognize the OCTA-CAPTURE if the driver could not be installed according to the specified procedure. If so, you’ll need to delete the driver that was detected by mistake. - Page 74 1. Start up your Macintosh with all USB cables other than those for a USB keyboard and USB mouse disconnected . 2. Insert the included “OCTA-CAPTURE Driver CD-ROM” into the CD-ROM drive of your Macintosh . 3. On the CD-ROM, in the Driver (OS version) folder, double-click “Uninstaller . ”...
-
Page 75: Power Management Settings
Power Management Settings If you experience problems such as interrupted notes or dropouts in the sound, you may be able to solve the problem by changing your computer’s power management settings. Windows 7 users 1. Open the “Control Panel,” click [System and Security], and then click [Power Options] . If you’re using an icon display, double-click the [Power Options] icon. -
Page 76: System "Performance" Settings (Windows)
Windows XP users 1. Open the “Control Panel,” click [Performance and Maintenance], and click [Power Options] . * If you’re using the Classic view, double-click the [Power Options] icon . 2. Click the [Power Schemes] tab, and in the “Power Schemes” field, select [Always On] . 3. Click [OK] to close “Power Options Properties . -
Page 77: System Volume Settings
System “Performance” Settings (Windows) If you experience problems such as interrupted notes or dropouts in the sound, you may be able to solve the problem by changing the “Performance” setting of the system as described below. Windows 7 users 1. Open the “Control Panel,” click [System and Security], and click [System] . If you’re using an icon display, double-click the [System] icon. -
Page 78: Voice Communication Software Settings (Windows 7)
If you’re using the classic view, double-click [Sound and Audio Devices]. 2. Click the [Audio] tab . 3. In the “Sound playback” area, make sure that [1-2 (OCTA-CAPTURE)] is selected as the “Default device,” and click [Volume] . 4. The “Volume Control” will appear; adjust the Wave volume . - Page 79 1. In “System Preferences,” click [Sound] . 2. Click the [Output] tab . 3. In the “Choose a device for sound output field,” make sure that the [OCTA-CAPTURE] is selected, and use the “Output volume slider” to adjust the volume .
-
Page 80: Windows Monitoring Function Settings (Windows 7)
* If the Control Panel shows the Icon view, click “Sound . ” 2. In “Recording,” select the OCTA-CAPTURE [1-2 (OCTA-CAPTURE)], and click [Properties] . 3. Open the “Listen” tab, and clear the [Listen to this device] check box . - Page 81 Device Name (Windows) Audio output device 44 .1 kHz–96 Device Name MME, WDM/KS ASIO 192 kHz OUT 1-2 1-2 (OCTA-CAPTURE) OUT 1-2(2) OUT 3-4 3-4 (OCTA-CAPTURE) OUT 3-4(4) OUT 5-6 OCTA-CAPTURE 5-6 (OCTA-CAPTURE) − OUT 5-6(6) OUT 7-8 7-8 (OCTA-CAPTURE) −...
-
Page 82: Troubleshooting
If you experience a problem, read this chapter first. It contains information that may help you solve the problem. If the information here does not help you solve the problem, try accessing the Roland website. If you are still unable to solve the problem, please contact a service location listed at the end of this manual. - Page 83 A number such systems may automatically add a number to the beginning of the device name, as “2-” appears at but this should not be a problem when using the OCTA-CAPTURE. If you want the beginning of p. 73 to return to the device name that does not have this number, you can either...
-
Page 84: Problems With Settings
Could the computer to which the OCTA-CAPTURE is connected have entered standby (suspend) mode, hibernate mode, or sleep mode? Close all software that’s using the OCTA-CAPTURE. Next, switch off the OCTA- – CAPTURE’s power, then turn it back on again. -
Page 85: Problems With Playback Or Recording
Can’t select/use the Could the OCTA-CAPTURE’s “VS EXPAND” setting be “ON”? OCTA-CAPTURE p. 60 Turn the “VS EXPAND” setting “OFF, ” and turn the OCTA-CAPTURE’s power off, within software or then on again. in system settings Could the monitoring function of Windows be enabled? Can’t make driver... - Page 86 Set the input impedance select switch to the Hi-Z position. Is the input level appropriate? Insufficient volume p. 33 Try turning the OCTA-CAPTURE’s [SENS] knob toward the right to increase the from your guitar input level. Could you be using a cable that contains a resistor? –...
- Page 87 The sample rate setting of your software must match the sample rate setting of the OCTA-CAPTURE itself. p. 68 * After setting the sample rate on the OCTA-CAPTURE itself, you must close all application software that is using the OCTA-CAPTURE, switch off the OCTA-CAPTURE’s power, then turn it on again.
- Page 88 Some commercially available USB cables do not meet the requirements of the USB standard, and this may prevent the OCTA-CAPTURE from operating correctly. Could you have updated the Mac OS X software while OCTA-CAPTURE was Playback contains connected? clicks, dropouts, or p.
- Page 89 Problem What to check Page Could two or more audio devices such as the OCTA-CAPTURE or a mixer be connected to your computer? If you’ve connected a MIDI sound module via USB to the same computer as the OCTA-CAPTURE, and connected the MIDI sound module’s output to the OCTA-CAPTURE’s combo input jacks, noise from the computer may be heard...
- Page 90 If this does not solve the problem, restart your computer. Could you have connected or disconnected the USB cable during playback or recording, or switched off the OCTA-CAPTURE, then turned it back on again? If you disconnect and reconnect the USB cable during playback or recording, or switch off the OCTA-CAPTURE, then turn it back on again, the OCTA-CAPTURE may become unable to play back or record.
-
Page 91: Problems When Two Units Are Connected
Are the OCTA-CAPTURE’s “VS EXPAND” settings correct? p. 60 Set the first OCTA-CAPTURE unit’s “VS EXPAND” to “OFF, ” and the second unit to “ON. ” Have you used a coaxial cable to connect the second unit’s OUT (9/10) to the p. - Page 92 Try increasing the buffer size as described in “Driver Settings” (p. 69). Could a USB device other than the OCTA-CAPTURE, a mouse, and a keyboard be connected? − Disconnect all USB devices other than the OCTA-CAPTURE, a mouse, and a keyboard from your computer.
-
Page 93: Problems With Sonar Le
Problems with SONAR LE Problem What to check Page In SONAR LE, the maximum number of channels that can be recorded Can’t simultane- simultaneously is limited to eight channels (four stereo pairs). ously record nine or − more channels of If you want to record nine or more channels of audio simultaneously, you’ll need audio to use a higher-level version of SONAR. -
Page 94: Main Specifications
Main Specifications OCTA-CAPTURE : 10 × 10 Audio Interface Sampling Frequency = 44.1 kHz, 48 kHz, 96 kHz Record: 12 channels Playback: 10 channels Number of Audio Record/ Playback Channels Sampling Frequency = 192 kHz Record: 4 channels Playback: 4 channels... - Page 95 XLR type (balanced / phantom power +48 V) 1/4 inch TRS phone type (balanced) Combo input jacks 1–8 * INPUT 1 and 2 support high impedance COAXIAL IN (9/10) jack COAXIAL OUT (9/10) jack Connectors Headphones jack (Stereo 1/4 inch phone type) OUTPUT jacks 1–8 (1/4 inch TRS phone type (balanced)) MIDI connectors (In, Out) USB connector...
-
Page 96: Index
Index AC ADAPTOR ..........30 LOADING SETTINGS . - Page 97 Information Information When you need repair service, call your nearest Roland Service Center or authorized Roland distributor in your country as shown below. PHILIPPINES CURACAO URUGUAY POLAND JORDAN AFRICA G.A. Yupangco & Co. Inc. Zeelandia Music Center Inc. Todo Musica S.A.
- Page 98 For EU Countries For China...
-
Page 99: Declaration Of Conformity
For the USA DECLARATION OF CONFORMITY Compliance Information Statement Model Name : Type of Equipment : Responsible Party : Address : Telephone : For the U.K. IMPORTANT: THE WIRES IN THIS MAINS LEAD ARE COLOURED IN ACCORDANCE WITH THE FOLLOWING CODE. BLUE: NEUTRAL Model Name :...
Need help?
Do you have a question about the OCTA-CAPTURE and is the answer not in the manual?
Questions and answers