Table of Contents
Advertisement
The Razer Orbweaver is the world's first mechanical gaming keypad that binds every
command and skill from any FPS, RTS, and MMORPG to 20 mechanical keys at your
fingertips. With that many keys within quick reach, and requiring only 50g of force to
actuate, you'll be able to react to any challenge at an unrivaled speed. The distinctive
tactile feedback from the mechanical keys also provides a whole new feel to your
gaming experience, and for maximum comfort, the Razer Orbweaver features
adjustable hand size, thumb, and palm-rest modules to provide the most ergonomic
form factor, just the way you like it.
With the Razer Orbweaver, get complete control for complete victory.
1 | razer
Advertisement
Table of Contents

Subscribe to Our Youtube Channel
Related Manuals for Razer Orbweaver


Summary of Contents for Razer Orbweaver
- Page 1 The Razer Orbweaver is the world’s first mechanical gaming keypad that binds every command and skill from any FPS, RTS, and MMORPG to 20 mechanical keys at your fingertips. With that many keys within quick reach, and requiring only 50g of force to actuate, you’ll be able to react to any challenge at an unrivaled speed.
-
Page 2: Table Of Contents
2. REGISTRATION / TECHNICAL SUPPORT ........... 3 3. TECHNICAL SPECIFICATIONS ..............4 4. DEVICE LAYOUT ..................5 5. USING YOUR RAZER ORBWEAVER ............6 6. INSTALLING YOUR RAZER ORBWEAVER ..........10 7. CONFIGURING YOUR RAZER ORBWEAVER ..........11 8. SAFETY AND MAINTENANCE ..............26 9. -
Page 3: Package Contents / System Requirements
1. PACKAGE CONTENTS / SYSTEM REQUIREMENTS PACKAGE CONTENTS Razer Orbweaver Elite Mechanical Gaming Keypad Quick Start Guide SYSTEM REQUIREMENTS PC/Mac with a free USB port Windows® 8 / Windows® 7 / Windows Vista® / Windows® XP (32-bit) / Mac OS X (10.6-10.7) -
Page 4: Technical Specifications
3. TECHNICAL SPECIFICATIONS Full mechanical keys with 50g actuation force 20 fully programmable keys Programmable 8-way directional thumb pad Adjustable hand , thumb, and palm-rests modules for maximum comfort Instantaneous switching between 8 keymaps Unlimited macro lengths ... -
Page 5: Device Layout
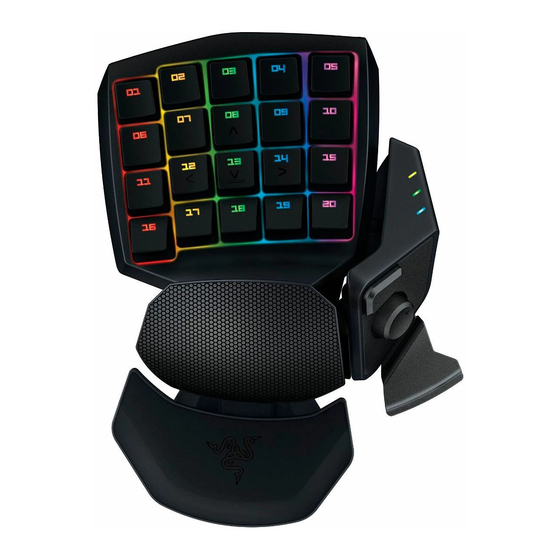
4. DEVICE LAYOUT A. 20 Fully Programmable Mechanical Backlit Keys B. Swiveling Palm Rest C. Adjustable Soft-Touch Wrist Pad D. Adjustable Thumb Module E. Hyperesponse Thumb Key F. Keymap Indicator G. Programmable 8-Way Directional Thumb Pad H. Spacebar Actuator 5 | razer... -
Page 6: Using Your Razer Orbweaver
5. USING YOUR RAZER ORBWEAVER ADJUSTING THE THUMB MODULE Press and hold the button to unlock the thumb module. Slide the thumb module diagonally to adjust. 6 | For gamers. by gamers™... - Page 7 Release the button to lock the thumb module into position. ADJUSTING THE OVERALL LENGTH 1. Press and hold the lever to unlock the bottom half of the Razer Orbweaver. 7 | razer...
- Page 8 2. Slide the bottom half of the Razer Orbweaver vertically to adjust. 3. Release the lever to lock the bottom half into position. 8 | For gamers. by gamers™...
- Page 9 ADJUSTING THE PALM REST Free-Play Mode Pull the locking pin to allow the palm rest to swing. Locked Mode Push the locking pin to secure the palm rest to its current position. 9 | razer...
-
Page 10: Installing Your Razer Orbweaver
6. INSTALLING YOUR RAZER ORBWEAVER Note: You may skip Steps 2-4 if you already have a Razer Synapse 2.0 installed and an existing account. Step 1: Plug the Razer Orbweaver into the USB port of your computer. Step 2: Download the Razer Synapse 2.0 installer from www.razersupport.com. -
Page 11: Configuring Your Razer Orbweaver
7. CONFIGURING YOUR RAZER ORBWEAVER Disclaimer: The features listed here require you to log in to Razer Synapse 2.0. These features are also subject to change based on the current software version and your Operating System. KEYPAD TAB The Keypad Tab is your default tab when you first install Razer Synapse 2.0. This tab allows you to customize your device’s profiles, key assignments and lighting. - Page 12 PROFILE A Profile is a convenient way of saving all of the changes you have made on your device. A single Profile can store numerous settings such as key assignments. Profile contains the default settings of your device. Any changes made within the Customize Tab will be automatically saved.
- Page 13 The changes made in this tab are automatically saved to your current profile. Top View The Top View is where you can customize the 20 fully programmable keys. 13 | razer...
- Page 14 Side View The Side View is where you can customize the Thumb Key, the Directional Thumb Pad and the Spacebar Actuator. 14 | For gamers. by gamers™...
-
Page 15: Key Assignment Menu
KEYBOARD FUNCTION from the Key Assignment Menu and enter the key you wish to use on the given field below. You may also include modifier keys such as Ctrl, Shift, Alt or any of those combinations. 15 | razer... - Page 16 Inter-device from the Key Assignment Menu, a sub-menu will appear. DEVICE TO LINK allows you to choose which currently connected Razer device can be linked while FUNCTION allows you to choose which functionality you want to use for the linked device.
- Page 17 Key Assignment Menu and an ASSIGN BUTTON submenu will appear. Disable This option renders the assigned key unusable. Use Disable if you do not want to use the key or if it interferes with your gaming. 17 | razer...
- Page 18 LIGHTING TAB The Lighting Tab allows you to adjust the backlight by using the BRIGHTNESS slider or by using the PULSATE option. This tab also allows you to turn off the backlighting whenever your screen enters sleep mode. 18 | For gamers. by gamers™...
- Page 19 To create a macro command, simply click the button and all your keystrokes and button presses will automatically register on the macro screen. When you are done recording your macro commands, click on the button to end the session. 19 | razer...
- Page 20 The Macro section allows you to input the delay in-between commands. In RECORD DELAY the delay in-between commands are registered as how it is entered. The DEFAULT DELAY uses a predefined time (expressed in seconds) as the delay. And NO DELAY omits all the pauses in-between keystrokes and button presses.
- Page 21 The buttons gives you the option to move the command up or down. button allows you to put in additional keystrokes, button presses or time delays either before or after the selected command. 21 | razer...
- Page 22 Once you have pressed the button, a new display window will appear beside the list of macro commands. The dropdown menu on this window allows you to choose a keystroke or a delay to be added in before or after the highlighted macro command.
- Page 23 You may add in a new set of macro commands by clicking the button on the keystroke menu; or input time delays on the duration field using the delay menu. 23 | razer...
- Page 24 ADD ON TAB The Add On Tab expands your device’s usability by adding game-specific settings such as a custom interface. To start using Razer Add Ons you must first enable the USE RAZER ORBWEAVER ADD ON option. 24 | For gamers. by gamers™...
- Page 25 Next, search for the game program or game application using the button. Finally, select your user account for the game by choosing it on the dropdown menu beside Sync Account. The Account Information screen will show you all the relevant information regarding your user account. 25 | razer...
-
Page 26: Safety And Maintenance
8. SAFETY AND MAINTENANCE SAFETY GUIDELINES In order to achieve maximum safety while using your Razer Orbweaver, we suggest that you adopt the following guidelines: 1. Should you have trouble operating the device properly and troubleshooting does not work, unplug the device and contact the Razer hotline or go to www.razersupport.com for support. - Page 27 MAINTENANCE AND USE The Razer Orbweaver requires minimum maintenance to keep it in optimum condition. Once a month we recommend you unplug the device from the computer and clean it using a soft cloth or cotton swab with a bit of warm water to prevent dirt buildup. Do not use soap or harsh cleaning agents.
-
Page 28: Legalese
LIMITATION OF LIABILITY Razer shall in no event be liable for any lost profits, loss of information or data, special, incidental, indirect, punitive or consequential or incidental damages, arising in any way out of distribution of, sale of, resale of, use of, or inability to use the Product. In no event shall Razer’s liability exceed the retail purchase price of the Product. - Page 29 COSTS OF PROCUREMENT For the avoidance of doubt, in no event will Razer be liable for any costs of procurement unless it has been advised of the possibility of such damages, and in no case shall Razer be liable for any costs of procurement liability exceeding the retail purchase price of the Product.
Need help?
Do you have a question about the Orbweaver and is the answer not in the manual?
Questions and answers