Table of Contents
Advertisement
Available languages
Available languages
Advertisement
Chapters
Table of Contents

Related Manuals for Samsung DV365ETBGWR/A3-0001


Summary of Contents for Samsung DV365ETBGWR/A3-0001
- Page 1 100% Recycled Paper the possibilities Thank you i_or purchasing this Samsung product. To receive more complete service or acceeeorj pans, please register your product at or contact www.samsung.com/register 1-B00-SAMSUNG (726-7864 DV365-03064C EN.indd 2012-06-07 Z-7:54:08...
- Page 2 Fuzzy Logic Control measure the degree of dampness automatically set the drying time. Precision drying has never been easier than with Samsung. 3. Time Saving Our cycles are designed with you in mind. All our dryers are designed to dry your clothes in less time.., just 42 minutes!
- Page 3 Congratulations on your new Samsung Dryer. This manual contains valuable information on the installation, use, and care of your appliance. Please take the time to read this manual to take full advantage of your dryer's many benefits and features.
- Page 4 n trLA tion WARNING: To reduce the risk of fire, electric shock, or injury to persons when using your ..appliance, follow basic precautions, including the following: 1. Read all instructions before using this appliance. Do not dry articles that have been previously cleaned in, washed in, soaked...
- Page 5 WHAT TO DO IF YOU SMELL GAS: • Do not try to light any appliance. • Do not turn on the appliance. • Do not touch any electrical switch. • Do not use any phone in your building. • Clear the room, building or area of all occupants.
- Page 6 Do not sit on top of the dryer. Because of continuing product improvements, Samsung reserves the right to change specifications without notice. For complete details, see the Installation Instructions packed with your product...
-
Page 7: Table Of Contents
content, iNSTALLiNG YOUR DRYER Unpacking your dryer The Dryer's Exterior Key installation requirements Tools needed for installation Replacement parts and accessories Ducting requirements Important to installer Location considerations Alcove or closet installation Mobile home installation Exhausting Gas requirements Electrical requirements Grounding Electrical connections... -
Page 8: Installing Your Dryer
UNPACKING YOUR DRYER Unpack your Dryer and inspect it for shipping damage. If your Dryer was damaged during shipping, contact 1-800-SAMSUNG (726-7864).To prevent personal injury or strain, wear protective gloves whenever lifting or carrying the dryer. Packing materials can be dangerous to children. -
Page 9: Tools Needed For Installation
PARTS AND ACCESSORIES If your dryer requires replacement parts or accessories, contact the dealer from whom you purchased your dryer or the SAMSUNG customer care center at 1 800 SAMSUNG (726 7864). installing your dryer 9 DV365-03064C EN.indd Secll:9 2012-06-07 z-7:54:46... -
Page 10: Ducting Requirements
DUCTING REQUIREMENTS Use a 4-inch (10.2 cm) diameter rigid aluminum or rigid galvanized steel duct. Do not use a smaller duct. Ducts larger than 4 inches (10.2 cm) in diameter can cause increased lint accumulation. Lint accumulation should be cleaned regularly. - Page 11 If the new Dryer is being installed into an existing exhaust system, you must make sure: The exhaust system meets all local, state, and national codes. That a flexible plastic duct is not used. To Inspect and clean all lint buildup from inside the existing duct. The duct is not kinked or crushed.
-
Page 12: Important To Installer
IMPORTANT TO INSTALLER Please read the following instructions carefully before installing the dryer. These instructions should be kept for future reference. REMOVE THE DOOR FROM ALL DISCARDED APPLIANCES TO AVOID THE DANGER OF A CHILD SUFFOCATING..LOCATION CONSI DERATIONS Locate the Dryer where there is enough space at the front for loading and enough space behind for the exhaust system. -
Page 13: Mobile Home Installation
Locate the dryer in an area that has adequate fresh air. A minimum of 72 in2 (465 cm 2) of unobstructed space is required. Call 1-800-SAMSUNG (726-7864) for information about purchasing the Floor Anchoring Kit as an accessory. -
Page 14: Gas Requirements
GAS REQUIREMENTS Use only natural or LP (liquid propane) gases. THE INSTALLATION MUST CONFORM WITH LOCAL CODES, OR IN THE ABSENCE OF LOCAL CODES, WITH THE NATIONAL FUEL GAS CODE ANSI/Z223.1, LATEST REVISION (FOR THE UNITED STATES), OR WITH THE CAN/CGA-B149 INSTALLATION CODES (FOR CANADA). -
Page 15: Electrical Requirements
ELECTRICAL REQUIREMENTS A Wiring diagram is located on the back of the dryer. Improper connection of the equipment grounding conductor can result in a risk of electric shock..Check with a qualified electrician or serviceman if you are in doubt as to whether your Dryer is properly grounded. -
Page 16: Electrical Connections
ELECTRICAL CONNECTIONS Before operating or testing, follow all grounding instructions in the Grounding section. An individual branch (or separate) circuit serving only your Dryer is recommended. DO NOT USE AN EXTENSION CORD. Gas models- U.S. and Canada A 120 volt, 60 Hz AC approved electrical service, with a 15-amp fuse or circuit... - Page 17 InstNlation - GenerN procedure For proper installation, we recommend that you hire a qualified installer. Read these instructions completely before you begin the installation. To install the dryer, follow these steps: 1. Move your dryer to an appropriate location for installation. Consider installing the dryer and washer side- by-side...
- Page 18 Review the Electrical Requirements section, then follow the 3 Wire Three Wire System system connection instructions (Step 7) or 4 Wire system instructions (Step 8) below. Three Wire system instructions: Loosen or remove the center terminal block screw. Connect the neutral wire (white or center wire) of the power cord to the center, silver-colored terminal screw of the terminal...
-
Page 19: Final Installation Checklist
U.S. MODELS: IMPORTANT - All U.S. models are designed for a 3-WIRE SYSTEM CONNECTION. The dryer frame is grounded to the neutral conductor at the terminal block. A 4-WIRE SYSTEM CONNECTION is required for new or remodeled construction, mobile homes, or if local codes do not permit grounding through neutral. -
Page 20: Dryer Exhaust Tips
DRYER EXHAUST TiPS Plastic or non-metal flexible duct presents a potential fire hazard. WARNING Make sure your dryer is installed properly so it exhausts easily. Use a 4" diameter rigid metal duct. Tape all joints, including at the dryer. Never use lint-trapping screws. -
Page 21: Door Reversal
DOOR REVERSAL Reinsert the black screw Unplug the power cord, in the other hole. Remove two door hinge i ii',, ..screws. Lift the door and remove Remove a screw on the Reinsert the screw (Step Frame Front, 4) on the Frame Front. Remove the two screws t0. -
Page 22: Operating Instructions, Tips
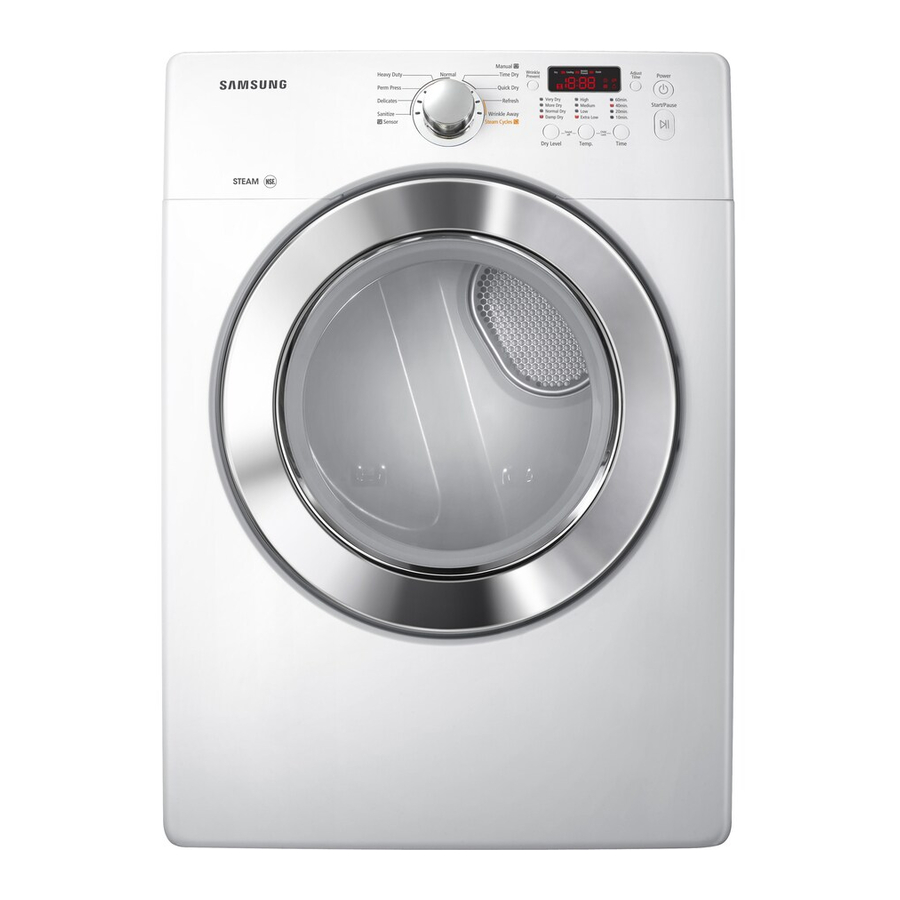
OVERVIEW OF THE CONTROL PANEL Manual_ '-Wri_ikle---F HeavyDuty Normal / Time Prevent Sanitize [C--) Wrinkle Away DNra°,TIDrC;Y [] Sensor Steam Cycles [ ] Temp. Time Dry Level @® @ ®® iiiiiiiiiiiiiiiiiiiiiiiiiiiiiiiiiiiiiiiiiiiiiiiiiiiiiiiiiiiiiiiiiiiiiiiiiiiiiiiiiiiiiiiiiiiiiiiiiiiiiiiiiiiiiiiiiiiiii To select a cycle, rotate the Cycle Sebctor dial to the desired cycb. The indbator light by the cycb name will illuminate. - Page 23 Wrinkle Prevent provides approximately 180 minutes of intermittent tumbling in unheated air at the end of the cycle to reduce wrinkling. Press the Wrinkle Prevent button to activate this feature. The indicator light above the pad will illuminate when you select Wrinkle Prevent. Tile load is dry and you can remove it at any time during the Wrinkle Prevent cycle.
-
Page 24: Child Lock
op r t n tnA tion CHILD LOCK Child Lock prevents children from playing with your dryer. Turning On and Off To turn Child Lock on or off, press the Temp. and Time buttons simultaneously for 3 seconds. Child Lock Details: You can set Child Lock while your dryer is running. -
Page 25: Drying Rack (Optional Part)
DRYING RACK (OPTIONAL PART) Installing and using the drying rack 1. Open the Dryer door. Position the drying rack in the tumbler, placing the front lip of the drying rack on top of the lint filter. Place the rear legs in the two recessed areas of the dryer's back wall, and then push down the middle of the drying rack to fix. -
Page 26: Clean The Lint Filter
CLEAN THE LINT FILTER After each load. To shorten drying time. To operate more energy efficiently. without the lint filter in [_Do not operate your dryer place. LOAD THE DRYER PROPERLY Place only one washload in your dryer at a time. In mixed loads, heavy and lightweight fabrics will dry differently. -
Page 27: Care And Cleaning
CONTROL PANEL Clean with a soft, damp cloth. Do not use abrasive substances. Do not spray cleaners directly on the panel. The control panel finish may be damaged by some laundry pre-treatment soil and stain remover products. Apply such products away from your Dryer and wipe up any spills or overspray immediately. -
Page 28: Special Laundry Tips
SPECIAL LAUNDRY TIPS Please follow the care label or manufacturer's instructions for drying special items, if care label instructions are not available, use the following information as a guide. Bedspreads & Comforters Follow the care label instructions or dry using the Normal cycle with the temperature set to High. -
Page 29: Troubleshooting
CHECK THESE POINTERS IF YOUR DRYER... Doesn't run, Be sure the door is latched shut. Be sure the power cord is plugged into a live electrical outlet. Check your home's circuit breakers or fuses. Press the Start/Pause button again if the door is opened during the cycle, Doesn't heat, Check your home's circuit breakers... -
Page 30: Information Codes
If the problem continues call for service. Invalid power source Frequency Try restarting the cycle. If the problem continues call for service. For any codes not listed above, call 1-800-726-7864 (1-800-SAMSUNG) 30 troubleshooting DV365-03064C EN.indd Sec7:30 2012-06-07 3-7:54:49... -
Page 31: Appendix
appendx FABRIC CARE CHART The following symbols provide garment care direction. The Clothing care labels include symbols washing, bleaching, drying and ironing, or dry cleaning when necessary. The use of symbols ensures consistency among garment manufacturers of domestic and imported items. -
Page 32: Protecting The Environment
a.ppondx PROTECTING THE ENVIRONMENT This appliance is manufactured from recyclable materials. If you decide to dispose of this appliance, please observe local waste disposal regulations. Cut off the power cord so that the appliance cannot be connected to a power source. Remove the door so that animals and small children cannot get trapped... -
Page 33: Cycle Chart
CYCLE CHART (e : factory setting, _ : selectable) Heavy Fabrics such as jean, corduroys, Heavy Duty Normal dry heavy work clothes Shirts, Synthetic Fabrics, Knits, Wrinkle-free Sensor Dry Normal dry cottons, Permanent Underwear, Blouses, Lingerie Normal dry Very dry Sanitize Bedding, Curtains, Children clothing... - Page 34 All replaced parts and products become the property of SAMSUNG and must be returned to SAMSUNG. Replacement parts and products assume the remaining original warranty, or ninety (90) days, whichever longer. This limited warranty...
- Page 35 Nor shall recovery of any kind against samsung...
- Page 36 All replaced parts and products become the property of SAMSUNG and must be returned to SAMSUNG. Replacement parts and products assume the remaining original warranty, or ninety (90) days, whichever longer. This limited warranty covers manufacturing...
- Page 37 EXCEPTAS SET FORTH HEREIN,THERE ARE NO WARRANTIES ON THIS PRODUCT EITHER EXPRESS OR IMPLIED, AND SAMSUNG DISCLAIMS ALL WARRANTIES INCLUDING, BUT NOT LIMITED TO, ANY IMPLIED WARRANTIES OF MERCHANTABILITY, INFRINGEMENT OR FITNESS FOR A PARTICULAR PURPOSE. NO WARRANTY OR GUARANTEE GIVEN BY ANY PERSON, FIRM, OR CORPORATION WITH RESPECT TO THIS PRODUCT SHALL BE BINDING ON SAMSUNG.
- Page 38 DV365-03064C EN.indd Sec10:38 2012-06-07 7:54:50...
- Page 39 DV365-03064C EN.indd Sec10:39 2012-06-07 z-7:54:50...
- Page 40 Scan the QR code* or visit www.samsung.com/spsn to view our helpful How-to Videos and Live Shows *Requires reader to be installed on your sma_tphone bit.ly/samsu ngwashers QUESTIONS OR COMMENTS? U.S.A ]-800-SAMSUNG (726-7864) www.samaung,com MEXICO 01-800-SAMSUNG (726-7864) www.samsung,com/mx CANADA 1-800-SAMSUNG (726-7864) www.samsung.com/ca...
- Page 41 100% Recycled Paper de possibilites Nous ous rernerc_or s a aVOlr chols ce produit Samsung. Afin de b6n6ficier d'ur service plus comDle-[ ou de pieces acoessoires, veulllez enregls-Erer vo-[re uroduit a I'adresse SUlvante ou comaoter www.samsung.com/register 1-800-SAMSUNG (726-7864_ DV365-03064C CFR.indd...
- Page 42 Le s6chage jamais _t6 aussi simple qu'avec Samsung. 3. Gain de temps Nos programmes ont _t_ con_us pour r6pondre _ tous vos besoins. Tous nos s_che-linge sont con_us pour s6cher vos v&tements rapidement..,...
- Page 43 Felicitations pour I'achat de votre nouveau seche-linge Samsung. Ce manuel contient de precieuses informations sur I'installation, I'utilisation et I'entretien de votre appareil. Prenez le temps de le lire pour tirer pleinement profit de tousles avantages et de toutes les fonctionnalites de votre seche-linge.
- Page 44 c©n ian cLArt AVERTISSEMENT : afin de r6duire les risques d'incendie, d'61ectrocution ou de blessures AvE_E_physiques Iors de I'utilisation de I'appareil, des pr6cautions de base doivent @re prises : 1. Lisez toutes les consignes de s6curit6 avant d'utiliser I'appareil. Ne faites pas s6cher de linge ayant 6t6 en contact par nettoyage, lavage ou trempage avec de I'essence,...
- Page 45 QUE FAIRE EN CAS D'EMANATION DE GAZ • • Ne tentez pas d'Nlumer un appareil 61ectdque. Ne mettez pas I'appareil sous tension. Ne touchez & aucun interrupteur 6lectrique. N'utilisez aucun t616phone dans le b&timent. Faites 6vacuer tousles occupants de la pi6ce, du b&timent ou du secteur. Appelez imm6diatement votre fournisseur de gaz depuis le t616phone d'un voisin.
- Page 46 & la terre. Ne vous asseyez pas sur le s_che-linge. Dans le cadre de I'am_lioration constante de ses produits, Samsung se r6serve le droit de modifier les sp6cifications sans pr_avis. Pour plus de d_tails, consultez consignes...
- Page 47 iNSTALLATiON DU Sr:CHE-LiNGE D6baller le sgche-linge Ext6rieur du s_che-linge Conditions d'installation principales Outils requis pour I'installation Pi_ces de rechange et accessoires Conditions requises en mati@e de conduits Remarque importante pour I'installateur Choix de I'emplacement d'installation Encastrement dans une niche ou installation dans un placard Installation en mobile...
- Page 48 _t6 endommag6 pendant le transport. Si votre s_che-linge a 6t6 endommag6 pendant le transport, appelez le 1-800-SAMSUNG (726-7864). Afin de pr_venir tout risque de blessures, munissez-vous de gants de protection pour soulever ou porter le s_che-linge.
- Page 49 Cl_ anglaise PII_CES DE RECHANGE ET ACCESSOIRES Si vous avez besoin de pi_ces de rechange ou d'accessoires pour votre s_che-linge, contactez votre revendeur ou le centre d'assistance clientele au 1-800-SAMSUNG (726 7864). installation du secheqinge DV365-03064C CFR.indd Secll:9 2012-06-07 _-7:55:07...
- Page 50 G h -ing CONDITIONS REQUISES EN MATII_RE DE CONDUITS " Utilisez un conduit en aluminium ou en acier galvanis6 rigide d'un diam_tre de 4 pouces (10,2 cm). N'utilisez pas de conduit plus petit. Les conduits dent le diam_tre est sup6rbur _ 4 pouces (10,2 cm) peuvent provoquer une trop grande accumulation de peluches.
- Page 51 Si un nouveau s_che-linge est reli6 & un syst_me d'6vacuation existant, vous devez veiller & ce que : Le syst_me d'6vacuation soit conforme aux r_glementations locales, r_gionales et nationales. Aucun conduit flexible en plastique ne soit utilis& Le conduit existant soit contr616 et les peluches accumul_es A I'int6rieur retirees.
- Page 52 incj REMARQUE IMPORTANTE POUR L'INSTALLATEUR Lisez attentivement les instructions suivantes avant d'installer le s_che-Iinge. Oonservez soigneusement consignes afin de pouvoir vous y reporter ult6rieurement. RETIREZ LE HUBLOT DES APPAREILS MIS AU REBUT POUR EVITER QU'UN ENFANT NE S'ASPH_I CHOIX DE L'EMPLACEMENT D'INSTALLATION Le s_che-linge doit _tre install6 dans un endroit suffisamment...
- Page 53 Installez-le dans un endroit correctement a6r6. Un espace d_gag6 minimum de 72 pc 2 (465 cm 2) est requis. Appelez le 1-800-SAMSUNG (726-7864) si vous souhaitez faire I'acquisition du kit de fixation au sol. Toutes les installations en mobile home doivent...
- Page 54 SYST#MES FONCTIONNANT AU GAZ Utilisez uniquement du gaz naturel ou du propane liquide (PL). [_'INSTALLATION DOlT ETRE CONFORME AUX RI_GLEMENTATIONS LOCALES EN VlGUEUR EN L'ABSENCE DE DISPOSITIONS SPI6CIFIQUES,/_ LA RI_GLEMENTATION NATIONALE SUR LE GAZ COMBUSTIBLE ANSI/Z223.1 (NATIONAL FUEL GAS CODE), DERNIERE Re:VISION (POUR LES...
- Page 55 NORMES ELECTRIQUES sch6ma de cfiblage est situ_ _ I'arri_re du s_che-linge. Un branchement incorrect du conducteur de mise A la terre peut repr6senter un risque de surtension 61ectrique. _ER_SSa_Em Demandez conseil A un 61ectricien ou un r_parateur agr66 si vous avez des doutes quant A la mise la terre correcte de I'appareil.
- Page 56 RACCORDEMENT I=LECTRIQUE Avant toute mise en marche ou test, observez les consignes de mise A la terre pr_sent6es dans la section Mise & la terre. Nous vous recommandons de relier votre s_che-linge & une d_rivation individuelle ou & un circuit distinct. N'UTILISEZ PAS DE RALLONGE AVEC CET APPAREIL...
- Page 57 Installation : proc6dure g6n6rale Pour une installation optimale, nous vous recommandons de faire appel _ un installateur qualifi_. Lisez int_gralement les consignes avant de commencer I'installation. Pour installer le s_che-linge, suivez les _tapes ci-dessous 1. Installez votre s_che-linge _. I'emplacement appropri_.
- Page 58 Consultez la section Normes _lectriques, puis suivez les consignes Syst6me _.trois ills les branchements A 3 fils (Etape 7) ou A 4 fils (Etape 8) ci-dessous. Consignes sur les branchements A trois fils : Desserrez ou retirez la vis centrale du bornier. Reliez le fil neutre (blanc ou central) du cordon d'alimentation A la...
- Page 59 MODELES POUR LES ¢:TATS-UNIS : IMPORTANT : tousles mod&les destinTs aux I£tat-Unis sont congus pour un BRANCHEMENT 3 FILS. Le chfissis du s&che-linge est reli6 a la terre par un conducteur neutre au niveau du bornier. Un BRANOHEMENT _, 4 FILS est requis dans les cas suivants : nouvelles constructions, habitations...
- Page 60 CONSEILS POUR L'¢YACUATION DU Sl_CHE-LINGE Les conduits en plastique ou non m6talliques repr6sentent un danger potentiel d'incendie Assurez-vous que le s_che-Iinge a _t_ install_ de mani_re ce que 1'6vacuation de I'air se [asse sans probl6me. Utilisez un conduit d'6vacuation m_tallique rigide de 4".
- Page 61 INVERSION DU HUBLOT D6branchez le cordon R6-engagez la vis noire d'alimentation, dans I'autre trou. 2o Retirez les deux vis de la charni6re du hublot, 3. Soulevez le hublot et retirez-le du s6che-linge. Retirez une vis de I'avant R6-engagez la vis du cadre.
- Page 62 PRE_SENTATIONDU PANNEAU DE COMMANDES "; High Medium Extra Low Temp, Time ® ®® ®® iiiiiiiiiiiiiiiiiiiiiiiiiiiiiiiiiiiiiiiiiiiiiiiiiiiiiiiiiiiiiiiiiiiiiiiiiiiiiiiiiiiiiiiiiiiiiiiiiiiiiiiiiiiiiiiiii_ Pour choisir un cycle, positionnez le sebcteur sur b progranlnle de votre choix. Le temoin lumineux s'allume en regard du programme. LeDprogrammeD Normal, Grand rendement, Repassage facile et Delicat sont des cycles avec sechage par capteur. La fonction Sensor Dry (S@hage par capteur) calcule automatiquement le taux d'humidite du linge et arr6te le seche-linge une fob b degre souhaite de sechage (S@hage fort a Leg6rement ........................
- Page 63 (Temp@ature)pour selectionner la temperature appropriee de la charge de linge. Un voyant s'allume a c6te de la temperature souhaitee. Appuyez plusieurs fois sur le bouton pour faire ddiler les differents parametres. High (!elev6e) : pour le linge en coton resistant ou portant I'etiquette Sechage en machine autorise.
- Page 64 CHILD LOCK (SE_CURITE ENFANT) Cette fonction emp_che les enfants de jouer avec le s_che-linge. Activation/D6sactivation Pour activer ou d6sactiver la s6curit6 enfant, appuyez simultan_ment sur les boutons Temp. (Temp6rature) et Time (Temps) pendant 3 secondes. Informations sur la s6curit6 enfant " Vous pouvez activer cette fonction alors que le s_che-linge...
- Page 65 GRILLE DE SE_CHAGE (PIF'CE EN OPTION) Installation et utilisation de la grille de s6chage 1. Ouvrez le hublot du s_che-linge. Placez la grille de s6chage dans le tambour, en positionnant son bord avant sur le dessus du filtre _, peluches. Ins6rez les deux pieds arri@e dans les orifices situ6s sur la paroi arri@e du s_che-linge, puis appuyez...
- Page 66 NETTOYAGE DU FILTRE/_ PELUCHES Apr_s chaque s6chage. Pour r@duire la dur@e de s6chage. Pour un meilleur rendement @nerg6tique. ne faites pas fonctionner le s@che-linge si le filtre & peluches n'est pas remis en place. CHARGEMENT DU SECHE-LINGE N'introduisez qu'une seule charge de linge lav@A la fois dans votre s@che-linge. Un m61ange de textiles @pais et 16gers s6chera diff6remment ;...
- Page 67 PANNEAU DE COMMANDES nettoyez-le avec un chiffon doux et humide. N'utilisez pas de produits abrasifs. Ne vaporisez aucun produit d'entretien directement sur le panneau de commande. Certains d6tachants pour tissu peuvent endommager le rev_tement du panneau de commandes. Appliquez ces produits A 1'6cart de votre s_che-linge et essuyez imm6diatement toute 6claboussure...
- Page 68 CONSEILS D'ENTRETIEN DU LINGE Respectez les symboles textiles ou les consignes du fabricant concemant le sechage des articles speciaux. Si aucun symbole textile n'est fourni, observez les consignes suivantes. Couvre-lits et couettes Observez les symboles de I'_tiquette ou s61ectionnez le programme de s6chage Normal et la temp6rature High (Elev6e)
- Page 69 dSAsnn g VE_RIFIEZ LES POINTS SUWANTS SI VOTRE S_:CHE-LINGE... Ne se met pas en route. Assurez-vous que la porte est bien fermee. Verifiez que le cordon d'alimentation est branche sur une prise 61ectdque operationnelle. Verifiez le disjoncteur et les fusiUes de votre domicile. Appuyez de nouveau sur le bouton Start!Pause (DeparVPause) en cas d'ouverture du hublot en cours de programme.
- Page 70 Si le probleme persiste, appelez le service de depannage. Frequencede source d'alimentation non Essayezde relancer le cycle. valide Si le probleme persiste, appelez le service de depannage. Pour tout autre code non r6pertori@ ici, appelez le 1-800-726-7884 (1-800-SAMSUNG) d@pannage DV365-03064C CFR.indd Sec7:30 2012-06-07 C-7:55:10...
- Page 71 AHHSX@ TABLEAU DES SYMBOLES TEXTILES Les symboles suivants fournissent des conseils d'entretien des v6tements. Les _tiquettes d'entretien v6tements incluent des symboles relatifs au lavage, au blanchiment, au s6chage, au repassage et au nettoyage b. sec, le cas _ch6ant. L'utilisation de ces symboles garantit la coh6rence des informations entre...
- Page 72 HHSXS PROTECTION DE L'ENViRONNEMENT Cet appareil a _t6 fabriqu_ & partir de mat6riaux recyclables. Si vous d_cidez de le jeter, veuillez respecter les normes locales en mati@e d'_vacuation des d_chets. Coupez le cordon d'alimentation de fa¢on Ace que I'appareil ne puisse pas _tre raccord6 &...
- Page 73 TABLEAU DES PROGRAMMES (o : r6glage usine, : s61ectionnable Normal Coton, v6tements de travail, lin, charges mb<tes S6chage normal Grand Pibces au tissu 6pals, tels que les jeans, les S6chage normal rendement velours c6tel6s ou les vStements de travail S_chage Repassage Chemises, 8ssus syr/th6tiques, lainages, tissus S6chage normal...
- Page 74 Ce produit de la marque SAMSUNG, fourni, distribu6 par SAMSUNG ELECTRONICS AMERICA, INC. (SAMSUNG) et livr6 neuf, dans son emballage d'origine _. I'acheteur initial, est garanti par SAMSUNG contre tout d6faut de fabrication relatif aux mat6riaux et _. la qudit6 d'ex6cution,...
- Page 75 Samsung a 6t6 avis6 de 1'6ventuNit6 de tels dommages. l...esindemnit6s financi6res exigees aupres de Samsung ne pourront en aucun cas exc6der le pdx d'achat du produit vendu par Samsung et _. I'origine des dommages invoques.
- Page 76 Ce produit de la marque SAMSUNG, fourni, distribu6 par SAMSUNG ELECTRONICS CANADA, INC. (SAMSUNG) et livr6 neuf, dans son emballage d'origine _. I'acheteur initial, est garanti par SAMSUNG contre les d6fauts de fabrication et de mat6riaux, pour une p6riode limit6e de :...
- Page 77 SAUF EXCEPTION MENTIONNEE DANS LE PRESENT DOCUMENT, SAMSUNG NE FOURNIT AUCUNE GARANTIE EXPRESSE OU IMPLICITE QUANT _, CET APPAREÁL,Y COMPRIS, MAIS SANS S'Y LIMITER, LES GARANTIES IMPLICITES DE QUALITI£ MARCHANDE, DE CONTREFAOON OU D'APTITUDE _, UN USAGE PARTICULIER.
- Page 78 DV365-03064C CFR.indd Sec10:38 2012-06-07 7:55:11...
- Page 79 DV365-03064C CFR.indd Sec10:39 2012-06-07 7:55:11...
- Page 80 DES QUESTIONS OU DES COMMENTAIRES ? U.S.A 1-800-SAMSUNG (726-7864) www.samsung,com MEXICO 01-800-SAMSUNG (726-7864) www.samsung,com/mx www.samsung.com/ca CANADA 1-800-SAMSUNG (726-7864) www.samsung,com/ca fr (French) N ° de code : D068-03064C DV365-03064C CFR.indd Secl0:40 2012-06-07 7:55:11...
- Page 81 100% Recycled las posibilidades Gracias nor adauirir este producto Samsung. Para recibir un set _cJomas completo o lOS accesonos, regls_re SU producto en o contac_e con www.samsung.comiregister 1-800-SAMSUNG(726-7864) DV365-03064C MES.indd 2012-06-07 7:53:26...
- Page 82 La precisi6n en el secado nunca fue m&s sencilla que con Samsung. 3. Ahorro de tiempo Los ciclos estfin dise5ados pensando en usted. Todas nuestras secadoras estfin diseSadas para secar su ropa en menos tiempo..,...
- Page 83 Felicitaciones por la compra de la nueva secadora Samsung. Este manual contiene informaciOn importante acerca de la instalaciOn, el uso y el cuidado del electrodomestico. Lea detenidamente estas instrucciones a fin de aprovechar al maximo los m01tiples beneficios y funciones de la secadora.
- Page 84 ADVERTENCIA: Para reducir el riesgo de incendio, descargas el6ctricas o lesiones fisicas AD_o_cuando usa este electrodom6stico, siga las instrucciones de seguridad b_sicas que figuran a continuaci6n: 1. Lea todas las instrucciones antes de usar este electrodom6stico. No seque prendas que han sido previamente limpiadas, lavadas, remojadas salpicadas...
- Page 85 QUE_ HACER SI PERCIBE OLOR A GAS: • No intente encender ningOn ebctrodomestico. • No encienda este electrodomestico. • No toque ning0n interruptor electrico. • No utilice ning0n telefono de su edificio. • Haga que todos los ocupantes se retiren de la habitaci6n, edificio o Area. •...
- Page 86 No se siente encima de la secadora. Debido alas constantes mejoras a los productos, Samsung se reserva el derecho de modificar las especificaciones sin previo aviso. Para conocer detalles completos, consulte...
- Page 87 contendo INSTALACI6N DE LA SECADORA Desembalaje de la secadora Exterior de la secadora Requisitos de instalaci6n importantes Herramientas necesarias para la instalaci6n Reemplazo de las piezas y los accesorios Requisitos para el tendido de conductos Importante para el instalador Consideraciones acerca de la ubicaci6n Instalaci6n del electrodom6stico...
-
Page 88: De La Secadora
Si la secadora sufri6 da_os durante el transporte, comunfquese con el 1-800-SAMSUNG (726-7864). Para evitar lesiones fisicas o tirones, use guantes protectores cada vez que levante o transporte la secadora. -
Page 89: Herramientas
Si es preciso reemplazar piezas o accesorios de la secadora, comunfquese con el distribuidor al que le compr5 la secadora o con el centro de atencidn al cliente de SAMSUNG al 1-800-SAMSUNG (726-7864). instalacidn de la secadora DV365-03064C MES.indd Secll:9 2012-06-07 _-7:53:46... -
Page 90: Requisitos
REQUISITES PARA EL TENDiDO DE CONDUCTOS Utilice un cenducto de acere galvanizade @de e de aluminie @do, de 4 pulgadas (10,2 cm) de di_metre. No ufilice un cenducto de mener tamale. Los conductes de m_s de 4 pulgadas (10,2 cm) de di_metro pueden ecasbnar una mayor acumulacidn de pelusa. Pedddicamente, debe retirar la pelusa acumulada. - Page 91 Si la nueva secadora se estfi instalando dentro de un sistema de drenaje existente, debe asegurarse de que: el sistema de drenaje cumpla con todos los cddigos locales, estaduales y nacionales; no se utilice un conducto flexible de plAstico; se controle y limpie toda la pelusa acumulada del interior del conducto existente;...
-
Page 92: Importante
IMPORTANTE PARA EL INSTALADOR Lea las siguientes instrucciones con detenimiento antes de instalar la secadora. Estas instrucciones deben conservar para consultas futuras. RETIRE LA PUERTA DE TODOS LOS ELECTRODOMI_STICOS DESECHADOS PARA EVITAR EL AD_'_"_,_o_PELIGRO D E QUE UN NINO SE ASFIXIE. CONSIDERACIONES ACERCA DE LA UBICACION... -
Page 93: Instalaci6N
Se requiere un espacio mfnimo de 72 pulg 2 (468 cm 2) sin obstrucciones. Llame al 1-800-SAMSUNG (726-7884) para obtener m_s informaci6n acerca de la compra del kit de anclaje al piso como accesorio. -
Page 94: Requisitos
REQUISITOS EN CUANTO AL GAS Utilice Onicamente gas natural o gas LP (gas licuado de propano). LA INSTALAClON DEBE REALIZARSE EN CONFORMIDAD CON LOS CODIGOS LOCALES, O EN AUSENClA DE ELLOS, CON EL CODIGO NACIONAL PARA GAS Y COMBUSTIBLES ANSI/Z223.1, REVISION M,&S REClENTE (PARA LOS ESTADOS... -
Page 95: Requisitos
REQUISITOS ELE_CTRICOS la parte posterior de la secadora se encuentra un diagrama del cableado. La conexidn inadecuada del conductor de conexidn a tierra del equipo puede generar una descarga el6ctrica. ADVEmENC_ Consulte a un electricista o t6cnico calificado si le surgen dudas acerca de si la conexidn a tierra de su secadora es correcta. -
Page 96: Conexiones
CONEXIONES ELF'CTRICAS Antes de poner al electrodom6stico en funcionamiento o realizar pruebas, siga las instrucciones conexi6n a tierra de la secci6n Conexi6n a tierra. Se recomienda que se destine un circuito derivado individual (o separado) s61o para la secadora. UTILICE UN CABLE PROLONGADOR. - Page 97 Instalaci6n - procedimiento general Para realizar una instalaci6n adecuada, recomendamos contratar a un instalador calificado. Lea estas instrucciones en su totalidad antes de iniciar la instalaci6n. Para instalar la secadora, siga estos pasos: 1. Mueva la secadora al lugar adecuado para la instalaci6n.
- Page 98 Consulte la seccidn Requisitos El_ctricos, luego siga las instrucciones Sistema de tres cables para conexidn de sistemas de 3 cables (Paso 7) o las instrucciones para el sistema de 4 cables (Paso 8) a continuacidn. Instrucciones para el sistema de tres cables: Afloje o retire el tornillo central del bloque de terminales.
- Page 99 MODELOS ESTADOUNIDENSES: IMPOR fANTE - Todos los modelos estadounidenses est&.n diseF_ados para una CONEXION DE SISTEMAS DE 3 CABLES, El arm_6n de la secadora esta conectado a tierra al conductor neutro del bloque de terminales. Se requiere una CONEXION DE SISTEMAS DE 4 CABLES para las construcciones nuevas o remodeladas, Eascasas rodantes o si los c6digos...
- Page 100 SUGERENCIAS ACERCA DEL DRENAJE DE LA SECADORA /_Un eonducto flexible de plfistico o de un material que no sea el metal presenta un poteneial ..nesgo de ineendio. AsegOrese de que su secadora est6 instalada correctamente para que extraiga el aire fficilmente. Utilice un conducto de metal rfgido, de 4"...
- Page 101 INVERSK)N DE LA PUERTA Desconecte el cable de Vuelva a colocar alimentaci6n. tornillos negros en los otros orificios. Retire los dos tornillos la bisagra de la puerta, Levante la puerta y retfrela. Retire un tornillo del frente Vuelva a colocar el tornillo delantero.
-
Page 102: Sugerencias
manua in ruooion _kACIQF@NQI_ DESCRIPCION GENERAL DEL PANEL DE CONTROL Manual i m-l.JCID-I _4'/ _Time Power 910.OO HeavyDuty Time Dry '-Wrinkle--- I Adjust %j High 60rain. 40rain, Start/Pause Medium DeiicateW( x O_q/W_rinkRefres h ::VMery%% _i 20rain. Sanitize ) O) WrinkleAway DN;°m?'D;... - Page 103 La pantaJJadigital muestra eJ tbmpo restante deJcbJo caJcu[ado despu6s de presJonar e[ bot6n Start/Pause (Inbio/Pausa). E[ tiempo restante calculado puede fluctuar a medida que avance el cic[o. Se ilurnfflara la [uz de Drying (Seear)y se rnantendra i[uminada hasta que se haya cumplido e[ cic[o.
-
Page 104: Sin Sonido
manua in truooion IACIQF@NQI L_.) Presidnelo para detener y reiniciar los programas. Presidneio una vez para encender la secadora. Vuelva a presionarlo para apagarla. Si enciende su secadora y no toca ningLin botdn durante 10 minutos, se apagar& automfiticamente. CHILD LOCK (SEGURO PARA NINOS) La funci6n Child Lock (Seguro para niflos) evita que los niflos jueguen... - Page 105 ESTANTE DE SECADO (PIEZA OPCIONAL) Instalaci6n y uso del estante de secado 1. Abra la puerta de la secadora. 2. Coloque el estante de secado en el tambor, con el borde superior del estante de secado encima del filtro para pelusas. 3.
-
Page 106: Cargue
m _nu _ in ruooion IACIQF@NQI LiMPiE EL FiLTRO PARA PELUSAS Despu6s de eada earga. Para reducir el tiempo de seeado. Para hacer uso de la energfa con mayor eficacia. [_No haga funcionar la secadora sin el filtro para pelusas colocado. -
Page 107: Cuidado Y Limpieza
y impieT PANEL DE CONTROL Limpie con un paBo suave y h0medo. No utilice sustancias abrasivas. No rocfe el panel directamente con limpiadores en aerosol. El acabado del panel de control puede daBarse a causa de algunos productos removedores de suciedad manchas de tratamiento previo al lavado. - Page 108 p ndas sucjereno a_s @ B@o ia@c SUGERENCIAS PARA PRENDAS ESPECIALES Siga las instrucciones del fabricante o de la etiqueta de indicaciones para secar prendas especiales. Si no se dispone de etiquetas con indicaciones, use la siguiente informaciOn como guia. Cubrecamas y edredones Siga las instrucciones...
- Page 109 CONTROLE ESTAS INDICACIONES SI SU LAVADORA... No funciona. • AsegOrese de que la puerta este cerrada con traba. • AsegOrese de que el cable de alimentacidn este enchufado a un tomacorriente que funcione, • Controb los disyuntores o fusibles de su casa, •...
- Page 110 Frecuencia de fuente de aJimentaci6n Pruebe reiniciar el cicb. no v6.1ida Si el probiema contin0a, Name aJ servicio t6cnico. Para los c6digos que no figuran mils arriba, Ilame al 1-800-726-7864 (1-800-SAMSUNG). guia de soluci6n de problemas DV365-03064C MIZS.indd Sec7:30 2012-06-07...
- Page 111 ap ndice TABLA DE INDICACIONES SOBRE LA TELA Los siguientes sfmbolos ofrecen indicaciones acerca de las prendas. La etiqueta de indicaciones de la prenda incluye sfmbolos para lavado, blanqueado, secado y planchado, o limpieza a seco cuando necesaria. El uso de sfmbolos garantiza la consistencia entre los fabricantes...
- Page 112 aDders c ] PROTECCION DEL MEDIO AMBIENTE Este electrodom6stico se fabrica con materiales reciclables. Si decide desechar este electrodom6stico, siga la normativa local relacienada con la eliminaci6n de desechos. Corte el cable de alimentaci6n para que el electrodom_stico no pueda conectarse a una fuente de alimentaci6n.
- Page 113 TABLA DE CICLOS (o : configurado en f_brica, _ : seleccionable) Normal Ngoddn, rope de trabajo, rope de cama, Secado normal carga mezclada Tabs resistentes, tabs como jeans, corderoy Secado normal y rope de trabajo pesado Camisas, tabs sint6ticas, tejidos, prendas Seaado corl Secado normal Plancha permanente...
- Page 114 SECADORA SAMSUNG GARANT[A LIMITADA PARA EL COMPRADOR ORIGINAL El presente producto de la mama SAMSUNG, tal como Io provee y distribuye SAMSUNG ELECTRONICS AMERICA, INC. (SAMSUNG) y Io entrega nuevo, en su embalaje de cart6n original al comprador consumidor original, estfi garantizado...
- Page 115 NingOn resarcimiento de ninguna [ndole contra samsung superar_ el precio de compra del producto vendido por samsung y causante del presunto da_o.
- Page 116 SECADORA SAMSUNG GARANT[A L[M[TADA PARA EL COMPRADOR ORIGINAL El presente producto de la mama SAMSUNG, tal como Io provee y distribuye SAMSUNG ELECTRONICS CANADA, INC. (SAMSUNG) y Io entrega nuevo, en su embalaje de cart6n original al comprador consumidor original, estA garantizado...
- Page 117 SALVO LO ESTABLEOIDO EN LA PRESENTE GARANT[A, NO EXISTEN GARANT[AS SOBRE EL PRESENTE PRODUOTO, YA SEAN EXPRESAS O TAOITAS, Y SAMSUNG DESCONOOE TODAS GARANTiAS QUE INCLUYEN, AUNQUE NO EN OARAOTER TAXATIVO, CUALQUIER GARANT[A T_,OITA DE QUE EL PRODUOTO SE ENOUENTRA...
- Page 118 DV365-03064C MIZS.indd Sec10:38 2012-06-07 Z-7:53:50...
- Page 119 DV365-03064C MES.indd Sec10:39 2012-06-07 -- 7:53:50...
- Page 120 DC98-01452C _TIENEPREGUNTAS O COMENTARIOS? U.S.A 1-800-SAMSUNG (726-7864) www.samsung,com MEXICO 01-800-SAMSUNG (726-7864) www.samsung,com/mx www.samsung.com/ca CANADA 1-800-SAMSUNG (726-7864) www.samsung.com/ca fr (franc6s) N.° de c6digo: D068-03064C DV365-03064C MES.indd Secl0:40 2012-06-07 7:53:50...