Panasonic Omnivision PV-M1378W Operating Instructions Manual
Hide thumbs
Also See for Omnivision PV-M1378W:
- Operating manual (32 pages) ,
- Service manual (130 pages)
Advertisement
Quick Links
Download this manual
See also:
Operating Manual
Thank
you for choosing
panasonic
OmnlvBion_
ed
8 1998
Combination
VCR
MODEL
PV-M1378W
Operating
Instructions
Pleaseread theseinstructions carefullybeforeattempting to connect,
operateor adjustthis product.Please save this manual.
SpanishQuick Use Guide is included.
Gufa para rdpidaconsultaen espaSolestdincludo.
VQTS3436
(A)
Advertisement

Related Manuals for Panasonic Omnivision PV-M1378W


Summary of Contents for Panasonic Omnivision PV-M1378W
- Page 1 Thank you for choosing panasonic OmnlvBion_ 8 1998 Combination MODEL PV-M1378W Operating Instructions Pleaseread theseinstructions carefullybeforeattempting to connect, operateor adjustthis product.Please save this manual. SpanishQuick Use Guide is included. Gufa para rdpidaconsultaen espaSolestdincludo. VQTS3436...
- Page 2 Things -You Should Know Congratulations Date of Purchase Dealer Purchased From on your purchase of one of the most sophisticated and reliable products Dealer Address on the market today. Used properly, it will bring you and your family Dealer Phone No. years of enjoyment.
- Page 3 Important Safeguards and Precautions OUTDOOR ANTENNA INSTALLATION FOR YOUR SAFETY, READ AND RETAIN SAFETY AND OPERATING INSTRUCTIONS. SAFE ANTENNA AND CABLE CONNECTION If an outside antenna or cable [ HEED ALL WARNINGS IN THE MANUAL l ON THE UNIT equipment, be sure the system is connected to the antenna or cable system is grounded so as to provide...
- Page 4 Unpacking YourCombination V CRoProduct Features Load the batteries Unpacking Your Combination Pressin and up on the latch with yourthumbnailand liftoffthe lid. The accessories shown below are provided to help you use or set up your Combination VCR. Installtwo batteries as indicated insidethe BatteryCompartment.
- Page 5 Antenna,,or Cable Connections (Flat)Twin Lead 300 Ohm Cable UHFNHF Band Unhook the antenna from your previous TV 7 _5Ohm Mixer (not supplied) or VCR and connect it to the back of the (Round) Combination VCR as shown in the diagram. If your antenna system has separate UHF and VHF lead-ins, you need a UHFNHF •...
- Page 6 Location of Controls -B(_.]i|[t]_'_ [iK_,i iii'_ I i'_Ti|(o] il,:l RAPID TUNE POWER See page 11. See pages 8, 11. VOLUME UP/DOWN MUTE SET/BACKSPACE See pages 11, 14. See pages 8-14, 17-24. CHANNEL UP/DOWN PROGRAM SELECT UP/DOWN See pages 18, 19. See pages 8-15, 17-24.
- Page 7 CHANNEL UP/DOWN Cassette Compartment TRACKING UP/DOWN See pages 16, 17. See pages 8, 11, 16, 17. Built-In Speaker See pages 8, 11. Remote Sensor POWER See pages 8, 11. Phones Jack See page 11. Audio/Video In See page 19. STOP/EJECT REWIND/ PLAY/REPEAT FAST FORWARD/...
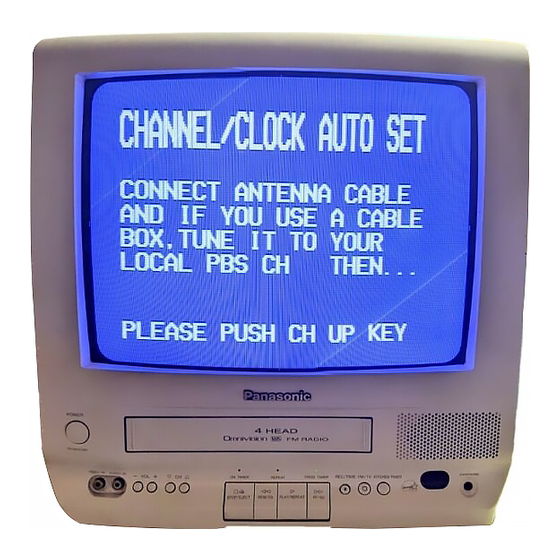
- Page 8 "One Time Setup When the Combination VCR is turned on for To Set Language, Channels and Clock the first time, it automatically enters the setupmode.Setupincludesthe following: • Choosethe languagefor on-screenmenus 1 Press POWER to turn the Combination VCR on. and messages. •...
- Page 9 (_lf AUTO CLOCK SET IS INCOMPLETE appears, please set the clock manually. a. Press ACTION to display the SET CLOCK screen. /I \ DST:ON b. Press &v to select and _ to ...... mmmmm-m enter the month, date, year, time and DST.
- Page 10 On-Screen Displays (OSD) Warning and Instruction Displays Channel & Function Display These displays will alertyouof a missedoperationor Whenever the channel is providefurtherinstructions. changed, the channel number will appear for a few If no active channels are NO CH FOUND seconds on-screen. found for CHANNEL PLEASE CHECK ANTENNA...
- Page 11 "TV Operation/Picture Adjustment TV Operation [_Check list before you begin. [] Allconnections a re made(see page5). 1 Press POWER to turn the Combination VCR on. [] Your Combination V CR is pluggedin. Select a channel using CH &V or the NUMBERED keys. Press VOLdF to adjust the volume level.
- Page 12 TV Timer Features Kitchen Timer I_Check list before you begin. This feature allows you to set a timer alarm for up to 60 minutes. Useful for [] Allconnections a re made(see page5). when you are cooking and need to leave the kitchen. [] Your Combination V CR is plugged in.
- Page 13 On-Timer with Alarm Feature The Combination VCR can be set to automatically power on in one of 3 modes ('IV, Playback, or FM radio). You can also combine the On-Timer with a one minute alarm that gradually increases in volume. 1 Press ON-TIMER to display the ON TIMER screen.
- Page 14 Closed Caption System Closed Caption Mode Feature _f'Check list before you begin. This multi-use system not only allows the hearing impaired to enjoy [] All connections are made (seepage5). selected programs, but also makes useful information from "IV stations available to everyone. At first, read through the different closed caption [] YourCombination V CR isplugged in.
- Page 15 FM Radio The Combination VCR has an FM FM Radio Feature Setup radiowithbuilt-in antenna,9 station preset,and a band rangeof 87.5-108.1 MHz. You can evenset the Press FM/TV on the remote control On-Timer(page 13) to wake up to your or Combination VCR to select FM favorite musicstation.
- Page 16 Playback a Tape Insed a casse_e. _f'Check list before you begin. • The Combination VCR power comes on automatically. [] Allconnections a re made(see page5). [] YourCombination V CR isplugged in. Press PLAY on the remote control or Combination VCR to start playback.
- Page 17 Record On a Tape _VCheck list before you begin. Insert a cassette with record t_b. _/( q • The Combination VCR power ['7 Allconnections a re made(see page5). comeson automatically. L._._' "1_ [] YourCombination V CR isplugged in. Press CH &V, CliO8 NUMBERED keys on the...
- Page 18 Timer Recording Your Combination VCR can be set upto do START Press PROG to display the SET a recording whileyouare away or PROGRAM screen. otherwiseoccupied.Up to 8 programs can be placedin memory.You can chooseto • If a programis already in memory, recordonetime, daily,or weekly.
- Page 19 Copying Your Tapes (Dubbing) Connections you'll need to make. Cancel a Timer Recording: • Use this same connection for your video (Recording is in progress) camera, laser disc player, video Recording(Editing) games, etc. Combination VCR Hold down STOP for a few seconds to cancel the Timer Recording.
- Page 20 Special VCR Features Preset Caption Channel Caption You can set channel names, i.e. ABC, Press ACTION to display the MAIN CBS, so that when selected, the MAIN channel name and number appear on- MENU. screen for easy identification. You can go with preset names (up to 24), or Press &Y4•...
- Page 21 Time Stamp Feature _f'Check list before you begin. For about the first 10 secondsof each recording, the Combination VCR automatically [] The clock is set tO correct time. writes the following program data on the tape: Date, Start time, Scheduled stop time (for Timer Rec.
- Page 22 Tape Operation VHS Index Search System Each time you start a recording, an invisibleindex markis placed on the tape. When timer recordings are made, programindexand programinformation (see =TimeStamp Feature"on page 21) are also included. You can then use these indexmarksto access or scanyour recordings. Direct Access Index Search (For normal and/or timer recordings.) This feature allowsyouto go directly to the recording youwantfrom...
- Page 23 Timer recordings must be recorded Program Index Search back to back in order for them to be (For timer recordings only,) placed on the Program Index list. If a timer recording is followed by a This feature allows you to choose a timer recorded program from a function, such as REW or PLAY the Program Index list, and then start a search for that program.
- Page 24 o Tape Operation (continued) YourCombination VCR is equippedwith Repeat Play severaltime savingfeatures as well as You can setyourCombination VCR up to play a recording overand over. convenient a utomaticfunctions which maketape operationeasier than ever. Press ACTION to display the MAIN MAIN MENU MENU.
- Page 25 Unit and Cassette Information Erase Protection (Record Tab) Maximum Record/Playback Time Cassettes have a record tab to ensure that recordings are not accidentally erased. Only use tapes with the _ mark in this unit. To prevent accidental Tape Speed Type of Video Cassette erasure, break off with a screwdriver.
- Page 26 Before Requesting Service Checkthe followingpointsonce again ifyou are havingtroublewith yourCombination VCR. • Completelyinsertthe Power PlugintoanAC wall outlet. No power... • Set the POWER buttonto ON. • Make sure your antenna or cable system isconnected to the Combination VCR. (P. 5) No picture or sound...
- Page 27 Service Center List MICHIGAN GEORGIA CALIFORNIA TENNESSEE 6550 Katella Avenue 8655 Roswell Road 37048 Van Dyke 919-8 = Avenue South Suite 100 Avenue Cypress, CA 90630 Nashville, TN 37203 Atlanta, GA 30350 Sterling Heights, MI 48312 TEXAS 800 Dubuque Avenue ILLINOIS S.
- Page 28 (if included) - New video cassette tape in exchange for a defective video cassette tape for five (5) days. In-home, carry-in or mail-in service, as applicable, in the USA can be obtained during the warranty period by contacting a Panasonic Services Company (PASC) Factory Servicenter listed in the Service Directory.