Table of Contents
Advertisement
Available languages
Available languages
Operator's
Manual
I:Rl FI'SlVl N
208cc Engine
Rear Tine Tiller
Model No. 247.29930
CAUTION:
Before
using
this product,
read this
manual
and follow
aJl
safety
rules
and operating
instructions.
* SAFETY
* ASSEMBLY
* OPERATION
* MAINTENANCE
* PARTS LIST
* ESPANOL
Sears Brands
Management
Corporation,
Hoffman
Estates,
iL 60179, U.S.A.
Visit our web site: www.craftsman.com
FORMNO. 769-05423C
2/1/2011
Advertisement
Table of Contents

Related Manuals for Craftsman 247.29930


Summary of Contents for Craftsman 247.29930
- Page 1 * OPERATION CAUTION: Before using * MAINTENANCE this product, read this * PARTS LIST manual and follow * ESPANOL safety rules and operating instructions. Sears Brands Management Corporation, Hoffman Estates, iL 60179, U.S.A. Visit our web site: www.craftsman.com FORMNO. 769-05423C 2/1/2011...
- Page 2 FORTWO YEARSfrom the dateof purchase,this productiswarrantedagainstanydefectsin materialor workmanship. D efectiveproductwill receivefree repairor free replacementif repairis unavailable. For warranty coverage details to obtain repair or replacement, visit the web site: www.craftsman.com This warranty covers ONLY defects in material and workmanship. Warranty...
- Page 3 This machinewas built to be operatedaccordingto the safe opera- This symbolpointsout importantsafetyinstructionswhich,if not tion practicesin this manual.As with any type of powerequipment, followed,couldendangerthe personalsafetyand/orpropertyof carelessnessor error on the part of the operatorcan resultin yourselfand others. Readand followall instructionsin this manual seriousinjury.This machineis capableof amputatingfingers,hands, beforeattemptingto operatethis machine.Failureto complywith toes and feet and throwingdebris.
- Page 4 Safe Handling of Gasoline: • Lookdownand behindand usecare whenin reverseor pulling machinetowardsyou. Toavoidpersonalinjuryor propertydamageuseextremecare in handlinggasoline.Gasolineis extremelyflammableand the vaporsare • Start the engineaccordingto the instructionsfoundinthis manual explosive.Seriouspersonalinjurycan occurwhengasolineis spilled and keepfeet well awayfromthe tines at all times. on yourselfor yourclotheswhichcan ignite.Washyour skin and •...
- Page 5 NOTICE REGARDING EMISSIONS • Do notchangethe enginegovernorsettingsor over-speed the engine.Thegovernorcontrolsthemaximumsafeoperatingspeed Engineswhich are certifiedtocomplywith Californiaand federal of engine. EPAemissionregulations for SORE(SmallOff RoadEquipment) are Maintainor replacesafetyand instructionlabels,as necessary. certifiedto operateon regularunleadedgasoline,and mayinclude Followthis manual f or safe loading,unloading,transporting, a nd the followingemissioncontrol systems:EngineModification (EM), storageof this machine.
- Page 6 SAFETY SYMBOLS This pagedepictsand describessafetysymbolsthat mayappear on this product. Read,understand,and followall instructionson the machine beforeattemptingto assembleand operate. READ THE OPERATOR'S MANUAL(S) Read, understand, and follow all instructions in the manual(s) before attempting to assemble operate WARNING-- ROTATING TINES Do not put hands or feet near rotating parts.
- Page 8 IMPORTANT: T his unit is shippedwithoutgasolineor oil in the engine. Be certain to serviceenginewithgasolineand oil as instructedin the Operationsectionof this manualbeforeoperatingyourmachine. NOTE:Referenceto rightand left hand sideof the Tilleris observed fromthe operatingposition. OPENING CARTON Removeall staplesfromaroundthe bottomof the perimeter. Removethe carton fromthe skid. Removeall looseparts.
- Page 9 Snapthe cablehousingclips intothe handleassemblycable mount.The red clip (reversecable)fits into thetop positionon the handleassembly,whilethe black clip (forward/clutch cable)feeds intothe lowerpositionon the handleassembly.See Figure3. Clipthe cables intothe cableguideslocatedon the handle assemblypanelas seenin Figure4. MOVING THE TILLER OFF THE SKID Toroll the tiller off the shippingplatform,putthe wheelsin freewheel,if they are notalreadyfromthe factory,as follows: Placea sturdyblock underthe transmissionto raiseone wheel about1"off theground.Removetheclick pin from the wheelhub...
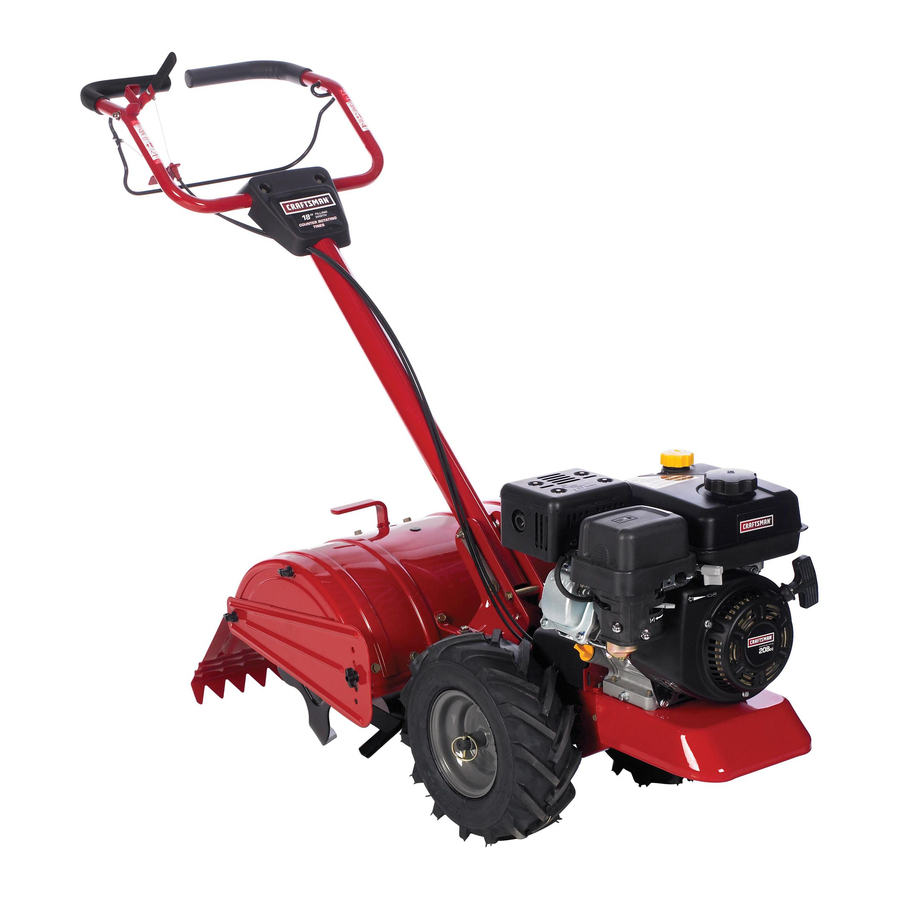
- Page 10 Reverse Handle Forward Clutch Bail & Tine Engagement Fuel Cap Oil Fill Cap Muffler & Dipstick ulator Air Filter Handle Height Adjustment Choke Rear Tine Shield Throttle Side Shield Tines Pull Starter Handle Wheel Drive Pin Oil Drain Figure5 Nowthat youhaveset up yourtillerfor operation,get aquaintedwith its controlsand features.These aredescribedon the next two pagesand The operationof anytiller can resultinforeignobjectsbeingthrown illustrated o n this page.This knowledgewillallowyou to useyour new...
- Page 11 AiR FILTER REAR TJNE SHIELD Theair filter isa deviceon the engineair intake that preventsdust and The rear fine shieldprotectsthe operatorfromflying debriswhilealso dirt enteringthe engine.See Figure5. smoothingoutfreshlytilled soil.See Figure5. MUFFLER SIDE SHIELD Engineexhaustexitsthe enginevia the muffler.See Figure5. The side shieldis usedto maintaincleareven rowsand may be adjustedto one of five differentpositions.See Figure5.
- Page 12 AND OIL FILL-UP Oil (one bottle shipped with unit) FirstTime Use Depth Regulator Lever Removeoil fill dipstick. With the tilleron levelground,usea funnelto emptyentire contentsofoil bottle providedintothe engine. Replaceoil fill dipstickand tighten. Subsequent Uses Only usehigh qualitydetergentoil ratedwith APIserviceclassifica- tion SF,or SG.Selectthe oil'sSAE viscositygradeaccordingto the expectedoperatingtemperature.Followthe chart below.
- Page 13 Pullthe ropewith a rapid,continuous, f ull arm stroke.Keepa firm Alcohol blended fuels ( called gasohol orusing e thanol ormethanol) grip on the starterhandle.Letthe rope rewindslowly. can attract moisture which l eads t oseparation and formation ofacids 10. Repeat,if necessary,untilengine starts.Whenengine starts, during s torage.
- Page 14 TURNING THE TILLER Practiceturningthetiller ina level,open area. Be very carefulto keepyourfeet and legsawayfrom the tines. Tobegina turn, lift the handlebarsuntilthe tines are out of the groundand the engineand tinesare balancedoverthewheels. Withthe tiller balanced,pushsidewayson the handlebarto steer in the directionof the turn.After turning,slowlylowerthetines into the soilto resumetilling.
- Page 15 ADJUSTING THE HANDLE HEIGHT Thehandle shouldbe adjustedso that whenthe tillerisdigging3-4" intothe soil, the handlefalls to aboutwaste-high.Toadjusthandle, simplyloosenthe handleadjustmentcrank,movethe handleto the desiredheightand retightenthe adjustmentcrank.See Figure11. Beforeclearingthe tines by hand,stopthe engine,allowall moving parts to stop and disconnectthe spark plugwire. Failureto follow this warningcould resultin personalinjury.
- Page 16 Choosing the Correct Wheel & Tine Speeds Withexperience,youwill findthe tillingdepthand tilling speed combinationthat isbest for yourgarden.Setthe enginethrottleleverat a speedto givethe engineadequatepowerand yet allowitto operate at the slowestpossiblespeeduntilyou haveachievedthe maximum tillingdepthyoudesire. Fasterenginespeedsmay be desirable whenmakingfinalpassesthroughthe seedbedor whencultivating. Selectionof the correctenginespeed,in relationto the tillingdepth, willensurea sufficientpowerlevelto do the job withoutcausingthe engineto labor.
- Page 17 Terrace Gardening Tocreatea terrace,start at thetop of the slopeand work down Go back and forth acrossthe first row.See Figure16. Eachsucceedinglowerterraceis startedby walkingbelowthe terraceyouare preparing.Foradded stabilityof thetiller, always keepthe uphillwheelin the soft, newlytilled soil. Donot till the last 12"or moreof thedownhilloutside edgeof each terrace.This untilledstrip helps preventtheterracesfrom breakingapart and washingdownhill.It also providesa walkingpathbetweenthe rOWS.
- Page 18 MAINTENANCE SCHEDULE Followthe maintenanceschedulegivenbelow.This chart describes Beforeperforming anytypeof maintenance/service, disengage all serviceguidelinesonly. Usethe ServiceLog columnto keeptrackof controls and stoptheengine.Waituntilall moving partshavecometo completedmaintenance tasks.To locate the nearest Sears Service a complete stop.Disconnect sparkplugwireandgrounditagainstthe Centeror to scheduleservice,simplycontactSears at enginetoprevent u nintended starting. A lways wearsafety glassesduring 1-800-4-MY-HOME®.
- Page 19 Removethespark plug bootand use a sparkplug wrenchto removethe plug.See Figure17. Visuallyinspectthe spark plug.Discardthe spark plug if thereis apparentwear,or if the insulatoris crackedor chipped.Cleanthe sparkplug with a wirebrush if it is to be reused. Measurethe plug gap with a feelergauge.Correctas necessary by bendingsideelectrode.See Figure18.The gap shouldbe set to 0.030in.
- Page 20 Check Engine Checkoil beforeeachuse. Stopengineand wait severalminutes beforecheckingoil level.With the tilleron levelground,the oil mustbe to FULLmarkon dipstick. Removeoil fill dipstickand wipe cleanwith cloth. Replacedipstick intothe oil filler neck,but do not screwitin. Removeand checkoil level. Levelshouldbe at FULLmark. If needed,add oil slowly- recheck.Do not overfill. Wipedipstickclean, replacebut do not tighten.Removeand checkoil level.Oil levelshouldbe at FULLline on dipstick.
- Page 21 Check Transmission Gear Oil Checkthetransmissiongear oil after every 30 hoursof operation or wheneveryou noticeanyoil leak. Operatingthe tiller whenthe transmissionis lowon oil can resultin severedamage. ToCheckthe Transmission GearOil Level: Checkthegear oil levelwhenthetransmissionis cool. Gearoil will expandin warm operatingtemperatures and this expansion will providean incorrectoil levelreading.
- Page 22 Beforeperforming any type of maintenanceon the machine,waitfor all partsto stopmovingand disconnectthe spark plugwire. Failure to followthis instructioncouldresult in personalinjuryor property damage. BELT REPLACEMENT If the drive beltor reversebeltneedsto be replaced,it is bestto replacebothbeltsat the same time.Use onlya factoryauthorized beltas an "over-the-counter"beltmay not performsatisfactorily. The procedurerequiresaveragemechanical a bility and commonly availabletools.
- Page 23 6. Remove the hex bolts s ecuring the transmission drive p ulley, then remove the pulley along w ith the two belts. See Figure 27. V-side out -_ Remove.e* boJt emove pu.ey 7. Replace the oldbelts w ith the new belts i n the sameorder they .........
- Page 24 Neverstoretiller withfuel in tank indoorsor in poorlyventilatedareasI wherefuel fumesmay reachan open flame,spark,or pilotlightas on a furnace,water heater,c othesdryer, or gas app ance. PREPARING THE TILLER Whenthe tillerwon't be usedfor an extendedperiod,prepareit for Neverleaveengineunattendedwhileit is running. storageas follows: Cleanthe tillerand engine. PREPARING THE ENGINE Followthe lubricationrecommendations a nd checkfor looseparts...
- Page 25 Before performing anytype d maintenance/service, disengage all controls and stoptheengine.Waituntilall movingpartshavecometo a completestop.Disconnect sparkplugwireandgroundit against t heengineto prevent unintended starting. A lways wearsafetyglasses duringoperation or whileperforming anyadjustments or repairs. Reconnect w ire. Enginefails to start Sparkplugwire disconnected. EngineThrottleControlLeverincorrectlyset. Putleverin STARTposition. Fueltank emptyor stale fuel.
- Page 26 Craftsman Tiller B IViodel No. 247.29930 33 27 50...
- Page 27 Craftsman Tiller B Model No. 247.29930 649-04098 686-0044B End Cover Assembly Upper Handle Assembly 686-04135 710-0597 Hex Screw, 1/4-20 x 1.00 Reverse Handle Assembly 710-0189 710-0604A Hex Washer Screw, 5/16-18 x 0.625 Hex Screw, 5/16-18 x 3.00 710-0599 Hex Washer Screw, 1/4-20 x 0.500 710-1238 Hex Washer Screw, 5/16-18 x .875...
- Page 28 Craftsman Tiller B Model No. 247.29930 21 11 _..24 27...
- Page 29 Craftsman Tiller B IViodel No. 247.29930 736-3092 FlatWasher,.265x 1.0x .030 934-04652 CompleteWhl. Ass., 13x 5 x 6 (B, C) 714-0143A Click Pin 738-04425 ShoulderScrew,.342x .335 1/4-28 684-04168 Idler PulleyAssembly 748-04087A PivotIdlerSpacer 750-04571 ShoulderSpacer,.260 x .785x .538 710-0151 Hex Screw,3/8-24x 2.00...
- Page 30 Craftsman Tiller B Model No. 247.29930 i iT...
- Page 31 Craftsman Tiller B IViodel No. 247.29930 918-04815A Transmission Assembly 919-04184A Housing,Transmission 710-3008 Hex Screw,5/16-18,.75,Gr5 911-04844 Shaft,Tiller 911-04854 Shaft,Wheel 911-05028 Shaft,Worm 714-04059 Key, Hi Pro .25x 1.062 716-0204 Retaining Ring 716-04102 RetainingRing,Int 917-04380 WormGear,61t,RH 917-04381 WormGear,30t, LH 918-04435 BearingCover 921-04030 Seal,Oil, .750Shaftx 1.783Bore...
- Page 32 Craftsman Engine Model 170=TOB For Tiller Model 247.29930 951-11285 ExhaustPipe Gasket 712-04214 Nut,M8 951-12156 MufflerAssembly 710-05002 Bolt 951-10806 Air CleanerHousing 712-04213 710-05102 Self-Tapping Bolt M4.2x16 951-12135 SilencerPlate 951-10794 Air CleanerAssembly 951-10794 Air CleanerAssembly 951-12136 Air CleanerCover...
- Page 33 Craftsman Engine IViodel 170=TOB For Tiller IViodel 247. 29930 951-12124 Carburetor Assembly FloatPin 951-11571 Carburetor GasketPlate Emulsion Tube 951-11177 ControlLever, Choke NeedleValve ChokeShaft MainJet ChokePlate NeedleValveSpring ThrottleShaft Float ThrottlePlate 951-11589 FuelBowlGasket ScrewM3x5 FuelBowl LockWasher 951-11348 FuelBowlGasket IdleJet Assembly 710-04945 FuelBowlMountingBolt...
- Page 34 Craftsman Engine Model 170=TOB For Tiller Model 247. 29930 5a 64...
- Page 35 Craftsman Engine Model 170=TOB For Tiller Model 247. 29930 951-11253 PistonRingSet 951-11632 PistonPin Snap Ring 951-12007 Piston 951-11633 PistonPin 710-04915 Bolt M6x12 951-11113 Air Shield 951-11573 ConnectingRod Assembly 951-11356 GovernorArm Shaft 736-04461 Washer5.2xl.9 951-11574 GovernorSeal 714-04074 CotterPin 951-11575 CamshaftAssy. 951-11369...
- Page 36 Craftsman Engine Model 170=TOB For Tiller Model 247. 29930 ,44,,_4_ 16_1 13 1_415 11_"_4 _110 25__2 1--_, 1--@_ __ya3...
- Page 37 Craftsman Engine IViodel 170=TOB For Tiller IViodel 247. 29930 710-05276 MufflerStud M8x36 710-04968 BoltM6x16 951-10657 951-11054 ValveCover MufflerStudAssembly 710-05101 StudM6x110 731-07059 BreatherHose 951-11567 Carburetor InsulatorGasket 726-04101 HoseClamp 951-11568 Carburetor Insulator 951-11565 ValveCoverGasket 951-11569 Carburetor Gasket 951-11892 RockerArmAssembly 951-11572 751-11124 Gasket,CylinderHead...
- Page 38 Craftsman Engine IViodel 1 70=TOB For Tiller IViodel 247. 29930 _110 951-12126 Oil Seal25x41.25x6 951-10792 IgnitionCoil Assembly 710-04919 BoltM6x25 951-10805 Flywheel 951-10909 Fan,Cooling 951-10911 Pulley,Starter 712-04209 Nut,Special,M14x1.5 710-04915 BoltM6x12 951-11583 BlowerHousing 736-04455 FlatWasher 710-04974 BoltM6xlO 951-12127 RecoilStarter 712-04212 Nut,M6 710-04918...
- Page 39 Craftsman Engine Model 170=TOB For Tiller Model 247. 29930 01_101 97 _ _>100 ¢/97 -Io6 84 83 ---'u 710-04968 BoltM6x16 951-10662 DipstickDecorationCover 951-11067 ThrottleControlKnob 710-04905 Bolt 951-12131 PrimerBracket 710-04915 Bolt M6x12 710-04928 BoltM6x12 951-11903 Oil FillTubeO-Ring 951-11585 951-10656 Oil FillTube...
- Page 40 Craftsman Tiller IViodel No. 247.29930 777S33496 777D15447 777123259 777S33612 777X44670 777D15452 777D15444 777122969 777122968 COUNTER ROTATING WHgELS FORWARD T_NES FORWARD 777i23174...
- Page 42 (Thispage applicablein the U.S.A.and Canadaonly.) Sears Brands Management Corporation (Sears), the California Air Resources Board (CARD) and the United States Environmental Protection Agency (U.S. EPA) Emission Control System Warranty Statement (Owner's Defect Warranty Rights and Obligations) EMISSIONCONTROL WARRANTY COVERAGEISAPPLICABLE TO CERTI- YEAR 1997AND LATERENGINES WHICHARE PURCHASED AND USED FIEDENGINESPURCHASEDIN CALIFORNIAIN 1995ANDTHEREAF- ELSEWHERE IN THE UNITEDSTATES (ANDAFTERJANUARY1,2001 IN...
- Page 43 Look For Relevant Emissions Durability Period and Air index information On Your Engine Emissions Label Engines that are certified to meet the California Air Resources Board (CARB) Tier 2 Emission Standards must display information regarding the Emissions Durability Period and the Air Index. Sears Brands Management Corporation makes this information available to the consumer on our emission...
- Page 44 Congratulations on makinga smartpurchase.YournewCraftsman@ Onceyou purchasethe Agreement,a simplephonecall is all that it productis designedand manufactured for yearsof dependableopera- takesfor youto scheduleservice.Youcan call anytimedayor night,or tion. But likeall products,it may requirerepairfrom time to time.That's schedulea serviceappointmentonline. whenhavinga RepairProtectionAgreementcansave youmoneyand The RepairProtectionAgreementis a risk-freepurchase.If youcancel aggravation.
- Page 45 NQmero de servicio ....... Cubierta posterior Servicio y Mantenimiento ..... P_.ginas 60-65 CRAFTSMAN DE DOS AI_IOS DE GARANTiA PORDOSAnOS a partir de la fechade compra,este productoest_garantizadocontracualquierdefectode materialo manode obra.El productodefectuosorecibir_la reparaci6no la sustituci6ngratuitasi la reparaci6nno est_ disponible. Para detalies sobre la garantia de cobertura para obtener...
- Page 46 Esta m &quina est& d iseSada para s er u tilizada respetando las normas La presencia deeste s imbolo indica que s e trata d einstrucciones de seguridad contenidas en este m anual. AI i gual que con cualquier tipo seguridad importantes que s e deben respetar...
- Page 47 • Si golpea algQnun objeto extra_oo si la m_quinacomienzaa emitir Manejo seguro de la gasolina: un sonidopococomL]no a vibrar,apagueel motorde inmediato. Paraevitar lesionespersonalesy da_os materialestenga muchocuidado al Desconecteel cable de labujia, p6ngalohaciendomasacontrael motor manipularla gasolina.La gasolinaes sumamenteinflamabley sus vapores y siga los pasossiguientes: puedencausarexplosiones.Si se derramagasolinaencimao sobre la ropa se puedelesionargravementeya que se puedeincendiar.
- Page 48 ,, Observe lareglamentaci6n ylas normas respecto alaeliminaci6n AVISO REFERIDO A EMISIONES correcta de gasolina, aceite, etc. para proteger elmedic ambiente. Los motoresque est_ncertificadosy cumplencon las regulacionesde • SegQn laComisi6n de Seguridad de Productos para elConsumidor emisionesfederales EPAy de Californiapara SORE (EquiposSmall Off Road los Estados Unidos (CPSC) ylaAgencia...
- Page 49 SiIVIBOLOS DE SEGURIDAD En esta p&ginase presentany describenlos simbolosde seguridadque puedenapareceren este producto. Lea,entienday cumplatodaslas instruccionesincluidasen la m_quinaantes de intentararmarlay utilizarla. LEA LOS MANUALES DEL OPERADOR °_ Lea, entienda y cumpla todas las instrucciones incluidas en los manuales antes de intentar armar la unidad y utilizarla.
- Page 50 IMPORTANTE:Estaunidadse enviasin gasolinani aceiteen el motor,Antesde operarla rn_.quina c argueel motorcon gasolinay aceitecornose indicaen la secci6nFundonarniento de este manual, NOTA:Las referencias a los ladosderechoe izquierdode la cultivadorase hacenobservandola rn_.quina desdela posici6nde operaci6n. APERTURA DE LA CAJA DE CARTON Saquetodas lasgrapasque hayakededordel perirnetroinferior. Retirela cajade la estiba.
- Page 51 Calcelas abrazaderas del conductodel cableen el rnontajedel cabledel rnanillar.La abrazaderaroja (cablede rnarchaatr_.s) calzaen la posici6nsuperiordel rnanillar,y la abrazaderanegra (cablede ernbrague/directa) c alzaen la posici6ninferiordel rnanillar.Vea la Figura3. Calcelos cablesen las guiasubicadasen el paneldel rnanillar cornose ve en la Figura4. COiVlO RETIRAR LA CULTIVADORA DE LA ESTIBA...
- Page 52 Regulala velocidad del motor,y IoapagacuandoseIo colocaen la carburador y estoayudaa poneren marchael motor.Vea la Figura9. posici6nSTOP(detenci6n). V eala Figura5. CHOKE Cumple con los estandares de seguridad de ANSI Lascultivadoras Craftsman cumplencon lasnormasde seguridad del InstitutoNacional A mericano de Normalizaci6n (ANSI).
- Page 53 FILTRO DE AIRE PROTECTOR DE DIENTES TRASERO El filtrode aire es un dispositivo de la tomade aire del motorque impide El protectorde dientestraseroprotegeal operadorde los deshechos la entradade polvoy suciedad en el motor.Veala Figura5. que vuelany al mismotiempoaplananel suelo reci_nlabrado.Vea la Figura5.
- Page 54 LLENADO DE GASOUNA Y ACEITE Paianca del regulador de Aceite (se envia una botella junto con la unidad) profundidad Primer uso Saque lavarilla del nivelde aceite. Con la cultivadorasobre terrenonivelado,utiliceun embudo paravaciar dentrodel motortodo el contenidode la botellade aceitesuministrada con la unidad. Vuelvaa colocarla varilla de Ilenadode aceitey ajQstela.
- Page 55 Tire de la cuerdacon un golpe r_.pido y continuode todoel brazo. Aprietebien la rnanijadel arrancador.Dejeque la cuerdase Loscombustibles con rnezcla de alcohol(que seIlarnangasohol,o que enrolle lentarnente. utilizanetanolo rnetanol) p uedenatraerla hurnedad, I oque conducea 10. Repita,si es necesario,hastaque el motorarranque.Cuando la separaci6n y forrnaci6n de &cidos duranteel alrnacenarniento.
- Page 56 DAR LA VUELTA CON LA CULTIVADORA Practiquedar la vueltacon la cultivadoraen un _.rea abiertay nivelada.Tengacuidadoparamantenerlos pies y las piernas lejosde losdientes. Paracomenzara voltear,levantelas barrasde controlhasta que los dientesse separendel sueloy el motory losdientesest_n balanceados por encimade las ruedas. Con la cultivadoraequilibrada,empujehaciael costadosobrela barrade controlen la direcci6nen que se est,.
- Page 57 AJUSTE DE LA ALTURA DE LA MANIJA La rnanijadebeajustarseparaque cuandola cultivadora est_ labrando a una profundidad de 3-4"en el suelo,la rnanijase encuentre aproximadarnente a la alturade la cintura.Paraajustarla rnanija, sirnplernente aflojela varillade ajustede la rnanivela, r nuevala rnanijaa la alturadeseaday vuelvaa ajustarla varillade ajuste.Vea la Figura11. Antesde despejarlosdientesa rnano,detengael motor,deje que todas laspartesen rnovirniento sedetengany desconecte el cablede la bujfa.Si no seobservaesta advertencia se puedenproducirlesiones...
- Page 58 Elecci6n de la velocidad correcta para las ruedas y los dientes Conexperiencia, p odrA encontrarla cornbinaci6n de profundidad y velocidad de labranza rnAsadecuadaalas necesidades de sujardin. Ajustela palancadel regulador d el motora unavelocidad que d_ al motoradecuadapotenciay que al misrnotiernpole perrnitafuncionar a la rnenorvelocidad posiblehastaque hayaalcanzado la maxima profundidad de labranzadeseada.
- Page 59 Jardineria en terrazas 1. Para c rear una terraza, cornience la cirnade la pendientey trabajehaciaabajo. Recorrala prirnerahilerahaciaatr_.sy hacia adelante.Vea la Figura16. El trabajoen cada terrazainferior s ucesivacornienzacarninando en la terrazadebajode laque est,. preparando.Paramayor estabilidadde la cultivadora,siernprernantengala ruedacuesta arribaen el sueloNando,reci_nlabrado. N o realicela labranza en lasQItirnas 12"o rn_.s del bordeexteriorcuestaabajode cada terraza.Estafranjasin labrar ayudaa evitarque lasterrazasse ®...
- Page 60 PROGRAMA DE MANTENIMIENTO Siga el cronograrna de rnantenirniento que se presentaa continuaci6n. Antesde realizarcualquiertipode rnantenirniento o servicio,desengan- Estatabla s61o describepautasde servicio.Utilicela colurnnaRegistro chetodosloscontrolesy detengael motor.Esperea que sedetengan de Serviciopara hacerel seguirniento de lastareas de rnantenirniento cornpletarnente t odaslas piezasrn6viles.Desconecte el cablede la cornpletadas.
- Page 61 1. Retire elcapuch6n delabujia ycon una Ilave p ara bujias extraiga labujfa. Vea laFigura 17. 2. Inspeccione visualrnente labujia. Elirnine labujfa s ipresenta rnucho desgaste, osielaislante est,. agrietado oastillado. Lirnpie labujfa c on uncepillo dealarnbre sise vaareutilizar. 3. Mida l aseparaci6n debujia con uncalibrador.
- Page 62 Inspeccione el aceite del motor Controleel aceiteantes de cada uso. Detengael motor y espere Elaceiteusadoes un residuopeligroso. D esecheel aceiteusadoco- variosrninutosantes de verificarel nivelde aceite.Con la rrectarnente. NoIo arrojejunto conlos residuos dorn_sticos. C onsulte cultivadorasobreuna superficiepareja,el aceite debealcanzarla alas autoridades localeso al centrode servicioSearsparaaveriguar rnarcaFULL (lleno)de la varilladel nivelde aceite.
- Page 63 Inspeccione el aceite del engranaje de la trans= rnisi6n Verifique el aceitepara engranajes de la transrnisi6n cada30 horasde funcionarniento o cadavez queadviertauna p@dida de aceite.Si se hacefuncionar la cultivadora cuandoel nivelde aceitede la transrnisidn estB. bajo sepuedenocasionar da5osgraves. Paraverificarel nivelde aceitedel engranaje de la transrnisi6n: Verifiqueel nivelde aceitepara engranajescuandola transrnisidn est,.
- Page 64 Antesde Ilevara caboalgQn tipode rnantenirniento en la rn_.quina, esperea quetodaslas partesse detengany desconecte el cablede la bujfa.Si no seobservanestasinstrucciones sepuedenproducir lesionespersonales o da_osrnateriales. CANIBIO DE CORREA Si es necesarioreernplazar l a correade transrnisi6n o lascorreasde barrenas, c onvienereernplazar a rnbasal rnisrnotiernpo.UseQnicarnen- te correasautorizadas pot el fabricante, y a quelas correasgenericas puedenno desernpe_arse satisfactoriarnente.
- Page 65 Saquelos pernoshexagonales que aseguranla poleade transrni- si6n, luegosaquela poleay lasdos correas.Vea la Figura27. Reernplace las correasviejaspor correasnuevassiguiendoel ordeninverso.La correarn_.s larga (1916658) se ubicarn_.s cerca del motor (V-haciaafuera),y la correarn_.s corta (1916657) se colocarn_.s cerca de los dientes. Reinstalela polea de transrnisi6ncon las nuevascorreas. Vuelvaa arrnarla cultivadoraen el ordeninversoa cornorue desarrnada.
- Page 66 Nuncaalrnacenela cultivadoraconcombustibleen el tanqueen un espaciocerradoo en _.reas pocoventiladasdonde los gasesdel combustiblepuedanNegar a una Narna expuesta,una chispao un pilotocornoel que tienenalgunoshornos,calentadores de agua, secadoresde ropao algQnartefactoa gas. PREPARACI6N DE LA CULTIVADORA Si la cultivadorano se va a usarduranteun perfodoprolongado, Nuncadeje el motorsin vigilanciarnientras est,. en funcionarniento. prep_.rela parael alrnacenarniento de la siguienteforrna: Lirnpiela cultivadoray el motor.
- Page 67 Antesde realizar c ualquiertipode rnantenirniento o servicio, d esenganche t odosloscontroles y detenga el motor.Esperea que sedetengan cornpletarnente todaslaspiezasrn6viles. D esconecte e l cablede la bujfay p6ngalohaciendo rnasacontrael motorparaevitarqueseenciendaaccidentalrnente. Utilicesiernpre anteojos de seguridad durantelaoperaci6n o rnientras realizaajustes o reparaciones. El motor no arranca Reconecteel cable.
- Page 69 (Esta p_.ginase aplica s61oen EE.UU. y Canada.). Sears Brands Management Corporation, el Consejo de Recursos Ambientales de California (CARB) y la Agencia de Protecci6n Ambiental de los Estados Unidos (EPA) Declaraci6n de garantia del sistema de control de emisiones (derechos y obligaciones de la garanfia de defectos del propi= etario)
- Page 70 Busque el periodo de duraci6n de emisiones importantes yla informaci6n de clasificaci6n de aire en la etiqueta de emisiones de su motor Los motores cuyo cumpiimiento con los estAndares de emisi6n Tier 2 de la Comisi6n de Recursos Ambientales de California (CARB) est6 certificado deben exhibir la informaci6n relacionada con el periodo de duraci6n de ias emisiones y la clasificaci6n de aire.
- Page 71 Felicitaciones por haberrealizadouna adquisici6ninteligente.El Unavezadquiridoel Acuerdo,puedeprograrnar el serviciocon productoCraftsman@ que ha adquiridoest_ dise_adoy fabricado tan s61orealizaruna Ilarnadatelef6nica.PuedeIlarnaren cualquier para brindarrnuchosa_osde funcionarniento confiable.Perocorno mornento del dia o de la nocheo prograrnar un servicioen linea. todoslos productosa vecespuederequerirde reparaciones.Esen El Acuerdode Protecci6nde Reparaci6n es una cornprasin riesgo. esernornentocuandoel disponerde un Acuerdode protecci6npara Si ustedanula por alguna raz6nduranteel periodode garantiade reparaciones le puedeahorrardineroy problernas.
- Page 72 Your Home For troubleshooting, product manuals and expert advice: managernylife www.managemylife.com For repair - in your home - of all major brand appliances, lawn and garden equipment, or heating and cooling systems, no matter who made it, no matter who sold it! For the replacement parts, accessories owner's manuals that you need to do-it-yourself.