
Related Manuals for Kodak EasyShare CX6330


Summary of Contents for Kodak EasyShare CX6330
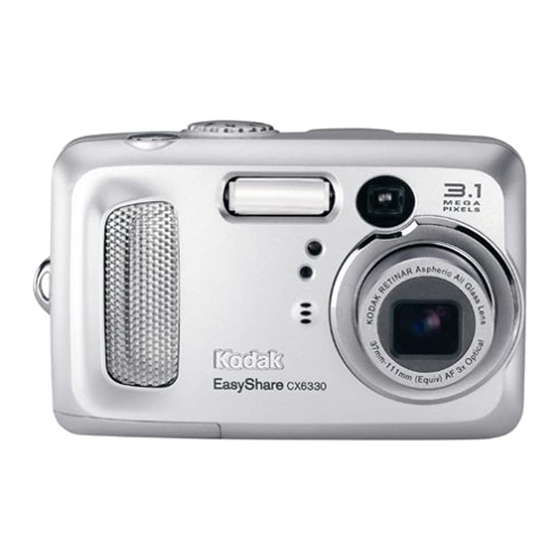
- Page 1 Kodak EasyShare CX6330 zoom digital camera User's Guide For i_teracti_e m_oriaIs, _.kodak.col_l/go/ho_o...
- Page 2 Product Overview • Front View Shutter buttnn Microphone Mode dial Lightsensor Flashunit SelfTimer/Videolight Vie_finder Wriststrap post 10 Lens Grip...
- Page 3 Product Overview Back View Camera screen (LCD) Sdf Timer/Burst b utton _ Share buttnn (page 47) ModediagOff (page 13, page 6) OKbutton (press) 11 Shutter button DC-/n(3V) {_;.._ ,fnr 12 Flash button _t optional At;adapter 4-x_a)controller _/_ 13 Zoom ("_ideAugle/Telephoto) Ddete buttn_l Grip -r Vice, f inder...
- Page 4 Product Overview • Side Views I,eft Side Right Side DC-ln(3V)_C:'-_, A/VOut, for television*ie_ing for optional ACadapter Slot for optional MMC/SD card I5SBPort...
- Page 5 Product Overview Top and Bottom Views Bottom Mode dial Locator, dock 6000 Shutter buttou Dock cmmector Tripod sockeglocator, clock 6000 Batte U door...
-
Page 6: Table Of Contents
Table of Conten'l;s 1 Getting Started ..............1 install Software First ..............1 Need This User Guide in Larger Print? ......... 1 What Can i Do With My Camera? ........... 2 What Can i Do With My Pictures and Videos? ....2 Package Contents .............. - Page 7 Taking a BurstSeries o fPictures ........Changing Optional Settings ........... Setting Exposure Compensation ........Setting Picture Quality ..........Setting Color M ode ............. Pre-tagging forAlbum Names ......... Placing theDate onPictures .......... Setting theOrientation Sensor ........3 Taking V ideos ............Taking aVideo ............
- Page 8 Copying Pictures a nd Videos ........Displaying Video D ate ..........Viewing Picture!Video information ........5 Sharing Pictures andVideos ........When Can i Tag MyPictures a nd Videos? ......Tagging Pictures forPrinting ........Tagging Pictures and Videos forEmailing ....... Tagging Pictures and Videos asFavorites .....
- Page 9 install t heSoftware ............. 8 Connecting Camera t o Computer ....... Transferring Pictures With theUSB Carte ...... Printing P ictures F rom Your C omputer ......Printing F rom anOptional MMC!SD Card ....... Print W ith orWithout a Computer ........
- Page 10 11 Getting Heip ..............87 Helpful Links ................Help in this Manual ..............87 Software Help ................Telephone Customer Support ..........88 12 Appendix ................91 Camera Specifications ............91 Original Factory Settings ............ 93 Upgrading Your Software and Firmware ......9 4 Tips, Safety, Maintenance ...........
-
Page 11: Getting Started
Getting Started Install Software First Install tllesoft_are from tim KodakEas)Sharesol, are CDbefore cmmecting the camera (or camera dock) tothe computer.Failure to do so ma!,cause the sol, rare toloal incorrectl!,. Seethe QuickStart 6hide or InstallingtireSoft_are, page 57. Need This User Guide in Larger Print? 1 Gnto \_w_vkodak.eonl/go/ex6330support. -
Page 12: What Can I Do With My Camera
• Chapter 1 What Can 1 Do With My Camera? Capture Still Pictures I_--Use Automode to enjn) point-aud-sftoot operation.UseSport,Night,Landscape, aid Close-upmodes to e\paud your capal)ilities. Capture Videos with Sound _--Capture _qdeos:is Quicklime movies. Review _--Displa b protect, and delete pictures aid videos; tagfor albums. Share _--Sftare pictures (print, email, sa_eas Favorites)mid_qdeos (email,sae as Favorites). -
Page 13: Package Contents
Chapter 1 • Package Contents 1 Camera 4 USBcal)le 2 Custom(lockinsert (for cmnera 5 Audio/Videocable (for _iewing dock 6000 or printer dock 6000) pictures and videos on television) 3 KodakMaxdigitalcamera batteries (2 AA, n on-rechargeable) Not shown: User'sGuide, QuickStart Guide,wrist strap, KodakEasyShare so_are CD. -
Page 14: Loading The Batteries
• Chapter 1 Loading the Batteries Tx_o A ,_. batteries (non-recbargeable) are included xqthyour camera. 1 Turnthe Modedial tn Off. 2 On the bottom of tile camera, slide the batteU door aid liftto open. Insert tile &_,Ilatteries as shown. Close tile batte U door. IMPORTANT BATTERYINFORMATION For acceptable battery life and to make... -
Page 15: Attaching The Wrist Strap
Chapter 1 Attaching the Wrist Strap 1 Thread the short loop of file wrist str:q3 fllroughthe wrist strap post. 2 Thread the long loop through the short loop. 3 Pull until secure. -
Page 16: Turning On The Camera
• Chapter 1 Turning On the Camera Turnthe Modedial from Offto ;myother position. The ready l/_)t blblk._' gree_lu'lffle the eamera pe_nw*s a sdf-&eek, tt)e*_ g hm's green uhel* the camera is reel& to take pictures (or videos, if the mode dial is set h_ Still aIM l)'deo modes, status ieens @pear on the camera semen. -
Page 17: Setting The Date And Time
Chapter 1 • Setting the [:)ate and Time Setting Date & Time, First Time TheDate mid Time bare beel_reset message appears tile first timeyou turn on tilecalnera or if the batteU is remowd for all extended time. 1 SETDaTE&T/ME is highlighted.Press the OKbutton. -
Page 18: Checking Camera Status
• Chapter 1 Checking Camera Status Theicons that appear on the eamera sereen indicatetile aetiw camera aml picture settings.Seepage 9 for a list of fileicons. Tncheck the current camera settings: 1 Tnrnthe Modedial frmn the Off'position. dial 2 /f 1[_ is displa_,ed in tile statusarea, press tileFlaslVStams huttontodisplay,additional settings. -
Page 19: Camera Screen Icons
Chapter 1 Camera Screen icons These icons appear on your camera screen _¢en the settings are actise. Camera/Picture Status Capture Modes (foundon Modedial*) Share Icons Qualit}Icons Video *** Best Print *** Best (3 2) F'.m_l Better Fau_rite Good Auto Storage/Picturelocation SelfTimer port I1_ Internal memory... -
Page 20: Inserting An Mmc!Sd Card
• Chapter 1 Inserting an MMC/SD Card ;our eamera has 16 MBofinternal meulor_ H(me_er,optionalMMC/SD cards prm_deremovable,reusable storage for pictures and _qdeos. ,d[]k CAUTION: Tile card can only be inserted one way; forcing it may damage the camera or card. Do not insert or remove a card when the green ready light is blinking;... - Page 21 Chapter 1 Choosing Internal Memory or MMC/SD Card The camera offers t_u optionsbr storingpictures and videos: Internal Memory _ --Store pictures a_d videosi_ 16 MBinterual memory. MMC/SDCard _l--Store pictures and _ideos on a card. The nnmber/length of picturesMdeos dependson the size ofthe card. Purchase accessories at a dealer of Kodakproducts or ww_vkodak.eom/goA:x6330aeeessories.
- Page 22 • Chapter 1 Checking Your Storage Setting Ill Still and Yideo modes, the storage loeation leon that appears in tile status area indicates the camera's storage location. Todmck thelocation, either: Storage location 0 Turnthe Mode dialfrom the Offposition,or 0 /n any cai)tnremode, press _. r"t-I --Memory Card --Intenlal Memory...
-
Page 23: Taking Pictures
Taking Pictures Tile camera is read}'to take pictnres mlytilneit is on--even if),nn are ill Re_ie_,Share, or Setup. (li1Videomode, tilecamera captures video.) Befnre yon take a picture, make sure the storage location is set the x_a), you want it "(seepage II ). Take a Picture Turnthe Modedial to themode ),ou wantto use. -
Page 24: Picture-Taking Modes
• Chapter 2 Picture-Taking Modes For file best possible pictures, choose the mode that suits _our conditions. ¸ iii ; !;iiiiiiiiiiiiiiiiiiiiiiiiiiiiiiiiiiiiiiiiiiiiiiiiiiiiiii ..i,ll!,iiiiiiiiiiiiiiiiiii!,,,,ii iii Auto Generalpicture-taking.Mltomatic_fll) s ets exposure, fimus,and flash. Subjectsthatare in motion. Shutter speed is fast. Sport &_ Night Nightscenes or Imp-fight c onditions.Plaee thecamera on a flat,steadysurface or use a tripod. -
Page 25: Liveview--Framng
Chapter 2 Liveview--Framing with the Camera Screen When},nullm}on l,i_evieu,filecamera screen displa},s a liveimageof xqlattile lens sees. Usetile camera screen m frame your subject. IMPORTANT: Li_e_iew quick{_ depletes barrel3' power," use it ,_paringlv. 1 Turnthe Modedial tn an},On position. 2 Press tile OKbutton to turn oil Livevie_v 3 Frame!,nut subiect in the camera screen. - Page 26 • Chapter 2 Using the Auto Focus Framing Marks In I,i_eqet_the frmningmarks indicatethe area of your seene that the eamera isfocusing Oil.For the best possiblepictures, the canlera atteull)tsto focusos foreground subjects, exenif tilesulljectsare not cestered ill the scene. 1 Press the OKbutton toturu OllLi_exiex_ 2 PresstheShutterlluttonhalf-wayandhold.
-
Page 27: Quickview--Reviewing The Picture Just Taken
Chapter 2 Quickview--Reviewing the Picture Just Taken Aftery(mtake apicture, the camera screen displaysa QuicMqeuof that picture fur approximately5 seconds.Whilethe picture is displa}ed,you can: Delete O Re'viewit:/f}uu takeno action, the picmm is saxed. O Shaxe it: Press the Share buttonto tag the picture for print, email, or as a Favorite (see page 47). -
Page 28: Using The Optical Zoom
• Chapter 2 Using Optical Zoom UseOpticalZoonl to get up to 3Xcloser to your subject. Opticalzoom is effectivewhenthe lens is no closer thau 23.6 ill. (60 cm) to the subject. _hen you turn on the camera, tilelens extendsto the Wide_.ngleposition. 1 Usethe _ie\_fJnder o r camera screen to frame"_oursubject. -
Page 29: Using The Flash
Chapter 2 • Using the Flash Usethe flash\qlel} _OU 'takepictures at night, indoors, or outdoors in h< W shadows.Youcall chatlge tileflash settingin ms}Stillmode; tile defaultflash settingis restored _qlenyou e,_itthe mode or turu offthe camera. Wide Augle _ (0.6-3.6_ _/) Telephoto ]2-6.9 ft (0.6-2.1 Ill) Turning On the Flash... - Page 30 • Chapter 2 Flash Settings in Each Mode Forthebestpossiblepictures, f lashsettings a repre-set f or eachcapturemode. Auto EMttilemode or tllrn Auto,FlashOff, Allto* offthe camera. FillFlash,Red-e_e Auto Sport Night Auto* I'Jl_ Landscape Close-up Video Nolle Flashcannot be tllrl]ed o_]. Burst *_hen }ou chauge toRed-e}ein these modes, it reulaiusuutilyou chmlgeit or alr)] offthe camera.
-
Page 31: Putting Yourself In The Picture
Chapter 2 Putting Yourself in the Picture Tile SelfTimerereates a lO-seeonddela_bet_weI} the timeyou press tile Shutter button and tile timetilepicture is taken. 1 Placetile camera on a fiat surface or use a _-_Seif tripod. Timer 2 hi aw Stillmode, press the Sdf Tinier bu_on buttun. -
Page 32: Taking A Burstseries O Fpictures
• Chapter 2 Taking a Burst Series of Pictures Burstlets }nn to take up to 4 pictures in quiek sueeession (apprn_matel} 3 ff:unesper second). Burst is ideal fur capturing sportingeventsor objects in motion.Flash and SelfTimerare disabled _q_enyou use Burst. Turn On Burst /n an_Stillmode, press the SelfTimer/Burst button twice. -
Page 33: Changing Optional Settings
Chapter • Changing Optional Settings Press the ._lenubutton to access optkmal Mode dial picture-tatting setOngs. Not all menu options :ire a_ailable in :ill modes. Menu button Picture Taking Modes Video Auto _ I,andseape Sport {_ Menu Options Available Night _* Image Storage (page I I ) ExposureComp,... -
Page 34: Setting Exposure Compensation
• Chapter 2 Setting Exposure Compensation UseExposureCompensationtocoutrol howmueh light enters the eamera. This settingis useflllfor taMngpictures ill high-contrastscenes, or for retaMng pictures x_llen .'y<m :ire not satisfiedwith tilebrightness. Adjustthe exposure b._ phls or minus 2 steps in l/2-step increments. 1 In an}Stillmode, press tileMenu button. 2 Press _'[_ to highlightExposureCompensation['g'_, then press the OF, button. -
Page 35: Setting Picture Quality
Chapter 2 Setting Picture Quality UsetileQnali_ settingto selecta pietnre resolution. 1 In aWStillmo&, press the Menu button, Press _/_ tn highlightQualit_"Jr, then press the OKbutton. Highlightan option: Best "_$_'_ (3.1 MP) for printingup to 11 x 14 in.(28 x 36 cm); pictures are higl!est resolution aild largest filesize. -
Page 36: Setting Color Mode
• Chapter 2 Setting Color Mode Use Color Mode to choose eolor tones. NOTE:Once a picture is taken, its color mode cannot be changed on tile CalUeV_. Ill any Still mode, press tile Menu button. Press _[_ to highlight Color Mode _, then press tile OK button. -
Page 37: Pre-Tagging Foralbum Names
Chapter 2 • Pre-tagging for Album Names UsetileSetMbum (Still) featureto pre-seleet album names before "_<m take pictures. Then,all the pictnres you take are taggedwithtbose allnun ramies. FirstiOn Your Computer UseKodakEas}Sbaresoftware,V3.0 orhigher, to create album names on your computer.Thencopy up to 32 album names to tile cmnera's address book tile next time}ou comlect the camera to the cmnputer.SeeKodakEas}Share sol, are Helpfor details. -
Page 38: Placing Thedate Onpictures
• Chapter 2 Third--Transfer to Your Computer WheI1 Bm transfer the _K$'d pictures Iny)nr enmputer, the KodakF, a s_,Share soft_are opens asldcategorizes_nur pictures in the appropriate album fokler. SeetileKodakEas_,Share s oftwareHel I ) fordetails. Placing Date on Pictures Usethe Date Stampsettingto imprint tile dateOil_,nurpictures. 1 Makesure tilecamera clock is set to the correct date (page 7). -
Page 39: Setting Theorientation Sensor
Chapter 2 • Setting the Orientation Sensor /f _,(m rntate theeamera tn tare a pietnre (for example, a portrait shot), the OrientationSensor reorients the picture so that it is displa_,ed correct side up. The OrientationSensor is turned on :Ls the default."Ynu cal turu it offso that pictures are not rotated. -
Page 41: Taking Videos
Taking Videos '" • I_se_ldeo mude_ totake "_deosor to eustomize,ddeo-takingsettings. Before taking a video, make sure your sturage locat]o_l i s set tile x_a}, you x_ant it (see page II). NOTE: F lashis not alailable ill Videomode. ChmlgeOpticalZoom befure (but notduring)/ideo recording. -
Page 42: Quickview--Reviewing Thevideo J Usttaken
• Chapter 3 Quickview_Reviewing the Video Just Ta ken M'teryou take a _qdeo,the camera screen displa_s tile first fr:mleof filevideo for approximately5 seconds.Whiletile frameis displayed,_ou can: O PIW it: Press tile OKbutton. Press OKagain to pause the _ideo. Ifthe camera is connected to a telexision (see page 55) press _/t'_ m adjust tilerelume. -
Page 43: Using T Heoptical Zoom
Chapter 3 • Using the Optical Zoom UseOptie_ Zoom to get up to 3Xcloser to )our subjeet. Optiealzoom is effectkewhentilelens is no closer tMn 23.6 in. (60 cm) to the_ubject. _hen " " you turn oll tllecamera, tilelees extendsto tile \Vide4ugleposition. NOTE: 3 ou can change OpticalZoom before (but not during) _kleo recording. - Page 44 • Chapter 3 Pre-tagging for Album Names Usethe SetMhmn(Video)feature to pre-select a,lbunlnames before"_outake _ideos.Then,all the "_ideos yon take are taggedx_iththose a/bran names. First--On Your Computer UseKodakF.as}Share sol, are, V3.0 or higher,toereate albmn names on )our computer.Then coD up to 32 album names to the camera's address book tlle next time_,ouconnect the camera to tllecomputer.
-
Page 45: Putting Yourself Inthevideo
Chapter 3 Putting Yourself in the Video Tile SelfTimerereates a 10-seeonddela_bet_eee the timeyou press tile Shutter button and tile time/ideo recording Ilegins. 1 Placetile camera on a flat surface or use a tripod. 2 Turnthe Modedial toVideo_, tileupress the SelfTimer button. 3 Press _/_ to highlighta VideoLength option, then press tileOKbutton:... -
Page 47: Reviewing Pictures Andvideos
Reviewing Pictures Videos Presstile Redewbutton to _iewand work _vithymr pictures and ddeos. To savebatteU power,place )our camera ill the optionalKodakEas_,Share c amera (lock6000 to re_qe_pictures a_ldvideos (see page 63). Remember, press the Shutter button to take a picture anytime--even in Review. Viewing Single Pictures... -
Page 48: Playing Avideo
• Chapter 4 Viewing Multiple Pictures Videos 1 Press the ReviewMtton. 2 Press _. NOTE: "rancan _dsopress the Menu button, highlight_, then press fileOKbutton. Thumbnails of nine pictures arm videos are dis/)ko'ed at once. Review Press --/_ to disl)la} tile pre_ious or next row of thumbl_ails. Press _/N to scroll through the thumbnails one at a time. -
Page 49: Ddeting P Ictures A Nd Videos
Chapter 4 • Deleting Pictures and Videos 1 Pressthe Revie_button. 2 Press {/b m locate a picture or video (or highlightone in multiple vie_), then press the Delete button. 3 Press _/_ to highlightan option, then press tile OKbuttun: PICTURE or VIDEO--&letes the displa_,ed picture or video. -
Page 50: Changing Optional Review Settings
• Chapter 4 Changing Optional Review Settings In Re_Je_mode, press tile._lenubuttou toaccess optiou_lre_Je_ settings. Magnif_(pictures) (page 40) _> Cop} (page 45) Pla} ('_ideos) (page 38) Share (page 47) VideoDate Displa} (page 46) Image Storage (page I I) Multi-up (page 38) Protect (page 41) Picture/Video hfformation (page 46) -
Page 51: Tagging Pictures!Videos Foralbums
Chapter 4 Protecting Pictures and Videos From Deletion Press tJle Revie_button, then locate the picture or vkleo to protect. Press file Menubutton. Protect icon - 3 Press _/_ to IdghlightProtect I_1' then press the OKbutto[1. 7bepicture or video/sprotected and camwt be deleted, l_*e Protect icon _, appears with thepretected picture or video. - Page 52 Dur wlectlons are saved. 7 Press the Menubutton to return m Re_ie_mode. Third--Transfer to Your Computer When _,outraslsferthe taggedpictures and videos to_,ourcomi)uter,the Kodak Eas_,Share s oft_are opens and categorizes_,ourpictures and ddeos in the appropriate a.lbumfolder.See KodakEas_,Share s oft_are Help for details.
-
Page 53: Running A Slide Show
Chapter 4 • Running a Slide Show UsetileSlideShm_todispla) your pietures andvideos on the eamera screen. To run a slide show on a televisionor on any external device,see page 44. To savebatteU pm_er,use an optional KodakACadapter, 3-volt (see page 99). Starting the Slide Show 1 Press tilt"Reviex_ b utton, then press the Melnlbntton. - Page 54 • Chapter 4 Running a Continuous Slide Show Loop When)ou turn on I,oop,the slide shinsis coutinuousl) repeated. 1 On the SlideShowmetal, press _/_" highlightI,oop,then press the OKbutton. 2 Press/_-/_ tohighlightOn, then pn,ss the OKbutton. l_benyou start a sfide shou', it m/mats unta you cancel it Iu pressing the OK button or until batteo_power is exhausteg l'heLoopsetting remains until...
-
Page 55: Copying Pictures A Nd Videos
Chapter 4 • Copying Pictures and Videos _oneancoD picturesand_Jdeos f rom acar(|to internalmemor_ or from internal me[nor?to a card. Before you eop_,,mare sure that: O &card is insertedin the camera. 0 Tilecamera's pictnre storage location isset tothe location from _¢ich }<m are cop}in&SeeChoosinghlternal Memor)or MMUSD Card, page I I. -
Page 56: Displaying Video D Ate
• Chapter Displaying Video Date To displa} tile capture date ml(l time before tile/ideo starts: Press tile Re/ie_ button, then press tim Vlenu button. Press _/_ tohigbligbtVideoDateDispla!,l_],timnpresstimOKbutton. Press _/v to Itighlight ;ul option, then press tile OK button. 4- Press tim Menu button to exit tile menu. ThecaDturedate aJ_dtime appear dzlrh_g video pkg'back (m the camera. -
Page 57: Sharing Pictures Andvideos
Sharing Pictures and Videos The Share buttonlets }ou "tag" your pictures and videos.When they are transferred to your computer,you can sMre: Tagged Pictures Tagged Videos O Byprint O Byemail 0 Byelnail Q) AsFaxoritcs Q) AsFa/orites, for eas) orgauization on your computer Print (page 48) Email (page 49) Faxorite (page 50) -
Page 58: Tagging Pictures Forprinting
• Chapter 5 Tagging Pictures for Printing 1 Pressthe Sharebutton. Press {/b locate a pienlre. 2 Press _[',,,w,,' t o highlightPrint _, then press tile OKImttou.* 3 Press _/'_' toselectthe numberofcopies (0-99). Zero removes the tag for that picture. ThetW_t ico1_ _ appealw i_ the ,vtat*_s area. -
Page 59: Tagging Pictures And Videos Foremailing
Chapter 5 • Tagging Pictures and Videos for Emailing First--On Your Computer UseKodakl_',as) Sharesoftwareto create a_lemaiIaddress book on )our computer.Then,copy up to 32 email addresses tu tile camera's internal memory. Second--Tag On Your Camera 1 Pressthe Sharehuttou. Press 41b to locate a picture. -
Page 60: Tagging Pictures And Videos Asfavorites
• Chapter 5 Tagging Pictures and Videos as Favorites 1 Press tilt, Sharebutton. Press </b to locate a pienlre. 9 Press _]_ to highlightFavoriteV, then press the OKbutton. l'be l:arorite icon _# appeal:v[n the statlI,Yarea. 3 Toremove the tag,press the ORbutton again. -
Page 61: Customizing Yourcamera S Ettings
Customizing Your Camera Settings UseSetup to customizecamera settingsaccordh_gto }our preferences. To Access Setup Mode/Menus 1 In alr_Capture mode (or in Reqe_a),press tile\_lenubutton. 2 Press _/_ to highlightSetupMeuu ;=, then press the OKI)utton. Setup Menus DefaultPrint Quantit_ VideoOut (page 55) (page 52) "... -
Page 62: Changing Thedefault Printquantity
• Chapter 6 Changing the Default Print Quantity Tilt'DefaultPrint Quanti_ settingdetermines tilt'valuetMt is displa)ed on tile SharePrint screen (page 48). Tiledefaultvalueis 1. 1 Pressthe Menubutton. 2 Press _/€_ to highlightSetu) \,let _=, then press tile 0Kbt tto . 3 Press _/_ mhighlightDefaultPrint Quanti W _ , then press the 0K bnttml. -
Page 63: Turning Qn Liveview Instillmodes
Chapter 6 Turning On Liveview in Still Modes Tile Li_e_ie\_ feaillrelets }ou use tile eamera screen as a _ie_finder (see page 15). The defaultsettingis Live_iew Off. IMPORTANT: Live_ iew quick(_ depletes barrel3' power," use it .waringlv. Tu change the Liw,_iew defanltto On: 1 Press the Metalbutton. -
Page 64: Changing Advanced Digital Zoom
• Chapter 6 Changing Advanced Digital Zoom _ou c_mcustomizedie wa) the A(hanced DJ_ Zoom turns on. 1 Press tile Menubuttnn. 2 Press _/_ to highlightSetup Menu_, then press the OKbutton. 3 Press _/'_ m ItighlightA&ancedDigital Zoom ['gO,, , then press the OKbutton. 4 Press _/_ m Itighlightall option: (_ontinuous--digi_ zoom automaticall}... -
Page 65: Setting Video Out
Chapter 6 • Setting Video Out VideoOut is a regionalsettingthat lets you connect to a tele/ision or otiler external de/ice (see page 55). 1 Press tlle Menubutton. 2 Press a,_/_ to highlightSetupMetal _=, tilenpress the ORbutton. 3 Press _/_ to highlight_kleo Out ["_, then press the OKbutton. 4- Press _/_"w'_to highlightan option: NTSC(default)--used in most countries... -
Page 66: Formatting Internal Memory Ormmc!Sd Card
• Chapter 6 Formatting Internal Memory or MMC/SD Card CAUTION: Formatting erases all pictures and _ideos, including those that are protected. Removing a card during formatting may damage the card. 1 Pressthe Memlbutton. 2 Press a_[_ to highlightSetup ___ then press tile OKbuttou. M(I}U 3 Press _[_ to h'ghl'gllt fort 1 t I_'... -
Page 67: Installing The Software
Installing the Software NOTE: T o iustallsoft_are o,1computers runni*g Windows2000, \Vindm_ s XP Pro, or ._lacOSX,:,ouneed administratorprivileges.Seeyour computer user's guide. Windows System Requirements O Personal computer running Windu\_s98, 98SE., . ME, 2 000, or XPOS O 233 _z processor or greater (300 VlHz recommended for Windm_s 2000 and XP) O 64 \_Bof a_ailableRAVI ( 128 ._IBrecommended) Q) 100 MBof availablehard disk space... -
Page 68: Mac Qs Xsystem Requirements
• Chapter 7 Mac OS X System Requirements O Macintosh computer with a 63 or (;4 processor O Mac OS 10.1.2, minimum 128 MB of a_ailable RAM O 200 YlBof a_aflable haN disk space Q) CD-ROM drive O Built-ill tSB port Q) Color monitor Nth a minimum resolution of 800 x 600 pixels;... -
Page 69: Install T Hesoftware
Chapter 7 • Install the Software For informationoil the soft_are applicationsincluded on the KodakEas)Share sofi_are CD,click the Help buttonin the KodakEas)Shareso_are. CAUTION: Install Kodak EasyShare software before connecting camera or optional dock to the computer. Failure to do so may... - Page 70 Thislets _,oureceiveinformation regardil}g so_xare updates and registers some of theproducts included withtile caulera. Youmust be connected to_,nur/nternet sersice prmqder to register electronica/lt Toregister later,see wx_x_.kodak.com/go/register. 5 /f prompted, restart the computer.If !,outurnedoffanti-_irus soft_,_are, t11i"11 it back on. Seetile anti-viresso_are manual for details.
-
Page 71: Connecting Camera T O Computer
Connecting Camera to Computer CAUTION: Install Kodak EasyShare software before connecting tile camera or optional dock to the computer. Failure to do so may cause tile software to load incorrectly. _ou can transferpictures and videosfromtile camera to file computer usiug: O Tile (included) tfSBcable. -
Page 72: Printing P Ictures F Rom Your C Omputer
• Chapter 8 NOTF,: Visitt_t_ kodak.conVgo/h(m¢o foran online tutorial o n eonnecting. _ou can also use a Kodakmulti-card readeror KodakSDmulthnedia card reader-x_ r iter to transfer your pictures. Printing Pictures From Your Computer Fur details on printingpictures from your computer,click the Help buttonin the KodakEas}Sharesoft_are. -
Page 73: Using The Camera D Ock 6Qqq
Using the Camera Dock 6000 Tile KodakEas_,Share c amera dock 6000: O Makes it easyto transferpictures and _ideosto the computer. (_ Chargestile includedKodakEas_,Share N i-MHrechargeallle batteU pack. (Installtile batteU pack in the camera fnr charging.) O Suppliespower to the camera. Youc:m purehase a camera dock at a dealer of Rodak products or at _w_v kndak.eom/go/c\6330aeeessories. -
Page 74: Installing T Hecustom Camera Insert
Chapter 9 Installing the Custom Camera Insert Auniversal insert is pre-installed in theeamera doek./t alkm s all Kodak Eas!,ShareCX/DX6000 s eries and LS600seriescameras to use tilecamera dock. Acustom insert is inchlded withyour camera./t I)rovi(lesa perfectfit for the KodakEas}ShareCX6330zoom digitalcaulera, Remove the Universal... -
Page 75: Connecting Thecamera Dock 6 000
Chapter 9 Connecting the Camera Dock 6000 Aftertile KodakF, a s_,Share soft_are is loaded (set.page 57), eonnect tiw camera dock to _,ourcomputer aM to a p(mer outlet."_uuneed: 0 TileUSBcable included with_,ourcamera Q) Tile5-volt4Cadapter included withthe canera {lock IMPORTANT: Make sure _our {amer. is NOT in the career, dock when )ou alY"cotmecting to power and the ( onvmtex 1 Plugthe labeled _ end of tile tfSBcable... -
Page 76: Installing T Herechargeahe Battery
Rechargeable Battery _ou received (2) Kodak Max digfital eamera batteries (,_) with _our eamera. To take fllll ads:mtage of._our camera dock 6000, replace the A£ batteries x_ith the kodak Eas_,Share Ni-MH rechargeable batte U pack that is packaged x_th the camera dock. -
Page 77: Docking Thecamera
&agh_g l/£,btghm's greets. lhe camera is now powemd L D, the Transf_ lights camera dock hzstead (fthe camera light batteries. NOTE: If the Kodak Eas_,Share Ni-MH rechargeable battew pack requires charging, charghlg begins (see page 68). -
Page 78: Charging Thebattery
• Chapter 9 Charging the Battery 1 Makesure tile KodakF.as}@areNi-MH rechargeable batter_pack is installedin tlle camera (see page 66). 2 Turnofftile camera and place it in the camera dock (see page 67). lf the batterr req*dreschalshzg, cha_shzgbeghzs c_ter a brief batterr check. C) Fullcharghagtakes about 2.5 hours. -
Page 79: Transferring Pictures With Thedock
2 Push the Trallsferbutton. l_e l?ausfi, rl/gbt b&_& gmeu u'bile the pictmws arm videos are tra_l,sfi,lri_l_q_ Jlessc_es about the tmt_sfer status cqq_ear button ott the camera screen. Kodak Ea,%Sg,aw software automatica&' ()/)ells (m your light computer NOTE: After transferring, file camera dock resmnes charging as necessary,. -
Page 80: Reviewing Pictures A Nd Videos
Revie_qng Pictures aud Videos,for details. _nu can perform any c:uneraflmction xqth tilecmnera in the dock (ex., faking pictnms, checMugor changingsettings). Camera Dock 6000 Specifications Sp_a Communication I_SB Cable(included\dth Kodak Eas_,Share withcomputer cameras) Dimensions Width 6.1 in. (155 ram) (/qthouthlsert) Depth 3.7in. (94.5 mm) Height 1.2 in.(31 mm) -
Page 81: Troubleshooting--Camera
Transfer butt(re. (luringpicture tralsfer. Tra_sferbuttonwasnot Press tile Transfer button. pressed. Earlier Cameras and Docks _nur KodakEas}Sharecamera dock 6000 requires a Kodak Eas}Share CX/DX6OOO or 1£600 series digitalcamera. Earlier camera models (KodakEas}Share4000 series and pre_ious) require tileoriginal KudakEas}Sharecamera dock or canlera dock/I,... -
Page 83: 1Qtroubleshooting
0 Troubleshooting When you have questionsabout ymr camera or camera dock 6000, start here. AdditJmlal t echnical informatiouis availablein tileReadMefilelocated on tile KodakEas_,Share s oft_are CD.For updates to Troubleshootinginformation,see _w_v kodak.eoul/go/cx6330support. Camera Problems Cameradoes not Batteriesare not Reinstallthe batteries (page 4). - Page 84 Chapter 10 iii,iii+i++ll+i++iiii{iiiiiiiiiiii ShortbatteU lili' Dirtor n_datiou ontbe Wille the euntaclswitha cleatl, dU _ith Kodak batteU contacts, cloth (page 97) before loading batteries Eas},Share Ni-MH ill the camera, recMrgeable batteU pack. Shutter button Camera is not turned tile ]'llFll Oil camera does not work.
- Page 85 Chapter 10 • Check tilepicturestorage location Thecamera I11W notbe /fl Re\iew mode, setting (pageII). du not sPe a accessing filecorrect )icture (or the stnrage location. expectedpicture) on tilecamera screeu. /n Reviewmode, Thepicture has no Transfertilepicture to tile a blue screen is thumbnail or ao computer (page 61 or page 69), tiispla},ed instead unrecognized...
- Page 86 \qlen a cardis error \_hen the card inserted or was inserted or before iuseNug or remmiug a reulo/ed, reulo/ed. card. Kodak CRV3 Batte U is not oriented See page 4. litbimn batte U correct b. (loes not fit in the can/era.
- Page 87 Chapter 10 • Picture is not Thelens is diW. Cleanthe lens (page 94). dear. Subject tooclose when Moveso fllere is at least 23.6 in. (60 cm) betueen tilecamera and taking picture. the subject, or at least 5.1 in. ( 13 cm) at Widein Close-upmode.
-
Page 88: Camera!Computer Communications
Thecomputer Thereis a problem with See this fileon the Eas_Share file configurationof the softwareCD:USB.bm_I O r, go to: Callnot communicate USB port on the wx_x_.kodak.com/go/ witbthe compnter. camerasupport camera, ¢mnera pmwr is off. rum o_ the camera (page 6). BatteU is not charged. -
Page 89: Mmc!Sd Cards A Ndinternal Memory
Chapter 10 • _a..s i_'_,i_,i!iii!lli!iiiiiiiii Cannot t ransfi_r Sol_aareis notinstalled. Disconnect USBcable. (/l rising cmnera dock,disconnectcableaud pictures. remove camera fromdock). Install (TheAddNe_ Eas}Shareso_are (page 57). Hardx_:are Wizardc:mnot Soft_/areis installed Disconnectthe USBcable. Closeall locate drivers.) incorrectl}, open applications.Uninsta[l,then re-install the software (page 57). To uninstall, go to StarVSetlings/ ControlPmleVAdd!Remove Programs. -
Page 90: Camera Screen Messages
Chapter 10 ..iii,iii,i ll,i iiii{iiiiii Memo_ card Storageis filll. Transferpictures and videos to the filll computer (page 61 or page 69), tfienddete them from the camera. m_[\inmnl Transferpictures and _ideos tn the nmnber of filesor computer, then fnnnat the card or foldersis reached (or internal menloU (page 56). - Page 91 Chapter 10 • so); The camera intenlal Format the internal /merna/memo U requires fnnnatting memoU is corrupted. memoU (page 56). Internal melnol_ _ Cmltion: F ormattingerases all pictures midvideos, cannotlie read (Please formatinternal includingprotected files. (Formattinginternal memoU) email inenlol_. also erases addresses and album nanles.
- Page 92 • ChapterlO Insert a newcard Memo U card is Thecard is slow, mmsable (Insert anew corrupted, or (page 10). unreadable. memoU card) Card cauuot be used tn Recordingstopped. Changestorage location tn Record in internal take _ideos. internal memory memoW (\_lemo U (page 11).
- Page 93 Chapter 10 • soi; No album names on Albnnlnames haw not Create and coW _flbum camera (Connectwith been copied tn tile names fromcomputer. See canlera from tile computerto import Eas)Sharesol, are Help. album names) computer. The internal tea_e the camera offfnr High calnem temperatnm (Camera temperatnre of the...
-
Page 94: Camera Ready Light S Tatus
• Chapter 10 Camera Ready Light Status Ready light _+!!!!!!!!!!!!!!!!!!!!!!!!!!!!!!!!!!!!!!!!!!!!!!!!!!!!!!!!!!!!!!ii!i _,Ls Read_light does not Cameraisnotturned Turll oll the camera tile (page 6). ttlrll o11 alld does camera Ilot Batteriesare Recharge the batte_ _ork, e\hausmd, (page 68) or install'ne_ ones (page 97). Mode dial wason Turn Mode dial off,then \dmn batteries were... - Page 95 Chapter 10 • s.lutto Read}light blinks Flashis not charged. Wait.Resumepicture taMng allow, tqlen thelight stops blinking and turns green. Release the Shutter button AlltO exposure and recompose the picture. auto fncus are not locked. Batieries are low or Rechargethe batteU Read_ light blinks red.
-
Page 97: Getting Heip
Getting Help Helpful Links Helpwithyour cmnera ww_.kodak.eom/go/ex6330support HelpwithWindowsoperating ww_.kodak.eonggo/pebasies s}stemand working withdigital )ictnms Dm_uloadthe latest c;unera ww_.kodak.eonggo/(x6330downloads soft_are aud firmware Optimize}our printer furtruer, wwx_.kodak.eonVgo/onetoueh more_Jbrmltcolors Getsupport for cameras, ww_s.kodak.eonVgo/support soft_are, accessories, more Purchase cmnera accessories ww_.kodak.eonggoA:x6330aeeessories Registeryour camera ww_.kodak.eonggo/re_ster Vie_ online tutorials wwx_.kodak.eoul/go/howto... -
Page 98: Software Help
• Chapter 11 Software Help Clicktile Helpbutton in tJle KodakEas)Sharesof_,_are. Telephone Customer Support /f ym haw questionsconcerning tilt' uperatiou of the sub, are or camera, ym ma}speak \qth a customer support representatffe. Before You Call 0 Havetilecmuera or camera dock connected to your computer. 0 Be at your contputer. - Page 99 Chapter 11 • Telephone Numbers Australia 1800 147 701 Austd_Osterreich 0179 567 357 02 713 14 45 Belgium/BdgJque Brazil 0800 150000 Cmlada 1 800 465 6325 C]_na 800 820 6027 Denmark/Danmark 3 848 71 30 /relan_D_ire 01 407 3054 Finland!Suomi 0800 1 17056 France 01 55 1740 77...
- Page 100 • Chapter11 Spain/F, spana 91 749 76 53 Sweden/Sverige 08 587 704 21 S_Jtzer/an(1!Schx_ei_JSuisseOl 838 53 51 Taix_au 0 080 861 008 Thailand 001 800 631 0017 0870 243 0270 UnitedStates 1 800 235 6325 Outside tileIlnited States 585 726 7260 International TollLine +44 131 458 6714 /ntematio_al TollFa',...
-
Page 101: Appendix
Appendix Ca mera Specifications For more specifications,_isit_Lkodak.eonVgo/cx633(tsupport. Color 24-bit, millionsof colors Colormodes Color,black &\qtite, sepia Communicationx_ithcomputer USB, v ia: ITSB cable, E:Ls_Share c amera clock6000, or printer dock 6000 Dimensions Width 4.0 in. (102.5 ram) Depfll 1.5 in. (38 ram) Height 2.6 in. - Page 102 • Chapter 12 /SOsp(,(,d AntomatJc 100-200 Lens T}pe OpticalqualiU glass, 6 groups/7 eMneuts (2 aspherica/lenses) Wide:f/2.7-f!5.2;Tele: f/4.6-f/8.7 ,_,.perture FocalLength 37 - 111 nnn (35 mm equivalent) Focus Distance Wide: 23.6 in. (.6 m) to infiniff Close-up:Lessthan 5.1 in. (13 cm) 1.6 in.
-
Page 103: Original Factory Settings
Chapter 12 • Original Factory Settings Date/Time 2003/01/01; 12:00 Date/TimeStamI) DefaultPrint Quanti_ DigitalZoom initiatiou Pause ExposureCompensation Flash Auto,Night:_uto flash Sport: _,utoflash Landscape, C lose-up, V ideo:FlashOff hnage Storage Auto Lmlguage English LBe\iex_ OrientationSensor Picture Qualit_ Best Quick'_qe\_, SlideShm_Inter_al 3 secouds SlideShowLoop VkleoDateDisplg None... -
Page 104: Upgrading Your Software And Firmware
Software and Firmware Do_nload the latest versions of tile soft_are included on tile I_odakF.as_,Share soft_are CD:rodthe camera firm_are (tile soft_are that runs on the camera). Seeww_.kodak.conl/go/cx6330downkmds. Tips, Safety, Maintenance 0 Alwa_,s f ollm_basic safe_ precautions. Referto the "hnpurtant SafeW Instructions" booklet paeked withyour camera. -
Page 105: Storage Capacities
Chapter • Storage Capacities File sizes can _ar_ "_numa'_be able to store more or fe_er pictures and _idens. Video Storage Capacity 1 rain. 16 MB internal memol 3' 1 rain. 16 MB MMC/SD 2 rain., 15 sec. 32 MB MMC/SD 64 MB MMC/SD 4 rain., 30 sec. -
Page 106: Locating Pictures And Videos On A Card
• Chapter 12 Locating Pictures and Videos on a Card Pietures stored on M\_IC/SD Cards use a s_ldard (DCF-Digqtal Camera Forma) agreed upon by manycamera manufacturers.Thislets Bm use the cards in differentcameras, lfym use a card reader to retrieveynlr files,the followingdescription of the card filestructure ma_,lie helpM. -
Page 107: Using The Batteries
Chapter 12 • Q)/f _,ouuse the eard ill a ca_n'ra other than the KodakF.as)ShareCX6330 zoom digita]camera, and that camera m*mfaeturer adheres to this file structure standard, the \DC/Mfolder contains a folder named b} that csm_era. F or morn information, refer m the documentation that accompaniedthat cmnera. - Page 108 • Chapter12 C) To lengthen battery life, limit the followingactivities: UsingLi_esiew(using the camera screen as fileviex_finder, see page 15) Reviex_ing }our pictures on the camera screen (see page 37) Excessiveuse of the flash Q) Dirt ml tileIlatteU contact'_can affectbatteU life.Wipetile contactswitha de:m, dU cloth before loading batteries ill the camera.
-
Page 109: Power-Saving Features
Optional AC Adapter You can lmrehase an optional Kodak 3-volt AC adapter to 1)mwr }our camera. Use it tn sa_e batte U pnwer when revieMng and transferring picinres. Connect tile ACadapter to the De-In port. Conneet the nther end of the A¢ adapter to an electrical outlet. -
Page 110: Fcc Compliance And Advisorj
Chapter 12 FCC Compliance and Advisor/ Tested to comply with FCC Standards. Kodak EasyShare CX6330 zoom digital camera FOR HOME OR OFFICE USE Thisequipme_}t Ms been testedaud found to comply_ith the limitsfor a Class Bdigita]device,pursuant to Part 15 ofthe FCCRules.These limitsare designed m providereasonable protection against harmfulinterference in a residential installatiou. - Page 111 Index Numerics batteries 4-wa} controller, ii loading,4 rq)lacement bpes, 97 A/'€ out, iii, 44, 55 batteU AAbatteu, installing, 4 charge via camera dock, 68 about door location,iv camera infommtJon, 56 extendinglife,98 picture, video, 46 burst, ii, 22 button AC adapter, 99 accessories ddete, ii, 17 batmu, 97...
- Page 112 index camera dock, 71 connecting camera dock, 65 charging batteL',, 68 system requirements, 57 connection, 65 transfer to, 61,69 camera, iv connecting COllllector docking camera, 67 camera dock, 65 lights s .tams, 69 camera to camera dock, 67 package contents, 63 COlllleCtor specifications, 70 for camera dock, iv...
- Page 113 index • ddete button,ii ddeting favorites,tagging,50 by formatting,56 FCCcompliance,100 during quick*Jew, 1 7, 32 file names, card, 96 firmware frominterna3memou, 39 from MMC/SD Card, 39 upgrading, 94 version, 56 protectingpictures, flash videos, 41 digitalzoom settings, 19 changing,54 unit, focus using, 18 displayingslide show,43 framingmarks, 16 disposal, recycling,94...
- Page 114 _" index camera status,8 light mode dial, 14 camera dock, 68 image storage menu, 11 reaCh,ii information sdf timer, 21,35 about camera, 56 sellsor, i liveview about pictures, videos, 46 camera screen as installing batteries, 4 viewfinder,15 _DIC/SD card, 10 chmlgingdefault,53 software,59 loading...
- Page 115 index • MISC folder, card, 96 pictures MMC/SD card checMng location, 12 file names,96 coding, 45 formatting,56 date imprint, 28 inserting, 10 ddeting, 39 printingfrom, 62 emaJling tagged, 49 settingstorage location, 11 file naming, 96 slot location,iii locating on card, 96 storage capacities,95 magni_ing, 40 mode dial, ii, 14...
- Page 116 index urder online,62 deleting,39 pictures, 62 magni_ing, 40 taggedpictures, 62 protecting, 41 this user guide, 1 slide show,43 \_ithuutcomputer,62 reviewingvideos product uverview, i i as youtake them, 32 protectingpictures, videos,41 camera screell, deleting,39 protecting, 41 quailU setting,25 slide show,43 quickviex_, running slide show,43 turning off, 52 using, 17,32...
- Page 117 index • resolution,25 systemfolder, card, 96 self timer,21, 35 systemrequirements storage location, 11 Macintosh,58 videoout, 55 Windows, setup mode, using, 51 sham fiutton,ii, 47 tagging shutoff,auto, 99 shutter favorites,50 for email,49 problems, 74 for print, 48 self timer ddaL 21, 35 when to tag,47 sleep mode, 99 slide show...
- Page 118 46 upgrading software, viewing picture firmx_are, 94 after taMng, 17, 37 URLs,Kodak web sites, 87 magnified, 40 USB (universal serial bus) viewing video, after taking, 32 connection location, iii transferring pictures, 61 white balance, 92 ¥...
- Page 119 EastmanKodakCompany 343 StateStreet Rochester,Ne_ "turk 14650 © Eastmal KodakCompal}, 2003 Kodaka11dEas}Shareare trademarks of EastmanKodakCompa11}. P/N6B8451...
Need help?
Do you have a question about the EasyShare CX6330 and is the answer not in the manual?
Questions and answers