Table of Contents
Advertisement
Available languages
Available languages
TABLE OF CONTENTS
WARRANTY STATEMENT
......
2
SAFETY RULES ...............
3
INTERNATIONAL
SYMBOLS
....
5
ASSEMBLY
...................
6
OPERATION
..................
8
MAINTENANCE
...............
13
SERVICE AND ADJUSTMENT
..
16
TROUBLE SHOOTING CHART.,
19
REPAIR PARTS
...............
20
ENGINE REPAIR PARTS
.......
25
SPANISH (ESPAI_IOL) ..........
31
PARTS ORDERING/SERVICE
..
BACK COVER
WARRANTY
STATEMENT
LIMITED
ONE-YEAR
WARRANTY
ON CRAFTSMAN
CULTIVATOR
For one year from the date of purchase, when this Craftsman Cultivator is maintained, lubri-
cated, and tuned up according to the operating and maintenance instructions in the owner's
manual, Sears will repair, free of charge, any defect in material or workmanship.
This warranty excludes tine(s), spark plug, and air cteaner which are expendable parts and
become worn during normal use.
If this Craftsman Cultivator is used for commercial or rental purposes, this warranty applies
for onIy 90 days from the date of purchase.
WARRANTY
SERVICE IS AVAILABLE
BY RETURNING
THE CRAFTSMAN
CULTIVA-
TOR TO THE NEAREST
SEARS SERVICE CENTER/DEPARTMENT
IN THE UNITED
STATES. THIS WARRANTY
APPLIES ONLY WHILE THIS PRODUCT IS IN USE IN THE
UNITED STATES.
This warranty gives you specific legal rights, and you may also have other rights which may
vary from state to state.
Sears, Roebuck and Co., D817WA, Hoftman Estates. IL 60179
Engine Exhaust,
some of its constituents,
and
certain
vehicle
components
contain
or emit
chemicals
known
to the State of California
to
cause cancer
and birth
defects or other repro-
ductive
harm.
Battery posts, terminals
and related accessories
contain
lead and lead compounds,
chemicals
known to the State of California
to cause cancer
and birth
defects or other
reproductive
harm.
WASH HANDS AFTER HANDLING.
IMPORTANT: This unit is equipped with an internal combustion
engine and must not be
used on or near any unimproved forest-covered,
brush-covered
or grass-covered
lard
unless the engine's exhaust system is equipped with a spark attester meeting
applicable local or state laws (if any). If a spark arrester is used, it must be maintained
in
effective working order by the operator.
In the State of California the above is required
by law (Section 4442 of the California
Public Resources Code). Other states may have similar laws. Federal laws apply on fed-
eral lands. See a Sears Authorized
Service
Center for a spark attester
for the muffler.
F-011302M
2
Advertisement
Table of Contents

Related Manuals for Craftsman 536.292522


Summary of Contents for Craftsman 536.292522
- Page 1 ON CRAFTSMAN CULTIVATOR For one year from the date of purchase, when this Craftsman Cultivator is maintained, lubri- cated, and tuned up according to the operating and maintenance instructions in the owner's manual, Sears will repair, free of charge, any defect in material or workmanship.
- Page 2 IMPORTANT Safe Operation Practices for Cultivator WARNING: It means: "Attention! Look for this symbol to point out important safety precautions. Become Alert. Your Safety Is Involved. • Never store fuel or cultivator with fuel in the ARNING: To prevent acciden- tank inside e building where fumes may tal starting when setting-up, reach an open flame.
- Page 3 IMPORTANT • Take all possible precautions when leaving and keep the wire away from the plug to the cultivator unattended. Stop the engine, prevent accidental starting. Thoroughly in- , Do not overload the cultivator capacity by spect the cultivator for any damage, and repair the damage before restarting and attempting to till too deep at too fast a rate.
- Page 4 IMPORTANT INTERNATIONAL SYMBOLS IMPORTANT: Many of the following symbols are located on your unit or on literature sup- plied with the product. Before you operate the unit, learn and understand the purpose for each symbol. Control And Operating Symbols Slow Fast Fuel Half Choke...
- Page 5 ASSEMBLY ASSEMBLY PARTS PACKED SEPARATELY IN CARTON 1 - Owner's Manual (not shown) f - 5.2 oz. 2-cycle 1 - 5.2 oz. 2-cycle glasses or eye shields while as- WARNING: Always wear safety sembling the cultivator. Figure 1 shows the cultivator completely sembled.
- Page 6 ASSEMBLY _." CHECKLIST For the best performance and satisfaction from this quality product, please review the following checklist before you operate the cultivator: All assembly instructions have been completed. Check carton. Make sure no loose parts remain in the carton. All fasteners have been properly tight- ened.
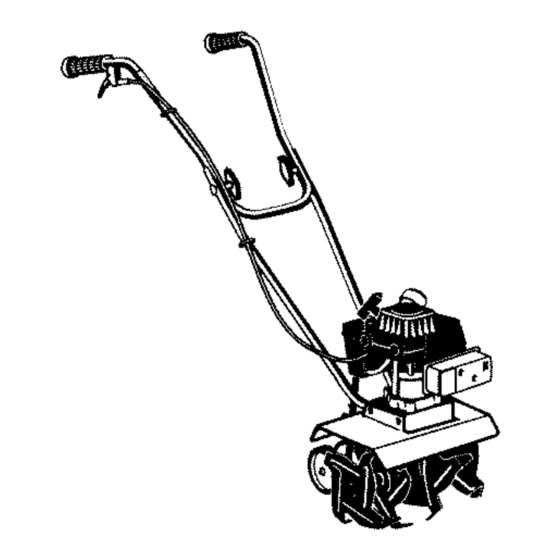
- Page 7 OPERATION KNOW YOUR CULTIVATOR READ THE OWNER'S MANUAL AND ALL SAFETY RULES BEFORE YOU OPERATE the cultivator. To familiarize yourself with the Iocation of the controls, compare the illustrations with our cultivator'. Save this manual for future reference. Recoil Starter Handle ON / OFF Switch Throttle Control...
- Page 8 OPERATION HOW TO USE THE CULTIVATOR How To Stop The Cultivator Release the throttle control to stop the tines. Depth Stake Move the ON/OFF switch, on the engine, to the OFF position. Clevis Pin How To Set The Depth Use the depth stake to control the tilling depth and the forward speed.
- Page 9 OPERATION BEFORE STARTING THE ENGINE IMPORTANT: Do not use outboard mo- How To Prepare The Engine tor oil or multi-viscosity oils,such as WARNING: Always use a safety 10W-30 or 10W-40. fuel container. Do not smoke _when adding the fuel mixture to install the fuel cap onto the gasoline con- the engine.
- Page 10 OPERATION HOW TO START THE ENGINE Before you start the engine, make sure that Pull the starter handle with rapid, full arm you have read and understand all the in- strokes until the engine starts. structions on the preceding pages. When the engine starts, move the choke Iever to the HALF CHOKE position.
- Page 11 OPERATION CULTIVATING TIPS Tilling is digging in, turning over and If the cultivator stops forward motion and breaking up packed soil before planting. tries to dig deeper than necessary, move the handles from side to side to start for- Loose unpacked soil helps root growth. ward motion.
- Page 12 MAINTENANCE CUSTOMER RESPONSIBILITIES SERVICE RECORDS After Fill in dates as you Before First Every Every Before complete regular Each Before Each SERVICE service. Hours Hours Hours Storage Season DATES Tighten Ag Screws and ..Nuts Lubricate Tine Shaft Lubricate Transmission Check Spark Plug Clean Cylinder Exhaust Ports...
- Page 13 MAINTENANCE LUBRICATION Every 25 hours and/or at the beginning of if it is damaged (see the Repair Parts each season, make sure the gear box is section in this manual). filled with lubricant (see Figure 6). Tubes of Clean and lubricate the tine shaft with a gear lubricant are available from most auto- few drops of oil.
- Page 14 MAINTENANCE SPARK PLUG Before installing the spark plug, coat the threads lightly with oil for easy re- moval Tighten the spark plug to a torque Check the spark plug every 25 hours Re- of 15 foot pounds place the spark plug if the electrodes are pitted or bur ned or d the porcelain Es cracked Feeler Gauge...
- Page 15 SERVICE AND ADJUSTMENT HOW TO REMOVE AND INSTALL THE TINES Tine Installation References to the dght or left side of the cul- tivator are from the viewpoint of the opera- Clean and lubricate the tine shaft with a tot's position behind the unit. few drops of oil.
- Page 16 SERVICE AND ADJUSTMENT HOW TO ADJUST THE CARBURETOR A dirty air cleaner will cause the engine to Turn the mixture adjusting screw clock- run improperly or to smoke excessively. Be- wise until it is halfway between the first fore adjusting the carburetor, make sure the _osition and the second position.
- Page 17 SERVICE AND ADJUSTMENT STORAGE Cover the cultivator with a suitable pro- tective cover that does not retain mois- tivator indoors with fuel in the ARNING: Never store the cul- fuel tank. Never store in an en- ture. Do not use plastic. closed, poorly ventilated area where IMPORTANT: Never cover the cultivator fumes could reach an open flame, a...
- Page 18 TROUBLE SHOOTING CHART TROUBLE CAUSE CORRECTION Stale fuel mixture Drain fuel tank. FilI with fi'esh Engine difficult to start fuel mixture. Too much oil in fuel mixture Check fuel mixture chart and mix fresh fuel. Dirt in fuel tank or out of fuel Clean fuel tank.
- Page 19 CRAFTSMAN 536.292522 REPAIR PARTS 323392C NO. DESCRIPTION PARTNO. DESCRIPTION PARTNO. Screw 180042 Engine 143.002072 2.0HP Flat washer 56694 Cable, Throttle 319306 Rotor 335350 Instruction Manual F-O11302M Washer 120380 F-O11302M...
- Page 20 CRAFTSMAN 536.292522 REPAIR PARTS 312_ 318848C DESCRIPTION PARTNO. Transmission 740061 340550 Bracket, Depth Rod 180024 Screw, 1/4-20xl.25 Nut, 1/4-20 782585 F_O11302M...
- Page 21 CRAFTSMAN 536.292522 REPAIR PARTS _491 318849c DESCRIPTION PARTNO. DESCRIPTION PART NO. Shield, Tine 309073-848 Tine Assy. Inner RH 56156_53 Screw, 1/4-20x5.00 273869 Tine Assy. Outer RH 56154-853 Clevis Pin 56123 Flat washer 120392 Hair Pin 56180 Nut, 1/4-20 46931 Decal, Caution...
- Page 22 CRAFTSMAN 536.292522 REPAIR PARTS 318852G PARTNO. DESCRIPTION 330799-853 Wheel Support Assy. Clevis Pin 333635 Hair Pin 56180 Tire & Rim 339277 Push On Nut 73664 F-O11302M...
- Page 23 CRAFTSMAN 536.292522 REPAIR PARTS 319375C DESCRIPTION PARTNO. Upper Handle 56237-853 Lower Handle LH 339398-853 Lower Handle RH 339399-853 Bolt 5/16-18xl 56199 Formed Washer 783000 Flat washer 120393 T Knob 57171 Nut, 5116-18 120376 Hand Grip 56778 Screw, 10-16xl.50 426635 Cable Tie...
- Page 24 CRAFTSMAN 143.002072 REPAIR PARTS 7250 101\ "258 110f _210 _/178 F-Ol1302M...
- Page 25 CRAFTSMAN 143.002072 REPAIR PARTS PART PART DESCRIPTION DESCRIPTION RPM High 5000 to 5400 650849 Flywheel Nut RPM Low 1700 to 3000 611056 Solid State Ignition (Incl. 101) 250303 Cylinder(Incl. 119, 184, 187 & 187A) 610118 Spark Plug Cover 650888 Screw, T-30...
- Page 26 CRAFTSMAN 143.002072 REPAIR PARTS 450253 Air Cleaner Cover 410280 Fuel Cap 650867 Screw, 10-24 x 1/2" 570659 Blower Housing Plug 350435 Blower Housing Base 610650B Toggle Switch 370C 550239 Choke Decal 650850 Screw, 8-32 x 1-9/16" 650939 Stud 370D 35977...
- Page 27 CRAFTSMAN 143.002072 REPAIR PARTS F-Ol1302M...
- Page 28 CRAFTSMAN 143.002072 REPAIR PARTS PART DESCRIPTION 640231 Carburetor (Incl. 184 of Engine Parts List) 640232 Throttle Shaft & Lever Ass'y. 640233 Throttle Return Spring 640234 Dust Seal Retainer 640236 Spacer 640237 Dust Seal Washer 640238 Dust Seal 640239 Throttle Shutter 640235 Screw, Throttle Shutter &...
- Page 29 CRAFTSMAN 143.002072 REPAIR PARTS PART DESCRIPTION 590690 Rewind Starter & Housing Ass'y. 650987 Retainer Screw, 10-24 x 1-3/8" 650985 Pawl Screw, 12-24 x 11/64" 650147 Washer 590691 Pawl Spring 590692 Pawl 590693 Pulley 590562 Rewind Spring 590639 Starter Rope (#4 rope, 71" long)
- Page 30 NOTES F-O11302M...
- Page 31 NOTES F-O11302M...
- Page 32 CULTIVADORA dientes de 10 pulgadas, motor de 49,2 cc, 2 tiempos y 2,0 caballos de fuerza MODELO 536.292522 Precaucibn: Lea y siga todas las normas de seguridad e instrucciones de operacibn antes de usar este producto. SEARS, ROEBUCK AND CO., Hoffman Estates, IL 60179 U.S.A.
- Page 33 GARANTiA LIMITADA DE UN ANO PARA LA CULTIVADORA CRAFTSMAN Esta cultivadora Craftsman esta garantizada por un aSo a partir de la fecha de compra, siem- prey cuando se le haya dado mantenimiento, lubricado y aflnado de acuerdo con las instruc-...
- Page 34 IMPORTANTE Pr_cticas para la operacibn segura de la cultivadora. ADVERTENCIA: Busque este simbolo que le indicara puntos importantes de precaucibn para su seguridad. Este simbolo quiere decir: "iAtencibn! iEst_ alerta! Preste atencibn a su seguridad". dado. Nunca Io Ilene en un espacio cerra- do.
- Page 35 IMPORTANTE • Nunca permita que haya personas cerca • Mantenga la cultivadora en condiciones de de la cultivadora en marcha, funcionamiento seguras. Revise con regu- laridad todos los sujetadores para mante- • Mantenga alejados a niSos y mascotas du- nerlos debidamente apretados.
- Page 36 IMPORTANTE SiMBOLOS INTERNACIONALES IMPORTANTE: La mayoria de los simbolos siguientes se encuentran en la unidad o en la informacibn que viene con el producto. Antes de usar la unidad, familiaricese con el signifi- cado de cada uno de los simbolos. Simbolos de control y funcionamiento Combustible Aceite...
- Page 37 MONTAJE MONTAJE MATERIALES INCLUIDOS EN LA CAJA 1 - Manual del usuario (no aparece en la figura) f - Aceite de 2 tiempos 5,2 onzas. 1 -Botella de aceite, 2 tiempos 5,2 onzas gafas de seguridad durante el ADVERTENCIA: Siempre montaje de Ia cultivadora.
- Page 38 MONTAJE _." LISTA DE COMPROBACION Para obtener un rendimiento 6ptimo y la ma- yor satisfacci6n de este producto de alta ca- lidad, favor de revisar la siguiente lista de comprobaci6n antes de hacer funcionar su cultivadora: Se han completado todas Ias instruc- ciones de montaie.
- Page 39 OPERACION CONOZCA SU CULTIVADORA ANTES DE HACER FUNCIONAR LA CULTIVADORA, LEA EL MANUAL DEL USUARIO Y TODA LA INFORMACION SOBRE SEGURIDAD. Para familiarizarse con la ubicaci6n de los controles, compare las siguientes ilustraciones con su cultivadora. Guarde este manual para referencias futuras.
- Page 40 OPERACION COMO USAR LA CULTIVADORA Cbmo detener la cultivadora Suelte el control del acelerador para de- tener la rotaci6n de los dientes. Barra de Mueva el interruptor de ENCENDIDO APAGADO (ON/OFF), ubicado en el mo- tor, a la posici6n APAGADO (OFF). i_'ad Pasador de Cbmo...
- Page 41 OPERACION ANTESDEHACERARRANCARELMOTOR Cbmo preparar el motor Afiada al contenedor de gasolina 5,3 on- zas de aceite para motor de dos tiempos asegurandose que el aceite est6 limpio y recipiente de seguridad para el DVERTENCIA: Use siempre un que sea de buena calidad. combustible.
- Page 42 OPERACION COMO ARRANCAR EL MOTOR Antes de arrancar el motor, aseg_rese de Una vez que el motor arranque, mueva haber leido y entendido todas las instruccio- el control de cebado a ia posici6n de nes de las p_ginas anteriores. CEBADO MEDIO (HALF CHOKE). Cuando el motor est_ corriendo de ma- Llene el tanque de combustible hasta hera uniforme, mueva el control de ce-...
- Page 43 OPERACION CONSEJOS PARA CULTIVAR Arar es cavar, revolver y aflojar la tierra m&s r_pido y que cave a menor profun- didad. compactada antes de cultivar. La tierra suelta facilita el crecimiento de las rai- Si la cultivadora deja de avanzar y trata ces.
- Page 44 MANTENIMIENTO RESPONSABILIDADES DEL USUARIO REGISTRO Despu_s Antes SERVIClO Antes de las FECHAS Anotelasfechasa 3rimeras Cada Cada Antes cada medidaque complete cada 2 horas tempo- SERVI- cadaservicio, de uso horas horas guardar rada Apretar todas los tornillas ..y tuercas Lubricar el eje de los dientes Lubricar la transmisi6n Revisar la bujia...
- Page 45 MANTENIMIENTO LUBRICACI¢)N Revise la arandela de fieltro (vea la Figura 6). Si la arandela de fieltro est& Despu_s de cada 25 horas de uso y/o a prin- da_ada, reemplacela (consulte la sec- cipios de cada temporada, aseg[irese de ci6n sobre piezas de repuesto en este que la caja de engranajes contenga lubrican- manual).
- Page 46 MANTENIMIENTO BUJ|A Antes de instalar la bujia, aplique una capa ligera de aceite a la parte roscada Revise la bujia despu6s de cada 25 horas para facilitar su remoci6n. Apriete la bu- de uso. Debe reemplazar la bujia si los eIec- jia hasta Iograr un par de apriete de 15 trodos se encuentran daSados o quemados, Iibras-pie.
- Page 47 SERVICIO Y AJUSTES COMO DESMONTAR E INSTALAR LOS DIENTES Instalacion de los dientes Cuando se indica el lado izquierdo o dere- cho de la cultivadora en este manual, siem- Limpie y lubrique el eje de los dientes pre se refiere al punto de vista del operador con unas gotas de aceite.
- Page 48 SERVICIO Y AJUSTES COMO AJUSTAR EL CARBURADOR Un flltro de aire tapado impedira el buen fun- Gire el tomillo de ajuste de la mezcla ha- cionamiento de] motor o provocara la gene- cia la derecha hasta que se encuentre raci6n excesiva de humo. Asegerese de que entre las dos posiciones anotadas.
- Page 49 SERVICIO Y AJUSTES ALMACENAMIENTO Proteja la cultivadora con una cubierta la cultivadora con combustible apropiada que no retenga humedad. No DVERTENCIA: Nunca guarde use cubiertas de plastico. en el tanque en un recinto ce- rrado. Nunca Ia guarde en un _rea cerra- IMPORTANTE: Nunca cubra la cultivadora da y con poca ventilacibn,...
- Page 50 TABLA DE LOCALIZACION DE AVERiAS CAUSA SOLUCION PROBLEMA El motor arranca con Combustible viejo Vacie el tanque de combustible. Ll_nelo con dificultad combustible fresco. Demasiado aceite en la Revise la tabla de mezcla de mezcla de combustible combustible y mezcle mas combustible fresco.