Table of Contents
Advertisement
Owner's Manual
IERRFTSMRN'I
10 in. Stationary
TABLE SAW
Model No.
315.228410
Save this manual
for
future reference.
CAUTION:
Read and follow all
Safety
Rules and Operating
Instructions before first use of
this product.
Customer
Help Line: 1-800-932-3188
)
• Safety
• Features
• Assembly
• Operation
• Maintenance
• Parts List
Sears,
Roebuck
and Co., Hoffman
Estates,
IL 60179
USA
Visit the Craftsman
web page: www.sears.com/craftsman
972000-525
11a-98
NRTL/C
Advertisement
Table of Contents

Related Manuals for Craftsman 315.228410


Summary of Contents for Craftsman 315.228410
- Page 1 Rules and Operating • Assembly Instructions before first use of • Operation this product. • Maintenance • Parts List Customer Help Line: 1-800-932-3188 Sears, Roebuck and Co., Hoffman Estates, IL 60179 Visit the Craftsman web page: www.sears.com/craftsman NRTL/C 972000-525 11a-98...
-
Page 2: Table Of Contents
FULL ONE YEAR WARRANTY ON CRAFTSMAN TABLE SAW If this rRRFT$14RN Table Saw fails due to a defect in material or workmanship within one year from the date of purchase, Sears will repair it, free of charge. Contact a Sears Service Center for repair. -
Page 3: Table Of Contents
Assembling Leg Stand ..........................18-19 Mounting the Lag Stand on the Table Saw Base ..................Assembling Table Extensions ........................Aligning Table Extensions ..........................Installing the Rear Rail ..........................Installing the Front Rail ..........................Aligning Rip Fence and Front Rail ......................22-23 Mounting the Motor and Switch ....................... - Page 4 The purpose of safety symbols is to attract your attention to possible dangers. The safety symbols, and the explanations with them, deserve your careful attention and understanding. The safety warnings do not by themselves eliminate any danger. The instructions or warnings they give are not substitutes for proper accident prevention measures.
-
Page 5: Rules For Safe Operation
When servicing, use only identical 14 is recommended for an extension cord 25 feet Craftsman replacement pads. Use of any other or less in length. If in doubt, use the next heavier parts may create a hazard or cause product gage. - Page 6 RULES FOR SAFE OPERATION iContinued) • ALLOW THE MOTOR TO COME UP TO FULL • GUARD AGAINST KICKBACK. Kickback can occur when the blade stalls, driving the work piece SPEED before starting a cut to avoid blade bind- back toward the operator. It can pull your hand into ing or stalling.
- Page 7 Figure 1. It also has a grounding pin like the one shown. ELECTRICAL CONNECTION Your Sears Craftsman Table Saw is powered by a WARNING: Instructions are given in the precision built electric motor. It should be connected...
- Page 8 Table Size without table extensions 20 in. x 27 in. Cutting Capacity with Miter at O'/Bevel 0": 3-3/8 in. Table Size with table extensions 44 in. x 27 in. Cutting Capacity with Miter at 0"/Bevel 45": 2-1/4 in. CRAFTSMAN"TABLE SAW315.228410...
- Page 9 • Remove the wax paper covering on the table. Use Your new table saw has been designed to give you any ordinary household type grease and spot many years of high quality performance. To insure remover. Immediately apply a coat of automotive this goal, proper care and treatment is important.
- Page 10 The following items are included with your Table Saw. L° Figure 2 a A. Table Saw Base ............ O. Rip Fence ............. B, Belt ............... Rail, Front (Hardware Shown Separately) .... 1 Q. Rail, Rear (Hardware Shown Separately) .... 1 C.
- Page 11 Check all loose parts from the box with the list on the previous page, the figures below and on the following page. Small items such as fasteners and end caps are shown in figures 2 b and 2 c. Follow the instructions in the Assembly section to assemble your new saw.
- Page 12 Check all loose parts from the box with the list and figures below and on the previous pages. Small items such as fasteners and end caps are shown in figure 2 c. Follow the instructions in the Assembly section to assemble your new saw.
- Page 13 The remaining tools are typical shop tools and are not included with your saw. SMALL/ MEDIUM NUTDRIVER PHILLIPSSCREWDRIVER 8 mm,10 ram,and 12 mm HEXKEYS(PROVIDED) and 6 mm COMBINATION SQUARE HAMMER 45° TRIANGLE WRENCHES: 8 mm,10 mm,and 12 mm ADJUSTABLE WRENCH FRAMINGSQUARE CRAFTSMAN" TABLE SAW 315.228410...
- Page 14 Spinning Bladeand 10 inch Table Saw Break. 3,600RPM 120/240V01.1S S0_ ACONLY 13AIB,SA •To Reduce The Riskof Injury, WARNING: WHEN SERVIClNGjUSE ONLYIDENTICAL GuardMustBe CRAFTSMAN REPLACEMENT PARTS. In Place MODEL 315.228410 SER.NO. During Usa. M_DE IN T/dWAN • Alignand SEARS, ROEBUCK AND CO.
- Page 15 • Dlseonnact the sew from the power source before Turn Counterclockwise to See Instructions for dpplng. changing blade or servicing. Lower Blade. • Never reach around or ever sew b_ade. • Do not expose to rain or use |n damp places. Fig. 4 b CRAFTSMAN" TABLE SAW315.228410...
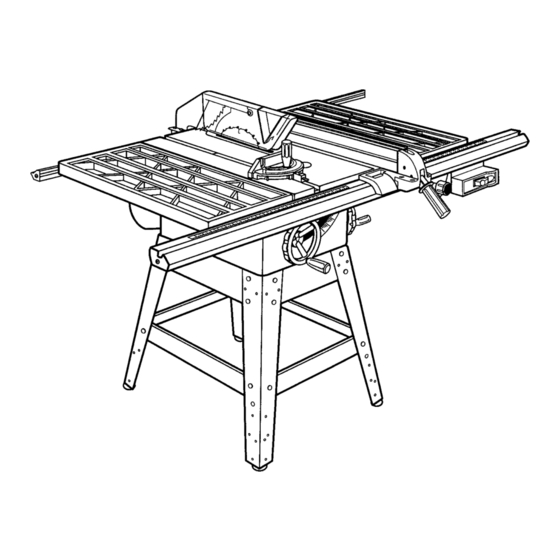
- Page 16 KNOW YOUR TABLE ANTI-KICKBACK PAWLS BLADE REARRAIL RiPFENCE RIVINGKNIFE ALIGN-A-CUT TABLE OR SPREADER INSERT EXTENSION MITER SCALE GAGEGROOVE TABLE EXTENSION :RONT RAIL MRER SWITCH GAGE WITH KEY BEVEL ADJUSTMENT HANDWHEEL KNOB SCALE RIP FENCE HANDWHEEL HANDLE LEGSTAND BELTCOVER LEVEUNGFOOT BEVEL LOCKHANDLE MOTOR Fig.
- Page 17 RIP FENCE - A sturdy metal fence guides the BLADE -This saw is provided with a Craftsman 24 workpiece and is secured with the rip fence handle. tooth, 10 in. carbide tipped blade. The blade is...
-
Page 18: Loose Parts List
Assembly is best done in the area where the saw will be used. When you remove the table saw base, loose parts, and hardware from the packing materials, check all items with the loose parts list and drawing. If you are unsure about the description of any part, refer to the drawing. -
Page 19: Labels
Add hardware and finger tighten. Repeat for the holes in the table with the holes in the end the other long upper brace. braces. Make sure the Craftsman label faces the • Usa the same steps to install the lower braces. - Page 20 ASSEMBLINGTABLE EXTENSIONS WARNING: The extensions are very heavy. Do not lift the saw table without help. Keep your Figure knees bent and lift with your legs, not your back. • Locate the table extensions and the small hard- Ignoring these precautions can result in back ware bag with the following: injury.
- Page 21 • At the back of the table, put the square head bolts INSTALLING THE REAR RAIL in the holes in the edge of the table and extensions See Figures 12, 13, and 14. so bolt heads extend outward 1/2 in. •...
- Page 22 RAIL SLOT HEXNUT INSTALLING THE FRONT RAIL See Figures 15, 16, and 17. • Locate the front rail, the switch assembly, and the following hardware: 6 square head bolts (5/16-18 x I in.) 6 fiat washers (5/16 in.) 6 hex nuts (5/16-18) Right and left end caps for front rail 2 screws (5/32-32 x 1/2 in.) for end caps •...
- Page 23 RIP FENCE HOOK O VER R EAR RAIL H ERE MOUNTING THE MOTOR AND SWITCH See Figures 21 and22. • Locate the motor and switch assembly, the motor mounting plate and the following hardware: 4 hsx bolts (5/16-18 x I in.) 8 fiat washers (5/16 in.) RAIL 4 lock washers (5/16 in.)
- Page 24 • Locate the switch assembly, two screws (1/4-20 x • Pull the motor out until the belt is taut. Securely 318 in.) and two square nuts (1/4-20).Insert the tighten the hex bolts above the rods with a 12 mm wrench. screws from the rear of the switch plate and add the square nuts on the front.
- Page 25 INSTALLING THE BLADE GUARD SOCKETHEADCAPSCREWS(3) BLADEGUARD See Figures 25, 26, and 27. FLATWASHER WARNING: If the blade is not fully lowered, tum the height handwheel on the front of the cabinet to lower the blade to prevent the risk of injury. •...
- Page 26 CHECKING THE THROAT PLATE BLADEGUARD See Figure 28. CAUTION: The throat plate must be even with the table surface. Ifit istoo high ortoo low,the workplace can catch on uneven edges and cause kickback. • Make sure the throat plate is flush with the table top. To change the height ofthe throat plate, loosen the fiat head screw that secures the throat plate and adjust the four setscrews on the throat plate with a 2 mm hex...
- Page 27 CHECKINGRIPFENCEAND MITERGAGEGROOVE FRAMING BLADEALIGNMENT SQUARE See Figures 32, 33, and 34. The rip fence is self-aligning but should be checked before first use. WARNING: Failure to align the rip fence to the blade can cause jams and kickback, resulting in serious personal injury.
- Page 28 GREENGROUNDING CHANGING THE MOTOR VOLTAGE BLACKLEAD WIRE See Figures 35 and 36. BROWNLEAD WARNING: If you are unfamiliar with the basic fundamentals of electricity do not attempt this procedure. Use a qualified electrician to change the voltage of the saw to avoid electric shock or possibly a fire.
- Page 29 To avoid unnecessary setups and adjustments, a good practice is to check your setups carefully with a framing square and make practice cuts in scrap wood before making finish cuts in good workpieces. Do not start any adjustments until you have checked with a square and made test cuts to be sure adjustments are needed. REPLACING THE BLADE See Figures 37, 38, and 39.
- Page 30 HEELING (PARALLELING) THE SAWBLADE MARKEDTOOTH FRAMING SQUARE TO THE MITER GAGE GROOVE AT BACK See Figures 40, 41, and42. until you have checked with a square and made test cuts to be sure adjustments are necessary. Once the screws are loosened, these Items must be reset.
- Page 31 SAW TABLE V IEWED FROM B ELOW • If scale indicator does not point to O', loosen scale REAR T ABLE B RACKET REAR B RACKET SCREW indicator screw with a screwdriver. Adjust scale indicator within slot and retighten screw. •...
- Page 32 MITER GAGEKNOB ADJUSTING THE MITER GAGE See Figure 45. MITERGAGEROD You can set the miter gage at 0" and plus or minus 45" with the miter gage stop pin and adjustable stop screws. Note: The miter gage provides close accuracy in MITERGAGEBASE angled cuts.
- Page 33 BASIC OPERATION OF THE TABLE • To avoid pinching the blade, support the work properly before beginning a cut. A table saw can be used for straight-line cutting operations such as cross cutting, ripping, mitering, • When making a cut, use steady, even pressure. Never force cuts.
- Page 34 CAUSES OF OVERLOAD RESETrlNG THE THERMAL OVERLOAD PROTECTOR Overload and overheating result from a number of See Figure 48. sources. Always check the connections, the load and the supply circuit if motor performance is not satisfac- Your table saw is equipped with an overloed protector tory.
-
Page 35: Features
TYPES OF CUTS See Figure 49. There are six basic cuts: 1) the cross cut, 2) the rip cut, 3) the miter cut, 4) the bevel cross cut, 5) the CROSSCUT bevel rip cut, and 6) the compound (bevel) miter cut. All other cuts are combinations of these basic opera- tions. - Page 36 MAKING A CROSS See Figures 50, 51, 52, and 53. WARNING: Make sure the blade guard is lowered over the blade and is working properly to prevent possible injury. It is recommended that you make test cuts on scrap INSERTSWITCHKEY wood.
- Page 37 • Check that the wood is not touching the blade. WARNING: Make sure the blade guard is Insert switch key and lift switch to ON position. See lowered over the blade and is working properly to prevent possible injury. Figures 51 and 52. Let blade obtain full speed before feeding •...
- Page 38 MAKING A MITER • Hold work firmly against the miter gage and push to feed work into the blade. See Figure 55. • When work is completed, press switch off and remove switch key. WARNING: Make sure the blade guard is lowered over the blade and is working properly to MAKING A BEVEL CROSS...
- Page 39 • Set blade angle by loosening blade lock handle • Set miter gage to 0" if needed. Loosen miter gage and turning bevel handwheeL Retighten blade lock knob and use indicator on the miter gage. Re- handle. tighten miter gage knob. •...
- Page 40 • Set blade angle and height by loosening the bevel MAKING A COMPOUND (BEVEL) MITER CUT lock handle and tuming the height and bevel See Figure 59. handwheels. Retighten bevel lock handle. Practice on scrap wood. From the front of the saw, •...
- Page 41 • Depending on the shape of panel, use rip fence or MAKING A LARGE PANEL miter gage. If panel is too large to use either rip See Figure 60. fence or miter gage, it is too large for this saw. Make sure the saw is propedy secured to a work surface to avoid tipping from the weight of a large WARNING:...
-
Page 42: Assembly
MAKING A NON-THROUGH MAKING A DADO CUT See Figure 61. See Figure 62. This is the only type of cut made without the blade An optional dado throat plate is required for this guard. procedure. See the Accessories section of this manual and check with your nearest Sears Retail Store. - Page 43 Frequently vacuum or blow out any sawdust from the motor. WARNING: When servicing, use only identical Craftsman replacement parts. Use of any other part may create a hazard or cause product WARNING: If the power cord is worn, cut, or damage.
- Page 44 PROBLEM CAUSE SOLUTION Saw does not start. 1, Motor cord or wall cord is not 1. Plug in motor cord or wall cord, plugged in. 2, Circuit fuse is blown, 2. Replace circuit fuse. 3. Circuit breaker is tripped. 3. Reset circuit breaker. 4.
- Page 45 OBLEM CAUSE SOLUTION 1. Motor is overloaded. Fuses orcircuitbreakers open 1. Feed work more slowly. frequently. 2. Fuses or circuit breakers are 2. Replace fuses or circuit break- ers. wrong size or defective. 3. Dull blade. 3. Replace the blade. 4.
-
Page 46: Aligning Rip Fence And Front Rail
PROBLEM CAUSE SOLUTION 1. Remove and reposition the rip Rip fence does not move smoothly. 1. Rip fence is not mounted cor- fence, See Aligning Rip Fence rectly. and Front Rail in the Assembly section. 2. Clean and wax the rails. 2. - Page 47 CRRFT$141tN" TABLE SAW 315.228410...
- Page 48 TABLE SAW - MODEL NO. 315.228410 The model number will be found on a plate attached to the cabinet. Always mention the model number in all correspondence regarding your TABLE SAW or when ordering repair parts. FIGURE A CRAFTSMAN" TABLE SAW315.228410...
- Page 49 CRAFTSMAN TABLE SAW - MODEL NO. 315.228410 The model number will be found on a plate attached to the cabinet. Always mention the model number in all correspondence regarding your TABLE SAW or when ordering repair pads. PARTS LIST FOR FIGURE A...
- Page 50 CRAFTSMAN TABLE SAW- MODEL NO. 315.228410 I Them_de_numberwi__bef_un__nap_ateattachedt_thecabinet.A_waysmenti_nthem_de_numberina__c_rresp_ndenceregardingy_urTABLE }SAWor when ordering repair parts. ,-t. FIGUREB...
- Page 51 CRAFTSMAN TABLE SAW- MODEL NO. 315.228410 SAW or when ordedng repair parts. J The model number will be found on a plate attached to the cabinet. Always mention the model number in all correspondence regarding your TABLE PARTS LIST FOR FIGURE B...
- Page 52 CRAFTSMAN TABLE SAW - MODEL NO. 315.228410 SAW or when ordering repair parts. I The model number will be found on a plate attached to the cabinet. Always mention the model number in all correspondence regarding your TABLE /.÷" _,jJ 8.,,...
-
Page 53: Adjustments
CRAFTSMAN TABLE SAW - MODEL NO. 315.228410 SAW or when ordedng repair parts. I The model number will be found on a plate attached to the cabinet. Always mention the model number in all correspondence regarding your TABLE PARTS LIST FOR FIGURE C... - Page 54 CRAFTSMAN TABLE SAW- MODEL NO. 315.228410 SAW or when ordering repair parts, The model number will be found on a plate attached to the cabinet. Always mention the model number in all correspondence regarding your TABLE FIGURED...
- Page 55 CRAFTSMAN TABLE SAW - MODEL NO. 315.228410 SAW or when ordering repair parts. I The model number will be found on a plate attached to the cabinet. Always mention the model number in all correspondence regarding your TABLE PARTS LIST FOR FIGURE D...
- Page 56 CRAFTSMAN TABLE SAW- MODEL NO. 315.228410 The model number will be found on a plate attached to the cabinet. Always mention the model number in all correspondence regarding your TABLE SAW or when ordering repair pads. FIGUREE...
- Page 57 CRAFTSMAN TABLE SAW - MODEL NO. 315.228410 SAW or when ordedng repair pads. I The model number will be found on a plate attached to the cabinet. Always mention the model number in all correspondence regarding your TABLE PARTS LIST FOR FIGURE E...
- Page 58 CRAFTSMAN TABLE SAW - MODEL NO. 315.228410 SAW or when ordering repair parts. J The model number will be found on a plate attached to the cabinet. Always mention the model number in all correspondence regarding your TABLE RGURE F...
- Page 59 CRAFTSMAN TABLE SAW - MODEL NO. 315.228410 SAW or when ordering repair parts. I The model number will be found on a plate attached to the cabinet. Always mention the model number in all correspondence regarding your TABLE PARTS LIST FOR FIGURE F...
- Page 60 CRAFTSMAN TABLE SAW - MODEL NO. 315.228410 SAW or when ordering repair parts. The model number will be found on a plate attached to the cabinet. Always mention the model number in all correspondence regarding your TABLE FIGUREG...
- Page 61 CRAFTSMAN TABLE SAW - MODEL NO. 315.228410 SAW or when ordering repair pads. The model number will be found on a plate attached to the cabinet. Always mention the model number in all correspondence regarding your TABLE PARTS LIST FOR FIGURE G...
- Page 62 CRAFTSMAN TABLE SAW - MODEL NO. 315.228410 SAW or when ordering repair parts. The model number will be found on a plate attached to the cabinet. Always mention the model number in all correspondence regarding your TABLE "_11 FIGUREH...
- Page 63 CRAFTSMAN TABLE SAW - MODEL NO. 315.228410 SAW or when ordering repair parts. The model number will be found on a plate attached to the cabinet. Always mention the model number in all correspondence regarding your TABLE PARTS LIST FOR FIGURE H...
- Page 64 CRAFTSMAN TABLE SAW - MODEL NO. 315.228410 SAW or when ordering repair parts. I The model number will be found on a plate attached to the cabinet. Always mention the model number in all correspondence regarding your TABLE FIGUREI €...
- Page 65 CRAFTSMAN TABLE SAW - MODEL NO. 315.228410 SAW or when ordering repair parts. The model number will be found on a plate attached to the cabinet. Always mention the model number in all correspondence regarding your TABLE PARTS LIST FOR FIGURE I...
-
Page 66: Maintenance
For in-home major brand repair service: Call 24 hours a day, 7 days a week 1-800-4-MY-HOME s" (1-800-469-4663) Para pedir servicio de reparacibn a domicilio - 1-800-676-5811 In Canada for all your service and parts needs call - 1-800-665-4455 Au Canada pour tout le service ou les pi_ces For the repair or replacement parts you need: Call 6 am - 11 pm CST, 7 days a week PartsDirects.