Table of Contents
Advertisement
Available languages
Available languages
Owner's
Manual
®
6.75 HORSEPOWER
2500 PSI
2.2 GPM
HOURS:
Mort. - Fri. 8 a.m. to 5 p.m. (CT)
CAUTION:
Before
using
this product,
read this manual
and follow
aH Safety
Rules and Operating
Instructions.
SEARS,
ROEBUCK
and CO.,
Hoffman
Estates,
[L 60179
U.S.A.
Visit our Craftsman
website:
w_v.sears.comlcraftsman
Pal_t No. 194320OS
D_'afl 3 (]0 05 2004)
o Safety
o Assembly
o Operation
o Maintenance
o Parts
o Espaffo_
Advertisement
Table of Contents

Related Manuals for Craftsman 580.752700


Summary of Contents for Craftsman 580.752700
- Page 1 Parts read this manual and follow aH Safety o Espaffo_ Rules and Operating Instructions. SEARS, ROEBUCK and CO., Hoffman Estates, [L 60179 U.S.A. Visit our Craftsman website: w_v.sears.comlcraftsman Pal_t No. 194320OS D_'afl 3 (]0 05 2004)
- Page 2 ON CRAFTSMAN PRESSURE WASHER For one year from the date of purchase, when this Craftsman pressure washer is maintained and operated according to the instructions in the owner's manual, Sears will repair, free of charge, any defect in material and workmanship.
- Page 3 WARNING WARNtNG The engine exhaust from this product contains chemicals known to the State of California to cause cancer, birth defects, or other reproductive harm. , DANGER WHEN ADDING OR DRAINBNG FUEL Turn pressure washer OFF and let it cool at least 2 minutes before removing...
- Page 4 WARNING WARNING Keep water spray away from electric wiring or fatal electric shock may result. Always wear eye protection when using equipment or when in vicinity of equipment in use. WARNING CAUTION DO NOT tamper with governed speed. DO NOT operate pressure washer above...
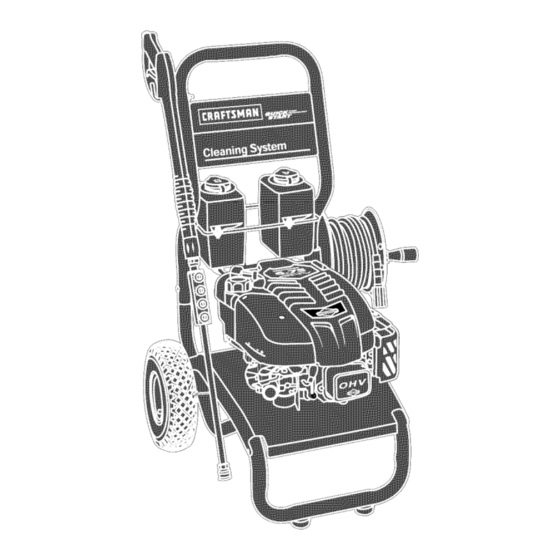
- Page 5 KNOW YOUR PRESSURE WASHER Read this owner's manual and safety rules before operating your cleaning system. Compare the illustrations with your cleaning system to familiarize yourself with the locations of various controls and adjustments. Save this manual for future reference. Spray Gun Chemical Reservoirs Spray Tips...
-
Page 6: Attach Chemical Hose To Pump
,',:!i, _i? ¸ ASSEMBLING CLEANING SYSTEM Attach Chemica_ Hose to Pump Your Craftsman cleaning system will need assembly before operation: Attach chemical hose to chemical injection fitting on 1. Attach handle to main unit. pump. Connect chemical hose to pump. -
Page 7: Add Engine Oil/Fuel
• • i ..NOTE: You may not need to use aH the supplied oil. Replace and tighten dipstick. NOTE: Check oil often during engine break-in..Add Fue{ WARNING Attach Hose Reem Attach hose reel to handle as shown on page 5 according to instruction sheet included with hose reel. - Page 8 Connect garden hose (not to exceed 50 feet in Connect Hose and Water Supp{y to Pump length) to water inlet. Tighten by hand. IMPORTANT: To avoid pump damage, you must assemble the nozzle extension to the spray gun and CAUTION attach all hoses before you start the engine.
- Page 9 HOW TO USE YOUR CLEANING To Start Your C_eaning System SYSTEM To start your engine-powered cleaning system for the first time, follow these instructions step-by-step. This if you have any problems operating your pressure information also applies whenever you start the engine washer, please call the pressure washer helpline at after you have let the pressure washer sit idle for at 1-800-222-3136.
- Page 10 10. Move throttle lever to "Fast" position, shown here WARNING as a rabbit. Throttle Lever DO NOT touch hot surfaces. Allow equipment to coo! before touching. The pressure washer must be at least 5 feet from Choke Lever structures having combustible walls and/or...
- Page 11 C_eaning and Appmying Chemicam to Use Spray Tips The nozzle extension quick-connect allows the use of IMPORTANT: Use soaps designed specifically several different spray tips. Each spray tip provides a pressure washers. Household detergents could different spray pattern. damage the pump. CAUTION CAUTION without all the hoses connected and...
- Page 12 How to Use the Hose Reel Pressure Washer Rinsing Your cleaning system is equipped with a hose reel After detergent is applied, scour the surface and rinse designed to store the hose when unit is not in use. it clean as follows: See "Prepare Unit for Storage"...
- Page 13 ENGtNE TECHNICAL INFORMATION PRODUCT SPECIFICATIONS This is a single cylinder, overhead valve(OHV)+ air Pressure Washer Specifications cooled engine. It is a low emissions engine. Pressure ....2,500 PSI in the State of California, Model Series 120000 Flow Rate ....2+2 GPM engines are certified by the California Air Resources Chemical Mix ....
- Page 14 OWNER'S RESPONSIBIUTtES Follow the hourly or calendar intervals, whichever occurs first. More frequent service is required when operating in adverse conditions noted below. MAINTENANCE SCHEDULE FILL IN DATES AS YOU SERVICE DATES COMPLETE REGULAR SERVICE SERVICE DATES Every 25 I Every 50 Every 100 Before MABNTENANCBTASK...
- Page 15 PRESSURE WASHER MAINTENANCE Check _n-Line Fi_ter Refer to the illustration and service the in-line filter if it C_ean Debris becomes clogged, as follows: Daily or before use, clean accumulated debris from cleaning system. Keep linkage, spring and controls clean. Keep area around and behind muffler free from any combustible debris.
- Page 16 Nozzle Maintenance Pump Maintenance A pulsing sensation felt while squeezing the spray gun Changing Pump Oil trigger may be caused by excessive pump pressure. Change oil every 50 hours or once yeady, whichever The principal cause of excessive pump pressure is a occurs first.
- Page 17 ENGINE MAINTENANCE Tip your pressure washer to drain oil from oil fill into a suitable container making sure you tip your WARNING unit away from spark plug and air cleaner. When crankcase is empty, return pressure washer to upright position. Wipe dipstick clean, insert it into oil fill hole and tighten securely, remove dipstick.
- Page 18 If the engine has been running, the muffler will be very Service Spark Pmug hot. Allow the muffler to cool before servicing the Service the spark plug every 100 hours of operation or spark arrester. yearly, whichever occurs first. • Remove spark attester screen for cleaning and Clean area around spark plug.
- Page 19 AFTER EACH USE WINTER STORAGE Water should not remain in the unit for long periods of CAUTION time. Sediments or minerals can deposit on pump parts and "freeze" pump action. FolJow these procedures after every use: • Failure to do so will permanently damage your pump Flush chemical system by turning its chemical...
- Page 20 LONG TERM STORAGE Oil Cylinder Bore • Remove spark plug. Squirt about 1 tablespoon of if you do not plan to use the pressure washer for more dean engine oil into the cylinder. Cover spark plug than 30 days, you must prepare the engine and pump hole with rag.
- Page 21 Problem Correction Cause Low pressure spray tip Replace spray tip with high pressure installed. spray tip. Water inlet is blocked. Clear inlet. inadequate water supply. Provide adequate water flow. inlet hose is kinked or leaking. Straighten inlet hose, patch leak. Pump has following problems: failure t o produce Check and clean inlet hose strainer.
- Page 22 CRAFTSMAN 2500 PSI Cleaning System 580.752700 Main Unit _ Exploded View 900 --\...
- Page 23 CRAFTSMAN 2500 PSI C_eaning System 580.752700 Main Unit m Parts List Item Part # Description 194667GS BASE M194719GS HANDLE 194316GS ASSY, Billboard 194662GS KIT. Chemical Tank 194663GS KIT. Chem Caps with Tags 192645GS KIT. Engine/Pump Mounting Hardware 194664GS KIT. Chem Tank Hardware 194264GS KIT.
- Page 24 CRAFTSMAN 2500 PSi Cleaning System 580.752700 Exploded View Pump ½ ° ½ °o<@ b" >...
- Page 25 CRAFTSMAN 2500 PSI C_eaning System 580.752700 Pump Parts List Item Part # Description 190571GS CAP, Oil 190627GS MANIFOLD 190578GS 190581GS 194298GS THERMAL RELIEF 190586GS OIL BOTTLE (not shown) 190594GS KIT UNLOADER STEM 190632GS WATER INLET, ALUM 190634GS OUTLET, ALUM 193808GS...
- Page 26 ENGINE, 6.75 HP, Briggs and Stratton, 129602 - E×ploded View ls_ 2o @...
- Page 27 ENGINE_ 6.75 HP, Briggs and Stratton, 129602 - Exploded View 137_ 276 @ 883 'I GASKET SET CARBURETOR 276 @ 633 @ 334_ 524_ 163_ 633A@...
- Page 28 ENGINE, 6.75 HP, Briggs and Stratton, 129602 - Exploded View 121 CARBURETOR 592 ® OVERHAUL 276 _ 104% ..6330 633A 689 o 163 _ 592 ® 78 _ ENGINE GASKET 868% 1005...
- Page 29 ENGINE, 8.75 HP, Briggs and Stratton, 129602 - Parts List Item Part # Description totem Part # Description 697893 Cylinder Assembly 690662 Nut (Fl,_vheel) 399269 Kit-Bushing/Seal (Magneto Side) 802574 Armature-Magneto 299819 § Seal-Oil (Magneto Side) 691061 Screw (Magneto Armature) 493279 SumpoEngine 692051 Plug-Spark...
- Page 30 Sears, Roebuck and Co., U.S.A. (Sears), the California Air Resources Board (CARB) the United States Environmenta_ Protection Agency (U.S.EPA) Emission Contro_ System Warranty Statement (Owner's Defect Warranty Rights and Obligations) EMiSSiON CONTROL WARRANTY COVERAGE Fuel Metering System APPLICABLE TO CERTIFIED ENGINES PURCHASED Cold...
- Page 31 Emissions Durability Period and Air index Emissions Compliance Period On Engine Information On Your Engine Emissions Labe_ Emissions Compliance Label Engines that are certified to meet the California After July 1,2000 certain Sears engines will be certified Resources Board (CARB) Tier 2 Emission Standards must...
- Page 32 OPERACION ........ 39°42 COMO ORDENAR PARTES ..PAGINA POSTERIOR ESPECIFiCACiONES ......GARANT_A L_M_TADA DE LA MAQU_NA LAVADORA DE PRESTON CRAFTSMAN Durante un aSo a partir de la fecha de compra, Sears reparara, sin cargo alguno, cualquier defecto en material y mano...
- Page 33 , ADVERTENCiA E[ escape dei motor de este producto contiene eiementos qu[micos reconocidos en ei Estado California pot producir c&ncer, defectos de nacimiento u otros dagos de tipo reproduetivo. PELIGRO CUANDO ANADA COMBUSTIBLE O VACiE DEP6SJTO Apague et lavadora de presi6n (posici6n OFF) y dqelo enfriar al menos pot 2 minutos antes de remover la tapa de la combustible.
- Page 34 Mantenga et chorro det agua alejado de alambrados electricos, de to contrario podrian ocurrir descargas el6ctricas fatales. Siempre use protecci6n para los ojos cuando utilice este equipo o cuando est_ cerca de donde se est6 asando et equipo. ADVERTENCIA NO juegue con partes que puedan aumentar o disminuir la velocidad de mando.
- Page 35 CONOZCA SU MAQUINA SISTEMA DE LIMP[EZA Lea e[ manual de[ propietario y [as reg[as de seguridad antes de porter en mareha su sistema de Bimpieza, Compare las ilustraciones con su sistema de limpieza para familiarizarse con las ubicaciones de los diferentes controles ajustes, Guarde...
- Page 36 Bomba Conecte la manguera para productos quimicos al La gran mayoria de su sistema de limpieza de presi6n acop]amiento de inyecci6n de productos quimicos de Craftsman ha sido ensamblado en la fabrica. Sin embargo, la bomba. usted debera !levar a cabo...
- Page 37 NOTA: Usted no puede necesitar utilizar todo el aceite suministrado. Vuelva a colocarla y ajQstela en su posici6n. NOTA: Revise e! aceite frecuentemente durante despegue de! motor. Agregue Gaso_ina ADVERTENCIA Montaje de_ Carrete_ de Manguera Conecte la carrete de la manguera a manubrio como mostrado...
- Page 38 NUNCA utilice productos limpiadores para motores Haga correr el agua a traves de la manguera de su carburadores en el deposito de combustible, ya que podrian jardin por 30 segundos para limpiar cualquier escombro provocar dafios permanentes. que se encuentre an ella.
- Page 39 COMO USAR SU StSTEMA Para Porter en Marcha e_ Sistema Limpieza Para darle arranque a su sistema de limpieza movido Si tiene problemas con el funcionamiento de su maquina motor por primera vez, siga estas instrucciones paso lavadora a presion, pot favor Ilame a la linea de ayuda de la...
- Page 40 Mueva el control de la valvula de admisi6n a la posici6n ADVERTENCIA "Rapido" ("Fast"), que se distingue con la figura de un conejo. Control de la V&lvula de Admisi6n NO toque las superficies catientes. Permita que el equipo se enfrie antes de tocado. El lavadora a presiOn debe estar situado a un minimo de 152 cm (5 pies) de toda estructura con muros combustibles Palanca...
- Page 41 C6mo Usar _as Puntas de Rociado Limpieza y Ap_icaci6n de_ Quimico El conector rapido de! prolongador de la boquilJa admite IMPORTANTE: UtHice quimicos diseSados varios tipos distintos de puntas de rociado. Cada punta especificamente para m_quinas mavadoras a presi6n. rociado proporciona un patr6n de rociado...
- Page 42 Cdmo Usar e_ Carrete de _a Manguera Enjuage de _a M_quina Lavadora Presion La limpiadora a presi6n esta equipada con un carretel manguera diset_ado para guardar la manguera cuando Despu_s de haber aplicado e! detergente, refriegue se utiliza la unidad, Consulte el apartado "Preparaci6n...
- Page 43 INFORMACION Tg:CNICA SOBRE EL ESPECIFICACtONES PRODUCTO MOTOR El motor es de uno cilindros, de valvulas en cabeza (OHV), Espec!f!caciones de la M_quina Lavadora refrigerado por aire y de baja emisi6n. a P'FeSIOrl En e! Estado de California, los motores de la serie 120000 Presi6n ........
- Page 44 RESPONSABILIDADES DEL PROPtETARiO Siga el programa de mantenimiento segOn e! nOmero de horas o segOn e! calendario, !o que suceda primero. Se requiere de servicio con mayor frecuencia cuando opere la unidad en las condiciones adversas descritas a continuaci6n. CALENDARIO DE MANTENIMIENTO INTERVALO DE OPERACION...
- Page 45 Revise e_ Fi_tro en Linea MANTENJMIENTO DE LA MAQUJNA LAVADORA A PRESiON Consulte la ilustracion y suministre servicio a! filtro en linea si se tapa siguiendo estos pasos: Limpie _os Residuos Filtro en linea Limpie a diario, o antes de cada uso, los residuos acumulados en el lavadora...
- Page 46 MANTENIMIENTO DE LA BOMBA Mantenimiento de [a Boqui[[a Si siente una sensaci6n pu[sante a[ momento de apretar Camb[o de[ ace[te de Ja bomba gatiHo de [a pisto[a rociadora, puede que sea causada por la Cambie el aceite cada 50 horas o una vez al aria, Io que presi6n excesiva...
- Page 47 MANTENIMIENTO DEL MOTOR Incline su maquina lavadora a presi6n para drenar aceite a traves del orificio de Ilenado en un recipiente adecuado asegurandose de inclinar la unidad hacia el lado opuesto de la bujia. Cuando la caja del cigOefial este vacia, vuelva a colocar la m&quina...
- Page 48 Remplace la Buj_a Retire la panta!la dei apagachispas para limpieza inspecci6n. Remplace la bujia anualmente o cada 100 horas de operaci6n. Remplace la pantalla si esta da_ada. Limpie el area alrededor de la bujia y retirela. ADVERTENCIA Retire y revise la bujia.
- Page 49 DESPUES DE CADA USO ALMACENAMJENTO PARA JNVJERNO No deber& haber agua en la unidad por largos periodos tiempo, Los sedimentos de minerales se pueden depositar en partes de la bombay "congelar" su funcionamiento. Lleve PRECAUCION a cabo estos procedimientos despues de cada uso: Limpie el circuito...
- Page 50 ALMACENAMIENTO PROLONGADO Aceite el Di&metro Interior de_ Ci_indro Retire la bujia. Rocie aproximadamente 1 onza de aceite Si usted no planea usar la maquina lavadora a presi6n limpio para motor dentro del cilindro. Cubra el orificio mas de 30 dias, debera preparar el motor para un...
- Page 51 SoJuci6n Prob[ema Causa Esta usando la punta de rociado Cambie la punta de rociado a una de las baja presi6n (negra). tres punta de rociado de alta presi6n. La entrada de agua esta bloqueada, Limpie la entrada, Suministro de agua inadecuado.
- Page 52 Sears, Roebuck and Co., U.S.A. (Sears), California Resources Board (Consejo de Recursos sobre eJ Aire California, BARB, pot sus sigJas en ingles) y United States Environmental Protection Agency (Agencia de Protecci6n Ambiental de EE.UU., EPA, pot sus siglas en ingles). Declaraci6n de garantia del sistema...
- Page 53 Jnformaci6n Sobre emPeriodo Periodo de Cump_imiento de _a Normativa Durabilidad de mas Emisiones y e_ indice de Emisiones en ia Etiqueta de Aire en _a Etiqueta de Emisiones CumpHmiento de Emisiones dem Motor Motor Desde el 1 de julio de 2000, algunos motores Sears...
- Page 56 Your Home For repair - in your home - of all major brand appliances, iiiiiiiiiiiiiiiiii!_ _¸_ :::::::::::::::::::i lawn and garden equipment, or heating and cooling systems, iiiiiiiiiiiiiiiiiii no matter made it, no matter sold it! iiiiiiiiiiiiiiiiiii For the replacement parts, accessories iiiiiiiiiiiiiiiiiii owner's manuals...