Advertisement
Table of Contents
- 1 Glossary of Terms for Woodworking
- 2 Electrical Connections
- 3 Table of Contents
- 4 Unpacking and Preassembly
- 5 Knowing Your Miter Saw
- 6 Assembly and Alignment
- 7 Assembly and Alignment
- 8 Mounting the Saw
- 9 Basic Saw Operations
- 10 Maintenance and Lubrication
- 11 Recommended Accessories
- 12 Trouble Shooting
- 13 Trouble Shooting
- 14 Repair Parts
- Download this manual
f
Save This Manual
_\
For Future Reference
SEARS
owner's
manual
MODEL NO.
113.234680
8¼" COMPOUND
MITER SAW
Serial
Number
Model and serial numbers
may be found at the side of
the miter saw arm.
You should record both
model and serial number in
a safe place for future use.
FOR YOUR
SAFETY:
READ ALL
INSTRUCTIONS
CAREFULLY
r
SEA/k_S/ I:RRFT$ M g N®
81/4-1NCH COMPOUND
MITER SAW
• assembly
• operating
• repair parts
J
Sold by SEARS, ROEBUCK AND CO., Chicago,
IL 60684
U.S.A.
Part No. SP5301
rv_ _
,_._14_-I _
Printed
in Taiwan.
m
Advertisement
Table of Contents
Troubleshooting

Related Manuals for Craftsman 113.234680


Summary of Contents for Craftsman 113.234680
- Page 1 Save This Manual For Future Reference SEARS owner's manual MODEL NO. 113.234680 8¼" COMPOUND MITER SAW Serial Number Model and serial numbers may be found at the side of the miter saw arm. SEA/k_S/ I:RRFT$ M g N® You should record both model and serial number in a safe place for future use.
- Page 2 FULL ONE YEAR WARRANTY ON CRAFTSMAN MITER SAW If within one year from the date of purchase, this Craftsman Miter Saw fails due to a defect in material or workmanship, Sears will repair it, free of charge. WARRANTY SERVICE IS AVAILABLE BY SIMPLY CONTACTING THE NEAREST SEARS SERV- ICE CENTER/DEPARTMENT THROUGHOUT THE UNITED STATES.
- Page 3 Tighten the arborscrew. Plan ahead to protect your eyes, hands, face, ears. Tighten the coverplatestopscrew. KNOW YOUR MITER SAW. Read and understand the CHECK DAMAGED PARTS. Check for: owner's manual and labels affixed to the tool. Learn its • Alignment of moving parts, application and limitations as well as the specific poten- •...
- Page 4 WARNING: If planning to cut aluminum or other • Noise levels vary widely. To avoid possible hearing non-ferrous metals: Under adverse conditions, the damage, wear ear plugs or muffs when using miter blade can grab and throw the workpiece suddenly saw for hours at a time.
-
Page 5: Glossary Of Terms For Woodworking
glossary of terms for woodworking Arbor Resin The shaft on which a cutting tool is mounted. A sticky, s_ _ based substance that has hardened. Bevel Cut Revolutions Per Minute (RPM) The number of turns completed by a spinning object in An angle cutting operation made through the face of one minute. - Page 6 DOUBLE INSULATED 3. If the motor suddenly stalls while cutting wood, re- lease the trigger switch, unplug the tool, and free The miter saw is double insulated to provide a double the blade from the wood. The motor may now be thickness of insulation between you and the tool's elec- restarted and the cut finished.
-
Page 7: Table Of Contents
contents Page Page Guarantee ........ Assembly and Alignment ....10-14 Mounting the Saw ..... 14-15 Additional Safety Instructions for Miter Saws .. 2-4 Basic Saw Operations ....16-21 Glossary of Terms for Woodworking ... Electrical Connections ....Maintenance and Lubrication ....Recommended Accessories .... - Page 8 tools needed Tools required for assembly and alignment: COMBINATION SQUARE MUST BE TRUE • Medium Screwdriver • #2 Phitlips Screwdriver STRAIGHT EDGE OF • Combination Square BOARD 3/4"THICK; • 1/2Box End/Open End Wrench or Socket DRAW LIGHT THIS EDGE MUST BE •...
-
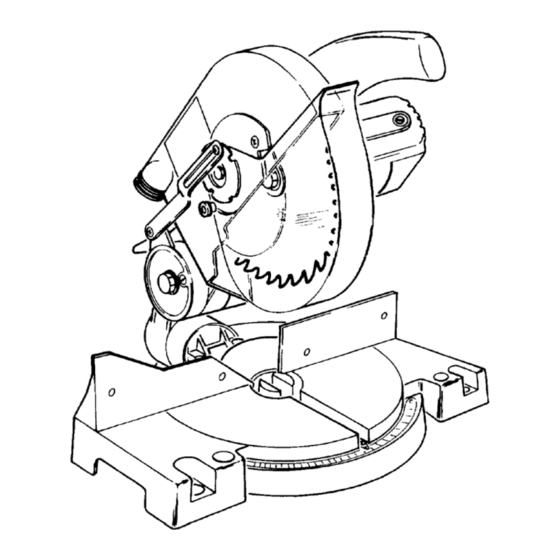
Page 9: Knowing Your Miter Saw
knowing your miter saw WARNING LABEL 1. Warning label, 2. Handle Latch--The miter saw can be locked in the lowered position for compact storage, 3. Fence Lock Handles--The fence automatically HANDLE LATCH moves to the best location as miter angle is adjusted. The lock handles secure the fence and miter (table rotation) positions, 4. -
Page 10: Assembly And Alignment
assembly and alignment HANDLE LATCH WARNING: For your own safety, never connect I plug to power source outlet until all assembly I steps are complete, and you have read and under- stood the safety and operational instructions. ASSEMBLY AND ALIGNMENT Assembling the Lower Blade Guard NOTE: For compact shipment the lower blade guard has been partially disconnected. - Page 11 StepTwo--Depth Stop The depthstoplimitsthe blade's downward t ravel.It SCREWDRIVER allowsthebladeto gobelowtheworktable enough to maintain full cutting capacities. The depth stop positions the blade about 1/4"from the turn-table structure. Maintaining Maximum Cutting Capacity WARNING: To avoid injury from unexpected start- ing or electrical shock, do not plug the saw in. The power cord must remain unplugged whenever you are working on the saw.
- Page 12 To check these three (3) settings position the blade at 0° miter index point and make sure the fence lock handles are securely tightened, a. To check blade squareness to fence place a com- bination square against the fence and next to the blade as illustrated.
- Page 13 Bevel Pivot Adjustment 1. The miter saw should bevel easily by loosening the bevel lock handle and tilting the power head to the left. If movement is tight or if there is looseness in the pivot follow the adjustment procedure. a.
-
Page 14: Mounting The Saw
9. Install t he new81/4 ,' blade(seerecommended ac- cessory list). Make sure the rotation arrow on the blade matches the clockwise rotation arrow on the upper guard. 10. Install the outer blade collar and arbor screw. Once 8-1_"BLADE again lower the blade down on to a scrap piece of wood positioned against the REAR of the fence. - Page 15 Ifthesawistobeusedina portable application, mount thesawtoa3/4"piece ofplywood. Themounting b oard canthenbeclamped downto prevent i t fromtipping. 3/4" PLYWOOD FRONT OF MITER SAW CATALOG NO. 9-22244 LEG SET FRONT SIDE (not included with miter saw) Recommended hardware (not included) for Mounting Miter Saw to Legset: 4 -- I/4-20 x 1-1/2 hex head bolts 4 -- 1/4-20 hex nuts 4 -- 1/4 lock washers...
- Page 16 Basic Saw Operation BEFORE USING MITER SAW: BEFORE EACH USE: WARNING: To avoid mistakes that could cause Inspect your miter saw. serious, permanent injury, do not plug the miter DISCONNECT THE MITER SAW. To avoid injury from saw in until the following steps are comp eted.
- Page 17 • Make sure the arbor collar's recessed sides are facing Inspect your workpiece. the blade. • Make sure there are no nails or foreign objects in • Using a 1/2-inch box wrench, make sure the arbor the part of the workpiece to be cut. cap screw is firmly hand tightened.
-
Page 18: Basic Saw Operations
WARNING: If planning to cut aluminum or other Never confine the piece being cut off. Never hold it, non-ferrous metals: Under adverse conditions, the clamp it, touch it, or use length stops against it while blade can grab and throw the workpiece suddenly the blade is spinning. - Page 19 Miter Cut When a miter cut is required loosen the fence lock handles and rotate the saw to the desired angle, The fence will automatically move to the best location as the miter angle is adjusted. Re-tighten the fence lock handles.
- Page 20 Cutting Bowed Material Before cutting a workpieee, check to make sure it is not bowed. If it is bowed the workpiece must be positioned and cut as illustrated. Do not position work- piece incorrectly or try to cut the workpiece without the support of the fence.
- Page 21 TIPS FOR CUTTING COMPOUND MITERS MITER AND BEVEL SETTINGS FOR STANDARD CROWN MOLDING A compound miter is a cut requiring both a miter setting and bevel setting. A compound miter is used for making frames or boxes that have sloping sides and are wide BEVEL MITER TYPE OF CUT...
-
Page 22: Maintenance And Lubrication
maintenance and lubrication Maintenance Recommended Accessories Always unplug the power cord before any maintenance WARNING: To avoid injury from unsafe acces- check on this saw. sories, use only accessories shown on the recom- mended accessories list in this manual. DANGER: Never put lubricants on the blade whilel it's spinning. -
Page 23: Trouble Shooting
TROUBLE SHOOTING GUIDE - MOTOR SUGGESTED CORRECTIVE ACTION PROBABLE CAUSE PROBLEM 1. Brushes not seated --Inspect/clean/replace brushes Brake does not stop blade within six (see maintenance section). or lightly sticking. (6) seconds. --Use a recommended blade. Motor brake winding-- overheated from use of not- --Let cool down, recommended accessory or rapid on/off cycling. -
Page 24: Trouble Shooting
(WHITE) FIELD LEAD FCI"(F't__.dTOT (RED)FIELD LEAD (GRAY)BRAKE LEAD WHITE JUMPER SWITCH N.C, LEADS J.4- FACING "1 BLACK N.O. BRUSH (BLACK)BRUSH LEAD WIRING DIAGRAM WARNING: For your safety, this miter saw is dou- ble insulated. To avoid electrical shock, fire, or injury use only parts identical to those identified in the parts list. - Page 25 NOTES...
- Page 26 PARTS LIST FOR CRAFTSMAN 81/4"COMPOUND MITER SAW MODEL NO. 113,234680 FIGURE...
- Page 27 PARTS LIST FOR CRAFTSMAN 81/4" MITER SAW MODEL NO. 113.234680 Always order by Part Number--Not by Key Number FIGURE WARNING: For your safety, this miter saw is specially insulated. To avoid electrical shock, fire or injury, use I only parts dentica to those ident f ed in the parts list.
- Page 28 PARTS LIST FOR CRAFTSMAN 81/4 ', MITER SAW MODEL NO. 113.234680 FIGURE...
- Page 29 PARTS LIST FOR CRAFTSMAN 81/4 " MITER SAW MODEL NO. 113.234680 Always order by Part Number--Not by Key Number FIGURE WARNING: For your safety, this miter saw is specially insulated. To avoid electrical shock, fire or injury, use only parts identical to those identified in the parts list.
- Page 30 PARTS LIST FOR CRAFTSMAN 81/4 " MITER SAW MODEL NO. 113.234680 Always order by Part Number--Not by Key Number FIGURE 3 WARNING: For your safety, this miter saw is specially insulated. To avoid electrical shock, fire or injury, use on y parts identical to those identified in the parts list.
- Page 31 NOTES...
-
Page 32: Repair Parts
SEARS owner's 81/4-1NCHCOMPOUND manual MITER SAW SERVICE Now that have purchased your 81/4-inch Compound Miter Saw, should a need ever exist for repair parts or service, simply contact Sears Service Center most Sears, Roebuck Co. stores. Be sure to provide all pertinent facts when you call or visit.
Need help?
Do you have a question about the 113.234680 and is the answer not in the manual?
Questions and answers