Table of Contents
Advertisement
Owner's Manual
I;RRFTSMRN°
1.5 HP (Max. Developed)
1/2" and 1/4" Router Collet
112" Removable Shaper Spindle
BENCH TOP
SHAPER/ROUTER
Model No.
137.217100
CAUTION:
Before using this shaper/router,
read this manual and follow
all its Safety Rules and
Operating
Instructions.
• Safety Instructions
• Installation
• Operation
• Maintenance
• Parts List
• Espa_ol
Customer
Help
Line
1-800-843-1682
Sears,
Roebuck
and Co., Hoffman
Estates,
IL 60179
USA
Part No. 137217100001
Advertisement
Table of Contents

Related Manuals for Craftsman 137.217100


Summary of Contents for Craftsman 137.217100
- Page 1 Owner's Manual I;RRFTSMRN° 1.5 HP (Max. Developed) 1/2" and 1/4" Router Collet 112" Removable Shaper Spindle BENCH TOP SHAPER/ROUTER Model No. 137.217100 CAUTION: • Safety Instructions • Installation Before using this shaper/router, read this manual and follow • Operation all its Safety Rules and •...
- Page 2 SECTION PAGE Warranty ........Product Specifications ......Safety Instructions ..Accessories and Attachments. Carton Contents .... Know Your Shaper / Router Assembly and Adjustments. Operation ....Maintenance ..... Troubleshooting guide ..Parts ....Espa_ol ....FENCE ....'MOTOR ....120 V, 60 HZ, 9 AMP AC MITER GAUGE .....
-
Page 3: General Safety Instructions
GENERAL SAFETY INSTRUCTIONS _ ALWAYSWEAR WEAR YOUR BEFORE USINGTHE SHAPER/ROUTER /- _ _i', PROTECTION. '_OGGLE,/jr _l_.! Any shaper/router can throw _'__,_, -..._j_- foreign objects into the eyes Safety is a combination of common sense, staying alert _ "-"_L._ which could cause permanent and knowing how to use your shaper/router. - Page 4 24. DO NOT operate the tool if you are under the influence 16. ALWAYS ADJUST the fence as close as possible to of any drugs, alcohol or medication that could affect the cutter, keeping the cutter between the fence boards. your ability to use the tool properly.
-
Page 5: Motor Safety
DOUBLE INSULATED Motor is overloaded. Overloading can occur if The shaper / router is double insulated to provide a double you feed too rapidly or make too many start / thickness of insulation between you and the tool's electrical stops in a short time. system. - Page 6 Visit your Sears Hardware Department or see the replaced, and assembly is complete. To avoid electrical Craftsman Power and Hand Tools Catalog to purchase shock, use only identical replacement parts when recommended accessories for this power tool.
- Page 7 UNPACKING YOUR SHAPER / ROUTER r" "i @ @!'_@ ® ®...
-
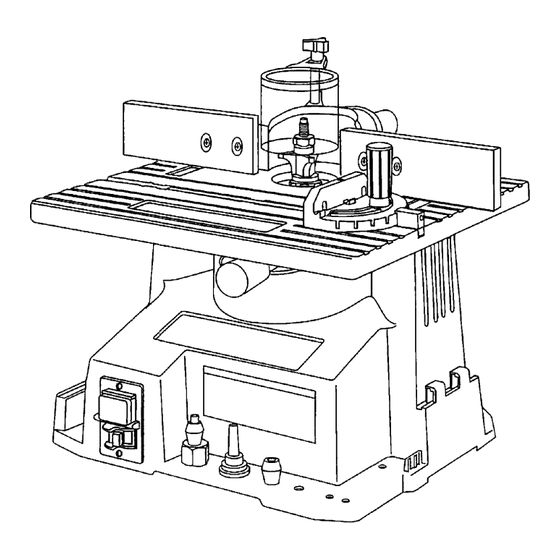
Page 8: Product Overview
insert Guard l ockknob Shaper nut Guard b racket Cutter guard Shaper spindle Wood fence board Starting p in Miter gauge Table Spindle depth adjustment Cutter depth lock handle Wrench stora( Miter gauge storage Forward/Reverse switch Base ON/OFF switcl Mounting hole Collar/cutter storage... -
Page 9: Installing Fence Assembly
ASSEMBLY INSTRUCTIONS Fig. B TOOLS NEEDED Open end wrenches (provided) ,I,l.l,i,l,l,l.l,t,_ll Combinationsquare screwdriver Phillips For your safety, never connect the plug to the power source receptacle until all assembly and adjustment steps are completed, and you have read and understood the safety and operating instructions. - Page 10 TABLE INSERT (FIG. F) INSTALLING THE DUST CHUTE (FIG. E) Place the dust chute (1) firmly into the fence backstop The table insert must be in position when shaping a port (2). A wet / dry shop vacuum hose can be attached to workpiece, to provide support and to keep dust and chips the chute to help keep the work area free of wood chips.
-
Page 11: Installing Shaper Cutters
INSTALLING SHAPER CUTTERS (FIG. H, I, J, K) Fig. I To avoid injury from an accidental start, make sure the switch is in the OFF position and the plug is not connected to the power source receptacle before changing any cutters. To use 1/2"... -
Page 12: Installing Router Bits
Remove the table insert. 11. Replace the table insert. 12. Place a 1/2" bore cutter (7) (not supplied) on the Turn the cutter depth lock handle (1) 1/4 turn counterclockwise to unlock. shaper spindle (3). (See "OPERATION" section for proper arrangement of cutters and collars.) Raise the tool spindle (2) to its highest point by moving If the cutter has a hole larger than 1/2"... -
Page 13: Adjustment
Fig. N MOUNTING THE SHAPER / ROUTER (FIG. M) To mount your shaper/router in a permanent location such as a sturdy workbench, bolt the shaper base to a ® ® solid workbench top. The shaper base (1) has 4 mounting holes. Place the shaper/router on the work surface (5), mark the holes on the work surface and drill 3/8"... -
Page 14: Adjusting The Guard
To turn the shaper/router OFF push the switch to the ADJUSTING THE GUARD (FIG. P) left position. 1. The clear cutter guard (1) should always be used with Remove the yellow switch key, when the shaper/router the fence, and can be rotated out of the way when has come to a complete stop, by gently pulling making adjustments or changing cutters. - Page 15 LARGE WORKPIECES For very long, wide, or irregularly shaped workpieces: Add an extension to the sides and front of the table. To avoid injury: Use only smooth flat wood, and be sure the extension BE SURE your cutter (1) is mounted so that the cutting is on the same level as the shaper/router table.
- Page 16 CURVED EDGE SHAPING (FIG.V through Clamp the test piece to the table so it will not move. To shape an edge that is not straight, remove the sliding Loosen the three fence lock knobs holding the fence fence brackets and boards, and replace them with the and fence sliding bracket.
- Page 17 To feed the workpiece (FIG. AA) To position the collars (FIG. X, Y, Z) The starting pin should be used as a support when The collars may be used above, below, or between two starting the cut. Always feed against the rotation of the cutters, according to the depth and pattern requirements.
-
Page 18: General Maintenance
Frequently blow out using an air compressor or dust vacuum, any dust that accumulates inside the motor. To avoid fire or toxic reaction, never use gasoline, naphtha, acetone, lacquer thinner, or similar highly Apply a light coat of automotive paste wax to the table volatile solvents to clean the shaper/router. -
Page 19: Troubleshooting
TROUBLESHOOTING GUIDE Turn switch OFF and always remove plug from power source before making any adjustments or repairs. All electrical or mechanical repairs should be done only by qualified service technicians. Contactthe nearest Sears Service Center. PROBLEM PROBABLE CAUSE SUGGESTED CORRECTIVE ACTION Cutter does not come up Extension cord too light or too long. -
Page 20: Parts List And Diagram
SHAPER / ROUTER 137.217100 When servicing use only CRAFTSMAN replacement parts. Use of any other parts may create a HAZARD or cause product damage. Any attempt to repair or replace electrical parts on this shaper/router may create a HAZARD unless repair is done by a qualified service technician. - Page 21 CRAFTSMAN SHAPER / ROUTER 137.217100...
Need help?
Do you have a question about the 137.217100 and is the answer not in the manual?
Questions and answers