Table of Contents
Advertisement
Owner's Manual
10-in. Compound
Miter Saw
Double Insulated
Model No,
172.24360
g
Save this manual
for future
reference.
CAUTION:
Read,
understand
and follow
all Safety
Rules and Operating
Instructions
in this manual
before
using this product.
Sears,
Roebuck
and Co., Hoffman
Estates,
IL 60179
U.S.A.
Visit the Craftsman web page: www.sears.com/craftsman
• SAFETY
• FEATURES
• ADJUSTMENT
• OPERATION
• MAINTENANCE
° PARTS LIST
• ESPANOL
Advertisement
Table of Contents

Related Manuals for Craftsman 172.24360


Summary of Contents for Craftsman 172.24360
- Page 1 CAUTION: Read, understand and follow • MAINTENANCE all Safety Rules and Operating Instructions ° PARTS LIST in this manual before using this product. • ESPANOL Sears, Roebuck and Co., Hoffman Estates, IL 60179 U.S.A. Visit the Craftsman web page: www.sears.com/craftsman...
-
Page 2: Fullone-Yearwarranty
Warranty............Page Safety Instructions .......... Pages 3 - 11 Safety Symbols ........... Page Glossary of Terms ........Pages 10-11 Product Specifications and Unpacking ..... Pages 11-12 Labels ............... Pages 12-13 Loose Parts and Tools Needed ......Page Description ............Pages 15-19 Adjustments ............ -
Page 3: Safety Symbols
Z_WARNING: BE SURE to read and understand all safety instructions in this manual, including all safety alert symbols such as DANGER, WARNING and CAUTION, BEFORE using this saw. Failure to follow all instructions listed below may result in electric shock, fire and/or serious personal injury. -
Page 4: Electrical Safety
ELECTRICAL SAFETY 1. Double Insulated tools are equipped with a polarized plug (one blade is wider than the other).Thls plug will fit in a polarized outlet only one way. If the plug does not fit fully into the outlet, reverse the plug. If it still does not fit, contact a qualified electrician to install a polarized... -
Page 5: Work Area Safety
WORK AREA SAFETY 1. ALWAYS keep your work area clean and well lit. DO NOT leave tools or pieces of wood on the saw while it is in operation. Cluttered benches and dark areas invite accidents. 2. DO NOT operate power tools In explosive atmospheres, such as in the presence of flammable... - Page 6 PERSONAL SAFETY cont. 10. ALWAYS avoid accidental starting. posVaon BE SURE switch Is in the "Off" before plugging 11. NEVER stand on tool. Serious injury could occur if the tool is tipped or if the blade is accidentally contacted. TOOL USE AND CARE SAFETY 1.
-
Page 7: Specific Safety Rules For Miter Saws
ADDITIONAL SPECIFIC SAFETY RULES FOR MITER SAWS 1. Know your power tool. Read operator's manual carefully. Learn the applications and limitations, as well as the specific potential hazards related to this tool. Following this rule will reduce the risk of electric shock, fire or serious injury. - Page 8 ADDITIONAL SPECIFIC SAFETY RULES FOR MITER SAWS cont. 14. ALWAYS keep blades clean, sharp and with the sufficient set. Sharp blades minimize stalling and kickback. 15. DO NOT use dull or damaged blades. Bent blades can break easily, or cause kickback. 16.
-
Page 9: Service Safety
ADDITIONAL SPECIFIC SAFETY RULES FOR MITER SAWS cont. Z_ WARNING: Some dust partlcles created by power sanding, sawing, grlndlng, drilllng and other construction jobs contain chemlcals known to cause cancer, birth defects or other reproductive harm. Some examples of these chemicals are: •... -
Page 10: Glossary Of Terms
SERVICE SAFETY cont. The labelon your tool may Include the following symbols. V ................Volts A ................Amperes Hz ................. Hertz W ................Watts mln ............... Minutes "_" ................ Alternating current ----===-- ..............Direct current no ................ No-load speed ................ -
Page 11: Glossary Of Terms For Woodworking
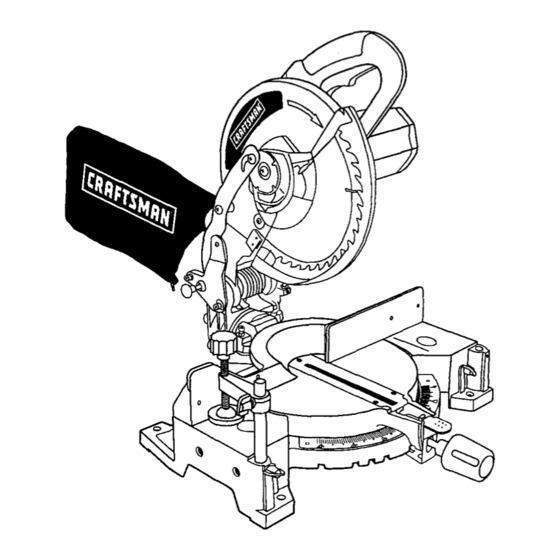
GLOSSARY OF TERMS FOR WOODWORKING cont. The distance that the saw blade tooth is bent (or set) outward from the face of the blade. Throw-Back Throwing of a workpiece in a manner similar to a kickback. Usually associated with a cause other than the kerr closing, such as a workpiece not being against the fence, being dropped into the blade, or being placed inadvertently in contact with the blade. - Page 12 Your Compound Miter Saw has been shipped fully assembled, except for the blade, miter lock handle, dust guide and dust bag. 1. Remove all packing materials from around your saw. 2. Carefully lift the saw from carton and place it on a level work surface. The saw is heavy, so get help, if you need it, to help avoid injuring your back.
- Page 13 • Do not expose to rain or use in damp places. Label # 5 (see fig. 2) 10-inch Compound Miter Saw Double Insulated 5000RPM120VOLTS 60 HZACONLY 14A [_,WARNING WHEN SERVICING, USE ONLYIDENTICAL CRAFTSMAN REPLACEMENT PARTS. .OO,L,O.2-°o MADE tN CHtNA S_ARSf ROEBUCK AND CO.
- Page 14 fig.3 The follows items are included wi_ your compound miter saw. • Blade Wrench • 10-1nchSaw Blade • Dust Bag * He_ Key • Miter Lock Handle • Vex:Adapter • Owners Manual • Hold-Down Clamp _ren Clamp Z_IWARNING: The use of attachments or acsessodes that are not recommended might be dangerous and cou d cause sar ous personal injury.
-
Page 15: Cutting Capacities
KNOWYOUR SAW (see fig. 5) Your miter saw has many built-in convenience features for fast, efficient cutting. Before attempting to use your saw, familiarize yourself with all of the operating features and safety requirements. you careless. Remember that a careless fraction of a second is I Z_WARNING: DO NOT allow familiarity with your saw to make sufficient to inflict serious injury. - Page 16 KNOWYOUR SAWcont, (seefig, 5) Upper Flg.5 Blade Guard Saw Arm Dust Bag Motor Housing Lower Blade Guard Fence "No Hands Zone" Label Hands Zone" Boundary Line Throat Plate Dust Guide for Vac Hook-up Miter Lock Handle Miter Table Frame Positive Stops Lock Knob...
- Page 17 KNOW YOUR SAW cont. Carrying Handle (see fig. 6) Yourmiter saw has a built-in carrying handle on the top of the saw arm for easy, convenienttransporting from one job site to another.Before carryingthe saw: 1. Shut olf the power and pull out the plug. 2.
- Page 18 KNOW YOUR SAWcont. BevelLock Knob The bevel lock knob securely locks your compound miter saw at the desired bevel angles. Positive stop adjustment screws have been provided on each side of the saw arm. These adjustment screws are for making fine adjustments at 0 ° and 45 °. See pages 29 to 31. Miter Fence Hold the workpiece securely against the miter fence when making all cuts.
- Page 19 KNOWYOUR SAWcont. ElectricalConnection Yoursawhasa precision-built electricmotor. I t shouldbeconnected to a power supply that is 120 volts, 60 Hz AC only (normal household current), DO NOT operate this tool on direct current (DC). A substantial voltage drop will cause a loss of power and the motor will overheat. If your tool does not operate when plugged into an outlet, double-check the power supply.
- Page 20 SQUARINGTHE SAW BLADETOTHE FENCE (See Figs. 11 - 14) 1. Unplug the saw. /KWARNING: Failure to unplug your saw could result in accidental starting causing possible serious personal injury! 2. Loosen (unscrew) the Miter Lock Handle approximately one-half turn. 3. Depress the Miter Lock Plate and rotate the Miter Table until the pointer is at 0 °.
- Page 21 SQUARING THESAWBLADETOTHEFENCE (SeeFigs,11 - 14) cont. 11. Locate the two hex screws on the bottom of the miter table (near the front). These two screws are on the bracket that secures the Miter Lock Plate, Loosen these two screws two complete turns with the Hex Key provided with your saw.
- Page 22 SQUARINGTHE SAW BLADETO THE MITERTABLE (See Figs. 15 - 17) 1. Unplug the saw. saw coutd result in acddentat starting I L WARNING: Failure to unplug your I causing possible sedous personal injury! I 2. Loosen (unscrew) the Miter Lock Handle approximately one-half turn.
-
Page 23: Pivot Adjustments
SQUARING THE SAW BLADETO THE MITER TABLE (See Figs. 15 - 17) cont. NOTE: MAKE ONLY SLIGHT ADJUSTMENTSTOTHE SCREW, THEN ROTATETHE SAW ARM BACKTO 0 °, CHECK BLADE WITH SQUARE. REPEAT THIS PROCESS UNTIL THE BLADE IS SQUARED TO THE FENCE. 13. - Page 24 DEPTH STOP (conL) Also, when a new blade is installed, it is necessary to check the clearance of the blade to the miter table support before starting the saw. Make adjustments if necessary, Depth Stop Adjustments (See Figure 18) 1. Unplug the saw. plug from power source BEFORE assembling parts, making adjustments I Z_WARNING:...
- Page 25 TOREPLACE BLADE(SeeFigs.19 - 21) than 10-inch blade will come in contact with the blade guards. Also, NEVER use a blade that is so thick that it prevents the outer blade washer from engaging with the flat side of the spindle. Blades that are too large or too thick can result in an accident causing serious I Z_WARNING: A 10-inch blade is the maximum blade capacity of your saw.
- Page 26 TO REPLACE BLADE (See Figs. 19 - 21) cont. 8. Use the blade wrench (included) to loosen and remove the blade bolt. Turn the blade bolt clockwise to loosen. 9. Remove the outer blade washer.Then carefully remove old blade. DO NOT remove the inner blade washer. 10.
- Page 27 TO REPLACE BLADE (See Figs. 19 - 21) cont. Your compound miter saw has been adjusted at the factory for making very accurate cuts. However, some of the components may have been jarred out of alignment during shipping. Also over a period of time, some readjustment will probably become necessary due to wear.
- Page 28 APPLICATIONS Only use your compound miter saw for the purposes listed below: • Crosscutting wood and plastic • Crosscutting miters, joints, etc., for picture frames, moldings, door casings, and fine joinery NOTE: The blade included with this saw is ideal for a wide variety of wood cutting operations.
- Page 29 ToCrosscutWithYour Miter Saw 1. Unplug the saw. plug from power source BEFORE assembling parts, making adjustments I /K WARNING: To prevent personal injury, ALWAYS disconnect or changing blades. 2. Pull out the lock pin and lift the saw arm to its full height. 3.
- Page 30 To Crosscut With Your Miter Saw cont. 12. BEFORE turning on the saw, perform a dry run of the cutting operation just to make sure that no problems will occur when the cut is made. 13. Hold the saw handle firmly, when squeezing the trigger switch. Allow several seconds for the blade to reach maximum speed.
- Page 31 To Bevel Cut With Your Miter Saw cont. miter lock handle securely BEFORE making a cut. Failure to do so could I /_WARNING: To avoid serious personal injury, ALWAYS tighten the result in movement of the control arm or miter table while making a cut. 8.
-
Page 32: Compound Miter Cutting
To Bevel Cut With Your Miter Saw cont. 13. Align cutting line on the workpiece with the edge on the saw blade. 14. Hold the stock firmly with one hand and secure it against the fence. Use the hold-down clamp or a C-clamp to secure the workpiece when possible. - Page 33 ToMakea Compound Miter CutWithYour Miter Saw 1.Unplugthe saw. plug from power source BEFORE assembling parts, making adjustments I _WARNING: To prevent personal injury, ALWAYS disconnect the or changing blades. 2. Pull out the lock pin and lift the saw arm to its full height. 3.
- Page 34 ToMakea Compound Miter CutWithYourMiter Saw cont, 12. Place workpiece fiat on the miter table with one edge securely Fig. 25 against the fence. If the board is warped, place the convex side against the fence. If the concave edge of the board is against the fence, the board could collapse on the blade at the end of the cut and jam the blade.
-
Page 35: Support Long Workpieces
SUPPORT LONG WORKPIECES (SeeFigure27) Long workpieces require extra supports. The supports should be placed along the workpiece so it does not sag. The support should allow the workpiece lay flat on the base of the saw and work table during the cutting operation. - Page 36 CUTTING COMPOUND MITERS To help you to make the correct settings, use the compound angle setting chart below. Since compound cuts are the most difficult to accurately obtain, plan carefully and make trial cuts in scrap material prior to making your required cut. PITCH OF SIDE M-45.00O...
-
Page 37: Cutting Crown Molding
CUTTING CROWN MOLDING Your compound miter saw is excellent for cutting crown molding. In order for it to fit propedy, crown molding must be compound mitered with extreme accuracy. To fit flat against the ceiling and wall, the sum of the angles of the crown molding's two connecting surfaces must equal 90 °. - Page 38 CUTTING CROWN MOLDING cont. Bevel Angle Setting Type of Cut Left side, Inside 90 = corner 1.Top edge ol molding against fence 33.85 ° 2. Miter table set right 31.62 _ 3. Save left end of cut Right side, Inside 90 ° corner 1.
-
Page 39: Clamping Wide Workpieces
CLAMPING WIDE WORKPIECES (See Figure 31) When cutting wide workpieces (such as 2-in x 6-in. boards), the boards should ALWAYS be clamped with a hold-down clamp or C-clamp as shown in Figure 31. GENERAL Z_WARNING: To avoid accidents, ALWAYS disconnect the tool from the power source BEFORE cleaning or performing any maintenance. -
Page 40: Extension Cords
GENERAL cont. It is a known fact that electric tools are subject to accelerated wear and possible premature failure when they are used to work on fiber glass boats and sports cars, wallboard, spackling compounds or plaster. The chips and grindings from these materials are highly abrasive to electrical tool parts, such as bearings, brushes, commutators, etc. -
Page 41: Description
10-in. Compound Miter Saw Model No. 172.24360 The Model Number will be found on the Nameplate. Always mention the Model No, in all correspondence regarding your tool. Part No, Description Quantity Part No. Description Quantity GB6170-86 Nut M6 Cable GB77-85 Screw M6X16 GB859-87 Washer -5... - Page 42 10-in. Compound Miter Saw Model No. 172.24360 The Model Number will be found on the Nameplate. Always mention the Model No. in all correspondence regarding your tool. Part No. Part No. Description !Quantity Description Quantity M1S-250C.01-63 PositionerBoard GB77-85 Bolt M8X12 GB889-86 Nut M5 M1S-250B.02-17 SupportScale Label...
- Page 43 ¢o...
-
Page 44: Maintenance
Your Home For repair in your home of all major brand appliances, lawn and garden equipment, or heating and cooling systems, no matter who made it, no matter who sold it! For the replacement parts, accessories owner's manuals that you need to do-it-yourself. For Sears professional installation of home appliances i!iiiii!i_ili...