Table of Contents
Advertisement
Advertisement
Table of Contents
Troubleshooting

Subscribe to Our Youtube Channel
Related Manuals for Smart Technologies AirLiner WS100

Summary of Contents for Smart Technologies AirLiner WS100
- Page 1 Installation and User’s Guide AirLiner WS100 Wireless Slate ™...
- Page 2 AirLiner, SMART Board, Sympodium, Notebook, smarttech and the SMART logo are trademarks or registered trademarks of SMART Technologies ULC in the U.S. and/or other countries. Windows is either a registered trademark or a trademark of Microsoft Corporation in the U.S. and/or other countries. Mac is a registered trademark of Apple Computer, Inc., registered in the U.S.
- Page 3 Important Information Read this installation guide carefully before setting up and using your AirLiner™ WS100 wireless slate. WARNING Keep batteries out of the reach of children. WARNING Do not puncture, crush, heat or disassemble the battery, expose it to fire or liquid, short its terminals, or abuse the battery in any other way.
- Page 4 WARNING When you dispose of the lithium ion battery, cover the terminals with adhesive tape to prevent contact with metal objects. As an additional precaution, do not transport the battery with metal objects. If the battery comes in contact with a metal object, the battery can short and can cause a fire or personal injury.
- Page 5 CAUTION When you are not using the AirLiner slate and its tools, store them in a clean, dry place. CAUTION If the AirLiner slate battery charge is nearly empty and you do not connect the slate to a power outlet, you risk draining the battery completely. The AirLiner slate continues to draw a small amount of battery charge, even when it is turned off.
- Page 6 Important Information 99-00666-20 B0...
-
Page 7: Table Of Contents
Table of Contents Important Information About the AirLiner™ WS100 Wireless Slate Features ............................1 Installing the Slate Enabling the Wireless Connection ....................5 Installing the Battery........................6 Recharging the Battery ........................8 Installing the Paper Underlay ......................13 Installing the Tethered Pen......................16 Installing SMART Board Software.................... - Page 8 Customer Support Online Support ..........................69 Training ............................69 Contacting SMART Technical Support ..................69 General Inquiries........................... 69 Warranty............................70 Registration ........................... 70 Index Table of Contents 99-00666-20 B0...
-
Page 9: About The Airliner™ Ws100 Wireless Slate
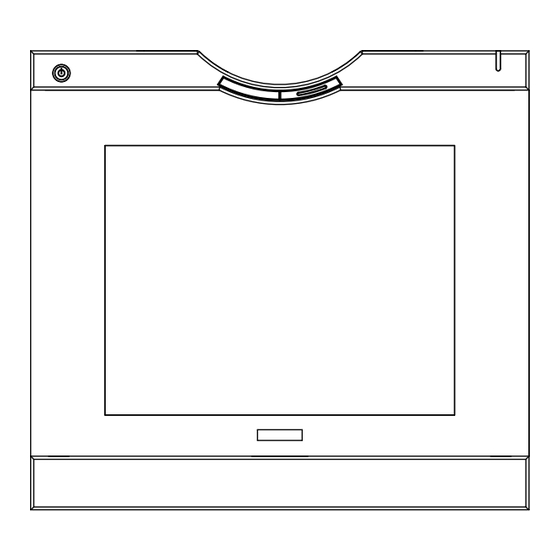
About the AirLiner™ WS100 Wireless Slate With the AirLiner™ WS100 wireless slate you can interact wirelessly with your computer, SMART Board™ interactive whiteboard or Sympodium™ interactive pen display from up to 52’ (16 m) away. The battery-free tethered pen allows you to control software programs, write notes, and highlight information in digital ink. - Page 10 Locking Slider Overlay DC IN Receptacle for Power Adapter Side View • A paper underlay, installed between the overlay and the workspace, allows you to select customizable tools and start programs when working with your slate (see page 30). Battery Connect Button Battery Compartment Anti-Slip Foot...
-
Page 11: Power Adapter
Bluetooth® USB Adapter The Bluetooth USB adapter enables wireless communication between the AirLiner slate and your computer (see page 6). NOTE: If you already have a Bluetooth USB adapter, or your computer has built-in Bluetooth wireless support, you don’t have to install the Bluetooth USB adapter included with the AirLiner slate. - Page 12 Cordless Mouse The cordless mouse includes customizable left, right and wheel buttons (see page 33). Wheel Button Right Mouse Button Left Mouse Button About the AirLiner WS100 Wireless Slate...
-
Page 13: Installing The Slate
Installing the Slate To install the AirLiner WS100 wireless slate, you must: • Enable the wireless connection (page 6). • Install the battery (page 6). • Recharge the battery (page 8). • Install the underlay (page 13). • Install the anti-slip feet (page 15). •... -
Page 14: Installing The Battery
To enable the wireless connection If you want to install the included Bluetooth USB adapter, or if you want to purchase and install a commercially available USB-to-Bluetooth wireless adapter, install the adapter’s driver software according to the instructions that came with the adapter. IMPORTANT •... - Page 15 3. Insert the battery connector into its receptacle. The black wire must be closest to the slate’s left edge. Battery Receptacle Left Edge Battery Battery Battery Connector WARNING Do not install the battery backwards or reverse its polarity. Doing so can damage the slate and can cause a fire or personal injury.
-
Page 16: Recharging The Battery
5. Close the battery compartment door. Battery Recharging the Battery A rechargeable lithium ion battery acts as the wireless power source for the AirLiner slate. A power adapter is included with the slate for recharging the battery and for powering the slate from a power outlet. - Page 17 To recharge the battery The AirLiner slate power adapter is composed of two parts: the power supply and the power cable. Before you begin, connect the power cable to the power supply. 1. Insert the power adapter’s round connector into the DC IN receptacle located on the right side of the AirLiner slate.
- Page 18 If the charging indicator doesn’t light up, the AirLiner slate isn’t receiving power. Verify the following: – The battery is correctly installed (see page 6). – The power outlet is working. – The power adapter cables are securely connected. – The AirLiner slate is correctly connected to the power outlet.
- Page 19 3. Click your AirLiner slate in the Select a SMART Product area. A blue border appears around your AirLiner slate. The AirLiner slate Battery Status is located at the bottom right corner of the SMART Board Settings dialog box. A fully green battery indicates a full charge. You can safely use the AirLiner slate wirelessly.
- Page 20 Tips and cautions on recharging the battery • Turn off the AirLiner slate when you’re not working with it. • Recharge the battery to ensure that some charge remains for when you next use the slate. NOTE: A built-in protection circuit prevents the battery from overcharging. CAUTION •...
-
Page 21: Installing The Paper Underlay
Installing the Paper Underlay An underlay is a sheet of paper placed between the AirLiner slate’s workspace and its transparent overlay. There is a tool strip of pens and icons printed on the underlay. You can press these pens and icons with the tethered pen to select customizable tools and start programs. One underlay is included with the AirLiner slate. - Page 22 To install the underlay 1. Locate the locking slider on each side of the slate, and then slide them towards the slate’s top edge. Locking Slider Transparent Overlay 2. Grasp the transparent overlay’s upper edges with your fingertips, and then lift the overlay away from the slate.
- Page 23 To install the adhesive anti-slip feet Four black, adhesive anti-slip feet are included with the AirLiner slate. 1. Remove the backing paper from each anti-slip foot. 2. Place each anti-slip foot into one of the circular grooves located on the back of the AirLiner slate, and then push it firmly into the groove to secure it.
-
Page 24: Installing The Tethered Pen
Installing the Tethered Pen Use the tether (included) to attach the pen to the AirLiner slate, so that it’s always within reach. To attach the pen to the AirLiner slate 1. Thread one loop of the tether through the opening at the end of the pen, and then slip the rest of the tether through the loop. - Page 25 2. Thread the other loop of the tether through one of the holes located at the back of the slate. 3. Slip the pen and the rest of the tether through the loop. Pull the pen until the loop is snug. Battery 99-00666-20 B0 Installing the Slate...
-
Page 26: Installing Smart Board Software
Installing SMART Board Software To maximize your AirLiner slate’s capabilities, install SMART Board software. However, if you don’t install SMART Board software, you can use the slate as a mouse device. To install SMART Board software 1. Turn on your computer and close all programs. 2. -
Page 27: Turning On The Slate And Creating A Wireless Connection
Turning on the Slate and Creating a Wireless Connection This chapter explains how to: • Turn on the slate. • Create a wireless connection between the AirLiner slate and your computer (page 19). • Reestablish a wireless connection between the AirLiner slate and your computer (page 22). •... -
Page 28: Creating A Wireless Connection Between The Airliner Slate And Your Computer
Creating a Wireless Connection Between the AirLiner Slate and Your Computer The first time you connect the AirLiner slate to a computer, you must create a wireless connection using the software included with your Bluetooth USB adapter or your computer’s built-in Bluetooth wireless support. - Page 29 To create a wireless connection between the AirLiner slate and your computer IMPORTANT • The first time you create a connection between the AirLiner slate and your computer, it is helpful to position the slate as close to your computer as possible and to ensure that there is a direct, unobstructed line of sight between the slate and your Bluetooth USB adapter or built-in Bluetooth wireless support.
-
Page 30: Reestablishing The Wireless Connection
IMPORTANT After you successfully create a wireless connection between the AirLiner slate to your computer, the slate appears as a connected device in your Bluetooth software, and the power indicator on the slate turns solid blue. To confirm a successful connection to your computer, write with the tethered pen on the slate’s workspace. -
Page 31: Disconnecting The Airliner Slate From Your Computer
To reestablish the wireless connection 1. Reset the device that caused the broken connection: – Turn on the computer. – Insert the Bluetooth USB adapter into your computer’s USB port. – Turn on your computer’s built-in Bluetooth wireless support. – Move the slate within the operational range of the Bluetooth wireless connection. -
Page 32: Turning Off The Slate
To disconnect the AirLiner slate using the computer 1. Open the control panel for your Bluetooth wireless device. 2. Open the list of devices that your computer connects to using Bluetooth wireless technology. NOTE: The procedure required to open the list of wireless connections varies, depending on whether you’re using a Bluetooth USB adapter or your computer’s built-in Bluetooth wireless support, and depending on your operating system. -
Page 33: Using The Slate And Its Tools
Using the Slate and its Tools This chapter describes how to use the AirLiner slate’s tools: • the battery-free tethered pen (page 26) • the cordless mouse (page 33) • the function buttons (page 34) • the slate locking feature (page 34). Function Buttons Workspace Tethered Pen... -
Page 34: Using The Battery-Free Tethered Pen
Using the Battery-Free Tethered Pen Within the slate’s workspace, you can use the tethered pen to point, single-click, double-click, select creative tools, start programs, and more. You can also customize the side switch. Use the tethered pen in place of a mouse device. When you aren’t using the tethered pen, place it in the storage compartment, so that it’s easily accessible for later use. - Page 35 To point on the display The AirLiner slate’s workspace is a mapped representation of your display, be it your computer screen, SMART Board interactive whiteboard or Sympodium interactive pen display. Each point on the workspace corresponds to a point on your display. When you move the pen on the slate’s workspace, the pointer moves along the corresponding points on your display.
- Page 36 To select or clear the Enable Hover feature NOTE: To select or clear the Enable Hover feature, you must first install SMART Board software (see page 18). 1. Start the SMART Board software control panel: – Windows operating systems: Click the SMART Board icon in your computer’s notification area, and then select Control Panel.
- Page 37 To click with the tethered pen To replicate a single-click on a mouse, tap the pen tip once on the workspace. To double-click with the tethered pen To replicate a double-click on a mouse, quickly tap the pen tip twice in the same place on the workspace.
- Page 38 To use the side switch Pressing the side switch as you move the tethered pen on the workspace changes the pen’s function. Upper Side Switch Side Switch (includes upper and lower side switches) Lower Side Switch 1. Press and hold the upper or lower side switch, depending on the tool you want to apply. 2.
- Page 39 To write in digital ink You can select a creative tool on the tool strip (adjacent) or by pressing the tethered pen’s side switch, and then write or draw on the AirLiner slate’s workspace with digital ink. Digital ink mimics the appearance of liquid ink on paper.
- Page 40 To use the side switch to erase 1. Press and hold the upper or lower side switch (depending on how you customize the switch) 2. Position the pointer at the desired location of your display. 3. Press the pen tip on the workspace, and then move it along the digital ink you want to erase. To practice hand-eye coordination The following exercise is designed to improve hand-eye coordination, a skill that will help you work with the tethered pen.
-
Page 41: Using The Cordless Mouse
Using the Cordless Mouse The cordless mouse is battery-free. You can use it like a traditional mouse within the workspace, instead of the tethered pen. Wheel Button Right Mouse Button Left Mouse Button The cordless mouse has three buttons. The left mouse button is set to left-click, the right mouse button is set to right-click, and the wheel button is set to middle-click. -
Page 42: Using The Function Buttons
Using the Function Buttons There are two customizable function buttons located at the top of the AirLiner slate. By default, the left function button is set to start Floating Tools, and the right function button is set to start Notebook software. However, you can customize the function buttons to suit your needs (see page 44). - Page 43 To lock and unlock AirLiner slates using the SMART Board icon Windows and Linux operating systems • To lock all AirLiner slates, click the SMART Board icon in your computer’s notification area, and then select Other SMART Tools > Lock Airliners. The AirLiners Locked floating tool appears.
- Page 44 Using the Slate and its Tools 99-00666-20 B0...
-
Page 45: Customizing The Slate
Customizing the Slate This chapter describes how to customize the AirLiner slate and its tools: • Customize the tethered pen (this page). • Customize the function buttons (page 44). • Customize and print underlays (page 46). • Map pointer movement to multiple displays (page 51). NOTE: To customize the AirLiner slate and its tools, you must first install SMART Board software (see page 18). - Page 46 5. Move the Tip Feel slider to the desired level. Select a firm Tip Feel if you want to apply a lot of pen tip pressure on the workspace, or select a soft Tip Feel if you want to apply minimal pen tip pressure on the workspace.
- Page 47 4. Select Pen and Button Settings in the list. Blue Border Around AirLiner Slate Pen and Button Settings Lower Side Switch List Upper Side Switch List 99-00666-20 B0 Customizing the Slate...
- Page 48 5. Select the desired functions in the upper and lower side switch lists. Side Switch List Item Side Switch Function Print page Print the current page in Notebook software. Next page Go to the next page in Notebook software. Previous page Go to the previous page in Notebook software.
- Page 49 6. If you select Pen or Eraser in the list, click Customize. The Customize Pen dialog box appears. The Customize Eraser dialog box appears. a. Select attributes for your pen in the Outline Color, Line Properties and Transparency areas. Click an eraser icon to select the desired eraser thickness. b.
- Page 50 7. Click OK. The SMART Board Settings dialog box closes. 8. Close the SMART Board software control panel. To customize Mouse Settings for the tethered pen 1. Start the SMART Board software control panel: – Windows operating systems: Click the SMART Board icon in your computer’s notification area, and then select Control Panel.
- Page 51 5. Select your mouse settings. Setting Function Double-Click Zone Double-Click Zone allows you to set a greater margin of error when double-clicking. When you select a large Double-Click Zone, you don’t have to tap the tethered pen twice in exactly the same place. Enable Mouse Assist Mouse Assist makes it easier to move the pointer to commonly used buttons and toolbars, such as...
-
Page 52: Customizing The Function Buttons
Customizing the Function Buttons By default, the left function button starts Floating Tools, and the right function button starts Notebook software. However, you can change the functions of these buttons. To customize the function buttons 1. Start the SMART Board software control panel: –... - Page 53 Left Function Button List Right Function Button List 5. Select the desired functions in the right and left function button lists. List Item Button Function Print page Print the current page in Notebook software. Next page Go to the next page in Notebook software. Previous page Go to the previous page in Notebook software.
-
Page 54: Printing And Customizing Underlays
6. Click OK. The SMART Board Settings dialog box closes. 7. Close the SMART Board software control panel. Printing and Customizing Underlays An underlay is a sheet of paper between the AirLiner slate’s workspace and its transparent overlay. A tool strip (adjacent) is a toolbar located on the underlay. You can press the icons on the tool strip to select creative tools and start programs. - Page 55 4. Select Display Properties in the list. Blue Border Around AirLiner Slate Display Properties 5. Select an underlay template in the Select a color scheme list. 99-00666-20 B0 Customizing the Slate...
- Page 56 6. Click the Customize and Print button. The Customize and Print Underlays dialog box appears. 7. Click the Print button to print the underlay template. To customize and print an underlay 1. Open the Customize and Print Underlays dialog box by following steps 1 to 6 in the previous procedure.
- Page 57 4. Click the Configure Icon Strip button to customize your underlay’s tool strip buttons. The Configure Command Strip dialog box appears. 5. Select items in the Available Tools area and click the Add button to move them to your underlay’s tool strip. –...
- Page 58 8. Click OK to save your underlay changes. Your changes take effect immediately. 9. Click the Print button to print the customized underlay. 10. Click the Close button to exit the Customize and Print Underlays dialog box. NOTE: The SMART Board software control panel saves your most recent underlay. The next time you open the Customize and Print Underlays dialog box, your latest configuration choices appear.
-
Page 59: Mapping To Multiple Displays
Mapping to Multiple Displays The AirLiner slate’s workspace is a mapped representation of your display, be it your computer screen, SMART Board interactive whiteboard or Sympodium interactive pen display. Each point on the workspace corresponds to a point on your display. When you move the pen on the slate’s workspace, the pointer moves along the corresponding points on your display. - Page 60 To map the AirLiner slate to multiple displays 1. Start the SMART Board software control panel: – Windows operating systems: Click the SMART Board icon in your computer’s notification area, and then select Control Panel. – Mac operating system software: Press and hold the Control key and click the SMART Board Tools icon in the Dock, and then select Open Control Panel.
-
Page 61: Maintaining The Slate
Maintaining the Slate This chapter describes how to maintain the AirLiner slate: • Clean the slate (this page). • Replace the tethered pen tip (this page). • Replace the battery (page 55). Cleaning the Slate Regularly clean the AirLiner WS100 wireless slate with a soft, damp cloth to remove dust and dirt particles. -
Page 62: Replacing The Tethered Pen Tip
Replacing the Tethered Pen Tip The tethered pen tip (nib) will wear down with regular use. When the tip becomes too short or develops a flat point, you can replace it with another tip. To order a replacement pen tip (Part No. 45-00008-20), contact SMART Technical Support (page 69). -
Page 63: Replacing The Battery
Replacing the Battery Lithium ion batteries typically need to be replaced every two or three years, whether you use them or not. If your battery no longer recharges (see page 8), contact SMART Technical Support (page 69) to order a new one. Only order and install rechargeable lithium ion batteries that have been designed for the AirLiner WS100 wireless slate. - Page 64 4. Dispose of the battery in accordance with the following recommendations. WARNING Keep batteries out of the reach of children. WARNING Do not puncture, crush, heat or disassemble the battery, expose it to fire or liquid, short its terminals, or abuse the battery in any other way. Doing so can cause the battery to explode or ignite, and can cause a fire or personal injury.
-
Page 65: Troubleshooting
Troubleshooting If your AirLiner WS100 wireless slate isn’t working as expected, try the following: • If an error message appears on your display, follow the instructions suggested in the message. • If you have new hardware or software that’s incompatible with the AirLiner slate, download and install the latest version of SMART Board software at www.smarttech.com/support/software/ index.asp. -
Page 66: Troubleshooting Scenarios
• Disconnect audio devices connected to your computer that use Bluetooth wireless technology, such as headsets. • Turn off devices operating in the 2.4 GHz band, such as WiFi networks and cell (mobile) phones, or move their antennas further away from your computer. Troubleshooting Scenarios Bluetooth Wireless Connection Bluetooth wireless support isn’t available on your computer... - Page 67 When you try to create a connection between the slate and your computer, the slate doesn’t appear in the list of available devices on your computer When your Bluetooth software searches for available wireless devices, wait for your computer to search for the AirLiner slate, and then select it.
- Page 68 The AirLiner slate works when it’s connected to an external power source, but turns off when it isn’t Remove the battery. Check that there is no leakage or other damage to the battery. If the battery is damaged, order a new one (Part No. 01-00173) from SMART Technical Support (page 69). If there’s no indication of damage to the battery, insert the battery into the slate and connect the power adapter to the slate and a power outlet (see page 6).
- Page 69 Tethered Pen When you move the pen tip across the workspace, the pointer doesn’t move on the display Complete the following procedures. After completing each procedure, move the tethered pen across the slate’s workspace to verify if the issue is resolved. •...
- Page 70 After you customize the tethered pen, it doesn’t work as expected Turn off your computer, and then turn it on again. The wireless connection between your computer and the AirLiner slate is automatically reestablished after you turn on the computer. You can use the tethered pen after the wireless connection is reestablished.
- Page 71 Cordless Mouse When you move the cordless mouse across the workspace, the pointer doesn’t move on the display Complete the following procedures. After completing each procedure, move the cordless mouse across the slate’s workspace to verify if the issue is resolved. •...
-
Page 72: Function Buttons
When you move the cordless mouse across the workspace, the pointer’s movement on the display lags or it jumps Optimize the Bluetooth wireless connection, because your Bluetooth wireless connection may not be transmitting data from the slate at the required speed (see page 57). The cordless mouse buttons don’t work as expected 1. - Page 73 Multiple Displays The connected computer is linked to multiple displays, but you’re unable to move the pointer from one display to another. Complete steps 1 to 7 on page 52, selecting Entire Surface from the list in step 5. NOTE: There are different methods for defining the arrangement of multiple displays, depending on your operating system.
- Page 74 Troubleshooting 99-00666-20 B0...
-
Page 75: Regulatory Compliance
If you need more information on the collection, reuse and recycling of electrical and electronic equipment, please contact your local WEEE recycling agency. Alternatively, contact your local reseller or SMART Technologies for information on the environmental performance of our products. - Page 76 Regulatory Compliance 99-00666-20 B0...
-
Page 77: Customer Support
Toll Free 1.866.518.6791 (Canada/U.S.) (Monday to Friday, 5 a.m. – 6 p.m. Mountain Time) Fax: +1.403.806.1256 E-mail: support@smarttech.com General Inquiries Address: SMART Technologies 1207 – 11 Ave SW, Suite 300 Calgary, AB T3C 0M5 CANADA Switchboard: +1.403.245.0333 or Toll Free 1.888.42.SMART (Canada/U.S.) Fax: +1.403.228.2500... -
Page 78: Warranty
Warranty Product warranty is governed by the terms and conditions of SMART’s “Limited Equipment Warranty” that shipped with the SMART product at the time of purchase. Registration To help us serve you, register online at www.smarttech.com/registration. Customer Support 99-00666-20 B0... -
Page 79: Index
Index Cordless Mouse Customizing, 33 AirLiner Slate Using, 33 Locking, 34 Writing with Digital Ink, 33 AirLiner Wireless Slate Creating a Wireless Connection, 19 Cleaning, 53 Creative Tool, 31 Customizing, 37 Customizing Features, 1 AirLiner Wireless Slate, 37 Installing, 5 Cordless Mouse, 33 Introduction, 1 Eraser, 41... - Page 80 Hand-Eye Coordination, 27, 32 Optimizing the Wireless Connection, 57 Headsets, 58 Orientation/Alignment Settings, 52 Overlay, 2 see Human Interface Device Hover, 27, 43 Human Interface Device, 5 Paper Underlay see Underlay Icon Strip see Tethered Pen see Tool Strip, 30, 49 Pen and Button Settings, 37, 39 Installing Pen Nib...
- Page 81 Pen, 40 Previous Page, 40 Warranty, 70 Print Page, 40 Waste Electrical and Electronic Equipment Right-Click, 40 Regulations (WEEE), 67 Screen Capture Toolbar, 40 Using, 30 Wireless Connection Skipping Creating, 19 Disconnecting, 23 see Jumping (Pointer), 64 Enabling, 5 Slate Optimizing, 57 see AirLiner Wireless Slate Reconnecting, 22...
- Page 82 Index 99-00666-20 B0...
- Page 84 SMART Technologies 1207 – 11 Avenue SW, Suite 300 Calgary, AB T3C 0M5 CANADA www.smarttech.com/support www.smarttech.com/contactsupport Support +1.403.228.5940 Toll Free 1.866.518.6791 (Canada/U.S.) 99-00666-20 REV B0...
Need help?
Do you have a question about the AirLiner WS100 and is the answer not in the manual?
Questions and answers