
Related Manuals for Hanna Instruments HI 98713


Summary of Contents for Hanna Instruments HI 98713
- Page 1 Instruction Manual HI 98713 ISO Portable Turbidimeter w w w. h a n n a i n s t . c o m...
-
Page 2: Table Of Contents
Dear Customer, Thank you for choosing a Hanna Instruments product. This manual will provide you with the necessary information for correct use of the instrument. Please read this instruction manual carefully before using the instrument. If you need additional technical information, do not hesitate to e-mail us at tech@hannainst.com or see the back side of this manual for our worldwide sales and technical service contacts. -
Page 3: Preliminary Examination
PRELIMINARY EXAMINATION PRELIMINARY EXAMINATION PRELIMINARY EXAMINATION PRELIMINARY EXAMINATION PRELIMINARY EXAMINATION Please examine this product carefully. Make sure the instrument is not damaged. If any damage has occurred during the shipment, please notify your dealer. This HI 98713 Portable Turbidimeter is supplied complete with: •... -
Page 4: General Description
GENERAL DESCRIPTION GENERAL DESCRIPTION GENERAL DESCRIPTION GENERAL DESCRIPTION GENERAL DESCRIPTION GENERAL DESCRIPTION HI 98713 is a high accuracy ISO compliant portable turbidimeter that benefits from Hanna’s years of experience as manufacturer of analytical instruments. The HI 98713 meets and exceeds the requirements of the ISO 7027 for water quality. -
Page 5: Tag Identification System
TAG IDENTIFICATION SYSTEM TAG IDENTIFICATION SYSTEM TAG IDENTIFICATION SYSTEM TAG IDENTIFICATION SYSTEM TAG IDENTIFICATION SYSTEM Hanna is the first manufacturer of turbidity instruments that has decided to add the unique T.I.S. - Tag Identification System to our Portable Turbidimeters, to meet the more restrictive needs of the users and fit all advantages of this system to the turbidity measurements and data manage- ment. -
Page 6: Principle Of Operation
PRINCIPLE OF OPERATION PRINCIPLE OF OPERATION PRINCIPLE OF OPERATION PRINCIPLE OF OPERATION PRINCIPLE OF OPERATION Turbidity of the water is an optical property that causes light to be scattered and absorbed, rather than transmitted. The scattering of the light that passes through a liquid is primarily caused by the suspended solids. -
Page 7: Measurement Units
M E A S U R E M E N T U N I T S M E A S U R E M E N T U N I T S M E A S U R E M E N T U N I T S M E A S U R E M E N T U N I T S M E A S U R E M E N T U N I T S Many methods were used to measure turbidity over the years. -
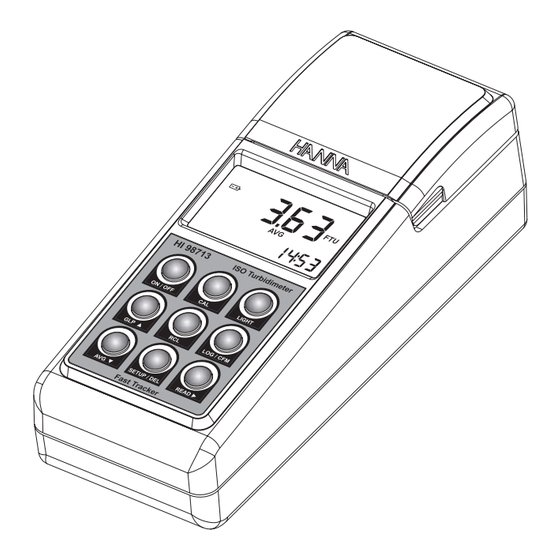
Page 8: Functional Description
FUNCTIONAL DESCRIPTION FUNCTIONAL DESCRIPTION FUNCTIONAL DESCRIPTION FUNCTIONAL DESCRIPTION FUNCTIONAL DESCRIPTION INSTRUMENT DESCRIPTION 1) Cuvet Lid. Close the cuvet lid prior to start a measurement. 2) Cuvet Holder. Insert the cuvet into the holder with the cuvet mark matching the case mark. 3) Liquid Crystal Display (LCD). - Page 9 8) ON/OFF, press to turn the instrument ON/OFF. If no key is pressed for more than 15 minutes, the instrument automatically shuts off. 9) GLP , press to enter/exit GLP feature. In SETUP it is used to increase the set values. In Log Recall it is used to select a newer record (scroll up).
- Page 10 DISPLAY DESCRIPTION 1) Battery icon. When it is ON, it shows that the instrument works on battery. When blinking, the batteries are almost empty and need to be replaced. 2) Wait icon. It is displayed when the instrument performs an internal checkup. 3) Measurement icon.
-
Page 11: Specifications
SPECIFICATIONS SPECIFICATIONS SPECIFICATIONS SPECIFICATIONS SPECIFICATIONS Range 0.00 to 9.99 FTU 10.0 to 99.9 FTU 100 to 1000 FTU Range Selection Automatically Resolution 0.01 FTU from 0.00 to 9.99 FTU 0.1 FTU from 10.0 to 99.9 FTU 1 FTU from 100 to 1000 FTU Accuracy ±2% of reading plus 0.1 FTU Repeatibility... -
Page 12: General Tips For An Accurate Measurement
GENERAL TIPS FOR AN ACCURATE MEASUREMENT GENERAL TIPS FOR AN ACCURATE MEASUREMENT GENERAL TIPS FOR AN ACCURATE MEASUREMENT GENERAL TIPS FOR AN ACCURATE MEASUREMENT GENERAL TIPS FOR AN ACCURATE MEASUREMENT HI 98713 is a highly accurate turbidimeter. To meet the instrument performance and fully benefit of its properties it is very important that the analyst perform accurate, precise and repeatable readings using proper measurement techniques. - Page 13 CUVET OILING To hide minor imperfections and scratches, the cuvets should be oiled outside with the supplied silicone oil. This is very important, especially for low turbidity samples (< 1 FTU), otherwise scratches can contribute and alter turbidity readings. The silicone oil has the same refractive index as the glass and will not alter the turbidity readings. It is important to apply only a thin layer of silicone oil.
- Page 14 In order to index a cuvet follow the next steps: • Fill the cuvet with high quality water (<0.1 FTU) up to the line. • Clean and oil the cuvet as described before. • Turn the instrument ON. • Insert the cuvet into the instrument and press READ .
- Page 15 MATCHING MULTIPLE CUVETS Precise measurements require the use of a single cuvet. If it is not possible, the cuvet selection and matching must be performed before taking measurements. In order to match multiple cuvets follow the next steps: • Fill some cuvets with high quality water (<0.1 FTU) up to the line.
- Page 16 • Open the instrument lid, slightly rotate the cuvet and take a new reading. • Repeat the last step for the second cuvet until the reading is within 0.01 FTU of the value obtained for the first cuvet. • Alternatively, keep READ pressed and, after the first value is displayed, open the lid and start rotating the cuvet until the displayed value matches the first cuvet.
- Page 17 APPLICATION OF VACUUM Vacuum works by decreasing the atmospheric pressure. In this way the bubbles from the solution came out to the surface. Application of vacuum is a very simple procedure and can be applied with any vacuum source at hand. The simplest equipment at hand is a syringe and a rubber stopper for vacuum degassing.
- Page 18 HEATING THE SAMPLE Use of heat to remove air bubbles, although very effective in some cases, should be handled with care because it can alter the turbidity of the sample. When heating a sample, the volatile components from the sample can vaporize, the suspended components can dissolve or the sample characteristics can change.
-
Page 19: Measurement Procedure
MEASUREMENT PROCEDURE MEASUREMENT PROCEDURE MEASUREMENT PROCEDURE MEASUREMENT PROCEDURE MEASUREMENT PROCEDURE When taking any turbidity measurements several basic rules should be followed: • Use always cuvets without scratches or cracks because they can cause inaccurate readings. • Cap always the cuvets to avoid spillage of the sample into the instrument. •... - Page 20 NORMAL MEASUREMENT This type of measurement can be used for regular measurements, when the sample is stable and normal accuracy is required. In normal measurement mode, the led is ON for a minimum period of time (about 7 seconds), saving the battery life. Normal measurement takes about 10 seconds. If normal measurement is selected, the “AVG”...
- Page 21 • Press READ to start the average reading mode. The display will show blinking dashes and the icons for cuvet, detectors and LED will appear during measurement. When a new partial value is displayed, the cuvet icon and the measurement unit will blink shortly.
-
Page 22: Calibration Procedure
CALIBRATION PROCEDURE CALIBRATION PROCEDURE CALIBRATION PROCEDURE CALIBRATION PROCEDURE CALIBRATION PROCEDURE HI 98713 has a powerful calibration function that compensates for LED aging or changing. The calibration can be done using the suplied calibration solutions or user prepared standards. HI 98713 turbidimeter is supplied with 4 AMCO standards: <0.1 FTU, 15 FTU, 100 FTU and 750 FTU. - Page 23 TWO-POINT CALIBRATION • Turn the instrument on by pressing ON/OFF. When the LCD displays dashes, the instrument is ready. • Enter calibration mode by pressing CAL. The display will show “CAL P.1” and no suggested value. This first point is used to check the optical system.
- Page 24 • At the end of the measurement, the third calibration point (100 FTU) is displayed on the primary LCD, “CAL P.3” on the secondary LCD, and “READ” tag will blink. • At this moment it is possible to exit calibration by pressing CAL.
- Page 25 • Close the lid and press READ . The display will show blinking dashes and the icons for cuvet, detectors and LED will appear during measurement. • At the end of the measurement, the four-point calibration is completed and the instrument returns automatically to measurement mode.
-
Page 26: Logging
L O G G I N G L O G G I N G L O G G I N G L O G G I N G L O G G I N G HI 98713 has a log space for up to 200 records. With each measurement, the date, time and tag ID is stored. - Page 27 VIEW LOGGED DATA The stored records can be viewed at any moment by pressing RCL. To return to normal measurement mode, press RCL again . LOG SEARCHING The log records are stored in chronological order. The first displayed record is the last stored one. •...
- Page 28 • Measurement date in YYYY.MM.DD format. • Measurement time in hh:mm format. • Delete the last record panel (only for last re- cord). • Delete all records. DELETE LAST RECORD To log other values, the last record or all records have to be deleted.
-
Page 29: Good Laboratory Practice (Glp)
• The instrument asks for confirmation and if LOG/CFM is pressed, all records are deleted. To abort the delete function, press READ instead of LOG/CFM. • After all records are deleted, dashes are displayed for one second and the instrument returns to idle mode. - Page 30 • Third calibration point (if available). • Fourth calibration point (if available). • Delete calibration panel. To delete calibration: • Press SETUP/DEL while in the delete calibration panel of the GLP. The user calibration will be deleted and the factory calibration will be restored. The instrument will enter automatically in idle mode.
-
Page 31: Setup
S E T U P S E T U P S E T U P S E T U P S E T U P Setup mode allows viewing and modifying the instrument parameters. The blinking “CAL” tag during setup mode suggest to press CAL for parameters editing. •... - Page 32 • Press LOG/CFM to save the change. The new selected option will be displayed on the LCD. Alternatively, press CAL to exit without saving the changes. SET THE DATE The HI 98713 turbidimeter has a built-in real time clock (RTC). The RTC time is used to generate a unique time stamp for each recorded value and to automatically store the last calibration date.
- Page 33 SET THE TIME • To set the current time, press CAL when set time panel is displayed. The time format is hh:mm. The hour value and “CFM” tag will start blinking. • Press the UP or DOWN keys to set the hour value.
- Page 34 • Press LOG/CFM to save the change. The new instrument ID will be displayed. Alternatively, press CAL to exit without saving the changes. SET BAUD RATE The HI 98713 has a RS232 and a USB link. When the USB connection is used, the RS232 connection becomes inactive.
-
Page 35: Lcd Backlight
L C D B A C K L I G H T L C D B A C K L I G H T L C D B A C K L I G H T L C D B A C K L I G H T L C D B A C K L I G H T The LCD can be illuminated to allow the user to see the readings even in dark environments. -
Page 36: Led Replacement
L E D R E P L A C E M E N T L E D R E P L A C E M E N T L E D R E P L A C E M E N T L E D R E P L A C E M E N T L E D R E P L A C E M E N T In case of LED failure, the defective LED can be easily replaced. - Page 37 BATTERIES REPLACEMENT To replace the batteries follow the next steps: • Press ON/OFF to turn OFF the instrument. • Open the batteries cover by pressing the locking clip. • Take out the used batteries and insert 4 new 1.5 AA size batteries, while paying attention to the correct polarity as indicated on the battery compartment.
-
Page 38: Pc Interface
PC INTERFACE PC INTERFACE PC INTERFACE PC INTERFACE PC INTERFACE To fully use the instrument tag identification system function, the measured data has to be downloaded to a computer. The instrument can use RS232 or USB connection to communicate with the PC. When using the RS232 protocol, simply connect a HI 920011 serial cable between the instrument and the computer. -
Page 39: Accessories
To avoid damage or burns, do not put the instrument in microwave ovens. For your own and the instrument safety do not use or store the instrument in hazardous environments. Hanna Instruments reserves the right to modify the design, construction and appearance of its products without advance notice. - Page 40 SALES AND TECHNICAL SERVICE CONTACTS SALES AND TECHNICAL SERVICE CONTACTS SALES AND TECHNICAL SERVICE CONTACTS SALES AND TECHNICAL SERVICE CONTACTS SALES AND TECHNICAL SERVICE CONTACTS Australia: Tel. (03) 9769.0666 • Fax (03) 9769.0699 China: Tel. (10) 88570068 • Fax (10) 88570060 Egypt: Tel.
Need help?
Do you have a question about the HI 98713 and is the answer not in the manual?
Questions and answers