Table of Contents
Advertisement
Manufacturer:
Dürkopp Adler Manufacturing (Shanghai) Co., Ltd.
1201 Luoshan Road, Pudong New Area, Shanghai 200135, China
Contact:
Dürkopp Adler AG, PO Box 17 03 51, D-33703 Bielefeld, Potsdamerstr. 190, D-33719 Bielefeld,
Phone +49 (0) 521 9 25 00, Fax +49 (0) 521 9 25 24 35, www.duerkopp-adler.com
Ausgabe / Edition:
Änderungsindex
02/2008
Rev. index: 00.0
69-373 / 69-373H
Spezialnaehmaschine
Serviceanleitung
Service Instructions
Printed in China
D
GB
Teile-Nr./Part.-No.:
0791 069642
Advertisement
Table of Contents

Related Manuals for Duerkopp Adler 69-373


Summary of Contents for Duerkopp Adler 69-373
-
Page 1: Service Instructions
69-373 / 69-373H Spezialnaehmaschine Serviceanleitung Service Instructions Manufacturer: Dürkopp Adler Manufacturing (Shanghai) Co., Ltd. 1201 Luoshan Road, Pudong New Area, Shanghai 200135, China Contact: Dürkopp Adler AG, PO Box 17 03 51, D-33703 Bielefeld, Potsdamerstr. 190, D-33719 Bielefeld, Phone +49 (0) 521 9 25 00, Fax +49 (0) 521 9 25 24 35, www.duerkopp-adler.com Manufacturer: Dürkopp Adler Manufacturing (Shanghai) Co., Ltd. - Page 2 Alle Rechte vorbehalten. Eigentum der Dürkopp Adler AG und urheberrechtlich geschützt. Jede, auch auszugsweise Wiederverwendung dieser Inhalte ist ohne vorheriges schriftliches Einverständnis der Dürkopp Adler AG verboten. All rights reserved. Property of Dürkopp Adler AG and copyrighted. Reproduction or publication of the content in any manner, even in extracts, without prior written permission of Dürkopp Adler AG, is prohibited.
-
Page 3: General Safety Instructions
General safety instructions The non-observance of the following safety instructions can cause bodily injuries or damages to the machine. 1. The machine must only be commissioned in full knowledge of the instruction book and operated by persons with appropriate training. 2. -
Page 5: Table Of Contents
Contents Page: Service Instructions Cl. 69-373 Cl. 69-373H (Edition 02/2008) General Gauge set ........... Zero position, feeding with sewing equipment Checking the zero position (position of the stitch regulator link) . -
Page 7: General
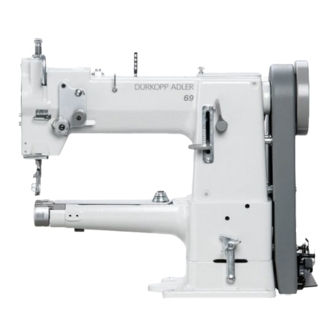
General These service instructions describe the adjustments that can be made to the class 69 special sewing machine. 69-373 Single-needle, lockstitch, free-arm sewing machine with bottom feed, needle feed and alternating top feed. 69-373-H like the class 69-373, additionally with bottom feed stroke. ATTENTION! The tasks described in the present service instructions may only be carried out by qualified staff or other appropriately trained persons! -
Page 8: Gauge Set
Gauge set You can use the setting gauges included in the gauge set to check and adjust accurately the sewing machine. Pos. Setting gauge Order no. Gauge 0981 150003 Loop stroke Block 0981 150002 Loop stroke Special wrench 0981 160402 Stitch uniformity... -
Page 9: Zero Position, Feeding With Sewing Equipment
Zero position, feeding with sewing equipment Checking the zero position (position of the stitch regulator link) Caution: Danger of injury! Turn off the main switch. Check the zero position of the stitch regulator only when the sewing machine is switched off. Rule and control In the zero position of the stitch regulator lever, the feed dog and the needle should not make any advancing motion when the handwheel is... -
Page 10: Setting Of The Bottom Feed
Setting of the bottom feed 2.2.1 Position of the feed dog in the throat plate cutout Caution: Danger of injury! Turn off the main switch. Check and set the position of the feed dog only when the sewing machine is switched off. Rule and control Sideways: The feed dog must lie centric in the throat plate cutout. -
Page 11: Advancing Movement Of The Feed Dog
2.2.2 Advancing movement of the feed dog Caution: Danger of injury! Turn off the main switch. Check and set the advancing movement of the feed dog only when the sewing machine is switched off. Rule and control When the stitch regulator lever is operated and set to have the greatest sewing length, both the needle and the feed dog should not move. -
Page 12: Lifting Movement Of The Feed Dog (Only With The Class 69-373H)
2.2.3 Lifting movement of the feed dog (only with the class 69-373H) Caution: Danger of injury! Turn off the main switch. Check and set the lifting movement of the feed dog only when the sewing machine is switched off. Rule and control In loop stroke position the marking 2 on the toothed wheel 1 should point to the top. - Page 13 – Unscrew screws 13. – Remove the cover 12 and the dirt wiper 11. The toothed belt 1 is now accessible. – Bring the machine into loop stroke position (see chapter 2.2.2). – Pull off the toothed wheel 1 and put it on again so that the marking 2 points to the top.
-
Page 14: Synchronous Run Of The Needle And Bottom Feed
Synchronous run of the needle and bottom feed Caution: Danger of injury! Turn off the main switch. Check and set the synchronous run only when the sewing machine is switched off. Rule and control The needle must penetrate the middle of the needle hole. –... -
Page 15: Setting Of The Upper Feed
Setting of the upper feed 2.4.1 Stroke of the upper feed and the material presser foot Caution: Danger of injury! Turn off the main switch. Check and set the stroke of the upper feed and the material presser foot only when the sewing machine is switched off. Rule and control The stroke of material presser foot and upper feed should be equal. -
Page 16: Advancing Movement Of The Upper Feed Foot
2.4.2 Advancing movement of the upper feed foot Caution: Danger of injury! Turn off the main switch. Check and set the advancing movement of the upper feed foot only when the sewing machine is switched off. Rule and control The upper feed foot should reach the top edge of the feed dog at the same time as the descending needle. -
Page 17: Stitch Regulator (Equal Stitch Length For Forward And Reverse Stitching)
Stitch regulator (equal stitch length for forward and reverse stitching) Caution: Danger of injury! Turn off the main switch. Check and set the stitch uniformity of forward and reverse stitching only when the sewing machine is switched off. Rule and control The stitch length for forward and reverse sewing must be equal. -
Page 18: Sewing Foot Height And Sewing Foot Lifting
Sewing foot height and sewing foot lifting Sewing foot lift with the lifting lever Caution: Danger of injury! Turn off the main switch. Check and set the height of the mechanically lifted sewing feet only when the sewing machine is switched off. The mechanically lifted sewing feet are arrested in the top position with the lifting lever 3 (for example when winding the bobbin thread or replacing the sewing feet). -
Page 19: Sewing Foot Lifting With The Knee Lever
Sewing foot lifting with the knee lever Caution: Danger of injury! Turn off the main switch. Check and set the height of the sewing feet lifted with the knee lever only when the sewing machine is switched off. Rule and control When both feet lie on the throat plate, there should be a clearance of 1 mm between the lifting lever 3 and the presser plate 2. -
Page 20: Opening The Thread Tension
Opening the thread tension 1 mm The needle thread tension is opened mechanically, – when the sewing feet are lifted with the knee lever. Caution: Danger of injury! Turn off the main switch. Check and set the opening of the thread tension only when the sewing machine is switched off. -
Page 21: Thread Controller Spring
Thread controller spring Rule and control The thread controller spring 1 must hold the needle thread under slight tension from the highest position of the thread lever to the moment the needle’s eye penetrates the sewing material. The thread controller spring 1 may only touch on the stop when the needle has entered the sewing material up to the eye. -
Page 22: Needle Bar Height
Needle bar height Rule and control In the loop stroke position the hook point 2 should be located in the middle of the needle furrow. Caution: Danger of injury! Turn off the main switch ! Check and set the needle bar height only when the sewing machine is switched off. -
Page 23: Hook Settings
Hook settings Loop stroke and clearance of the hook point to the needle 0,1 mm Caution: Danger of injury! Turn off the main switch. Check and set the loop stroke only when the sewing machine is switched off. Rule and control The loop stroke (2 mm) is the run of the needle bar from the bottom dead center up to the point where the hook point 1 lies at the middle of the needle. -
Page 24: Bobbin Case Holder
Bobbin case holder Caution: Danger of injury! Turn off the main switch. Set the bobbin case holder only when the sewing machine is switched off. Rule and control The thickest thread that can be used should be able to move easily through the slit between the bobbin case holder 2 and the groove of the lower part of the bobbin case 3. -
Page 25: Bobbin Winder
Bobbin winder Rule and control The bobbin winding operation must stop automatically when the bobbin is filled up to approx. 0.5 mm below the edge of the bobbin. Caution: Danger of injury! Turn off the main switch. Set the bobbin winder only when the sewing machine is switched off. Adjustment Slight changes in the bobbin fill quantity: –... -
Page 26: Oil Lubrication
Oil lubrication General Caution: Danger of injury! Oil can cause skin rashes. Avoid longer skin contact. After contact wash yourself thoroughly. ATTENTION! The handling and disposal of mineral oils is subject to legal constraints. Deliver used oil to an authorized reception point. Protect your environment. -
Page 27: Lubrication Points
Lubrication points 10 11 5 6 7 8 1 Needle bar joint 2 Arm shaft bearing - front 3 Lifting cam 4 Arm shaft bearing - center 5 Hook shaft bearing 6 Vertical shaft bearing - bottom 7 Vertical shaft bearing - top 8 Arm shaft bearing - rear 9 Hinge 10 Lifting lever bearing... -
Page 28: Maintenance
Maintenance Caution: Danger of injury! Turn off the main switch. You must turn off the special sewing machine before performing maintenance! The maintenance tasks to be conducted by the operating personnel of the special sewing machine daily or weekly (cleaning and oiling) are described in the “Operating Instructions”. -
Page 29: 10. Summary Of All Sewing Machine Settings
10. Summary of all sewing machine settings ATTENTION! The complete setting of the special sewing machine is to be made in the order described. No. Subject Chapter Correct setting Adjustment Set at the factory. Zero point, feed When the stitch length is set to “0”, with devices the feed dog and the needle should not make any advancing motion. - Page 30 Subject Chapter Correct setting Adjustment Sewing foot height and sewing foot lifting Sewing foot lifting with the The distance between the lifted Shift the material lifting lever material presser foot and the throat presser bar plate must amount 7 mm. Sewing foot lifting with the When both feet lie on the throat Set the adjusting...
Need help?
Do you have a question about the 69-373 and is the answer not in the manual?
Questions and answers