Table of Contents
Advertisement
Advertisement
Table of Contents

Related Manuals for Dymo LabelManager 160


Summary of Contents for Dymo LabelManager 160
- Page 1 User Guide LabelManager ®...
- Page 2 No part of this document may be reproduced or transmitted in any form or by any means or translated into another language without the prior written consent of Sanford, L.P. Trademarks DYMO and LabelManager are registered marks in the US and other countries. All other trademarks are the property of their respective holders.
-
Page 3: Table Of Contents
Contents About Your New Label Maker ............5 Registering Your Label Maker . -
Page 4: Overview
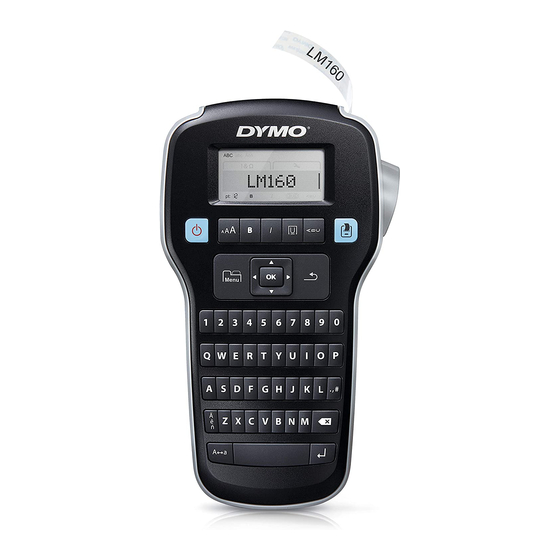
Figure 1 DYMO LabelManager 160 Label Maker 1 LCD display 8 Cancel 15 Accented characters 2 Italic 9 OK 16 Navigation 3 Label exit slot 10 Symbols – Punctuation 17 Menu 4 Underline/Boxes 11 Backspace 18 On/Off 5 Vertical 12 Return... -
Page 5: About Your New Label Maker
Connecting the Optional Power Adapter An optional 9 Volt, 2 A power adapter can be used to With the DYMO LabelManager 160 label maker, you can power the label maker. Connecting the power adapter create a wide variety of high-quality, self-adhesive labels. -
Page 6: Using The Label Maker For The First Time
LCD Display To remove the label cassette With DYMO’s exclusive graphical display, most of the formatting you add is visible instantly. Lift the label cartridge door on the back of the printer. Remove the label cassette. -
Page 7: Menu
Menu Adding International Characters key displays the Symbols/Clip Art and The label maker supports the extended Latin character Settings tabs. set. Pressing the key toggles between the Symbols/ Pressing followed by a letter displays all of the available Clip Art and Settings tabs. variations of that letter. -
Page 8: Adding Box And Underline Styles
Caring for Your Label Maker Adding Box and Underline Styles You can highlight the text by adding a box or Your label maker is designed to give you long and underline style. trouble-free service, while requiring very little maintenance. Clean your label maker regularly to keep it Five styles are available: working properly. -
Page 9: Clip Art
Clip Art Symbols ∞ ₁ ₂ ₃ ₄ ₀ ₅ ₆ ₇ ₈ ₉ ⁴ ⁰ ⁶ ⁷ ⁸ ⁹ ⁵ ☺... -
Page 10: Troubleshooting
Split backing Gently pinch the label length-wise, folding toward the printed side of the label. The label backing will separate. Carefully peel away the backing from the label. If you need further assistance, visit the DYMO Web site at www.dymo.com. -
Page 11: Documentation Feedback
You can also contact DYMO for more information on the environmental performance of our products. This product is CE marked in accordance with the EMC directive and the low voltage directive and is designed to conform with the following international standards:...
Need help?
Do you have a question about the LabelManager 160 and is the answer not in the manual?
Questions and answers