Table of Contents
Advertisement
Quick Links
Advertisement
Table of Contents

Related Manuals for Teac DR-100MKII


Summary of Contents for Teac DR-100MKII
- Page 1 D01160520A DR-100 " Linear PCM Recorder OWNER'S MANUAL...
-
Page 2: Important Safety Precautions
Changes or modifications to this equipment not government or the local authorities. expressly approved by TEAC CORPORATION for (b) By disposing of waste batteries and/or accumulators compliance could void the user's authority to operate correctly, you will help save valuable resources and this equipment. -
Page 3: Important Safety Instructions
TASCAM DR-100MKII... -
Page 4: Safety Information
If a rechargeable battery leaks, do not touch the • leaking fluid with a bare hand. Please consult with TEAC Small children may mistakenly swallow a lithium coin • Corporation if a battery fluid leak occurs. -
Page 5: Table Of Contents
Inserting and removing SD cards ........24 5 – Working with Files and Folders (BROWSE Inserting the card ..............24 Screen) ............. 39 Removing the card .............. 24 Screen navigation ..............39 SD card write protection ........... 24 TASCAM DR-100MKII... - Page 6 Setting the file name format..........51 File name format ..............51 Setting the file name (WORD) ......... 51 9 – Using the REMOTE/DIGITAL IN jack ....52 Footswitch (TASCAM RC-3F, sold separately) ....52 Setting footswitch operation ........... 52 TASCAM DR-100MKII...
-
Page 7: Quick Start Guide
Press the . or / button to move the cursor (highlighted portion), and adjust the date and time using the wheel. Then press the ENTER/MARK button to set. (See “Setting the date and time” on page 23.) 3 Set the INPUT switch to UNI. TASCAM DR-100MKII... - Page 8 Home Screen is displayed. 11 To turn the power OFF, press and hold the button on the left side panel until LINEAR PCM appears on the screen. When the recorder RECORDER is finished shutting down, the power will turn off. TASCAM DR-100MKII...
-
Page 9: Introduction
1 – Introduction Thank you very much for purchasing a TASCAM DR-100MKII 128 x 64 pixel LCD with backlight • Linear PCM Recorder. Mini-B type USB 2.0 port • Before using your unit, please read this manual carefully so Power can be supplied using a TASCAM BP-6AA external •... -
Page 10: Recycling The Lithium Ion Battery
Intellectual property rights This product is designed to help you record and reproduce sound works to which you own the TASCAM is a registered trademark of TEAC Corporation. • copyright, or where you have obtained permission SDHC Logo is a trademark of SD-3C, LLC. -
Page 11: Sd Cards
Noise might be heard from this unit if a mobile • telephone or other wireless device is used nearby during calls and when data is transmitted and received. If this should happen, use that device farther from the unit or turn its power off. TASCAM DR-100MKII... -
Page 12: Names And Functions Of Parts
Home Screen. When the Home Press this button during recording or recording standby Screen is open, press this to switch between displaying to cause the recording to stop. elapsed and remaining time. Use this button to answer “NO” to a confirmation message. TASCAM DR-100MKII... -
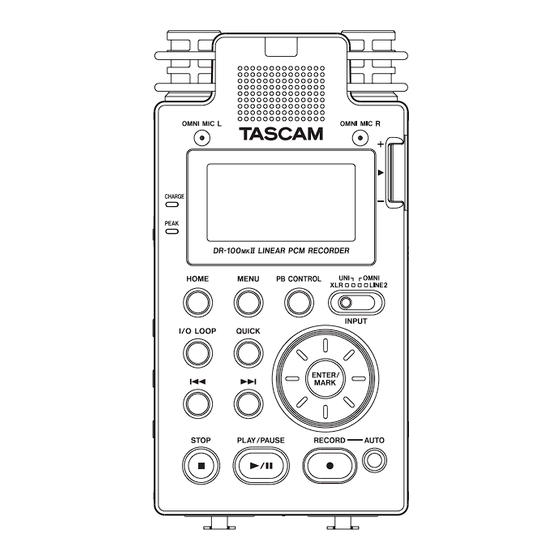
Page 13: Front Panel
The recording indicator will light when recording. Press this button when recording to pause recording. d Directional stereo mic pair (UNI MIC L/R) These are built-in electret condenser stereo mics. f SD card slot Insert and remove SD cards. TASCAM DR-100MKII... -
Page 14: Left Side Panel
DC IN 5V connector Connect a PS-P520 AC adaptor or BP-6AA battery pack (both sold separately). button Press and hold to turn the power ON and OFF. n MIC GAIN switch Set the sensitivity of the mic input. TASCAM DR-100MKII... -
Page 15: Remote Control (Tascam Rc-10)
This has the same function as the I/O LOOP button on the recorder. (See “Loop playback” on page 45.) 0 F4 button Use to switch the backlight setting between ALWAYS (always lit) and (always unlit). (See “Automatic backlight OFF setting” on page 49.) TASCAM DR-100MKII... -
Page 16: Home Screen
This shows the current playback area. supply status. All files in the folder MUSIC Lithium ion battery (TASCAM BP-L2) All files in the selected folder FOLDER AA batteries All files added to the playlist P . LIST AC Adaptor TASCAM DR-100MKII... -
Page 17: Recording Screen
Auto gain control ON Limiter OFF Limiter ON 5 Elapsed/remaining recording time This shows the elapsed time of the file being recorded or the remaining time (hours: minutes: seconds) according to the set maximum file size. If the remaining TASCAM DR-100MKII... -
Page 18: Menu Item List
7 Repeat step 3 to 6 as necessary to set each item. 8 To open the screen, press the MENU button. MENU To return to the Home Screen, press the HOME button. TASCAM DR-100MKII... -
Page 19: Basic Operation
Use this to move the cursor (the highlighted area) to the left on the screen, and to close folders on the BROWSE screen. Wheel Use to select (highlight) items and change values. QUICK button Use to open the QUICK popup menu on the Home Screen. TASCAM DR-100MKII... -
Page 20: Preparation For Use
Connect this unit to the computer directly. Proper • of time. (See “Changing batteries when the power is on” on operation cannot be guaranteed when using a USB hub. page 50.) When connected by USB, recharging occurs even if the • unit’s power is off. TASCAM DR-100MKII... -
Page 21: Using An Ac Adaptor (Sold Separately)
Never use any external battery pack other than the • Do not recharge the battery. TASCAM BP-6AA. Use of a different battery pack could • cause malfunction, fire or electric shock. Do not heat or disassemble the battery or put it into fire • or water. TASCAM DR-100MKII... -
Page 22: Using The Remote Control (Tascam Rc-10)
The wired remote control will only function if • FUNCTION is set to on the screen. (See RC- 10 REMOTE/D IGI IN “Enable wired remote control use” above.) TASCAM DR-100MKII... -
Page 23: Turning The Power On And Off
1 Press the MENU button to open the screen. MENU 2 Use the wheel to select the menu item DATE/ TIME (highlighted), and press the ENTER/MARK button. screen is displayed. DATE/ TIME TASCAM DR-100MKII... -
Page 24: Inserting And Removing Sd Cards
2 Press the SD card in gently and then release it to 2 The following message appears when a new card allow it to come out. or a card formatted for use with another device is installed in the unit. TASCAM DR-100MKII... -
Page 25: Using The Built-In Speaker
LINE OUT connector on the left side panel. Home Screen when set to HS mode When set to HS mode, appears in a popup when HS MODE the unit is started up. Headphones Powered monitor speakers or amplifier and speakers TASCAM DR-100MKII... -
Page 26: Restrictions When Using Hs Mode
When using loop playback with 96 kHz WAV files, a gap • will occur at the beginning of the loop. When starting a new track and continuing recording • without pause using 96 kHz WAV files, each recorded file must be at least 4 seconds long. TASCAM DR-100MKII... -
Page 27: Recording
The possible recording REC SETTING 5 Press the . button to show settings. time depends on the screen settings. REC SETTING 6 Use the wheel to select , and press the / or SAMPLE ENTER/MARK button. TASCAM DR-100MKII... -
Page 28: Setting Where Files Are Saved
NOTE situations where you want to record everything in a wide space. The DR-100MKII has been designed with high gain to • Place the unit in a stable location where there is little enable it to record even very quiet sounds. For this vibration. -
Page 29: Using Phantom Power
Do not supply phantom external sound source power to a ribbon microphone if you are in doubt. Do not connect or disconnect the AC adaptor when • using phantom power. Doing so could damage this device. TASCAM DR-100MKII... -
Page 30: Setting The Digital Input
MONO signal will be sent to both left and right channels. LOW CUT: Use this to set the cutoff frequency of the low-cut filter used on the mic inputs to . The 40Hz 80Hz 120Hz default value is TASCAM DR-100MKII... -
Page 31: Adjusting The Analog Input Level
This does not affect the sound to be NOTE recorded. The DR-100MKII has been designed with high gain to • enable it to record even very quiet sounds. For this reason, if using an AC adaptor when the MIC GAIN is set In addition to adjusting the input volume, try adjusting •... -
Page 32: Using The Level Control Function
When set to (auto gain control), the input gain is • AUTO adjusted automatically, so the INPUT volume control has no effect. When the input is LINE 1/2, regardless of the setting, it • will always function as (limiter). TASCAM DR-100MKII... -
Page 33: Dividing Files And Creating New Files While Recording
35). These marks can be easily located after 2 Press the MENU button to open the screen. MENU recording (see “Moving to a mark position” on page 37). 3 Use the wheel to select menu item. D IVIDE TASCAM DR-100MKII... -
Page 34: Recording Playback And Input Sounds Together (Overdubbing)
(or imported) audio files. You can even use it for karaoke. 3 Press the RECORD [0] button to start overdubbing. When recording starts, the RECORD indicator lights, and the elapsed recording time or the remaining recording TASCAM DR-100MKII... -
Page 35: Automatic Recording (Auto Rec)
1 Press the AUTO button to open the screen. MARK AUTO REC recording 2 Set the item to MODE MARK Automatically pauses during recording PAUSE Automatically creates new files during TRK INC recording 3 Set the value of the item. START LEVEL TASCAM DR-100MKII... -
Page 36: Automatically Pausing Recording (Pause)
To avoid this, use a remote control to add marks. 3 Set the value of the item. START LEVEL 4 Set the value of the item. END LEVEL 5 Press the HOME button to return to the Home Screen. TASCAM DR-100MKII... -
Page 37: Moving To A Mark Position
If the amount of time in record standby is less than two • seconds, the sound for that amount of time is recorded. You cannot use the PRE REC function with overdub • recording. When overdubbing set the PRE REC item OFF. TASCAM DR-100MKII... -
Page 38: Recording Duration
The recording times shown above are estimates. They might differ depending on the SD/SDHC card in use. • The recording times shown above are not continuous recording times, but rather they are the total possible recording • times for the SD/SDHC card. TASCAM DR-100MKII... -
Page 39: Working With Files And Folders (Browse Screen)
Screen, you can view the contents of the BROWSE Music Folder, which contains the audio files on the SD card that you can use with the DR-100MKII. On this screen, you The meanings of icons that appear on the Screen... -
Page 40: Folder Operations
In this case, file names with identification the STOP [8] button to cancel. tags added to the end using the QUICK TAG function will not be shown. Check the identification tag information on the Home Screen or check the screen to see this. BROWSE TASCAM DR-100MKII... -
Page 41: Delete The Selected File (Quick Del)
2 Select from the menu, and press the ENTER/ MARK button. screen appears. QUICK DELETE 3 Press the ENTER/MARK button to delete the file, or press the STOP [8] button to cancel deletion. TASCAM DR-100MKII... -
Page 42: Playback
3 Use the wheel to select , and press the / or “Screen navigation” on page 39. AREA ENTER/MARK button. 4 Press the ENTER/MARK button to open the following pop-up window. 4 Use the wheel to set the playback area. TASCAM DR-100MKII... -
Page 43: Selecting A Folder For The Playback Area (2)
1 Press the MENU button to open the screen. MENU PLAY 2 Use the wheel to select , and press the ENTER/ BROWSE Play the selected file and return to the Home Screen. MARK button. screen appears. BROWSE TASCAM DR-100MKII... -
Page 44: Selecting Files For Playback (Skip)
You can set the search speed. (See “Search speed setting” If you press the / button when located at the beginning on page 49.) of or middle of a file, the playback position will skip to the beginning of the next file. TASCAM DR-100MKII... -
Page 45: Using The Wheel To Change The Playback Position
The current file is played repeatedly. The icon appears on the Home Screen. Not only can you use the DR-100MKII to change the tempo ALL REPEAT of track playback, you can even do this without changing All files in the selected playback area are played back the pitch. -
Page 46: Changing Speed Without Changing Pitch (Vsa Function)
(50%) to (116%) –50 (default setting is – 32 NOTE Pressing the PB CONTROL button only turns the playback control function speed setting ON/OFF. Any other changes from default values made on the screen are PB CONTROL always ON. TASCAM DR-100MKII... -
Page 47: Connecting With A Computer
You can create subfolders in the MUSIC folder up to • This unit appears on the computer screen as external the second level for use with this unit. The DR-100MKII volume named DR-100MK2. cannot recognize subfolders and audio files on the third level or below. -
Page 48: Using The Information Screens
Shows the file name. If an MP3 file has ID3 tag title Shows the automatic power OFF setting. information that information appears. BACKLIGHT: DATE: Shows the automatic backlight OFF setting. Date of file creation System Ver.: SIZE: Shows the system firmware version. File size TASCAM DR-100MKII... -
Page 49: Battery Information Page (Battery)
2 Use the wheel to select the menu and press SETUP the ENTER/MARK button to open the menu 3 Press the ENTER/MARK button again to initialize SETUP screen. the recorder. Press the STOP [8] button to cancel initialization. TASCAM DR-100MKII... -
Page 50: Using Quick Format
“dr-1.sys” file that is necessary to use the SD card other as a backup. Usually the unit uses the main power with the DR-100MKII. source. 1 Use the wheel to select... -
Page 51: Setting The Type Of Aa Batteries (Aa Battery)
1 Press the MENU button to open the screen. MENU 2 Use the wheel to select , and press the FILE NAME ENTER/MARK button. screen appears. FILE NAME Use the . and / buttons and the wheel to set each item. TASCAM DR-100MKII... -
Page 52: Using The Remote/Digital In Jack
D IGI IN value: RC- 10 5 Use the . and wheel to select item, and MODE 5 After completing the setting, press the HOME button press the ENTER/MARK or / button. to return to the Home Screen. TASCAM DR-100MKII... - Page 53 9 – Using the REMOTE/DIGITAL IN jack NOTE is set to on the FUNCTION D IGI IN REMOTE/D IGI IN setting screen, moving the INPUT switch on the top panel will not change the input, and the following popup message will appear. TASCAM DR-100MKII...
-
Page 54: 10 - Messages
10 – Messages The following is a list of the popup messages that might appear on the DR-100MKII under certain conditions. Refer to this list if one of these popup messages appears and you want to check the meaning or determine a proper response. - Page 55 If the error message continues to appear frequently, please contact the dealer where the product was purchased from or the TASCAM Distributor in your area. System Error 2 System Error 3 System Error 4 System Error 5 System Error 6 System Error 7 System Error 8 System Error 9 TASCAM DR-100MKII...
-
Page 56: 11 - Troubleshooting
• INPUT SETTING MONITOR , enabling monitoring of the input signal? Recording does not work. Please check the operation mode again. • If you are using an external device, check the • connection again. TASCAM DR-100MKII... -
Page 57: 12 - Specifications
Connector: 1/8” (3.5 mm) stereo mini jack 266 MHz Power PC, iMac, G3, G4 or better Maximum output : 25 mW + 25 mW 64MB or more memory (with 32Ω headphone connection) USB port (USB 2.0 recommended) Built-in speaker TASCAM DR-100MKII... -
Page 58: General
Illustrations and other depictions may differ in part from • Recording, MP3, Built-in mics (UNI/ About 4 hours the actual product. 44.1 kHz, 128 kbps OMNI) Specifications and external appearance may be changed • JEITA Recording/Playback without notification to improve the product. TASCAM DR-100MKII... - Page 59 Notes TASCAM DR-100MKII...
- Page 60 7733 Telegraph Road, Montebello, California 90640 USA TEAC CANADA LTD. Phone: +1905-890-8008 Facsimile: +1905-890-9888 http://tascam.com/ 5939 Wallace Street, Mississauga, Ontario L4Z 1Z8, Canada TEAC MEXICO, S.A. de C.V. Phone: +52-55-5010-6000 http://www.teacmexico.net/ Río Churubusco 364, Colonia Del Carmen, Delegación Coyoacán, CP 04100, México DF, México...
Need help?
Do you have a question about the DR-100MKII and is the answer not in the manual?
Questions and answers