Table of Contents
Advertisement
Advertisement
Table of Contents
Troubleshooting

Related Manuals for Yamaha CRW2100SZ - CRW - CD-RW Drive


Summary of Contents for Yamaha CRW2100SZ - CRW - CD-RW Drive
- Page 1 UICK TART UIDE Internal CRW2100EZ & CRW2100SZ Models...
-
Page 2: Table Of Contents
Table of Contents 1. INTRODUCTION 1.1) Welcome to the Yamaha 3-in-1 CD-RW drives 1.2) About your Yamaha 3-in-1 CD-RW drive 2. REGISTRATION 3. SCSI MODEL HARDWARE INSTALLATION 3.1) Setup Flowchart for SCSI Models 3.2) About SCSI Controllers 3.3) SCSI Drive Settings 4. -
Page 3: Introduction
(CRW2100EZ) • Windows 95/98/ME, Windows 2000, or NT 4.0 (with Service Pack 5 or newer) Important Note: For SCSI models, Yamaha recommends Iwill 2930c / 2930u+ PCI SCSI controllers or Adaptec’s AHA-29xx, AHA-39xx family of SCSI cards. Important Note: Before attempting to make a CD with your new CD-RW recorder, Yamaha recommends per-... -
Page 4: About Your Yamaha 3-In-1 Cd-Rw Drive
If any of the items 1 through 7 (listed below) are missing from the retail package (excludes refurbished products), please contact Yamaha Customer Support (see section 7.4). In addi- tion to the items listed below, this package may contain additional software (see product box for details) and optional items such as promotional offers. - Page 5 CD-R media using a CD-ReWritable drive. 1.2.3) CD-ReWritable Drives vs. CD-Recordable Drives All Yamaha CD-RW drives are “multi-function” or “3-in-1” drives. This means that your new drive may be used as a CD-R drive (to write once on CD-R media), a CD-RW drive (to rewrite up to 999 times on CD-RW media), or as a CD-ROM drive (to play audio or computer CDs).
- Page 6 • Refer to the page at the URL below before attempting to read these discs on a Yamaha CD-R/RW drive not bearing the High Speed CD-RW logo. URL: http://www.yamaha.co.jp/english/product/computer/ Important Note: The Orange Book standard defines how all recordable discs (including CD-R and CD-RW) are written.
-
Page 7: Registration
Yamaha’s new CRW2100 Lightspeed drives use the CAV method in the inner portions of the disc while using CLV method in the outer portions of the disc in order to enable up to 16x of writing speed. -
Page 8: Scsi Model Hardware Installation
3. SCSI MODEL HARDWARE INSTALLATION Macintosh Computers 3.1) Setup Flowchart for CRW2100SZ (SCSI) This flowchart shows the procedure for setting up your new Yamaha 3-in-1 SCSI drive. For easy cross-referencing, the relevant pages in this manual are also given. STEP... -
Page 9: About Scsi Controllers
3.2) About SCSI Controllers The Yamaha CRW2100SZ package does not include a SCSI host adapter card. A host adapter card provides the interface between your PC and various peripheral devices. A wide range of cards are available with various levels of performance, features and price. If you plan to add peripherals such as scanners or external hard drives, you may want a more capable host adapter. - Page 10 512 bytes per sector. 3.3.2) Setting the SCSI ID Number of Your New Yamaha CD-RW Drive The default factory setting for the SCSI ID Number is 3. For most installations, no adjust- ment of the SCSI ID number is necessary.
- Page 11 Important Note: If you are using other SCSI devices, be sure to use a unique ID number for each device. SCSI ID Setting: 1 2 4 1 2 4 1 2 4 1 2 4 SCSI ID 0 SCSI ID 1 SCSI ID 2 SCSI ID 3 1 2 4...
- Page 12 Parity ON (default) Parity OFF ID SELECT ID SELECT PARITY PARITY TERMINATOR TERMINATOR BLOCK SIZE BLOCK SIZE 1 2 4 1 2 4 * Use jumper connectors to short the locations shown in black. 3.3.4) Terminator Setting of your new 3-in-1 CD-RW Drive The terminator setting indicates whether or not your new CD-RW drive is the last connected SCSI device.
-
Page 13: E-Ide Model Hardware Installation
4. E-IDE (ATAPI) MODEL HARDWARE INSTALLATION Macintosh Computers 4.1) Setup Flowchart for CRW2100EZ (E-IDE) This flowchart shows the procedure for setting up your new Yamaha 3-in-1 E-IDE drive. For easy cross-referencing, the relevant pages in this manual are also given. Set up the CD-RW drive... -
Page 14: About The Atapi/E-Ide Interface
4.2) About the E-IDE (ATAPI) Interface The most common standard for connecting internal hard drives and CD-ROM drives inside a PC is the E-IDE (ATAPI) interface. E-IDE or Enhanced IDE computers normally have two IDE interface connectors; a primary and a secondary. Each IDE interface connector allows up to two IDE devices to be connect- ed for a total of four IDE devices. - Page 15 CD-RW drives. In this case, only one drive would be the MASTER. The other drives should be selected as SLAVES. Note: If adding your new Yamaha CD-RW drive to a system already equipped with a DVD-ROM or high speed CD-ROM drive, you may want to proceed with the following configuration if you encounter problems: Turn off your computer.
-
Page 16: Physical Installation Of Your New Cd-Rw Drive
CSEL. Important Note: If installing your new Yamaha CD-RW drive in a PC equipped with a CD-ROM or DVD-ROM drive that features CSEL (in which case the jumper switch on that drive will be set on CSEL), you may encounter problems (such as a blue error screen) when attempting to record a CD using a CD recording software. - Page 17 2. Remove the cover of your computer carefully to allow access to the inside of the computer (Consult your computer’s operating manual for information on removing the cover.) 3. Before touching any of the components inside your computer, first ground yourself by touching the metal case of your computer.
- Page 18 3-in-1 CD-RW drive from the beginning. Note 2: The drive bays of most computers accommodate any Yamaha CD-RW drive directly. However, some computers may require an accessory rail or mounting bracket. These components are available from your com- puter’s manufacturer or your local computer hardware store.
- Page 19 9. Connect one end of the the supplied audio cable to the audio output (audio out) of your 3-in-1 CD-RW drive. Connect the other end of the audio cable to your soundcard. Do not force in the connector heads. Gently try to insert the connector heads in after determining their correct orientation.
- Page 20 Note 3: Your new Yamaha CD-RW drive will be fully functional without any connection to the soundcard. The only exception is that you will not be able to play an audio CD on your new CD-RW drive and hear it through your soundcard.
- Page 21 (usually red or pink) line on the SCSI cable. Connect the other end of the ribbon cable to the SCSI controller card. Your new Yamaha CD-RW drive is designed to accept the SCSI ribbon cable only at its correct orientation. Do not force the ribbon in if you feel it does not fit the slot.
- Page 22 A U D IO O D IG IT A N A L O G Color Mark IDE cable 16. Make sure the connector attached to your existing CD-ROM drive is still tight and has not become loose during installation. 17. Locate one of the available DC power connectors inside your computer. Power connectors are usually 4-pin extension with yellow.
- Page 23 19. Visually inspect your computer and make sure that you have not pulled any other cables loose, that no cables may be pinched when the case is re-installed, and that no wires are obstructing any cooling fans or block ventilation. 20.
-
Page 24: Operating System Recognizes The 3-In-1 Drive
5.1) Operating System Recognizes the 3-in-1 CD-RW Drive 1. Reconnect your monitor, mouse, keyboard and AC power cord to your PC. 2. Turn your computer on by flipping the switch to the ON position. Look for the LED light located on the front panel of the CD-RW drive to lit up. 3. -
Page 25: Installing Software
“Device Manager” window, then double-click the “YAMAHA CRW2100E” icon to open the “YAMAHA CRW2100E Properties” window, and click the “Settings” tab to select it. A screen similar to the one below appears. Make sure that the “Sync data transfer” check box is not checked. -
Page 26: Easy Cd Creator
[Drive Letter]:\CreatorCD\Setup.exe and click OK. 7. Follow the on-screen instructions to install Easy CD Creator. Congratulations! You are now ready to make a CD. Thanks for selecting a Yamaha 3-in-1 CD-RW drive. Note: After installing DirectCD & Easy CD Creator, you’ll be returned to the menu screen. Click Exit and then Finish. -
Page 27: Operating Your New Cd-Rw Drive
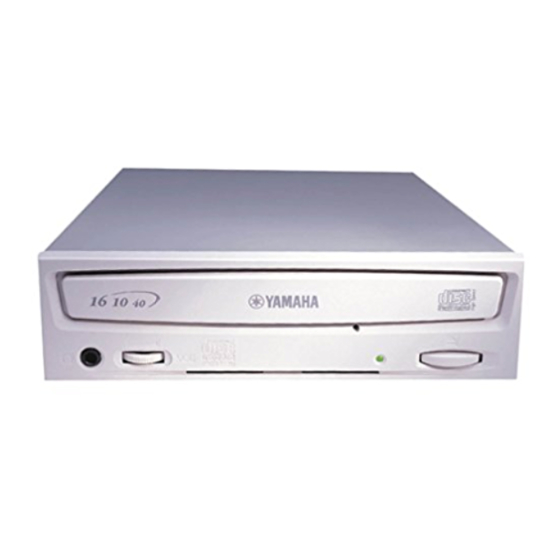
7. OPERATING YOUR NEW 3-IN-1 DRIVE It is important to familiarize yourself with your new Yamaha CD-RW drive. Please study the following illustrations and text carefully. 7.1) Front Panel Eject button Manual Eject hole Disc tray Press this button when you Only use this if no other The tray is used to hold the disc. -
Page 28: Ejecting A Disc
7.3) Ejecting a Disc • If your new CD-RW drive is powered on press the eject button to eject the disc. Important Note: You cannot eject the disc if the SCSI command prohibits the eject operation while the drive is reading data (CRW2100SZ only). -
Page 29: Troubleshooting
Service & Support. Click on CDR & RW Series of CD & CDRW Recorders, find your model number and click on it. Go to Yamaha Solutions Network (at the bottom of the page) for FAQ and specific solutions to common problems. - Page 30 8.1.2) Making an Audio CD using Easy CD Creator Please follow the instructions below to create your first Audio CD using your new Yamaha 3-in-1 CD-RW drive and Adaptec’s Easy-CD Creator: 1. Click the Start button located in the lower left side of your Windows 95/98 screen.
- Page 31 Important Note: The Easy CD Creator software may ask you to allow it to test you system and find out if it can write or rewrite at 4X or 8X or higher speeds. If you are using CD-RW media you may get an error message indicating that the source material is larger in size than the destination’s capacity allows.
-
Page 32: Making Data Cds
If you are using your CD-ROM drive as the source drive, please insert your blank CD-R or CD-RW media in your new CD-RW drive and follow the screen prompts. Important Note: If you are using your new Yamaha CD-RW drive as both the source and destination drive, recording time will be longer. - Page 33 Ejecting a DirectCD Disc - You may want to eject a DirectCD disc from your CD-RW drive and continue reading it on another computer using your Yamaha CD-RW or another CD-RW drive. When you eject a disc, DirectCD will automatically format it for you. To eject a disc,...
- Page 34 8.2.2) Making a Data CD using Easy CD Creator Please follow the instructions below to create your first Data CD using Adaptec’s Easy-CD Creator: 1. Click the Start button located in the lower left side of your Windows 95/98/ME screen. 2.
-
Page 35: Making A Wav File From A Cd
Yamaha drive functioning as a CD-ROM. This is not a plug and play device on the MAC. The Yamaha drive needs the extension Toast CD Reader to function as a CD-ROM player. To install Adaptec Toast, please follow the instructions below: 1. - Page 36 8.4.1) Making Data CD's from your HD (Hard Drive) with Toast 1. Find and launch the application Toast. 2. Double click on your HD. With your HD window open, select the files and folders that you want to put on the CD. 3.
- Page 37 10. Selecting Simulation mode will allow you to test the function of your computer system. It actually verifies the data transfer rates and functionality of the Yamaha drive. It does not actually write to the CD. It is only a practice run.
- Page 38 5. Inside that folder will be the application Toast Audio Extractor 1.0. 6. Launch the application. 7. Place an Audio CD in either the Apple CD player or the Yamaha drive. 8. The audio tracks should appear under the Title/Time window.
-
Page 39: Verification
As with all SCSI devices the device must be turned on prior to the computer, before you can use the device. If the Yamaha drive is not turned on first, you will not be able to read CD's. If the drive was turned on after the computer, then you will not see a CD icon on screen. -
Page 40: Troubleshooting
A summary of common questions and their answers are listed below to help you troubleshoot your new drive before calling for customer service. (Also see section 7.4 on page 28.) You may also refer to the Yamaha web site at http://www.yamaha.co.jp/english/product/ computer/ for more information. The drive does not power up. - Page 41 (SCSI units only). You may be trying to write to an unusable disc. If the drive fails to write to a variety of different discs, it may be faulty and you should contact your nearest Yamaha dealer.
- Page 42 What should I do if I get a blue “Error Screen” (Windows only) when trying to record a CD? If installing your new Yamaha CD-RW drive in a PC equipped with a CD-ROM or DVD- ROM drive that features CSEL (in which case the jumper switch on that drive will be set on CSEL), you may encounter problems (such as blue error screen) when attempting to record a CD using a CD recording software.
- Page 43 What should I do if I get a gray screen on start-up with my new MAC Tower (Blue) G3? See details below for work-around. Try starting up the computer with the power OFF on the Yamaha drive. When the computer is totally up, turn ON the Yamaha drive and use ADAPTEC’S SCSI Probe 5.1 (download SCSI Probe at http://www.adaptec.com/support/overview/macintosh.html)
-
Page 44: Specifications
I do not seem able to rip audio CDs at 40x. How can I reach the maximum 40x audio ripping speed? It’s important to understand that your new CRW2100 series CD-RW recorder could achieve the 40x maximum ripping speed via CAV (Constant Angular Velocity - see page 6 of the Quick Start Guide for details),which is increasingly becoming common in most top performing CD-ROM and CD-RW recorders today. - Page 45 Data Buffer Size 8MB (3,224 sectors) Average Random Access Time 160 msec. (reading) Sector Size 2,048 – 2,352 B Interface CRW2100EZ: Enhanced IDE(E-IDE)/ATAPI CRW2100SZ: SCSI-3 (Ultra SCSI) Installing style Horizontal Disc Loading Type Front auto-loading tray loading Audio Out Analog audio output Frequency Range: 20 ~ 20,000Hz Output Level: 700m Vrms Digital audio output...
-
Page 46: Appendix
11. APPENDIX 11.1) Writing Modes 11.1.1) Disc-at-Once (DAO) This mode is used when writing a complete disc in a single pass without pausing. Data cannot be added later, even if the full capacity of the blank disc has not been used. Example: General CD-ROM 650MB Data... -
Page 47: About The Firmware
URL for YAMAHA CD-R/RW Drives web site is http://www.yamaha.com or http://www.yamaha.co.jp/english/product/computer/ The most recent user support information, including firmware updates, can be found in the CD-R area of Yamaha’s web site. Please check this information regularly. Important Note: The firmware is completely unrelated to the CD writing application software. - Page 48 Screen shot from Windows 98. Important Note: When using Windows NT, you can verify by opening the Control Panel, double-clicking on SCSI Adapter and clicking the Devices tab. Then right-click on “YAMAHA CRW2100S” and select Properties. Important Note: In Windows 2000, the firmware version is not displayed. Use your writing software to check the firmware version.
- Page 49 Return the device immediately to the store at which it was purchased or alternatively, to the nearest Yamaha dealer (listed at the back of this manual). G Make sure the computer is electrically grounded. Otherwise, there is an increased risk of electrical shock.
- Page 50 Otherwise, dust can build up inside the device, increasing the risk of fire or damage. For information about servicing charges, contact the store at which the device was purchased or alternatively, the nearest Yamaha dealer (listed at the back of this manual). The device should be serviced about once a year.
- Page 51 I Warranty Yamaha and suppliers accept no liability for the loss of any data or any prob- lems caused as a result. As a precaution, it is recommended that the discs be tested after they have been written to.
- Page 52 No part of this publication may be reproduced, transmitted, transcribed, stored in a retrieval system, or translated into any language in any term by any means without the written permission of Yamaha Corporation of America. Yamaha reserve the right to make any changes...
- Page 53 Yamaha Corporation of America, Consumer Products Division 6600 Orangethorpe Ave., Buena Park, CA 90620 www.yamaha.com...