Table of Contents
Advertisement
Advertisement
Table of Contents

Related Manuals for Moffat MCH665X/GB

Summary of Contents for Moffat MCH665X/GB
- Page 1 INSTRUCTION BOOK COOKER HOOD MCH 665...
- Page 2 To enable you to use your appliance effectively and safely, please read this instruction book carefully before using the appliance and retain for future reference. If you require guidance in the use of the appliance or require further information on Moffat Products, please contact our Customer Care Department.
-
Page 3: Important Safety Information
IMPORTANT SAFETY INFORMATION These warnings are provided in the interests of your safety. Ensure that you understand them all before installing or using this appliance. Your safety is of paramount importance. If you are unsure about any of the meanings of these warnings contact the Customer Care Department. -
Page 4: Your Appliance
YOUR APPLIANCE OPERATING INSTRUCTIONS This cooker hood is designed to extract unpleasant odours from the kitchen, it will not extract steam. To obtain the best performance it is advisable to switch on the hood a few minutes before you start cooking and leave it running for approximately 15 minutes after finishing. The cooker hood controls are located at the front near the grease filters and the lamp covers. - Page 5 • The hood is supplied as an extractor unit and can also be used with a filtering function by fitting one charcoal filter. • You will need two original charcoal filters for this function (Available from your local Service Force Centre). Extraction In the extraction mode contaminated air enters the cooker hood, passes through the grease...
-
Page 6: Maintenance And Cleaning
MAINTENANCE AND CLEANING Before carrying out any Dishwasher maintenance or cleaning isolate the Place grease filters in the dishwasher. cooker hood from the mains supply. Select most powerful washing programme and highest temperature, The cooker hood must be kept clean, a build up of grease or fat at least 65°C. -
Page 7: Charcoal Filter
Charcoal Filter The charcoal filter cannot be cleaned. The filter should be replaced at least every three months or more frequently if the hood is used more than three hours per day. To Remove/Replace the Charcoal Filter 1. Remove the metal inlet grille. 2. -
Page 8: Something Not Working
SERVICE AND SPARE PARTS If you require an engineer or spare parts For general assistance with your appliance contact your local Service Force Centre or for further information on Moffat products by telephoning: please contact our Customer Care Department. 08705 929929... -
Page 9: Guarantee Conditions
GUARANTEE CONDITIONS We, Moffat, undertake that if within twelve months of the date of the purchase this Moffat built-in appliance or any part thereof is proved to be defective by reason only of faulty workmanship or materials, the company will, at our option repair or replace the same FREE OF ANY CHARGE for labour, materials or carriage on condition that: •... -
Page 10: Installation Instruction
INSTALLATION INSTRUCTION It is dangerous to alter the specifications or attempt to modify this product in any way. Technical Information DIMENSIONS HEIGHT: 750-1100mm WIDTH: 600mm DEPTH: 500mm WEIGHT GROSS: 10, 9 kg NET: 8, 8 kg ELECTRICAL SUPPLY: Voltage (50Hz) 240 V POWER CONSUMPTION: 240 W... -
Page 11: Installing The Cooker Hood
INSTALLING THE COOKER HOOD Please ensure that when the appliance is installed it is easily accessible to an engineer in the event of a breakdown. All installations must comply with the local authorities requirements for the discharge of exhaust air. Incorrect installation may affect the safety of this cooker hood. - Page 12 Clearance Height A minimum clearance height of 700mm (27 1/2 ”) is required when installed above an electric hob, or 750mm (29 1/2 ”) when installed above a gas hob. When installed between adjoining wall cabinets, the wall cabinets must not overhang the hob and the distance between the underside of the cabinet and the worktop must be 450mm.
- Page 13 Fitting the cooker hood to the wall • Decide where the cooker hood is to be installed, using a pencil mark the 4 points on the wall corresponding to 2 upper fixing points and 2 lower fixing points, ensuring that these points then correspond to the fixing points located at the back of the cooker hood.
- Page 14 • Remove the grease filters, and permanently affix the cooker hood to the wall from inside the cooker hood using 2 screws. • Only for Suction version: Apply the exhaust ring to the exit perforation of the cooker hood and fix it with 2 screws. Apply an exhaust pipe to the connection ring which is long enough to reach the exterior.
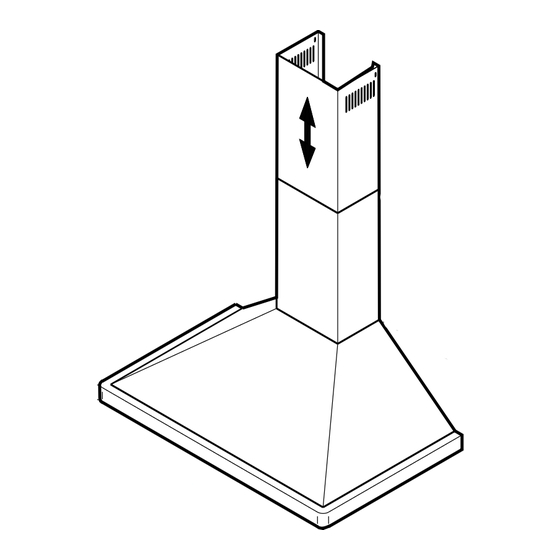
- Page 15 • Lean the chimney flue on top of the cooker hood, slide out the upper section until it reaches the ceiling and mark the sides on the wall with a pencil. • Fix the chimney flue support in proximity to the ceiling with 2 screws and screw anchors (check that the chimney flue support is centered in respect to the 2 lines previously marked on the wall).
- Page 16 From the Electrolux Group. The world´s No. 1 choice. The Electrolux Group is the world´s largest producer of powered appliances for kitchen, cleaning and outdoor use. More than 55 million Electrolux Group products (such as refrigerators, cookers, washing machines, vacuum cleaners, chain saws and lawn mowers) are sold each year to a value of approx.
Need help?
Do you have a question about the MCH665X/GB and is the answer not in the manual?
Questions and answers