Table of Contents
Advertisement
Advertisement
Table of Contents

Related Manuals for DigiTech RP355


Summary of Contents for DigiTech RP355
- Page 1 Modeling Guitar Processor Owner’s Manual...
- Page 2 If you want to dispose this product, do not mix it with general household waste. There is a separate collection system for used electronic products in accordance with legislation that requires proper treatment, recovery and recycling. Private household in the 25 member states of the EU, in Switzerland and Norway may return their used electronic products free of charge to designated collection facilities or to a retailer (if you purchase a similar new one).
-
Page 3: Table Of Contents
Unicord Uni-Vibe ............20 Tremolo/Panner ............21 Envelope Filter .............21 DOD FX25 ..............21 AutoYa ................21 YaYa™ ................22 SynthTalk ..............22 Step Filter ..............22 DigiTech Whammy™ ..........23 Pitch Shift ..............23 Detune ................23 Harmony Pitch Shifting ..........24 Boss OC-2 Octaver ..........24 ® Delay .................24 Reverb ................25... - Page 4 1. The warranty registration card must be mailed within ten days after purchase date to validate this warranty. 2. DigiTech warrants this product, when used solely within the U.S., to be free from defects in materials and workmanship under normal use and service.
-
Page 5: Section One - Introduction
If anything is missing, contact the factory at once. Please help us become acquainted with you and your needs by sending us your completed warranty card or registering online at www.digitech.com. It is your safeguard should a problem arise with your RP355. -
Page 6: Bypass Mode
Bypass Mode The RP355 presets can be bypassed via a true analog bypass circuit for a clean, unprocessed guitar signal. To bypass the RP355, press the Up and Down Footswitches simultaneously. The Display reads Bypass indicating the preset is bypassed. Press any footswitch to exit Bypass and return the RP355 to the last preset used. -
Page 7: X-Edit Tm Editor/Librarian
You can edit your RP355 with your computer, using the X-Edit Editor/Librarian. Download X-Edit , USB drivers, and documentation from www.digitech.com. Presets Presets are named and numbered locations of programmed sounds which reside in the RP355. Presets are recalled with the Footswitches. The active effects in each preset are indicated by lighted LEDs in the Effect Matrix. -
Page 8: A Guided Tour Of The Rp355
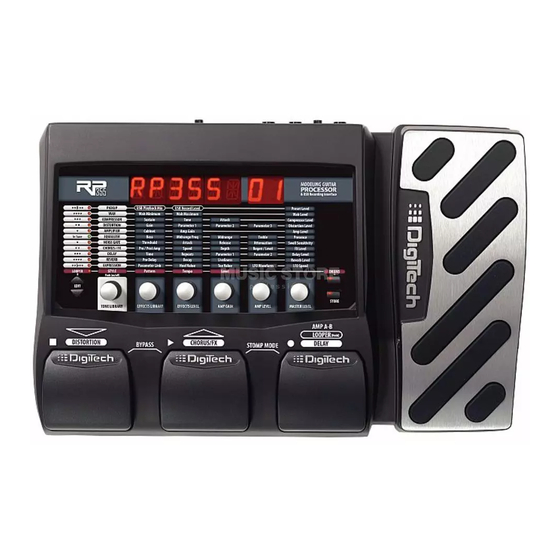
A Guided Tour of the RP355 Front Panel EXPRESSION AMP A-B DISTORTION BYPASS STOMP Mode DELAY 1. Up/Down Footswitches These two Footswitches are used to select presets, access the Tuner, or bypass the RP355. The Footswitch on the right will select the next preset up, and the Footswitch on the left will select the next preset down. - Page 9 Effects Level (Knob 3) 1. In Performance mode, this knob adjusts the overall level of post amp model effects (Chorus/FX, Delay, and Reverb). 2. When editing a preset, this knob modifies the parameter listed in the column directly above it for the selected Effect row. 3.
- Page 10 6. Drums The Drums button is used to turn on and off the RP355’s built-in drum machine. When the Drums button is turned on, the Drums LED lights and the selected drum pattern plays continu- ously. Select the Drums row using the Edit buttons and use Knobs 1-4 to change the style, pattern, tempo, and level of the drum machine.
-
Page 11: Rear Panel
RP355 is connected to. Knobs 4 and 5 also control the direct/playback mix and USB record level when USB is connected and the Pickup Row is selected. Note: X-Edit Editor/Librarian software and USB drivers can be downloaded at www.digitech.com. 9. Power Input Connect only the DigiTech PS0913B power supply to this jack. ®... -
Page 12: Getting Started
Getting Started Making Connections There are several different connection options available with the RP355. Before connecting the RP355, make sure that the power to your amplifier and the RP355 is turned off. There is no power switch on the RP355. To turn the RP355 on or off, connect or disconnect the included PS0913B power supply from the Power Input jack. - Page 13 Stereo Mixer Setup XLR Amp/Mixer switch set to “Mixer” -∞ -∞ -∞ -∞ -∞ -∞ -∞ -∞ Input XLR Left Out XLR Right Out Computer Recording Setup Studio Reference Monitors XLR Left Out XLR Right Out USB Ports XLR Amp/Mixer switch set to “Mixer”...
-
Page 14: Applying Power
Applying Power Before applying power to anything, set your amp(s) to a clean tone and set the tone controls to a flat EQ response (on most amps, this would be 0 or 5 on the tone controls). Then follow the steps listed below. -
Page 15: Section Two - Editing Functions
Section Two - Editing Functions Editing/Creating Presets The RP355 is designed to make preset editing and creation easy and intuitive. When creating your own sound, you must first start with an existing preset. Note that the preset you begin with doesn’t have to be in the memory location you intend to have it reside, since you can store it to any User preset location during the store procedure. -
Page 16: Storing/Copying/Naming A Preset
Storing/Copying/Naming a Preset Once the preset has been modified to your liking, you may store your settings to any of the 70 User preset locations (presets 1-70). The following steps outline the procedure for storing changes to a preset or copying a preset to a different location: 1. -
Page 17: Section Three - Models And Parameters
Preset Level - Knob 6 adjusts the preset’s level. Ranges from 0 to 99. Wah is an effect controlled by an Expression Pedal making the guitar sound as if it’s saying “Wah.” Wah Model - Knob 1 selects the Wah model. Values include: FuLrnG (DigiTech Full ®... -
Page 18: Compressor
DigiTech or Harman International Industries, Inc. They are trademarks of other manufacturers and were used merely to identify products whose sounds were reviewed in the creation of this product. - Page 19 Knobs 2-6 have the following functions for the various Distortion models: Dist. Knob 2 Knob 3 Knob 4 Knob 5 Knob 6 (Param. 3) Model (Gain) (Param. 1) (Param. 2) (Distor- (X-Edit tion Level) only) Drive Tone Level Scream Overdrive Tone Level Gain...
-
Page 20: Amplifier
The display will show which channel is selected (Amp A or Amp B). Amp Model - Knob 1 selects one of the classic, modern, and DigiTech custom Amp models. Press this knob to turn Amp and Cabinet modeling on and off. Note that when you select an Amp model, the default Cabinet model is automatically selected. -
Page 21: Cabinet
- 4x12 DigiTech Metal ® bmn410 - Based on a 4x10 ‘59 Fender digrck - 4x12 DigiTech Rock Tweed Bassman digalt - 4x12 DigiTech Alt Rock ® cls412 - Based on a 4x12 Marshall 1969 digvtg - 4x12 DigiTech Vintage ®... -
Page 22: Noise Gate/Auto Swell
Noise Gate/Auto Swell A Noise Gate is designed to eliminate noise while you are not playing, or provide an auto volume swell effect. Gate Model - Knob 1 selects between the DigiTech noise gate or the volume swell ® effect. Values include: gate (Selects the Noise Gate) and swell (Selects the Auto Swell effect.) Press this knob to turn the Noise Gate/Auto Swell on and off. -
Page 23: Flanger
Vibrato (viBrat) The DigiTech Vibrato effect modulates the pitch of the incoming signal at an even rate. Pre/Post Amp - Knob 2 determines where the effect appears in the effects chain. Turn counter-clockwise for Pre (appears before the Distortion effect), or clockwise for Post (appears after the Noise Gate effect). -
Page 24: Rotary Speaker
Ranges from 0 (200 Hz) to 99 (1600 Hz). VibroPan (vibpan) A vibrato is an effect that modulates the pitch of the incoming signal. This will take the whole signal slightly in and out of tune at a steady pace. The DigiTech VibroPan also incorporates an ®... -
Page 25: Tremolo/Panner
Sine, or Square. Envelope Filter (envlOp) The DigiTech Envelope Filter is a dynamic Wah effect that alters your sound based upon how hard you play. Pre/Post Amp - Knob 2 determines where the effect appears in the effects chain. Turn counter-clockwise for Pre (appears before the Distortion effect), or clockwise for Post (appears after the Noise Gate effect). -
Page 26: Yaya
99 to right 99. Step Filter (stpflt) The DigiTech Step Filter is like an automatic “random wah” with a square waveform. Pre/Post Amp - Knob 2 determines where the effect appears in the effects chain. Turn counter-clockwise for Pre (appears before the Distortion effect), or clockwise for Post (appears after the Noise Gate effect). -
Page 27: Digitech Whammy
As the Pedal is moved, the note bends either up or down. When DigiTech Whammy is selected, it is automatically placed before the Amp modeling as shown in the block diagram on page 13. -
Page 28: Harmony Pitch Shifting
Analog Delay), dm dly (Based on the Boss DM-2 Analog Delay), dig- ® dly (DigiTech Digital Delay), moddly (DigiTech Modulated Delay), pngdly (DigiTech Pong Delay), tapdly (DigiTech Tape Delay), and ecoplx (Based on the Maestro EP-2 Echoplex Tape Echo). Press this knob to turn the Delay models on and off. -
Page 29: Reverb
Knobs 2-6 have the following functions for the various Delay models: Delay Knob 2 Knob 3 Knob 4 Knob 5 Knob 6 Model (Time) (Repeats) (Param. 1) (Param. 2) (Delay Level) Time Repeats Delay Level algdly Repeat Rate Echo Intensity dm dly Time Repeats... -
Page 30: Section Four - Other Functions
Section Four - Other Functions Phrase Looper The RP355 features a built-in 20 second Phrase Looper for creating on the fly performance loops of the music you play. The Phrase Looper can be accessed any time during performance and used with any of the RP’s presets. To use the Phrase Looper, follow these steps: Press and hold the Amp A/B Footswitch for 2 seconds until LOOPer appears in the... -
Page 31: Aux Input
Drum Pattern List Beats jazz (8th beat) Beats hiphp (16th beat) rock world hrock metal blues groov cntry mtrnom Aux Input The Aux Input allows you to connect an MP3 or CD player to the RP355 and jam with your favorite artists. -
Page 32: Expression Pedal
7. The Expression Pedal will control output level of the recorded phrase. 8. To stop or restart the playback, press the Down (Stop/Play) Footswitch. 9. To record a new passage, press the Amp A/B (Record) Footswitch again. 10. To exit Learn-A-Lick mode, press and hold the Up and Amp A/B Footswitches simultane- ously. -
Page 33: Expression Pedal Calibration
1. Press and hold the Store button while powering up the RP355. 2. When the display prompts you with FACrSt, release the Store button, which is now flashing. 3. Press and hold the flashing Store button for 3 seconds until rStOrD appears in the display and release. -
Page 34: Section Five - Appendix
Section Five - Appendix Specifications General Specifications A/D/A Converter: 24-bit high performance audio Sampling Frequency: 44.1 kHz DSP Section: AudioDNA2™ DSP Processor Simultaneous Effects: 11 Preset Memory: 70 User Presets (1-70) / 70 Factory Presets (F1-F70) Phrase Looper: 20 seconds of record time Drum Machine: 60 Patterns Dimensions: 17.5˝... -
Page 36: Expression Pedal - Assignable Parameters
DigiTech or Harman International Industries, Inc. They are trademarks of other manufacturers and were used merely to identify products whose sounds were reviewed in the creation of this product. -
Page 37: Tone Library
Tone Library Effects Library... - Page 40 RP355 Owner’s Manual 18-6412V-B ©2009 Harman International Industries, Incorporated, all rights reserved. DigiTech and the RP355 are trademarks of the Harman Music Group. Other product names modeled in this product are trademarks of their respective companies that do not endorse and are not associated or affiliated with DigiTech.
Need help?
Do you have a question about the RP355 and is the answer not in the manual?
Questions and answers