
Related Manuals for DigiTech RP 2000


Summary of Contents for DigiTech RP 2000
- Page 1 MODELING PICKUP MODELING MODELING GUITAR ACOUSTIC EFFECT MODELING SYSTEM CABINET MODELING EFFECTS TALKER™ RHYTHM TRAINER LEARN-A-LICK™ USER’S GUIDE DIGITAL OUTPUT...
-
Page 2: Safety Instructions
Warning For your protection, please read the following: Water and Moisture: Appliances should not be used near water (e.g. near a bathtub, washbowl, kitchen sink, laundry tub, in a wet basement, or near a swimming pool, etc.) Care should be taken so that objects do not fall and liquids are not spilled into the enclosure through openings. -
Page 3: Declaration Of Conformity
7.The foregoing is in lieu of all other warranties, expressed or implied, and Digitech neither assumes nor authorizes any per- son to assume any obligation or liability in connection with the sale of this product. In no event shall Digitech or its dealers be liable for special or consequential damages or from any delay in the performance of this warranty due to causes beyond their control. -
Page 4: Table Of Contents
Table of Contents Safety Information ..................I Effects....................17 Declaration of Conformity ..............II Chorus ....................18 Warranty ....................II Flanger ....................18 Table of Contents ..................III Phaser ....................18 Tremolo ..................18 Section One - Introduction Panner....................19 Vibrato ....................19 Getting Acquainted ................1 Rotary....................19 Included Items ..................1 AutoYah™ ..................19 Quick Start ....................1 YahYah™... -
Page 5: Section One - Introduction
Section One - Introduction Section-1 Introduction Getting Acquainted Congratulations on your wise choice in purchasing the RP2000.Thanks to the continuous advances in musical technology, you have the flexibility, power, and capability of producing sonic creations never before thought possible. Although the RP2000 is so user friendly you may not even need to read this manual, we recommend that you become better acquainted with us, and what we have to offer by going through this User’s Guide with your RP2000 in front of you. -
Page 6: A Guided Tour Of The Rp2000
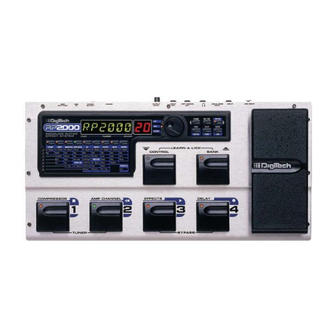
Section One - Introduction A Guided Tour of the RP2000 The Front Panel 1.Preset Switches - These 4 footswitches are used to select Presets, access the Tuner, turn individual effects on and off, change Amp Channels, select functions in Learn-A-Lick mode, or bypass the RP2000. 2 Matrix - The matrix provides information regarding the current Preset, and parameter edit functions.While in performance mode, the LEDs in the 9 buttons across the top of the Matrix will provide a visual indication of which effects are in use for the current Preset. - Page 7 Section One - Introduction 6. Mode Buttons- These 6 buttons are used to select various modes in which the RP2000 will function.The top three buttons perform single functions while the bottom three buttons perform dual functions based upon the current operation of the RP2000.The buttons are labeled as follows: A) FX Mode - The FX Mode button selects whether the 1-4 footswitches will recall Presets within the selected Bank, or act as on/off switches for the individual effects in the currently active Preset.
-
Page 8: The Rear Panel
8. Output Level - This knob controls the overall volume level of the signal coming out of the RP2000. 9. Power Input - This jack is used to power the RP2000. Use only the DigiTech PS0920 power supply provided. 10. S/PDIF Output - This is the digital output from the RP2000.The signal at this output is in a stereo digital format, and is to be connected to a digital S/PDIF input such as those found on digital recording devices. -
Page 9: Getting Started
Section One - Introduction Getting Started Making Connections Before connecting the RP2000, make sure that the power to your amplifier is turned off, and that the power to the RP2000 is disconnected.There is no power switch on the RP2000.To turn the RP2000 on or off, simply connect or disconnect the power supply from an AC outlet. -
Page 10: Direct To A Mixing Console
Section One - Introduction Direct to a Mixing Console The RP2000 can be connected directly to the inputs of a house PA system, or to a recording console. Connect the guitar to the input of the RP2000. Connect from the outputs of the RP2000 to the channel inputs of the mixing console. -
Page 11: About The Rp2000
Section One - Introduction About the RP2000 The Presets Presets are numbered locations of programmed sounds which reside in the RP2000. Presets can be recalled with the Footswitches or the Data Wheel.The RP2000 comes with 64 Factory and 64 User Presets available.The Factory Presets will not allow you to store any changes to them.The User Presets are locations where your creations may be stored. -
Page 12: The Expression Pedal
Section One - Introduction The Bank and Control switches are located on the upper tear. In Preset mode, the Bank switch will advance Banks with single presses or reverse Banks if held down. In FX mode, the Bank switch will advance Presets with single presses or reverse Presets if held down.The Control switch is used to control a Parameter of your choice in real time, or to change Banks. -
Page 13: Edit Mode
Section One - Introduction Edit Mode The Edit Mode of the RP2000 allows you to customize Presets to suit your particular needs and applications. Pressing the Edit/Exit button allows you to access, replace, or change any aspects of the effects which make up the Preset. Once in the Edit mode, the buttons in the matrix can be used to access the effects. -
Page 14: Learn-A-Lick Mode
Section One - Introduction Learn-A-Lick Mode The Learn-A-Lick function allows you to record a 10 second passage of music and play it back as slow as 1/4 speed with no change in pitch. This is very useful for picking out the notes of a fast solo passage. There are 6 functions for Learn-A-Lick.They are: •... -
Page 15: Section Two - Editing Functions
Section Two - Editing Functions Section Two - Editing Functions Editing/Creating Presets Creating your own signature sound with the RP2000 is easy and intuitive.The RP2000 lets you create your own Presets, or fine tune existing Presets to suit your needs. When creating or editing a sound, you must first start with one of the User or Factory Presets. -
Page 16: Storing/Copying A Preset
Section Two - Editing Functions Storing/Copying a Preset Once you have modified the Parameters and Effects to your liking, you can store them to a User Preset location.When editing a Preset, the Store LED will light indicating that you have changed a Parameter and need to store the changes. The following steps outline the procedure for storing a Preset 1. -
Page 17: Section Three - Effects And Parameters
Section Three - Effects and Parameters Section Three - Effects and Parameters About the Effects The RP2000 can be thought of as several different “virtual” amplifiers, and individual, hi-tech stomp boxes.With stomp boxes, the order in which they are connected can make a big difference in how good the overall sound is.Whether the stomp boxes are placed before the amp, or in the amp’s effects loop will also make a difference.The RP2000 has the Effects connected in the most logical, and best sounding order. -
Page 18: Wah/Pitch
Section Three - Effects and Parameters Wah/Pitch The Wah/Pitch column in the RP2000 is a multi-function module, allowing you to select your choice of classic Wahs, Pitch Shifting, Detuning,Whammy™, or Intelligent Harmonies. Only one effect from this column can be used at a time. After choosing the type of effect from this module, you can then adjust the individual parameters of the selected effect. -
Page 19: Harmony
(based on a Marshall JCM900) Marshall® is a registered trademark of Marshall Amplification Plc. Vox® is a registered trademark of Korg UK. Fender, Matchless, and Mesa Boogie, are trademarks of their respective companies and are in no way associated with DigiTech. RP2000 User’s Guide... -
Page 20: Cabinet Modeling
Section Three - Effects and Parameters The Gain adjusts the amount of drive applied by the Amp Model. Higher amounts of Gain will produce more break up or distortion. Gain ranges from 0 to 99. Gain is not available on the Acoustic or Direct Modeling selections. -
Page 21: Talker
Section Three - Effects and Parameters Talker™ The Talker™ is an effect designed exclusively by DigiTech, which enables your instrument to speak.The Talker™ requires a microphone to be connected to the Mic Input on the rear panel of the RP2000. As you speak into the microphone, your instrument will mimic any words that you say.The Talker™... -
Page 22: Chorus
Section Three - Effects and Parameters Chorus (Chorus) A Chorus adds a short delay to your signal and modulates the delay time which takes the delayed signal slightly in and out of tune.The delayed signal is then mixed back with the original signal to create a thicker sound as if two guitars were playing the same part. -
Page 23: Panner
Regen - Controls the throaty quality of the YahYah™. Ranges from 0 to 99. YahYah (YahYah™) The YahYah™ is another effect exclusive to DigiTech products. Like the AutoYah™, it combines the characteristics of a wah and a flanger together providing a unique talk box type of effect, but is controlled by the Expression Pedal.The YahYah™... -
Page 24: Envelope Filter
Section Three - Effects and Parameters Envlop (Envelope Filter) The Envelope Filter is an automatic Wah.The Envelope alters your sound based upon how hard you play. The softer that you play, the less intense the sweep of the Wah will be.The harder you play, the more intense the sweep will be. -
Page 25: Reverb
Section Three - Effects and Parameters Sets the time interval between repeats.The available delay time ranges are 10 milliseconds (1/100 of a sec- ond) to 3.0 seconds. Controls the number of repeats for the Delay. Ranges from 0 to 99, and rphold (infinite repeats).The Feedback Parameter is not available with the Reverse Delay. -
Page 26: Section Four - Tutorial
Section Four - Tutorial Section Four - Tutorial A Guided Example Suppose you wanted to create your own dual channel Preset which gave your single coil pickup a humbucker sound, used no Compression, had Wah before the Amp Modeling, the ripping distortion of a Rectified Amp with boosted bass on the red channel, the warm sounds of a vintage Tweed in the Green Channel, a Noise Gate that opens quickly, a clas- sic Phaser sound, no Delay, and a little bit of a Hall reverb.The following steps will guide you through the procedure for creating just such a Preset in the RP2000. -
Page 27: Select The Green Channel Amp Model
Section Four - Tutorial Select the Green Channel Amp Model We wanted our green channel’s Amp Model to produce the sound of a Tweed Amp. Press the Amp Model button and if necessary, rotate the Data Wheel until the Display reads Green. Press the Amp Model button again which will take us to the Amp Type Parameter for the Green channel. -
Page 28: Select The Red Channel Amp Model
Section Four - Tutorial Now to get a full sound out of the Cabinet, we should place the mic close to the center of the speaker. Press the Amp Model button again which will take us to the Mic Placement Parameter. Rotate the Data Wheel until the Display shows MicP 9. -
Page 29: Adjust The Noise Gate
Section Four - Tutorial Adjust the Noise Gate Now we can move on to our Noise Gate Parameters. Press the Talker button which will give us access to the Noise Gate Parameters. Our Example did not call for the use of the Talker effect so if necessary, rotate the Data Wheel to set the Talker to bypass. -
Page 30: Turn Delay Off
Section Four - Tutorial Turn the Delay Off In our example Preset we wanted the Delay to be bypassed. Press the Delay button and if necessary, rotate the Data Wheel until the Display reads bypass. Adjust the Reverb In our example Preset we also wanted a little bit of Hall Reverb to provide some ambience. Press the Reverb button to access the Reverb’s On/Bypass Parameter. -
Page 31: Store The Preset
Section Four - Tutorial Store the Preset The last step that we need to do is to store our changes to a User Preset. If we changed Presets or turned the RP2000 off without storing these settings, it would forget what we had done and revert back to the original Preset. Press the Store button once.The first letter in the Display begins to flash which is asking us to rename the Preset. -
Page 32: Section Five - Other Functions
Section Five - Other Functions Section Five - Other Functions Rhythm The Rhythm mode in the RP2000 is a great tool for improving your timing, rehearsing different musical styles, or just jamming when your drummer is out delivering pizzas.The Rhythm mode plays sampled drum beats in an infinite loop and lets you to select different patterns, change tempo, and adjust the volume level.When the Rhythm mode is activat- ed, the drum samples are mixed with your guitar signal at the left, right, and headphone outputs of the RP2000, and at the Digital Output if the Dry Track feature is off. -
Page 33: Expression Pedal
Section Five - Other Functions Use the Rhythm button to scroll to the right, or the FX Mode button to scroll to the left through the minimum and maximum value menus, and to reach the Control Switch and LFO menus. Note:The Rhythm mode must be disabled to access the Assign menus. -
Page 34: Lfo1 And Lfo2
Section Five - Other Functions LFO 1 and LFO 2 The LFOs in the RP2000 are filters that sweep back and forth between two points at an even rate.The speed that the LFOs cycle back and forth is programmable, and there are 5 selectable wave forms for the LFOs.The waveform con- trols the abruptness of change between the minimum and maximum values.These LFOs can be assigned to Parameters and as the LFO sweeps back and forth, the assigned Parameter will continuously change values at an even rate. -
Page 35: Global Cabinet Modeling
Section Five - Other Functions Global Cabinet Modeling The Cabinet Modeling in the RP2000 can be enabled globally in every Preset.This can save time when your application requires the use of the Cabinet Modeling on all Presets.To access the Global Cabinet Modeling, press the Utility button and scroll to the left or right until the display shows cabloc (Cabinet Local), or cabglb (Cabinet Global).When set to Global, all Presets will have the Cabinet Modeling enabled, regardless of whether it was programmed into a Preset or not.When set to Local, the Cabinet Modeling will only be enabled on Presets which were programmed with it on. -
Page 36: Midi Channel
Section Five - Other Functions MIDI Channel The RP2000’s MIDI channel is used for receiving incoming MIDI data only. The MIDI channel is access by pressing the Utility button and scrolling to the left or the right until MIDIch is shown in the Display. Rotate the Data Wheel to select the desired MIDI channel the RP2000 will respond to.The MIDI channel will be shown in the red Display. -
Page 37: Midi Merge
Section Five - Other Functions MIDI Merge The MIDI Merge function is used to enable or disable the transmission of incoming MIDI data to the MIDI Out port. This is useful when multiple MIDI devices are chained together, and you wish to pass the incoming MIDI Data on to MIDI devices downstream from the RP2000.To access the MIDI Merge function, press the Utility button once and scroll to the left or right until the Display shows Mmerge. -
Page 38: Section Six - Appendix
Section Six - Appendix Section Six - Appendix Preset List Bank 1 - Showcase (shocas) Bank 9 - Metal (metal) 33. Scoop 1. DaSolo 34. OctSub 2. Clasic 35.Whamit 3. Rhythm 36.Talker (Use Mic) 4. AYah Bank 10 - Amps 2 (amps 2) Bank 2 - Stars (stars) 37. -
Page 39: Midi Cc List
Section Six - Appendix MIDI CC List Parameter CC Number Parameter CC Number Pickup On/Bypass CC 1 Talker On/Bypass CC 29 Type CC 2 Type CC 30 Mic Sensitivity CC 31 Comp. On/Bypass CC 3 Attack CC 4 Gate/Swell On/Bypass CC 32 Threshold CC 5... -
Page 40: Midi Implementation
Section Six - Appendix MIDI Implementation RP2000 User’s Guide... -
Page 41: Specifications
Section Six - Appendix Specifications A/D Converter: 24 bit D/A Converter: 24 bit Sampling Frequency: 44.1 kHz DSP Section: Dual DSP architecture with true 24-Bit stereo processing @ 128 Million Instructions Per Second (MIPS) Connections: Guitar Input and Outputs: 1/4" TS Microphone: Balanced XLR with hard wire relay bypass to XLR output. - Page 42 MODELING GUITAR EFFECT SYSTEM Copyright the Harman Music Group 1999 Printed in the USA 11/99 Manufactured in the USA RP2000 User’s Guide 18-6334...
Need help?
Do you have a question about the RP 2000 and is the answer not in the manual?
Questions and answers