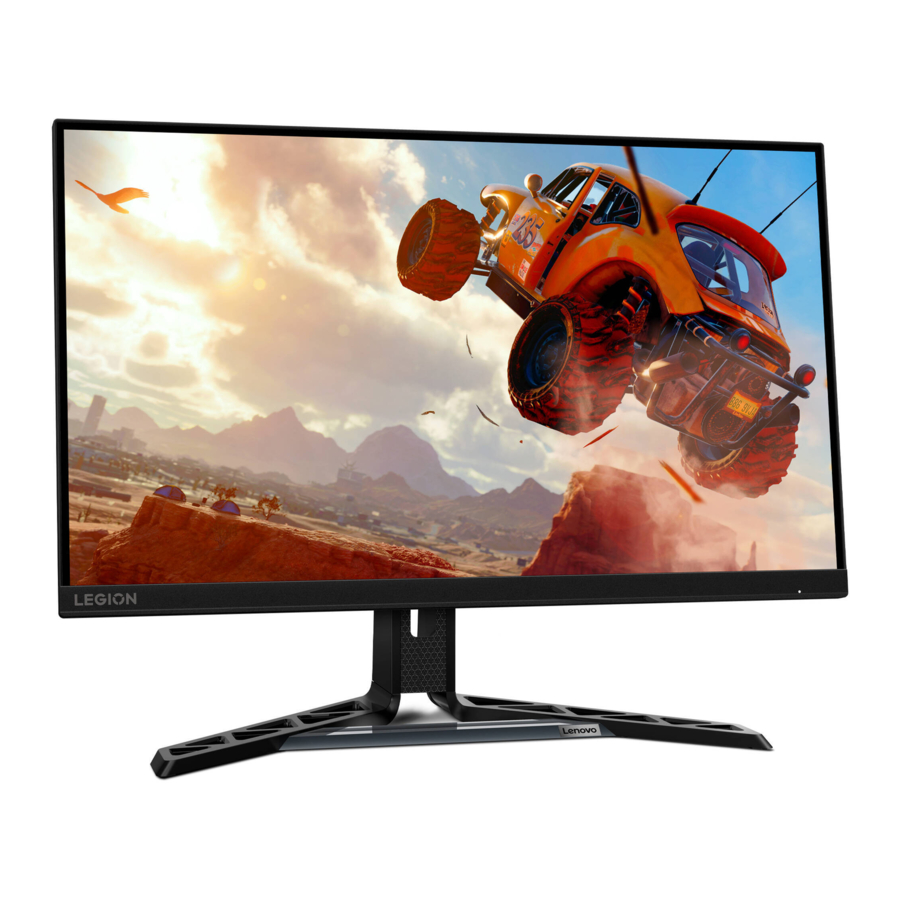
Lenovo Legion R27qe Manual
- User manual (34 pages) ,
- Quick start manual (2 pages)
Advertisement
- 1 Getting started
-
2
Adjusting and using your monitor
- 2.1 Comfort and accessibility
- 2.2 Arranging your work area
- 2.3 Positioning and viewing your monitor
- 2.4 Quick tips for healthy work habits
- 2.5 Adjusting your monitor image
- 2.6 Selecting a supported display mode
- 2.7 Understanding power management
- 2.8 Caring for your monitor
- 2.9 Detaching the monitor base and stand
- 2.10 Wall Mounting (Optional)
- 3 Reference information
- 4 Troubleshooting
- 5 Service and Support
- 6 Safety information
- 7 Documents / Resources

Getting started
This User's Guide provides detailed operation instructions for the user. For quick instruction overview, please see the Setup Poster for brief information.
R27qe supports Lenovo Accessories and Display Manager* - Artery.
*Formerly Lenovo Display Control Center.
Shipping contents
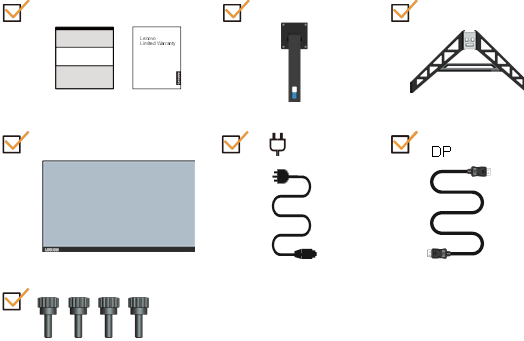
The product package should include the following items:
- Information Flyer
- Lenovo Limited Warranty Booklet
- Stand
- Base
- Flat Panel Monitor
- Power Cord
- DP Cable
- Screws
Notice for use
To set up your monitor, please see the illustrations below.


- Take out the Top cushion and accessories.
- Insert the base towards the stand and tighten the thumbscrew.
- Mounting the stand to monitor's recess and tighten the screws.
- Stand up the monitor with both hands carefully.

Product overview
This section will provide information on adjusting monitor positions, setting user controls, and using the cable lock slot.
Types of adjustments
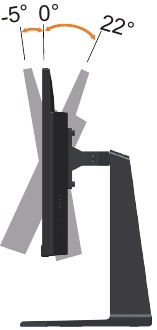
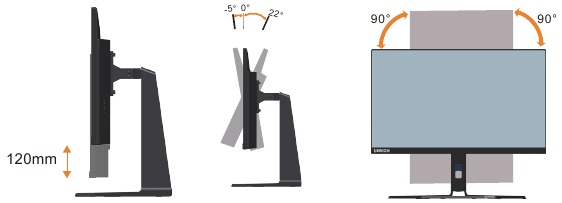
Tilt
Please see the illustration below for an example of the tilt range.
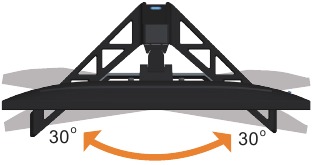
Swivel
With the built-in pedestal, you can tilt and swivel the monitor for the most comfortable viewing angle.
Height Adjustment
For height adjustment, user needs to press down or lift up the monitor.
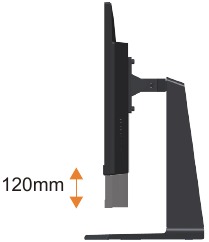
Monitor
- Adjust the screen position before rotating the monitor screen. (Make sure that the monitor screen ascent to its highest point, and it inclines backward at 22°.)
- Then rotate until the monitor stops at 90°.
![Lenovo - Legion R27qe - Product overview - Types of adjustments - Monitor Product overview - Types of adjustments - Monitor]()
Monitor controls
The keypad controls on the panel frame are accesses to various functions.
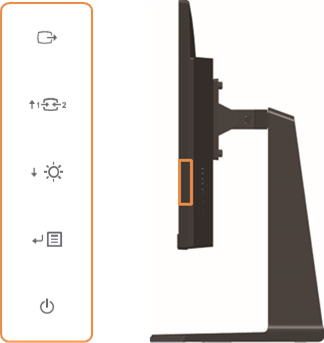
For information on how to utilize these keypad controls, please see "Adjusting your monitor image".
Kensington anti-theft lock
Your monitor is equipped with a Kensington anti-theft lock located on the rear of your monitor.
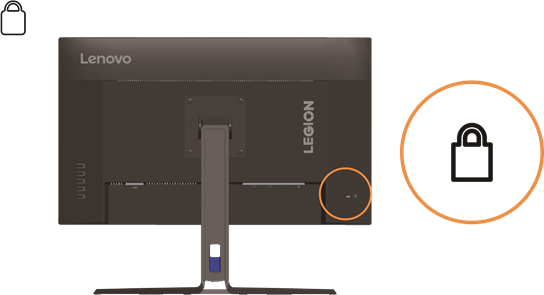
Setting up your monitor
This section provides information on how to set up your monitor.
Connecting and turning on your monitor

- Power off your computer and all attached devices, and unplug the computer power cord.
![Lenovo - Legion R27qe - Connecting and turning on your monitor - Step 1 Connecting and turning on your monitor - Step 1]()
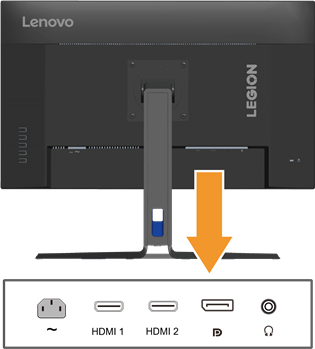
- Connect the cables according to below icon indication.
![Lenovo - Legion R27qe - Connecting and turning on your monitor - Step 2 Connecting and turning on your monitor - Step 2]()
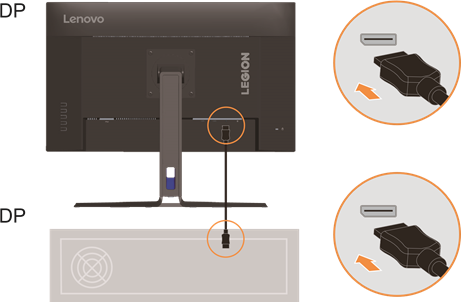
- For computer in DP connecting.
![Lenovo - Legion R27qe - Connecting and turning on your monitor - Step 3 Connecting and turning on your monitor - Step 3]()
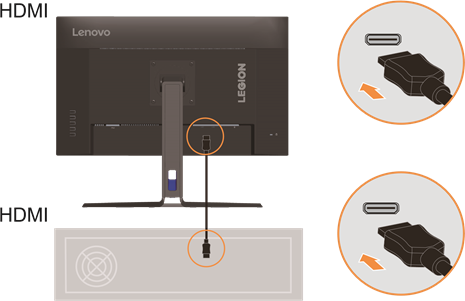
- For computer in HDMI connecting.
Note: For other regions Lenovo recommends that customers who require to use the HDMI input on their monitor purchase the "Lenovo HDMI to HDMI cable OB47070" http://www.lenovo.com/support/monitoraccessories
![Lenovo - Legion R27qe - Connecting and turning on your monitor - Step 4 Connecting and turning on your monitor - Step 4]()
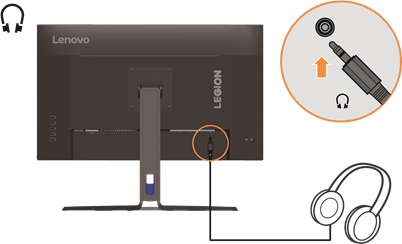
- Connect the speaker's audio cable and audio jack of monitor to transfer audio source from HDMI/DP.
Note: The audio output in HDMI/DP modoes.
![Lenovo - Legion R27qe - Connecting and turning on your monitor - Step 5 Connecting and turning on your monitor - Step 5]()
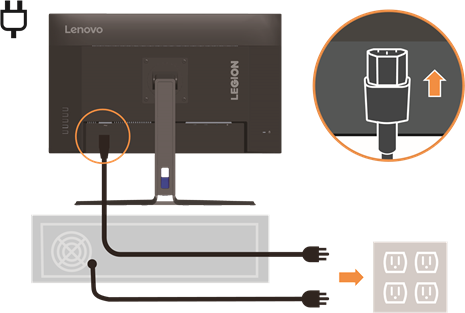
- Insert the power cord into the monitor, then plug the monitor power cord and the computer cord into grounded electrical outlets.
Note: A certified power supply cord has to be used with this equipment. The relevant national installation and or equipment regulations shall be considered. A certified power supply cord not lighter than ordinary polyvinyl chloride flexible cord according to IEC 60227 (designation H05VV-F 3G 0.75mm2 or H05VVH2-F2 3G 0.75mm2 ) shall be used. Alternative a flexible cord be of synthetic rubber according to IEC 60245 (designation H05RR-F 3G 0.75mm2 ) shall be used.
![Lenovo - Legion R27qe - Connecting and turning on your monitor - Step 6 Connecting and turning on your monitor - Step 6]()
- Connect the cables with cable clip.
![Lenovo - Legion R27qe - Connecting and turning on your monitor - Step 7 Connecting and turning on your monitor - Step 7]()
- Power on the monitor and the computer.
![Lenovo - Legion R27qe - Connecting and turning on your monitor - Step 8 Connecting and turning on your monitor - Step 8]()
- When you install the monitor driver, download the driver that corresponds to your monitor model from the Lenovo website https://pcsupport.lenovo.com/solutions/r27qe. Refer to the "Manually installing the monitor driver" section to install the driver.
![Lenovo - Legion R27qe - Connecting and turning on your monitor - Step 9 Connecting and turning on your monitor - Step 9]()
Adjusting and using your monitor
This section will give you information on adjusting and using your monitor.
Comfort and accessibility
Good ergonomic practice is important to get the most from your personal computer and to avoid discomfort. Arrange your workplace and the equipment you use to suit your individual needs and the kind of work that you perform. In addition, use healthy work habits to maximize your performance and comfort while using your computer.
Arranging your work area
Use a work surface of appropriate height and available working area to allow you to work in comfort.
Organize you work area to match the way you use materials and equipment. Keep your work area clean and clear for the materials that you typically use and place the items that you use most frequently, such as the computer mouse or telephone, within the easiest reach. Equipment layout and setup play a large role in your working posture. The following topics describe how to optimize equipment setup to achieve and maintain good working posture.
Positioning and viewing your monitor
Position and adjust your computer monitor for comfortable viewing by considering the following items:
- Viewing distance: Recommended viewing distance between the eye and the monitor screen is 1.5 x the diagonal of the screen. Solutions in meeting this required distance in cramped office situations include pulling desk away from wall or divider to make room for monitor, using flat panel or compact displays placing the monitor in the desk corner, or placing the keyboard in an adjustable drawer to create a deeper working surface.
- Monitor height: Position the monitor so your head and neck are in a comfortable and neutral (vertical, or upright) position. If your monitor does not have height adjustments, you might have to place books or other sturdy objects under the base of the monitor to achieve the desired height. A general guideline is to position the monitor such that the top of the screen is at or slightly below your eye-height when you are comfortably seated. However, be sure to optimize your monitor height so the line of site between your eyes and the center the monitor suits your preferences for visual distance and comfortable viewing when your eye muscles are in a relaxed state.
- Tilt: Adjust the tilt of your monitor to optimize the appearance of the screen content and to accommodate your preferred head and neck posture.
- General location: Position your monitor to avoid glare or reflections on the screen from overhead lighting or nearby windows.
The following are some other tips for comfortable viewing of your monitor:
- Use adequate lighting for the type of work you are performing.
- Use the monitor brightness, contrast, and image adjustment controls, if equipped, to optimize the image on your screen to meet your visual preferences.
- Keep your monitor screen clean so you can focus on the screen's contents.
Any concentrated and sustained visual activity can be tiring for your eyes. Be sure to periodically look away from your monitor screen and focus on a far object to allow your eye muscles to relax. If you have questions on eye fatigue or visual discomfort, consult a vision care specialist for advice.
Quick tips for healthy work habits
The following information is a summary of some important factors to consider to help you remain comfortable and productive while you use your computer.
- Good posture starts with equipment setup: The layout of your work area and the setup of your computer equipment have a large effect on your posture while using your computer. Be sure to optimize the position and orientation of your equipment by following the tips outlined in "Arranging your work area " so you can maintain a comfortable and productive posture. Also, be sure to use the adjustment capabilities of your computer components and office furniture to best suit your preferences now and as your preferences change over time.
- Minor changes in posture can help avoid discomfort: The longer you sit and work in front of your computer, the more important it is to observe your working posture. Avoid as summing any one posture for an extended period of time. Periodically make minor modifications in your posture to help deter any discomforts that might arise. Make use of any adjustments that your office furniture or equipment provide to accommodate changes in posture
- Short, periodic breaks help ensure healthy computing: Because computing is primarily a static activity, it is particularly important to take short breaks from your work. Periodically, stand up in front of your work area, stretch, walk for a drink of water, or otherwise take a short break from using your computer. A short break from work gives your body a welcome change in posture and helps to ensure you remain comfortable and productive while you do work.
Adjusting your monitor image
This section describes the user control features used to adjust your monitor image.
Using the direct access controls
The direct access controls can be used when the On Screen Display (OSD) is not displayed.
| Icon | Control | Description | |
| 1 |  | Exit |
|
| 2 |  | Sourceselecting/Up |
|
| 3 |  | Brightness Adjustment/ Low Blue Light/Down |
|
| 4 |  | Menu/OK |
|
| 5 |  | Power key | Press to turn On/Off the monitor. |
Using the On-Screen Display(OSD) controls
To adjust the settings, the user controls can be viewed through the OSD.
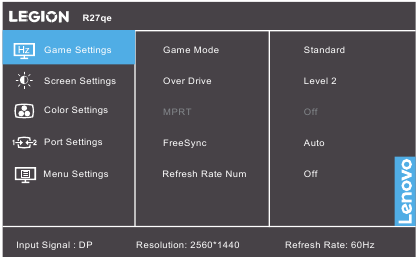
To use the controls:
- Press
![]() to open the main OSD menu.
to open the main OSD menu. - Use
![]() or
or ![]() to move among the icons. Select an icon and press
to move among the icons. Select an icon and press ![]() to access that function.
to access that function.
If there is a sub-menu, you can move between options using![]() or
or ![]() , then press
, then press ![]() to select that function. Use
to select that function. Use ![]() or
or ![]() to make adjustments then press
to make adjustments then press ![]() to save.
to save. - Press
![]() to move backwards through the sub-menus and exit from the OSD.
to move backwards through the sub-menus and exit from the OSD.
Table 2-1. OSD functions
| OSD Icon on Main Menu | Sub menu | Description | Controls and Adjustments |
| Game Settings | Game Mode |
| All input ports |
| Over Drive |
| ||
| MPRT |
| ||
| AdaptiveSync |
| for DP ports | |
| FreeSync |
| for HDMI ports | |
| Refresh Rate Num |
| All input ports | |
| Screen Settings | Brightness | Adjusts overall screen brightness. | All input ports |
| Contrast | Adjusts difference between light and dark areas. | ||
| DCR | Enable dynamic contrast ratio.
| ||
| HDR |
| ||
| Dark Boost |
| ||
| Scaling Mode |
| ||
| Sharpness | Adjust bar | ||
| Relative Gamma |
| ||
| Video range |
 Note: Refers to RGB range of HDMI input. Note: Refers to RGB range of HDMI input. | HDMI port | |
| Color Settings | Color Temp. |
| All input ports |
| Saturation | Adjust bar | ||
| Port Settings | Input Signal |
| |
| DP Select |
| DP port | |
| Menu Settings | Information |
| All input ports |
| Language | Select OSD Languages.
| ||
| Button Repeat Rate |
| ||
| LED indicator |
| ||
| OSD Timeout | Adjust Bar (5-60) | ||
| Menu Horizontal | Adjust Bar | ||
| Menu Vertical | Adjust Bar | ||
| OSD rotation |
| ||
| Transparency |
| ||
| DDC/CI |
| ||
| Reset All Settings |
|
*The use of Level 3/Level 4 may result in reduced display quality when fast moving video graphics are displayed.
Users should check Level 3/Level 4 to verify if it is compatible with any applications they would like to use it with.
*Low Blue Light: The display uses the low blue light panel. It complies with TÜV Rheinland Low Blue Light Hardware Solution certification under factory reset/default setting (Low Blue Light=Standard, Brightness: 75%, Contrast: 75%, CCT: Warm).
*Enable the display HDR function requires that the connected PC system supports the HDR function.
Selecting a supported display mode
The display mode the monitor uses is controlled by the computer. Therefore, refer to your computer documentation for details on how to change display modes.
The image size, position and shape might change when the display mode changes. This is normal and the image can be re-adjusted using automatic image setup and the image controls.
Unlike CRT monitors, which require a high refresh rate to minimize flicker, LCD or Flat Panel technology is inherently flicker-free.

Table 2-2. Factory set display modes
| Timing | Refresh rate(Hz) |
| 720x400 | 70Hz |
| 640x480 | 60Hz |
| 640x480 | 67Hz |
| 640x480 | 72Hz |
| 640x480 | 75Hz |
| 800x600 | 60Hz |
| 800x600 | 72Hz |
| 800x600 | 75Hz |
| 832x624 | 75Hz |
| 1024x768 | 60Hz |
| 1024x768 | 70Hz |
| 1024x768 | 75Hz |
| 1280x800 | 60Hz |
| 1280x1024 | 60Hz |
| 1280x1024 | 75Hz |
| 1440x900 | 60Hz |
| 1600x900 | 60Hz |
| 1680x1050 | 60Hz |
| 1920x1080 | 60Hz |
| 1920x1080 | 75Hz |
| 1920x1080 | 120Hz |
| 1920x1080 | 144Hz |
| 1920x1080 | 165Hz(only for DP port) |
| 2560x1440 | 60Hz |
| 2560x1440 | 120Hz |
| 2560x1440 | 144Hz |
| 2560x1440 | 165Hz(only for DP port) |
| 2560x1440 | 180Hz(only for DP port) |
*: 4K timing only for certain consoles to turn on HDR function, monitor remains 2560x1440 resolution.
Supports game console modes
| PS 5 | 1080p@60Hz |
| 1080p@120Hz | |
| 720p@60Hz | |
| PS 4 | 1080p@60Hz |
| 720p@60Hz | |
| X BOX one X | 2160p@50Hz |
| 2160p@60Hz | |
| 1080p@60Hz | |
| 1080p@120Hz | |
| 720p@60Hz | |
| 640x480@60Hz | |
| X BOX one S | 2160p@50Hz |
| 2160p@60Hz | |
| 1080p@60Hz | |
| 1080p@120Hz | |
| 720p@60Hz | |
| 640x480@60Hz |
Understanding power management
Power management is invoked when the computer recognizes that you have not using your mouse or keyboard for a user-definable period. There are several states as described in the table below.
For optimal performance, switch off your monitor at the end of each working day, or whenever you expect to leave it unused for long periods during the day.
Table 2-3. Power indicator
| State | Power Indicator | Screen | Restoring Operation |
| On | White | Normal | |
| Standby/Suspend | Amber | Blank | Press a key or move the mouse. There may be a slight delay reappears.
|
| Off | Off | Blank | Press power key to switch on There may be a slight delay before the image reappears. |
Power Management Modes
| VESA Modes | Horizontal Sync | Vertical Sync | Video | Power Indicator | Power Consumption |
| Normal operation | Active | Active | Active | White | 46 W (maximum)* 22 W (typical) |
| Active-off mode | Inactive | Inactive | Off | Amber | Less than 0.5 W |
| Switch off | - | - | - | Off | Less than 0.3 W |
** Maximum power consumption with max luminance.
This document is informational only and reflects laboratory performance. Your product may perform differently, depending on the software, components and peripherals you ordered and shall have no obligation to update such information. Accordingly, the customer should not rely upon this information in making decisions about electrical tolerances or otherwise. No warranty as to accuracy or completeness is expressed or implied.
Caring for your monitor
Be sure to turn off the power before you perform any maintenance on the monitor.
Do not:
- Apply water or liquid directly to your monitor.
- Use solvents or abrasives.
- Use flammable cleaning materials to clean your monitor or any other electrical equipment.
- Touch the screen area of your monitor with sharp or abrasive items. This type of contact may cause permanent damage to your screen.
- Use any cleaner which contains an anti-static solution or similar additives. This may harm the coating of the screen area.
Do:
- Lightly dampen a soft cloth with water and use this to gently wipe the covers and the screen.
- Remove grease or finger marks with a damp cloth and a little mild detergent.
Detaching the monitor base and stand
After placing the monitor face down on box with caution protected, remove the screws and lift the stand up to remove it from the monitor.

Wall Mounting (Optional)
Refer to the instructions that come with the base mounting kit. To convert your LCD display from a desk-mounted to a wall-mounted display, do the following:
Step 1: Verify that the Power button is turned off, then disconnect the power cord.
Step 2: Lay the LCD display face down on a towel or blanket.
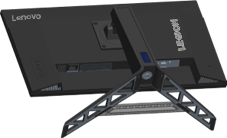
Step 3: Remove the base and stand from the monitor, refer to "Detaching the monitor base and stand".
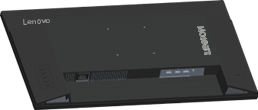
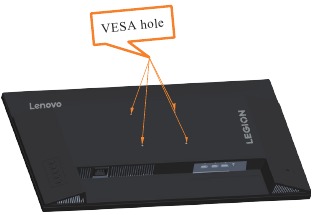
Step 4: Attach the mounting bracket from the VESA compatible wall mounting kit. (100mm x100mm distance), the type of VESA mounting screw is M4 x 10 mm.
Step 5: Attach the LCD display to the wall, and follow the instructions in the wall-mounting kit. For use only with UL Listed Wall Mount Bracket with minimum weight/load: 8kg

When you use a flexible arm, do not tilt the monitor downward by more than 5 degrees. The machine does not support 180° screen rotation.
Reference information
This section contains monitor specifications, instructions to manually install the monitor driver, troubleshooting information.
Monitor specifications
Table 3-1. Monitor specifications for type-model R27qe
| Dimensions | Depth | 258.81mm (10.19 in.) | |||
| Height | 505.01mm (19.88 in.) | ||||
| Width | 613.17mm (24.14 in.) | ||||
| Stand | Tilt | Range: -5o~22o | |||
| VESA mount | Supported | 100 mm x 100 mm (3.94 in. x 3.94 in.) | |||
| Image | Viewable image size | 685.8mm (27 in.) | |||
| Maximum height | 335.664mm (13.22 in.) | ||||
| Maximum width | 596.736mm (23.49 in.) | ||||
| Pixel pitch | 0.2331(H) x 0.2331(W) | ||||
| Power input | Supply voltage Max supply current | 100-240V AC 1.5A | |||
| Power consumption
| Normal operation | <46 W (Max) <22 W (Typical) | |||
| Standby/Suspend | <0.5 W | ||||
| Off
| <0.3 W at 100VAC and 240VAC | ||||
| DP | Interface | DP | |||
| Horizontal addressability | 2560 pixels (max) | ||||
| Vertical addressability | 1440 lines (max) | ||||
| Clock frequency | 780 MHz (max) | ||||
| HDMI | Interface | HDMI | |||
| Input signal | VESA TMDS (Panel Link™) | ||||
| Horizontal addressability | 2560 pixels (max) | ||||
| Vertical addressability | 1440 lines (max) | ||||
| Clock frequency | 590 MHz (max) | ||||
| Communications | VESA DDC/CI | ||||
| Supported Display Modes | Horizontal frequency | 30 kHz – 220 kHz(HDMI) 285 kHz – 285 kHz(DP) | |||
| Vertical frequency | 48 Hz – 144 Hz (HDMI) 48 Hz – 180 Hz (DP) | ||||
| Native Resolution | 2560 x 1440 at 60 Hz | ||||
| Temperature | Operating | 0° to 40°C (32°F to 104°F) | |||
| Storage | -20° to 60°C (-4°F to 140°F) | ||||
| Shipping | -20° to 60°C (-4°F to 140°F) | ||||
| Humidity | Operating | 10% to 80% non-condensing | |||
| Storage | 5% to 95% non-condensing | ||||
| Shipping | 5% to 95% non-condensing |
Manually installing the monitor driver
Below are steps for manually installing the monitor driver in Microsoft Windows 10, Microsoft Windows 11.
- Turn off the computer, all attached devices.
- Ensure that the monitor is connected correctly.
- Turn on the monitor and then the system unit. Allow your computer to start the Windows operating system.
- From the Lenovo website https://pcsupport.lenovo.com/solutions/r27qe, find the corresponding monitor driver and download it to a PC to which this monitor is connected (such as a desktop).
- Right-click the Windows Start button on the desktop, then click Device Manager, and double click Monitor.
- Double-click Generic Monitor.
- Click the Driver tab.
- Click Update Driver, and then click Browse Computer to find the driver.
- Click Let me pick from a list of available divers on my computer.
- Click the Have Disk... button. By clicking the Browse button, browse and point to the following path: X:\Monitor Drivers\Windows (where X indicates "the folder in which the downloaded driver is located" (such as a desktop)).
- Select R27qe.inf file, Click Open button. Click OK button.
- In the new window, select R27qe and click Next.
- After the installation is complete, delete all downloaded files and close all Windows.
- Restart the system. The system will automatically select the refresh rate and the corresponding color matching profile.
Troubleshooting
If you have a problem setting up or using your monitor, you might be able to solve it yourself. Before calling your dealer or Lenovo, try the suggested actions that are appropriate to your problem.
Table 3-2. Troubleshooting
| Problem | Possible cause | Suggested action | Reference |
| The words" Out of Range" are shown on the screen, and the power indicator is flashing white. | The system is set to a display mode which is not supported by the monitor |
| "Selecting a supported display mode" |
| The image quality is unacceptable | The video signal cable is not connected with the monitor or system completely. | Be sure the signal cable is firmly plugged into the system and monitor. | "Connecting and turning on your monitor" |
| The color settings may be incorrect. | Select another color setting from the OSD menu. | "Adjusting your monitor image" | |
| The automatic image setup function was not performed. | Perform automatic image setup. | "Adjusting your monitor image" | |
| The power indicator is not lit and there is no image. |
|
| "Connecting and turning on your monitor" |
| Screen is blank and power indicator is amber. | The monitor is in Standby / Suspend mode |
| "Understanding power management" |
| The power indicator is amber, but there is no image | The video signal cable is loose or disconnected from the system or monitor | Be sure the video cable is connected with the system properly | "Connecting and turning on your monitor" |
| The monitor brightness and contrast are at the lowest setting. | Adjust the brightness and contrast setting on the OSD menu. | "Adjusting your monitor image" | |
| One or more of the pixels appear discolored | This is a characteristic of the LCD technology and is not an LCD defect | If there are more than five pixels missing, contact the Support Center | Service and Support" |
|
| Adjust the resolution settings on your system to match the native resolution for this monitor: 2560 x 1440 at 60 Hz. | "Adjusting your monitor image" |
| Perform automatic image setup. If automatic image setup does not help, perform manual image setup. | "Selecting a supported display mode" | ||
| When working in the native resolution, you may find additional improvements by adjusting the Dots Per Inch (DPI) setting on your system. | See the Advanced section of your system's display properties. |
Service and Support
The following information describes the technical support that is available for your product, during the warranty period or throughout the life of the product. Refer to your Lenovo Statement of Limited Warranty for a fully explanation of Lenovo warranty terms.
Registering your option
Register to receive product service and support updates, as well as free and discounted computer Accessories and content.
Go to: http://www.lenovo.com/support
Online technical support
Online technical support is available during the life of your product through the Lenovo Support Web site at http://www.lenovo.com/support
Product replacement assistance or exchange of defective components also is available during the warranty period, assistance for replacement or exchange of defective components is available. In addition, if your option is installed in a Lenovo computer, you might be entitled to service at your location. Your technical support representative can help you determine the best alternative.
Telephone technical support
Installation and configuration support through the Customer Support Center will be available until 90 days after the option has been withdrawn from marketing. After that time, the support is cancelled, or made available for a fee, at Lenovo's discretion.
Additional support is also available for a nominal fee.
Before contacting a Lenovo technical support representative, please have the following information available: option name and number, proof of purchase, computer manufacturer, model, serial number and manual, the exact wording of any error message, description of the problem, and the hardware and software configuration information for your system.
Your technical support representative might want to walk you through the problem while you are at your computer during the call.
Telephone numbers are subject to change without notice. The most up-to-date telephone list for Lenovo Support is always available at: http://www.lenovo.com/support
Safety information
General Safety guidelines
For tips to help you use your computer safely, go to: http://www.lenovo.com/safety
Before installing this product, read the Safety Information.
To avoid shock hazard:
- Do not remove the covers.
- Do not operate this product unless the stand is attached.
- Do not connect or disconnect this product during an electrical storm.
- The power cord plug must be connected to a properly wired and grounded power outlet.
- Any equipment to which this product will be attached must also be connected to properly wired and grounded power outlets.
- To isolate the monitor from the electrical supply, you must remove the plug from the power outlet. The power outlet should be easily accessible.
The machine does not support 180 screen rotation.
To take special precautions to avoid the introduction of hazards when operating, installing, servicing, transporting or storing equipment, the necessary instructions shall be made available.
To reduce the risk of electric shock, do not perform any servicing other than that contained in the operating instructions unless you are qualified to do so.
Handling:
- If your monitor weighs more than 18 kg (39.68 lb), it is recommended that it be moved or lifted by two people.
Documents / Resources
References
Download manual
Here you can download full pdf version of manual, it may contain additional safety instructions, warranty information, FCC rules, etc.
Advertisement



 to open the main OSD menu.
 or
or  to move among the icons. Select an icon and press
  to move backwards through the sub-menus and exit from the OSD.


Need help?
Do you have a question about the Legion R27qe and is the answer not in the manual?
Questions and answers