Advertisement
Setting Up
Read This First
The ink for this printer must be handled carefully. Ink may splatter when the ink tanks are being filled or refilled with ink. If ink gets on your clothes or belongings, it may not come off.

Additional items may be included depending on the location.
Section 1

- Select the printer setup method.
Do you have a smart device?
No.
![]()
Go to section 2.
Yes.
![]()
Hold down the![]() button until it flashes. Then use your smart device to complete the rest of the setup process.
button until it flashes. Then use your smart device to complete the rest of the setup process.

Epson Smart Panel
Install Epson Smart Panel. This will help you set up the printer even if you use the printer with a computer.
![]()

 button until it flashes. Then use your smart device to complete the rest of the setup process.

Epson Smart Panel
You can set up the printer while watching instructions on your smart device. By using the app, you can remotely control the printer on your smart device or perform more diverse printing through the app.
Section 2
Follow these instructions if you selected "No" in section 1 — Step 3.

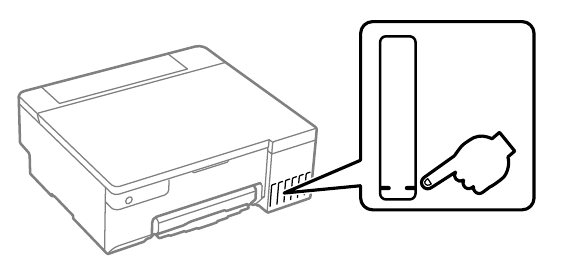
- Make sure that the color of the ink tank matches the ink color that you want to fill.


- Remove the cap while keeping the ink bottle upright; otherwise ink may leak.
- Use the ink bottles that came with your printer.
- Epson cannot guarantee the quality or reliability of non-genuine ink. The use of non-genuine ink may cause damage that is not covered by Epson's warranties.
- Check the upper line in the ink tank.

- Insert the ink bottle straight into the port to fill ink to the upper line.


- When you insert the ink bottle into the filling port for the correct color, ink starts pouring and the flow stops automatically when the ink reaches the upper line.
- If the ink does not start flowing into the tank, remove the ink bottle and reinsert it. However, do not remove and reinsert the ink bottle when the ink has reached the upper line; as doing so may cause ink to leak or damage the printer when the ink rises above the upper line.
- Ink may remain in the bottle. The remaining ink can be used later.
- Do not leave the ink bottle inserted; otherwise the bottle may be damaged or ink may leak.
- When the ink reaches the upper line of the tank, pull out the bottle.
If any ink remains in the ink bottle, tighten the cap and store the bottle upright for later use.


- Confirm that the tanks are filled with ink, and then hold down the
![]() button for 5 seconds to start charging ink. Charging ink takes about 7 minutes.
button for 5 seconds to start charging ink. Charging ink takes about 7 minutes.

- Load A4 size plain paper at the center of the paper support with the printable side facing up.

- Press the
![]() button to turn off the printer.
button to turn off the printer. - Print a nozzle check pattern to check if the print head nozzles are clogged.
While holding down![]() , press
, press ![]() to turn on the printer.
to turn on the printer.


- The nozzle check pattern is printed. Check the printed pattern to see if the print head nozzles are clogged.

- Run the print head cleaning. Print head cleaning uses some ink from all ink tanks.

- Visit the website to install software and configure the network. When this is complete, the printer is ready for use.
https://epson.sn/8050
 button for 5 seconds to start charging ink. Charging ink takes about 7 minutes.

 button to turn off the printer.
 , press
  to turn on the printer.


Guide to Control Panel
Buttons and Functions
 | Turns the printer on or off. |
| Wi-Fi | Clears a network error. Hold down for 5 seconds or more to make network settings using the WPS push button. |
 | Prints a network connection report to determine the causes of any network problems. To get more information, hold this button down for more than 5 seconds to print a network status sheet. |
 | Stops the current operation. Hold this button down for 5 seconds until the  button flashes to run print head cleaning. button flashes to run print head cleaning. |
Wi-Fi +  | PIN Code Setup (WPS): Hold down the and  buttons simultaneously to start PIN Code Setup (WPS). buttons simultaneously to start PIN Code Setup (WPS). |
Wi-Fi +  | Wi-Fi Direct (Simple AP) Setup: Hold down the and  buttons simultaneously to start Wi-Fi Direct (Simple AP) Setup. buttons simultaneously to start Wi-Fi Direct (Simple AP) Setup. |
Wi-Fi +  | Disable Network Service: Turn the printer on while holding down the button to disable Epson Connect settings. |
 | Restore Default Network Settings: Turn the printer on while holding down the button to restore the default network settings. When the network settings are restored, the  and and  lights flash alternately and then turn off. lights flash alternately and then turn off. |
 | Print Nozzle Check Pattern: Turn the printer on while holding down the  button to print the nozzle check pattern. button to print the nozzle check pattern. |
Reading the Indication Lights
 : Off
: Off
 : On
: On
 : Flashing
| Normal Status | |
 | The printer is connected to a wireless (Wi-Fi) network. |
 | The printer is connected to a network in Wi-Fi Direct (Simple AP) mode. |
| Error Status | |
 | Wi-Fi connection error has occurred. Press the button to clear the error and try again. |
 | No paper is loaded or more than one sheet has been fed at a time. Also, if this indicator light is on when printing a disc or PVC ID card, insert the disc/ID card tray correctly. After loading paper or inserting the disc/ID card tray correctly, press the  button. button. |
 | A paper jam has occurred or the disc or PVC ID card has not been placed on the disc/ID card tray correctly. After removing the paper or replacing the disc or PVC ID card, press the button. If a paper jam occurs, see the "Clearing Paper Jam" section. If the indicator light continues flashing, see the jammed paper section from "Solving Problems" in the User's Guide. |
 | Initial ink charging may not be complete. See section 2 to complete initial ink charging. |
 | A maintenance box is nearing the end of its service life. The light continues to flash until the maintenance box is replaced. You can continue printing until the  and and  lights flash alternately. lights flash alternately. |
 | The printer was not turned off correctly. Press the  button to clear the error. We recommend performing a nozzle check because the nozzles may have dried or clogged. To turn off the printer, make sure you press the button to clear the error. We recommend performing a nozzle check because the nozzles may have dried or clogged. To turn off the printer, make sure you press the  button. button. |
 | Flashing simultaneously: An ink pad is nearing or at the end of its service life. The ink pad needs to be replaced. Contact Epson or an authorized Epson service provider to replace the ink pad. Ink pads are not user-serviceable parts. Check the message displayed on the computer, and then press the button to clear the error or to continue cleaning. If the ink pad has reached the end of its service life, you can no longer perform cleaning. Printing can be performed but the quality of the printouts cannot be guaranteed. Flashing alternately: A borderless printing ink pad is nearing or at the end of its service life. Borderless printing is not available, but printing with a border is available. To replace the borderless printing ink pad, contact Epson or an authorized Epson service provider. |
 | Transportation lock is locked. After unlocking the transportation lock, press the button. |
 | Flashing alternately: A maintenance box is at the end of its service life. Replace the maintenance box, and then press the button to continue printing. To replace a maintenance box, see the User's Guide. |
 | The output tray has not been slid out. Slide out the tray. |
| All lights turn on except the light. | The printer has started in recovery mode because the firmware update failed. For more details, see the error indicator table from "Solving Problems" in the User's Guide. |
| All lights flashing including the light. | A printer error has occurred. Remove any paper inside the printer. Turn the power off and on again. If the error continues to occur after turning the power off and on again, contact Epson support. |
Checking Ink Levels and Refilling Ink
Check the ink levels. If any of the ink levels are below the lower line, see steps  to
to  in section 2 to refill the tank.
To confirm the actual ink remaining, visually check the ink levels in all of the printer's tanks. Prolonged use of the printer when the ink level is below the lower line could damage the printer.
Ink Bottle Codes
For Europe
| BK | LC | M | C | Y | LM |
| 108 | |||||
For Asia
| BK | LC | M | C | Y | LM |
| 057 | |||||
Use of genuine Epson ink other than the specified ink could cause damage that is not covered by Epson's warranties.
Clearing Paper Jam

Troubleshooting
See the online User's Guide for detailed information. This provides you with operating, safety, and troubleshooting instructions such as clearing paper jams or adjusting print quality. You can obtain the latest versions of all guides from the following website.
Support
For outside Europe
http://support.epson.net/
For Europe
http://www.epson.eu/support
Storing and Transporting


- Be sure to keep the ink bottle upright when tightening the cap. Place the printer and the bottle in a plastic bag separately and keep the printer level as you store and transport it. Otherwise ink may leak.
- When using the printer again after transporting, remove the tape securing the print head.
- If print quality has declined the next time you print, clean and align the print head.
Documents / Resources
References
Download manual
Here you can download full pdf version of manual, it may contain additional safety instructions, warranty information, FCC rules, etc.
Advertisement


Need help?
Do you have a question about the L8050 Series and is the answer not in the manual?
Questions and answers