
Advertisement
- 1 OVERVIEW
- 2 HYUNDAI VEHICLE OWNER PRIVACY POLICY
-
3
FEATURES AND CONTROLS
- 3.1 SMART KEY OVERVIEW
- 3.2 REMOTE WINDOW OPENING FEATURE
- 3.3 ACCESSING YOUR HYUNDAI
- 3.4 MECHANICAL KEY / EMERGENCY LOCK AND UNLOCK
- 3.5 HYUNDAI DIGITAL KEY
- 3.6 HYUNDAI DIGITAL KEY PAIRING
- 3.7 HYUNDAI CARD KEY / NEAR FIELD COMMUNICATION (NFC)
- 3.8 HYUNDAI DIGITAL KEY / LIMITATIONS
- 3.9 HYUNDAI DIGITAL KEY DOOR LOCK / UNLOCK
- 3.10 TWO PRESS UNLOCK FUNCTION
- 3.11 DRIVER'S DOOR LOCK / UNLOCK WITH TOUCH SENSOR
- 3.12 POWER LIFTGATE (PL) OPERATION CONTROL BUTTONS
- 3.13 HANDS FREE SMART LIFTGATE
-
4
STARTING YOUR HYUNDAI
- 4.1 HIDDEN ASSIST HANDLE
- 4.2 FINGERPRINT AUTHENTICATION SYSTEM
- 4.3 FRONT SEAT ADJUSTMENT - POWERED
- 4.4 RELAXATION COMFORT SEAT
- 4.5 HEADREST ADJUSTMENT
- 4.6 INTEGRATED MEMORY SYSTEM
- 4.7 SEAT EASY ACCESS OPERATION
- 4.8 UV-C STERILIZER SYSTEM
- 4.9 DRIVER'S DOOR MAIN CONTROLS
- 4.10 HEADLIGHTS
- 4.11 TURN AND LANE CHANGE SIGNALS
- 4.12 WIPERS AND WASHER
- 4.13 INSTRUMENT CLUSTER
- 4.14 CLUSTER DISPLAY CONTROL
- 4.15 CLUSTER VIEW MODES
- 4.16 INSTRUMENT PANEL ILLUMINATION
- 4.17 WARNINGS AND INDICATORS
- 4.18 AUTOMATIC CLIMATE CONTROL
- 4.19 HOMELINK WIRELESS CONTROL SYSTEM
- 4.20 WIRELESS SMARTPHONE CHARGING SYSTEM
- 4.21 USB DATA / SMARTPHONE PORT
- 5 INFOTAINMENT
-
6
DRIVING
- 6.1 LANE KEEPING ASSIST (LKA)
- 6.2 LANE FOLLOWING ASSIST (LFA)
- 6.3 FORWARD COLLISION-AVOIDANCE ASSIST (FCA)
- 6.4 BLIND-SPOT COLLISION-AVOIDANCE ASSIST (BCA)
- 6.5 DRIVE MODE
- 6.6 DRIVER ATTENTION WARNING (DAW)
- 6.7 DRIVER ATTENTION WARNING SETTINGS
- 6.8 FORWARD ATTENTION WARNING (FAW)
- 6.9 EMERGENCY STOP (ES)
- 6.10 SMART CRUISE CONTROL (SCC)
- 6.11 DRIVE SELECTOR
- 6.12 REAR CROSS-TRAFFIC COLLISION-AVOIDANCE ASSIST (RCCA)
- 6.13 ELECTRIC PARKING BRAKE (EPB)
- 6.14 AUTO HOLD
- 6.15 REAR VIEW MONITOR (RVM)
- 6.16 PARKING DISTANCE WARNING PDW
- 6.17 REMOTE SMART PARKING ASSIST (RSPA)
- 6.18 DRIVER ASSISTANCE SYSTEM SENSORS
- 7 Scheduled Maintenance for normal usage
- 8 Documents / Resources
OVERVIEW

HYUNDAI VEHICLE OWNER PRIVACY POLICY
Your Hyundai vehicle may be equipped with technologies and services that use information collected, generated, recorded or stored by the vehicle. Hyundai has created a Vehicle Owner Privacy Policy to explain how these technologies and services collect, use, and share this information.
You may read our Vehicle Owner Privacy Policy on the Hyundaiusa.com website at https://www.hyundaiusa.com/owner-privacy-policy.aspx. If you would like to receive a hard copy of our Vehicle Owner Privacy Policy, please contact our Customer Care Center at:
Hyundai Customer Care
P.O. Box 20850
Fountain Valley, CA 92728
800-633-5151
consumeraffairs@hmausa.com
Hyundai's Customer Care Center in English, representatives are available: Monday through Friday, between the hours of 6:00 AM and 5:00 PM PST and Saturday between 6:30 AM and 3:00 PM PST (English).
For Customer Connect Center assistance in Spanish or Korean, representatives are available: Monday through Friday between 6:30 AM and 3:00 PM PST.
WATCH & LEARN

Scan the QR code to view more Hyundai feature videos or go to https://hyundaihowtos.com

To reduce the risk of serious injury to yourself and others, read and understand the important SAFETY INFORMATION your Owner's Manual. Use this Quick Reference Guide to learn about the features that will enhance your enjoyment of your Hyundai. More detailed information about these features are available in your Owner's Manual. Some vehicles may not be equipped with all the listed features.
FEATURES AND CONTROLS
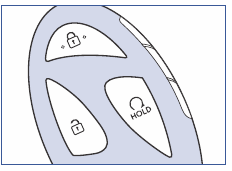
SMART KEY OVERVIEW

 Door Lock
 Door Unlock
 Remote Start
 Panic
Panic
 Power Liftgate Open/Close
Remote Smart Parking Assist (if equipped)
 Forward
 Backward
REMOTE WINDOW OPENING FEATURE
(if equipped)
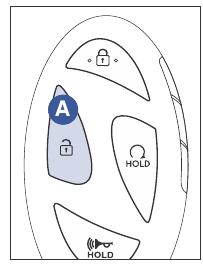
Press and hold the Door Unlock button A on the smart key for more than 3 seconds and the windows move down after the doors are unlocked.
Window movement stops when you release the door unlock button.
 NOTE: The remote window opening feature operates only with the Safety Power Windows equipped.
ACCESSING YOUR HYUNDAI

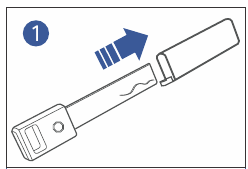
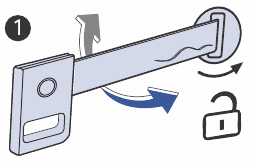
MECHANICAL KEY / EMERGENCY LOCK AND UNLOCK
If the smart key does not operate normally, you can lock or unlock the driver's door by using the mechanical key.
- Remove the key protector
![]()
![]()
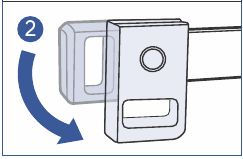
- Turn the knob of the mechanical key
![]()
![]()
- Pull open the driver's door handle
![]()

- Press and hold the release button located inside the cover with a mechanical key
![]()
- Carefully pull out the cover
![]() and insert key into the key cylinder
and insert key into the key cylinder ![]() .
. - Turn the key clockwise
![]() to lock and counterclockwise
to lock and counterclockwise ![]() to unlock.
to unlock.


 and insert
  .
.


HYUNDAI DIGITAL KEY
(if equipped)
Digital Key provides many of the same functions as physical Smart Key:

HYUNDAI DIGITAL KEY PAIRING
(if equipped) To pair your smartphone, complete the following steps:
- Set up your smartphone app profile
First, download the Bluelink App and create your account. For more information about Bluelink, refer to the infotainment system guide. - Register your digital key on your smartphone
- Turn on the vehicle with a smart key and have your smart key with you in the vehicle.
- With the gear in P (Park), from the infotainment system Settings menu, select: Setup > Vehicle > Digital keys > Smartphone key > My Smartphone Key.
- After selecting Digital Key > Set Up Digital Key from the Bluelink App in the smartphone, register the digital key according to the guidance in the smartphone screen.
- Press Save button in the infotainment system to start registration. When the digital key (smartphone) is saved, a message appears on the infotainment system.
HOW TO SET UP HYUNDAI DIGITAL KEY AND MORE
For information on how to set up digital key scan the QR code using your smartphone.

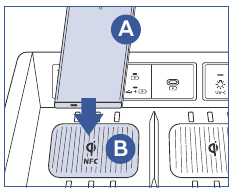
HYUNDAI CARD KEY / NEAR FIELD COMMUNICATION (NFC)
How to register your Hyundai Card Key (NFC key)
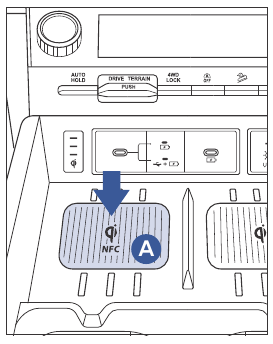
- Have both of your smart keys with you in the vehicle.
- In the infotainment system, select Setup > Vehicle > Digital Keys > NFC Card Key and check whether " Use " is selected.
- Place your card key on the vehicle wireless charging pad
![]() while the engine is on.
while the engine is on. - Register your card key by selecting Setup > Vehicle > Digital Keys > NFC Card Key > Save from the Settings menu in the infotainment system.
 while the engine is on.
HYUNDAI DIGITAL KEY / LIMITATIONS
HYUNDAI Digital Key may not operate if any of the following occurs:
- Smartphone battery or the vehicle battery is discharged.
- NFC or Bluetooth is turned off on the smartphone settings.
- A credit card is near your smartphone.
- Metal or thick smartphone case is used.
- The Card Key is in a wallet or card holder.
- The Card Key overlapped with other cards.
- There is electronic interference by other vehicles, objects, etc.
The vehicle may not be controlled by the smartphone if any of the following occurs:
- The Smart Key is in the vehicle.
- The POWER button is in ACC or ON position.
- Any of the doors, hood and trunk are open.
HYUNDAI DIGITAL KEY DOOR LOCK / UNLOCK
To lock / unlock your vehicle using the paired Digital Key device  , hold the key card up to the center of the door handle

TWO PRESS UNLOCK FUNCTION
If you UNLOCK the doors using the Driver Side Door Handle, either the driver's side door is unlocked or all the doors are unlocked depending on the setting for the Two Press Unlock feature.
Disable/Enable 2 Press Unlock Function: In the infotainment screen press Setup button > Vehicle > Door > Toggle ON/OFF 2 Press Unlock.
If you unlock the doors using the passenger side door handle, all the doors are unlocked always.
DRIVER'S DOOR LOCK / UNLOCK WITH TOUCH SENSOR
(if equipped)
![]() To Unlock (if 2 Press Unlock enabled):
To Unlock (if 2 Press Unlock enabled):

- Grabbing door handle One time will unlock the Driver's door only.
- Grabbing door handle Two times - Unlocks all doors
![]() To Lock: Press the touch sensor on the outside of the handle to lock.
To Lock: Press the touch sensor on the outside of the handle to lock.

 To Unlock (if 2 Press Unlock enabled):


- If you locked the door with the touch sensor on the door handle, the doors cannot be unlocked with the sensor within 3 seconds.
- If you unlocked the door with the touch sensor on the door handle, the doors cannot be locked with the sensor within 2 seconds.
POWER LIFTGATE (PL) OPERATION CONTROL BUTTONS
Smart key: Open/Close Button
When the liftgate is closed, press the power liftgate open button for 1 second. While the liftgate is opening, press the button to stop power liftgate operation.
Instrument Panel: Open/Close Button
When closed, press the power liftgate open button for 1 second. While the liftgate is opening, press the button to stop power liftgate operation. Press and hold the power liftgate Open/Close button to close the liftgate. If you release the button while the liftgate is closing, power liftgate operation will stop with a warning sound for 5 seconds.
Outside the Liftgate: Open/Close Button
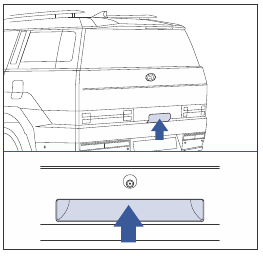
If the vehicle is locked, press the power liftgate open/close button with the smart key in your possession. If the liftgate is unlocked, the liftgate will open or close with a warning sound when the button is pressed without carrying the smart key.
Inside the Liftgate: Open/Close Button
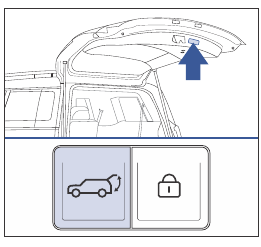
Press the power liftgate open/close button. The liftgate opens or closes automatically.
Inside the Liftgate: PL Lock Button
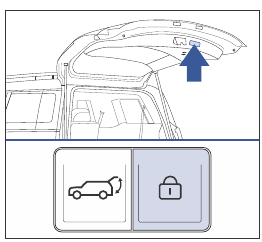
Press the LOCK button while carrying the smart key. The liftgate closes and locks automatically with two confirmation beeps. Additionally, all doors will lock. The liftgate can be closed and locked, and all doors locked only when the button is pressed while the engine is off.
HANDS FREE SMART LIFTGATE
(if equipped)

On a vehicle equipped with a smart key, the liftgate can be opened with hands free activation using the smart liftgate system. To enable Smart Liftgate, go to settings menu in the Infotainment system: Setup > Vehicle > Door > check Smart Liftgate and Power Liftgate.
Hands Free Smart Liftgate Operation
The liftgate can be opened with hands free activation after the below conditions are met:
- After 15 seconds from when all doors are closed and locked.
- Smart key is in your posession and detected in the liftgate area behind the vehicle for 3 seconds.
- The hazard warning lights blink and the chime sounds 6 times, the smart liftgate opens.
NOTE: If you unintentionally enter the detecting area and the hazard warning lights and chime starts, move away from the vehicle with the Smart key. The liftgate remains closed.
Setting the power liftgate
To use each feature, you must select the opening speed or opening height from the settings menu. Deselect the settings when you do not want to use the feature.
Power liftgate opening speed
To adjust the power liftgate speed, in infotainment system, press the SETUP button, and then select Vehicle > Door > Power Liftgate Opening Speed > select Normal or Fast (Default setting is Fast).
Power liftgate opening height
To adjust the power liftgate opening height, in infotainment system, press the SETUP button, and then select Vehicle > Door > Power Liftgate Opening Height > select Full Open or Level 3 or Level 2 or Level 1 or User Height Setting.
User height setting
- Position the liftgate manually to the height you prefer.
- Press the power liftgate open/close button located inside the liftgate for more than 3 seconds.
- Two confirmation beeps will sound.
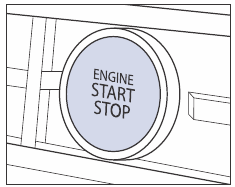
STARTING YOUR HYUNDAI
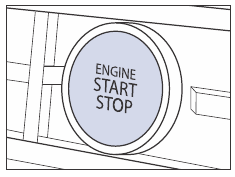
Engine Start / Stop Button
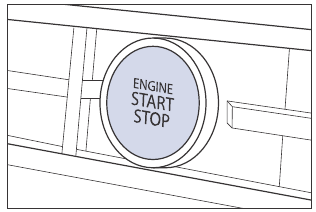
With the ignition OFF and foot OFF of the brake pedal, press the Engine Start / Stop button:
- ACC mode: first press
- ON mode: second press
- OFF: third press
Starting The Engine Remotely
SMART KEY
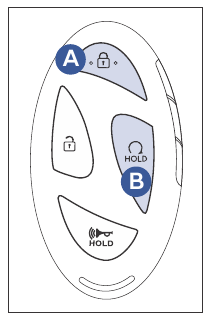
- Press the Door Lock button
![]() on the smart key. You must be within 32 ft. from the vehicle.
on the smart key. You must be within 32 ft. from the vehicle. - Press and hold the Remote Start button
![]() within 4 seconds from when you have pressed the Door Lock button
within 4 seconds from when you have pressed the Door Lock button![]() . The hazard warning lights blink and the engine starts.
. The hazard warning lights blink and the engine starts.
To turn off the engine, press the Remote Start button![]() once.
once.
SMART PHONE APP
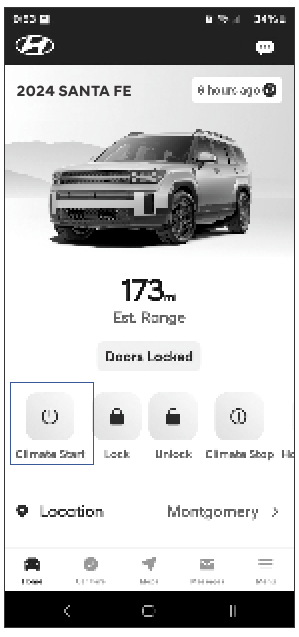
This feature enables you to remotely start your vehicle from virtually anywhere. You can also set the ACC temperature, activate heated / ventilated seats (if equipped) and turn on the front window defroster, ensuring a warm or cool car is ready to go when you are.
To use this feature, you must have a Bluelink Personal Identification Number. To create or change your PIN, log on to www.MyHyundai.com. Refer to BlueLink User's Manual for more information.
SETTING UP YOUR BLUELINK ACCOUNT

Starting The Engine
To start the engine in any mode ACC/ON/OFF:
- depress brake pedal
- press Engine Start/Stop button
- while using one of the following options:
SMART KEY
To start the engine, you must have Smart Key in your posession. You can leave your smart key in your pocket or purse when you start your vehicle.
DIGITAL KEY - SMARTPHONE
You can start the engine, if you have placed your paired Smart Phone  with set up Hyundai Digital key on Authentication Pad
  .
.
DIGITAL KEY - HYUNDAI CARD KEY
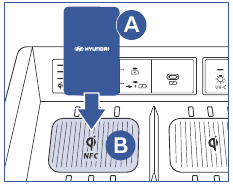
You can start the engine, if you have placed your paired Hyundai Card Key on Authentication Pad .
FINGERPRINT AUTHENTICATION
You can start the engine, if you have registered your fingerprint in the User profile and previously verified your fingerprint by placing your finger on fingerprint sensor.
NOTE: If you overlap and use the key card with other NFC-enabled cards such as a transportation card or credit card, it will not work. For security reasons, the vehicle can only have one NFC key card paired to it at one time. Any time that a new NFC key card is paired to the car it will disable the previously paired NFC key card.
Shutting Down The Engine
To shut the engine OFF:
- Stop the vehicle and depress the brake pedal fully.
- Make sure the gear is in P (Park).
- Press the Engine Start/Stop button to the OFF position.
- Take the key with you when you leave the vehicle.
Emergency Situations
Shutting Off the Engine while Driving
- Press and hold the Engine Start/Stop button for more than 2 seconds.
- Or rapidly press and release the Engine Start/Stop button 3 times within 3 seconds.
Restarting the Engine while Driving
If the vehicle is still moving, you can restart the vehicle without depressing the brake pedal by pressing the Engine Start/Stop button with the gear in the N (Neutral) position.
When Smart Key is not working properly
If the smart key battery is weak or the smart key does not work correctly, press the Engine Start/Stop button with the smart key.

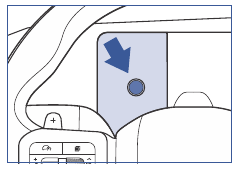
HIDDEN ASSIST HANDLE
(if equipped)
Handle can be used to assist with access loading cargo onto the roof rack.

- Lock or Unlock: You can lock or unlock the Hidden Assist Handle by turning the lock mechanism
![]() using either the mechanical key which comes with the vehicle or a small flat head screwdriver.
using either the mechanical key which comes with the vehicle or a small flat head screwdriver. - Expose the Handle: Press the lower part marked
![]() on the cover to reveal the hidden assist handle.
on the cover to reveal the hidden assist handle. - After Use: When done, press the upper part marked
![]() to return the cover to its original position.
to return the cover to its original position.
 using either the mechanical key which
  on the cover to
  to return the
 Scan To Learn About Hidden Assist Handle

FINGERPRINT AUTHENTICATION SYSTEM
(If equipped)
Fingerprint authentication system provides convenient features
- starting the engine
- accessing personal information
- unlocking profile
- exiting valet mode
- making electronic payment (Hyundai Car pay)

A fingerprint must be registered in the User Profile settings from the infotainment system to use the system. The maximum of two fingerprints can be registered. Driver 1 and Driver 2 can register one fingerprint each.
Fingerprint linked features can be turned ON or OFF from the Settings menu. Press the SETUP button, and then select: User Profile > Driver 1 > Fingerprint Identification.
Registering Fingerprint
- Turn ON the vehicle with a smart key. Have both of your smart keys with you in the vehicle.
- Press the SETUP button, and then select User Profile > Driver 1 > Fingerprint Identification > Set/Delete Fingerprint > Set in the infotainment system.
- Place your finger that you wish to register on the fingerprint sensor according to the instruction.
- Following the instructions, place several parts of your fingerprint until the scanning process is complete.
- Once the " Saving fingerprint.... " appears and the fingerprint registering process is proceeded.
- When the fingerprint registering process is completed in the vehicle, the status is displayed on the infotainment system.
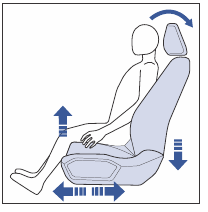
FRONT SEAT ADJUSTMENT - POWERED
(if equipped)

RELAXATION COMFORT SEAT
(if equipped)
Relaxation comfort seat helps distribute body pressure and concentrated weight on specific body parts that occur while sitting in the same position for a long period of time. The seat helps relieve fatigue and discomfort by providing the optimal sit position.
Using The Relaxation Comfort Seat
To activate relaxation comfort seat, press the rear portion  of the switch for more than 0.5 seconds while satisfying the relaxation operating conditions. The seat moves to the relaxation position:
- The seat cushion moves forward or rearward automatically.
- The seat cushion and seatback angle are adjusted.

Even when the relaxation comfort seat is operated by others, the additional adjustment is possible by pressing relaxation comfort seat switches.

Returning to the original seat position
Press the front portion of the switch  for more than 0.5 seconds while the seat is in the relaxation comfort seat position, the seat return backs to the original position.
NOTE: The driver seat returns to the original position when the gear was in P (Park).
HEADREST ADJUSTMENT

To RAISE the headrest just pull the headrest up.
To LOWER the headrest press the lock button while pressing down on the headrest.
INTEGRATED MEMORY SYSTEM
(if equipped)
Integrated Memory System for the driver's seat is provided to store and recall the following memory settings with a simple button operation:

- Driver's seat position
- Side view mirror position
- Head-Up Display (HUD) position (if equipped)
Storing memory positions
- Make sure the Engine Start/Stop button is in the ON position and the gear is in P (Park).
- Adjust the driver's seat and side view mirror to the desired position.
- Adjust the Head-Up display to desired position (if equipped).
- Press and hold one of the memory buttons (1 or 2). The system beeps once when successfully stored. "Settings 1 (or 2) saved" appears on the infotainment system.
Recalling memory positions
- Make sure the Engine Start/Stop button is in the ON position and the gear is in P (Park).
- Press the desired memory button (1 or 2). The system beeps once and then the driver's seat position, side view mirror and Head-Up display position are automatically adjusted to the stored positions. "Driver 1 (or 2) settings applied" appears on the infotainment system.
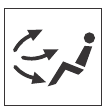
SEAT EASY ACCESS OPERATION
(if equipped)
You can set the Seat Easy Access feature from the Settings menu in the infotainment system.
Press the SETUP button, and then select: Vehicle > Seats > Seating Easy Access > Driver seat easy access > Extended / Normal / Off.
Exiting the vehicle (driver seat): The driver's seat moves rearward when the Engine Start/Stop button is in the LOCK/OFF position with the gear in P (Park) and the driver's door open.
Entering the vehicle (driver seat): The driver's seat moves forward when the Engine Start/Stop button is in the ACC, ON or START position or while carrying the smart key, the driver's door is closed with the Engine Start/Stop button in the LOCK/OFF position.
UV-C STERILIZER SYSTEM
(if equipped)
The passenger seat multi tray is equipped with an antibacterial sterilization system for personal belongings.

Using UV-C sterilizer system
- Press the UV-C tray open button
![]() to open the UV-C tray while the engine is running.
to open the UV-C tray while the engine is running. - Place the item in the tray.
- Close the tray cover and press the UV-C sterilizer system button
![]()
 to open the UV-C tray while the
- UV-C sterilizer system indicator light
![]() lluminates.
lluminates. - UV-C LED is turned on and sterilization begins.
- After 10 minutes, the UV-C indicator light
![]() turns off as sterilization is complete.
turns off as sterilization is complete.
 lluminates.
 NOTE:
- Within 10 minutes, up to 99.9% of germs on the surface can be removed.
- Only place the item which requires sterilization. Storing other items in the storage box may reduce the sterilization effect.
- UV-C sterilizer system does not guarantee 99.9% sterilization. The sterilization effect varies depending on the degree of exposure to UV-C light and the shape of the item. For effective use, change the position of the item and run additional sterilization.
This product emits ultraviolet rays. Do not gaze upon the UV rays while using the product. Exposing the eyes or skin to UV rays may have harmful effect to the body.
DRIVER'S DOOR MAIN CONTROLS

Outside Rearview Mirror
Press switch  to unfold/fold mirrors. Using switch
  , press the L (left)
  or R (right)
  button to adjust the mirror by using the directional switch
  . After adjustment, press switch to the middle to prevent unintended adjustment.
Door Lock
Press UNLOCK switch , all doors unlocks. Press LOCK switch
  , all doors locks.
Window Switches
FRONT LEFT (driver's) window switch  .
.
FRONT RIGHT window switch  .
.
REAR LEFT window switch  .
.
REAR RIGHT window switch 1 .
.
1st detent position - manual adjustment: press or pull up and hold window switch DOWN to OPEN or UP to CLOSE. Release button when you want the window stop in desired position.
2nd detent position - auto up / down: press or pull up switch once to the second detent position. This will completely lifts or lowers window. To stop the window at the desired position while the window is operating, pull up or press down and release the switch.
Power Window Lock Button
Press Power Window Lock  Button to Disable the power window switches on the rear passenger doors.
HEADLIGHTS

Headlight delay function
You can enable the headlight delay function from the Settings menu in the infotainment system. Press the SETUP button, and then select Vehicle > Lights > Headlight Delay.
If you place the Engine Start/Stop button to the ACC or OFF position with the headlights ON , the headlights (and/or parking lights) remain ON for about 5 minutes. If the driver's door is opened and closed, the headlights are turned off after 15 seconds.
The headlights (and/or parking lights) can be turned off by pressing the lock button on the smart key twice or turning the headlight switch to the OFF or AUTO position.
Flashing headlights

To flash the high beam headlight:
- pull the lever toward you
- then release the lever.
The high beam remains ON as long as you hold the lever.
High beam
- To turn high beam ON, push1the lever away from you.

- To turn high beam OFF, pull the lever towards you.


High Beam Assist (HBA)
High Beam Assist automatically adjusts the headlights between high beam and low beam depending on the light detected from oncoming vehicles or vehicles in front using the front view camera.
With the Engine Start/Stop button in the ON position, press Setup button and select Vehicle > Lights > High Beam Assist from the Settings menu to enable High Beam Assist (or deselect to disable the function. )
- Select AUTO position on lever
![]()

- Turn the high beam ON by pushing the lever
![]() away from you.
away from you.

High Beam Assist indicator will illuminate![]()
High Beam Assist system will turn ON when vehicle speed is above 20 mph. - To turn High Beam Assist OFF temporary, pull the lever toward you.


 away from

TURN AND LANE CHANGE SIGNALS

One touch turn signal
To use One Touch Turn Signal, push the turn signal lever up or down to position  and then release it. The lane change signals blinks 3, 5 or 7 times.
You can enable the One Touch Turn Signal function or choose the number of blinking from the Settings menu in the infotainment system. Press the SETUP button, and then select Vehicle > Lights > One Touch Turn Signal > Off/3 flashes/5 flashes/7 flashes.
WIPERS AND WASHER

Intermittent Wipe Time Adjustment

Windshield Washer

Pull the lever gently toward you to spray washer fluid on the windshield and to run the wipers 1 - 3 cycles.
The spray and wiper operation continues until you release the lever. If the washer does not work, you may need to add washer fluid to the washer fluid reservoir.
Rear Window Wipers and Washers

Auto Rear Window Wiper
The rear wiper operates while the vehicle is in REVERSE (R) with the front wiper ON. You can select the function from the settings menu in the infotainment system.
Press the SETUP button, and then select Vehicle > Convenience > Auto Rear Wiper (in R).
INSTRUMENT CLUSTER

TYPE A
- Tachometer 1 1
- Speedometer
- Engine coolant temperature gauge 4 1
- Fuel gauge 5
- Warning and indicator lights
- Cluster display
- Outside temperature gauge
- Odometer
- Distance to empty 10 1
- Transmission shift indicator
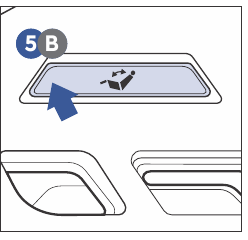
TYPE B

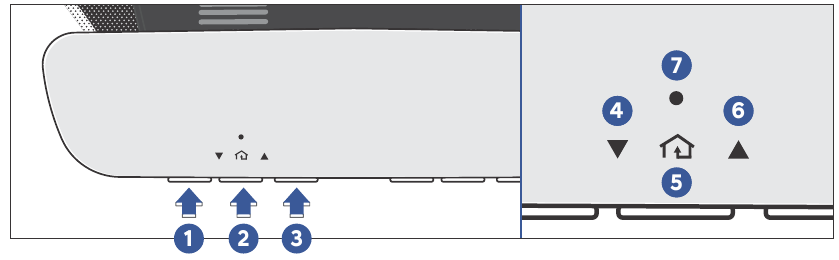
CLUSTER DISPLAY CONTROL

![]() MODE button
MODE button
for changing modes![]() MOVE switch
MOVE switch
for changing items- OK SELECT/RESET button
for setting or resetting the selected item


CLUSTER VIEW MODES
Driving Assist View Mode with Additional Information

MSLA/LKA/SCC/LFA/HDA
Displays the state and the current operation condition of Manual Speed Limit Assist, Lane Keeping Assist, Smart Cruise Control, Lane Following Assist, Highway Driving Assist (if equipped).
Turn By Turn Mode (TBT)

Displays TURN-BY-TURN navigation and distance / time to destination appear.
Utility View Mode
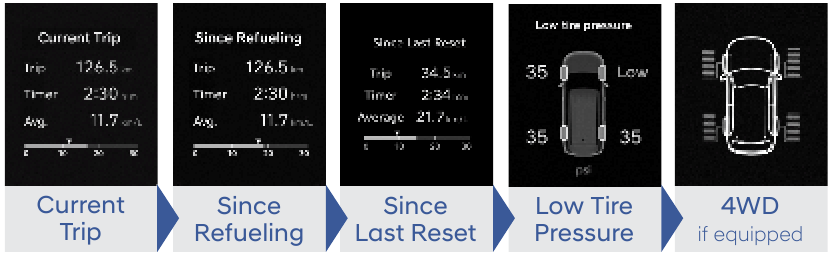
Cluster Display Messages

Displays the service interval and warning messages.
User Settings

Select options for settings:
- Driver Assistance
- Drive Mode
- Climate
- Seat
- Lights
- Door
- Digital Keys
- Convenience
INSTRUMENT PANEL ILLUMINATION

When the vehicle's parking lights or headlights are on, press the illumination control switch + or - to adjust the brightness of the instrument panel illumination. The interior intensity is also adjusted.
WARNINGS AND INDICATORS
*IF EQUIPPED

AUTOMATIC CLIMATE CONTROL
(if equipped)

- Driver's temperature control
- AUTO (automatic control)
- Driver seat set temperature
- Passenger's temperature control
- SYNC
- Passenger seat set temperature
- Fan speed control
- Mode selection
- Front/Rear control selection
- OFF
- A/C (air conditioning)
- Air intake control
- Front windshield defroster
- Rear window defroster
- Steering Wheel Heater
- Front Seat Warmers
- Front Seat Air ventilation
Defogging / Defrosting
- Press the A/C button. Indicator light turns ON.
![]()
- Press the front windshield defroster button. Indicator light turns ON.
![]()


- Set warmest temperature.
![]()
- Set the fan speed to the highest speed.
![]()
- The outside (fresh) air mode is selected automatically.
![]()

System OFF

Pressing the OFF button will place the system in the OFF mode:
- Climate control fan will turn off.
- Outside (fresh) air position will be selected.
- Vented air will be at last set temperature.
NOTE: To reduce tendency of the glass fogging and also to improve visibility, keep the interior surface of the windshield clean by wiping it with a clean cloth and glass cleaner. In addition, select air intake control to the outside (fresh) air position whenever possible while operating the vehicle.
Automatic heating and air conditioning
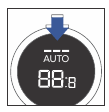
Press the AUTO button. The modes, fan speeds, air intake, and air conditioning are controlled automatically by the temperature setting. Turn the temperature control knob left or right to set the desired temperature.
Auto fan speed control in Automatic Mode
You can control the fan speed in three stages by pressing the AUTO button during automatic operation.

HIGH:
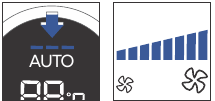
Provides rapid air conditioning and heating with the maximum fan speed setting.
MEDIUM:
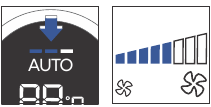
Provides air conditioning and heating with the mid-level fan speed setting.
LOW:
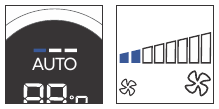
Fan speed is set to the lowest setting range.
NOTE: If the temperature is set to either HI or LO , the fan speed setting will be HIGH. For detailed precautions and instructions, see the Owner's Manual.
Manual heating and air conditioning
Air intake control
LED ON recirculated air position
LED OFF outside (fresh) air position
Mode selection
The MODE selection button controls the direction of the air flow through the ventilation system as follow:

SYNC button
Adjusting the temperature equally

Press the SYNC button (indicator light ON) to adjust the driver and passenger side temperature equally.
Adjusting the temperature individually
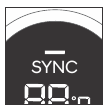
Press the SYNC button (indicator light OFF) again to adjust the driver and passenger side temperature individually.
Steering Wheel Heater (if equipped)
OFF

- Each time you press the heated steering icon, the temperature changes as follows: OFF > LOW > HIGH
LOW

- When the Engine Start/Stop button is in the ON position or when the engine is running, press the steering wheel heater button to warm the steering wheel.
HIGH

- When HIGH is manually selected, the heated steering wheel automatically changes to the LOW position after 30 minutes.
Air Conditioning Auto-drying
The Air conditioning auto-drying feature dries the moisture in the air conditioner and reduces air conditioner odor. The blower motor automatically operates 30 minutes after the engine is turned off. The feature can be turned ON and OFF from the infotainment system by selecting: Vehicle > Climate > Climate Features > A/C Automatic Drying.
Auto Defogging System (if equipped)
The Auto defogging reduces the possibility of fogging up the inside of the windshield by automatically sensing the moisture on inside the windshield. If high amount of humidity is detected in the vehicle, the Auto defogging system is enabled and the  indicator illuminates.
Turning Auto Defogging System ON:
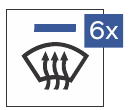
- Press the front windshield defroster button for 3 seconds.
- The defroster button indicator blinks 6 times.
Turning Auto Defogging System OFF:
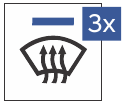
- Press the front windshield defroster button for 3 seconds.
- The defroster button indicator blinks 3 times.
Auto Defogging System can be turned ON and OFF from the infotainment system, select Vehicle > Climate > Defog/Defrost Options > Auto Defog.
Clean air system (if equipped)
Indoor fine dust concentration is measured by the fine dust sensor. If the indoor air status is poor, the clean air system cleans the indoor air by air conditioning, ventilating, and increasing fan speed. The air status is presented with the four levels as below:

HOMELINK WIRELESS CONTROL SYSTEM
(if equipped)
 HomeLink Channels: 1 / 2 / 3
 Garage Door Opener Status Indicator: Closing or Closed
 HomeLink Operation Indicator
 HomeLink User Interface Indicator
STEP 1: Press and release button or
or  . 1 1 2
- If the indicator
![]() illuminates and shows ORANGE light, go to Step 3 - Programming Mode.
illuminates and shows ORANGE light, go to Step 3 - Programming Mode. - If the indicator
![]() illuminates and shows a solid or flashing GREEN light, go to Step 2 - Erasing Mode).
illuminates and shows a solid or flashing GREEN light, go to Step 2 - Erasing Mode).
STEP 2: Erasing Mode - Press and hold the button you wish to program for approximately 15-25 seconds until the LED flashes in ORANGE for several times.
STEP 3: Programming Mode - While the HomeLink indicator light  is flashing ORANGE , press and hold the handheld remote button until the HomeLink indicator light changes from ORANGE to GREEN. You may now release the handheld remote button.
STEP 4: Wait until your garage door comes to a complete stop, regardless of position, before proceeding to the next steps.
STEP 5: Press and release the HomeLink button you are programming and observe the indicator light:
- If the indicator light
![]() remains solid GREEN , your device should operate when the HomeLink button is pressed. At this point, if your device operates, programming is complete.
remains solid GREEN , your device should operate when the HomeLink button is pressed. At this point, if your device operates, programming is complete. - If the indicator light
![]() rapidly flashes GREEN , firmly press, hold for 2 seconds and release the HomeLink button up to three times in a row slowly to complete the programming process. Do not press the HomeLink button rapidly. At this point if your device operates, programming is complete. If the device does not operate, continue with step 6.
rapidly flashes GREEN , firmly press, hold for 2 seconds and release the HomeLink button up to three times in a row slowly to complete the programming process. Do not press the HomeLink button rapidly. At this point if your device operates, programming is complete. If the device does not operate, continue with step 6.
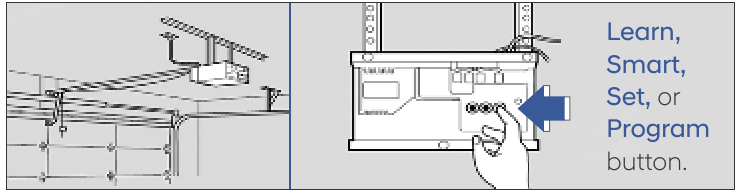
STEP 6: Rolling Code Programming - At the garage door opener motor, (security gate motor, etc.) locate the 'Learn', 'Smart', 'Set' or 'Program' button. This can usually be found where the hanging antenna wire is attached to the motor-head unit (see the device's manual to identify this button). The name and color of the button may vary by manufacturer.
STEP 7: Firmly press and release the 'Learn', 'Smart', 'Set' or 'Program' button. You now have up to 30 seconds in which to complete the next step.
STEP 8: Return to the vehicle, firmly press, hold for 2 seconds and release, the HomeLink button up to three times in a row slowly. Do not press the HomeLink button rapidly. As soon as you see the garage door start to move, stop pressing any buttons until a few seconds after the garage door has come to a complete stop, regardless of position. At this point, programming is complete and your device should operate when the HomeLink button is pressed and released.
Two-Way Communication
Some new garage door openers come equipped with a two-way communication feature. If your garage door opener has this feature, please also continue to follow the STEP 6: Rolling Code Programming steps.

For more information and programming tips communication please visit www.homelink.com/compatible/twowaycommunication or call (800)-355-3515.
For information scan the QR code using your smartphone.

WIRELESS SMARTPHONE CHARGING SYSTEM

There is a wireless smartphone charging system inside the front console. The system will operate when all doors are closed, and the ignition switch is in the ACC/ON position.
Turn on the wireless charging function from the Settings menu in the infotainment system. Press the SETUP button, and then select Vehicle > Convenience > Wireless Charging System for Mobile Devices.
Place the smartphone on the center of the wireless charging pad. The indicator light is ORANGE when the smartphone is charging and turns BLUE when phone charging is complete.
NOTE: Wireless charging pad will stop working when the driver's door is open. When the door is closed, the wireless charging pad will resume charging your phone again.
NOTE: The wireless cellular phone charging system supports on the ly Qi-enabled cellular phones  .
.
NOTE: Do not place any metallic items such as coins, keys on the charger. Avoid putting credit cards, etc. on the charger as they might get damaged by the magnetic field.
USB DATA / SMARTPHONE PORT

Front Panel USB ports
The left side USB data port  can toggle between charging or data connection while charging. Press button top part 2 for charging only. Press button bottom
 to listen to music or connect to Android Auto / Apple CarPlay. The right side USB port
  is for charging only.
2nd Row Passenger USB ports
Each front seat is equipped with one USB port for charging only located on side of the seat toward to 2nd row seat passengers.
INFOTAINMENT
BLUETOOTH® PHONE PAIRING

- Park the vehicle at a safe place before connecting a Bluetooth device to the system. Shift gear to P (Park) position.
- On the Home screen, press Setup
![]() > Device Connections
> Device Connections ![]() > Add New 3
> Add New 3![]() .
. - Turn on Bluetooth on your smartphone to connect and select the vehicle system name from the list of searched devices. The Vehicle name
![]() can be found in the Add New Device window that pops up.
can be found in the Add New Device window that pops up. - Confirm that the authentication code on smartphone screen matches the code on the vehicle system screen, and approve the connection on the device.
- When your smartphone is using Bluetooth communication, to download contacts from the phone to the system or use the text message notification, allow access to your phone.
- Enable AA/CP on smartphone screen and vehicle touchscreen.
![]()
 > Device Connections
  > Add New

Pairing tutorials, phone compatibility and operational tips can be found through the Smart QR code using the QR reader application on your Smartphone.

BLUETOOTH® AUDIO QUALITY TIPS
Ensure Bluetooth device volume is set to 100% for optimal audio quality. To adjust volume to your preference, utilize the head unit knob or steering wheel control. When placing a call, reduce the volume of the head unit if distortion or echoing is present.
In the following situations you or the other party may have difficulty hearing each other:
- High level volume may result in distortion and echo. Keep the Bluetooth volume low.
- When driving on a rough road, high speeds and/or with the window open.
- When the air conditioning vents are facing the microphone and/or when the air conditioning fan is at the max speed.
ANDROID AUTO ™
Requirements for Wireless or Wired Connection (if in use)
- any compatible phone with OS Android™ 11.0 and 5 GHz Wi-Fi support
- data plan with applicable feature(s).
- USB cable connection – OS Android™ 5.0 or higher
- phone manufacturer's USB cable
Before You Begin
- Android Auto features may operate differently than on your phone ™.
- Message and data char ges may apply when using Andr oid Auto ™.
- Android Auto relies on the performance of your phone. ™ If you experience performance issues:
- Close all apps and then restart them.
- Disconnect and then reconnect your phone.
- Using the USB cable that was pr ovided with your phone is recommended.
Dual Voice Recognition
- Pressing Voice Recognition button once will use vehicle onboard for requests.
- Pressing and Holding Voice Recognition button will use Android Auto for requests. ™
Phone Setup
- Turn on Bluetooth® on your phone
- Connect the micro USB cable to your phone and the USB port on the vehicle.
- Phone will prompt you to download the Android Auto™ app and update other needed apps (e.g. Google Maps™, Google Play Music™, Google Now™).
NOTE:
- Vehicle must be parked.
- Location mode setting should be set to High accuracy.
- Car and phone setup should be completed in one sitting. If phone setup needs to be resumed, recommend to Force Stop the Android Auto™ app on the Phone then reopen the app and accept the Disclaimer notifications.
Car Setup / Using Android Auto with a USB cable
- Make sure that vehicle USB port is set to data connection. Please, see Front Panel USB ports information.
- Connect a smartphone to the USB port on the vehicle by using the provided USB cable.
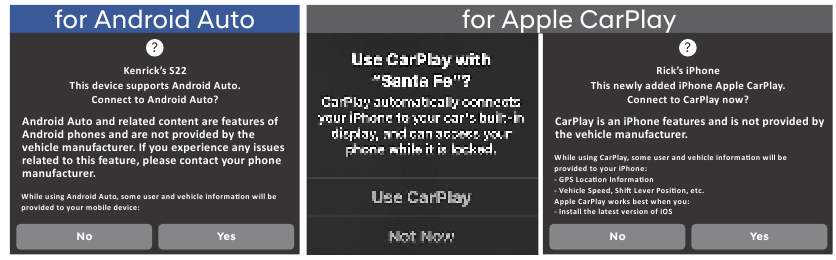
- When you have connected to the Android Auto for the first time, check the pop-up window displayed on system screen and press Yes.
- Agree to Enable Android Auto from the smartphone.
- Press Android Auto from the Home screen , and use a variety of features available on your smartphone.
For more information on how to operate Android Auto, please refer to your display audio or navigation manual. For additional Android Auto support, please refer to the Android Auto support website https://support.google.com/androidauto/.
ANDROID AUTO SUPPORT
Scan to learn more about new and existing features on your Hyundai with "How-To" guides.

APPLE CARPLAY ™
Requirements for Wireless or Wired Connection (if in use)
- Latest iOS
- iPhone 5 or above
- Data plan for applicable features ®
- Apple Lightning / Apple-certified cable (if using wired connection) .
Your iPhone Setup
- Go to Settings > General > CarPlay to allow CarPlay access.
- Go to Settings > Siri and ensure Siri is turned ON.
Car Setup / Using Apple CarPlay with a USB cable
- Make sure that vehicle USB port is set to data connection. Please, see Front Panel USB ports information.
- Connect an iPhone to the USB port on the vehicle by using the provided USB cable.
- When you have connected to the Apple CarPlay for the first time check the pop-up window displayed on system screen and press Yes.
- Agree to Enable Apple CarPlay from the iPhone.
- Press Apple CarPlay from the Home screen , and use a variety of features available on your iPhone.
APPLE CARPLAY™ SUPPORT
Scan to learn more about new and existing features on your Hyundai with "How-To" guides.

BLUETOOTH® OPERATIONAL TIPS
Steering wheel Bluetooth® control

- VOICE RECOGNITION BUTTON Activates voice recognition of a connected smartphone:
- a SHORT press activates system voice recognition on vehicles equipped with navigation.
- a LONG press activates the smartphone VR, if connected.
- CALL/ANSWER/CALL END
Answer a call or end a call. Press and hold to reject an incoming call. - CUSTOM Use a custom function. Press and hold to access the Custom Button settings screen. Tap to select the programmed function.
Making a call using voice recognition: 
The menu tree identifies available voice recognition Bluetooth® functions.
CALLING BY NAME:
- Press the Voice Recognition button
![]() .
. - Say the following command:
 .
.- " Call <John> ": Connects the call to John.
- " Call <John> <on Mobile/at Work/at Home> ": C onnects the call to John's Mobile, Home, or at Work phone number.
DIALING BY NUMBER:
- Press the Voice Recognition button
![]() .
. - Say " Dial Number "
- Say " Desired phone number "
For the complete list of commands, please refer to your Owner's Manual.
Note: Vehicles without Navigation require a compatible Apple or Android phone connected to the USB port to use the Voice Recognition button on the steering wheel. If connected via Bluetooth you cannot place a call using VR, you can only accept and end a call.
AUDIO MODE

Press POWER button to turn radio ON.
Tuning/listening To Channels
- On the control panel, press the MEDIA button
![]()

- On the Media Home screen
![]() , press desired band FM/AM/SXM.
, press desired band FM/AM/SXM. - Press the search backward SEEK or forward TRACK button
![]() to search desired channel.
to search desired channel.
![information]() NOTE: A clear view of the southern sky is recommended to ensure SXM radio reception.
NOTE: A clear view of the southern sky is recommended to ensure SXM radio reception.
 , press desired band FM/AM/SXM.
 to
to Setting Preset Memory Buttons (FM/AM/SXM )
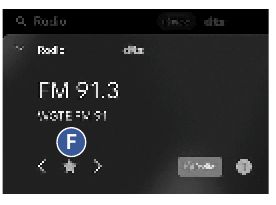
On the Media Home screen  , press and hold any star icon button
  until an audible beep is heard to store current channel.
Radio channels are saved to Favorites screen. To display Favorites screen, on Media home screen  , select Favorites
  .
.
FM RADIO
Radio Noise Control Mode

- Press the Menu button
![]() .
. - Press the Radio Noise button
![]() .
. - Select Radio Noise Control Mode
![]() or
or ![]() as your preference.
as your preference.
※ Default: Minimum Noise Reduction![]() .
.
 .
. .
.
 as your preference.
 .
.SOUND SETTINGS
The sound settings for various system and phone levels can be adjusted. To configure sound settings, press Setup > Sound, and the Sound Settings screen will appear. Configure the settings as needed.
NOTE: For more information on specific setting, refer to Online Manual.
Adjusting The Sound Control
On the control panel, press SETUP button and select Sound > Position. Touch on-screen arrows to adjust desired setting.

NOTE: Users can set the volume level of each source (FM, AM, SXM, USB, BT and etc.) individually by adjusting the  knob.
knob.
When the volume of a source is adjusted to the desired level, it will be automatically saved at that setting. Thus, when the user changes source and reverts back, the volume will be set at the last desired level.
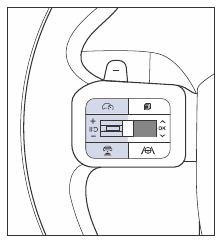
STEERING WHEEL AUDIO CONTROL

 VOLUME
Raises or lowers the speaker volume. Press to Mute.
 SEEK / PRESET Changes the station. Fast forward / rewind smartphone media (as set in the app).
 MODE Changes the audio source.
 MUTE Press the volume control to MUTE. Press the volume control again to UNMUTE.
NAVIGATION
Basic features on the map screen

- Redirects to the Search screen.
- Change the map display mode.
- Adjust the nav. sound volume.
- Set the map scale change mode.
- Zooms in or out of the map.
- Displays the system information.
- Displays the list of menu.
- Displays the detailed guidance.
- Displays the next point to change the driving direction.
- Displays the point to change the driving direction.
- Displays the rest or service areas on the route.
- Displays the lanes in different colors.
- Stops the route guidance.
- Shows the remaining distance to the destination and the estimated time of arrival or remaining time to the destination.
- Displays the current location or destination information.
Destination search screen

- Enter POI, address via keyboard (vehicle in Park (P)) or Voice.
- You can search by Previous Destinations here.
- You can search by Nearby Points of Interests (POIs).
- You can store saved addresses (Home, Work, an other POIs here.
HYUNDAI PAY
What is Hyundai Pay?
A new subscription service that seamlessly enables payments for services and items direct from the vehicle.
In its initial introduction, Hyundai Pay provides Hyundai Owners with the capability to make purchases for Parking, Charging (for EV vehicles) and Fueling (for ICE vehicles) from within the vehicle. Think of it as a wallet on wheels.
To join Hyundai Pay, perform the following steps:


- Download Hyundai BlueLink app or go to MyHyundai.com, log in or create a new BlueLink account, if you do not have one yet.
- In the app, find Utilities.
- Select Hyundai Pay.
- Follow Hyundai Pay Registration steps:
- Link your vehicle
- Add your Credit or Debit card
- Select the Merchants you wish to make purchases with via Hyundai Pay
When complete, you are now ready to use Hyundai Pay in the vehicle.
To use Hyundai Pay Parking in the vehicle, perform the following steps:
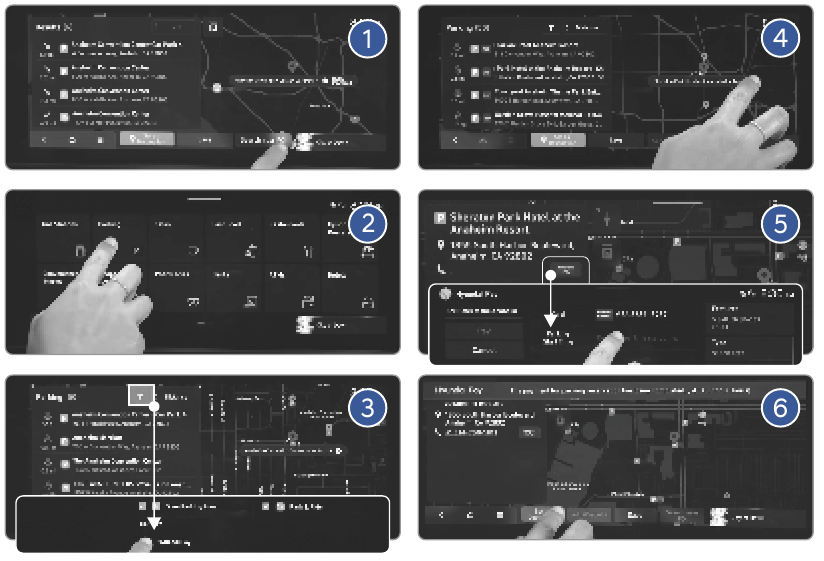
- Input destination location and search for POI near destination
- Select parking
- Filter parking results with Hyundai Pay
- Select participating Hyundai Pay garage
- Reserve parking
- Set reserved parking as destination
DRIVING
LANE KEEPING ASSIST (LKA)
")
Lane Keeping Assist is designed to help detect lane markings or road edges when the vehicle speed is above 40 mph and the LKA indicator is green displayed in the instrument cluster. LKA will not operate properly if the lane line is not clear, sharp bend in the road, or in heavy fog. The system will warn the driver if the vehicle leaves the lane without using the turn signal.
With the engine on, press the SETUP button, and then select Vehicle > Driver Assistance > Driving Safety > Lane Safety in the infotainment system. If Lane Safety is selected, LKA automatically assists the driver's steering when lane departure is detected to help prevent the vehicle from moving out of its lane.
To turn function ON, press and hold the Lane Driving Assist  button for about 2 seconds located on the steering wheel. The
  indicator light will illuminate on the cluster. Press and hold the button again to turn OFF the system. Refer to the Owner's Manual for more detailed information.
LANE FOLLOWING ASSIST (LFA)
")
Lane Following Assist helps detects lane markings and/or a vehicle ahead on the road, and helps center your vehicle in the lane. LFA helps to assist the driver steering to help keep the vehicle centered in the lane.
To enable LFA while driving, press and release the Lane Driving Assist button  on the steering wheel.
Operating conditions
When LFA is activated, the indicator  on the cluster will illuminate. The color of the indicator will change depending on the condition of LFA.
- Green: When LFA assist the steering
- White: When LFA can not assist the steering
FORWARD COLLISION-AVOIDANCE ASSIST (FCA)
Forward Collision-Avoidance Assist helps detect a vehicle, a pedestrian, or a cyclist ahead on the road. The function may warn you with a warning message and an audible warning if a collision is imminent. If necessary, it may assist with braking your vehicle to help reduce collision speed and avoid a collision.
")
With the engine on, press the SETUP button, select Vehicle > Driver Assistance > Driving Safety to set whether to use each function.
If "Forward Safety" is deselected, Forward Safety will turn off. The warning light  will illuminate on the cluster.
NOTE: Please refer to your Owner's Manual for further information.
BLIND-SPOT COLLISION-AVOIDANCE ASSIST (BCA)
Blind-Spot Collision-Avoidance Assist helps detect approaching vehicles in the driver's blind spot areas and warn you of a possible collision with a warning light and a warning sound.
")
With the engine on, press Setup button, select Vehicle > Driver Assistance > Driving Safety > Blind Spot Safety. If Blind-Spot Safety is selected, BCA Assist warns the driver with a warning message, an audible warning depending on the collision risk levels. Braking assist is applied for parking exit depending on the collision risk levels.
If the vehicle is turned on, when "Blind-Spot Safety" is selected, the warning light on the side view mirror blinks for three seconds.
The Warning Methods can be set from the infotainment system, select Setup > Vehicle > Driver Assistance > Warning Method:
> Warning Volume: Adjusts the volume of the warning sound.
> Haptic Warning: Activate the steering wheel vibration warning.
The Warning Volume and Haptic Warning cannot be turned off at the same time. When one of the warning is turned off the other is activated.
DRIVE MODE
The drive mode may be selected according to the driver's preference or road conditions. The system resets to NORMAL MODE, when the engine is restarted.

Whenever the DRIVE MODE switch is pushed UP or DOWN the mode changes, as the following:

Normal Mode
The engine and transmission control logic work together to provide regular daily driving performance with fuel efficiency.
Sport Mode
Manages the driving dynamics by automatically adjusting the steering effort, and the engine / transmission control logic for enhanced driving performance. The engine RPM will be a little higher than normal.
My Drive Mode Features
Selects the proper driving mode among SMART NORMAL / SMART SPORT by judging the driver's driving habits (f.e., mild or dynamic) from the brake pedal depression or the steering wheel operation. In MY DRIVE MODE, you can adjust the vehicle performance for each function. To set MY DRIVE MODE, press the SETUP button, and then select Vehicle > Drive Mode > MY DRIVE MODE in the infotainment system.
*Snow Mode (for 4WD vehicle, if equipped)
Offers special traction tuning for snow optimizing available traction in adverse conditions. Adjusts the left and right wheel slip control, engine torque, and shift patterns according to available traction levels.
Tow Mode (if equipped)
When towing a trailer, switching to TOW mode enables smooth driving by changing the shifting pattern to suit heavy loads. When the gear is in P (Park), press SETUP button, and select Vehicle > Drive Mode > Tow Mode to set the weight of trailer to be towed.

DRIVER ATTENTION WARNING (DAW)
Inattentive driving warning
Driver Attention Warning monitors your driving pattern while driving. When the driver's attention level is below a certain level, Driver Attention Warning recommends a break to help with safe driving.
Leading vehicle departure alert function
Leading Vehicle Departure Alert function will inform the driver when a detected vehicle in front departs.
DRIVER ATTENTION WARNING SETTINGS
Leading vehicle departure alert
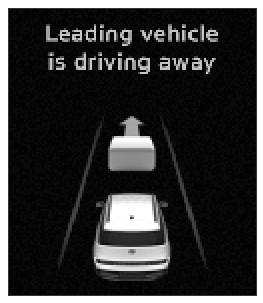
With the engine on, select Setup > Vehicle > Driver Assistance > Driver Attention Warning > enable Leading Vehicle Departure alert in the infotainment system to set whether to use function.
If Leading Vehicle Departure Alert is selected, the function will inform the driver when a detected vehicle in front departs from a stop.
FORWARD ATTENTION WARNING (FAW)
")
Forward Attention Warning uses the  in-cabin camera to help prevent the driver from being distracted while driving with an audible warning and warning light.
Forward Attention Warning settings
With the engine on, select or deselect Setup > Vehicle > Driver Assistance > Driver Attention Warning > Forward Attention Warning in the infotainment system to set whether to use the function.
If Forward Attention Warning is enabled, the function warns the driver when the driver's gaze is not focused on the road.
When the vehicle is restarted, Forward Attention Warning maintains the last setting. Even if Forward Attention Warning is turned off, the incabin camera still operates to detect the driver's forward attention under the condition Emergency Stop can operate (i.e., if Smart Cruise Control and Lane Following Assist are turned on). Forward Attention Warning will operate when the following conditions are satisfied:
- Vehicle speed is above 1 mph (1 km/h)
- The gear is in D (Drive) or N (Neutral)
EMERGENCY STOP (ES)
If Emergency Stop judges the driver is unresponsive, the function stops your vehicle within the driving lane by centering the vehicle in the lane and assisting in braking.
Emergency Stop operation
Operating conditions
Emergency Stop operates if all the following conditions are met:
- Smart Cruise Control is on.
- Lane Following Assist is on.
- The function judges you are unresponsive.
The function judges you are unresponsive if:
- You do not have your hands on the steering wheel after the hands-off warning is continuously displayed.
- Your eyes are not focused on the road after inattentive driving warning is continuously displayed.
Emergency stopping
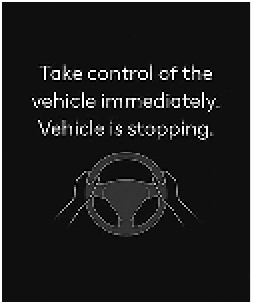
To warn you that Emergency Stop is operating the "Take control of the vehicle immediately. Vehicle is stopping." warning message appears on the instrument cluster, an audible warning sounds, and the steering wheel vibrates.
Emergency Stop provides steering and braking assist to stop the vehicle within the driving lane.
After stopping
After your vehicle has stopped, the following is performed:
- Doors are unlocked.
- SOS call is made. (if served)
- EPB (Electronic Parking Brake) isapplied.
SMART CRUISE CONTROL (SCC)
(if equipped)
Smart Cruise Control helps maintain a set distance with the vehicle ahead without holding the accelerator pedal. With the engine on, press the SETUP button and then select Vehicle > Driver Assistance > Driving Convenience > Smart Cruise Control is selected from the infotainment system, you can change the vehicle distance, the acceleration, and the reaction speed manually.
Turning SCC ON / OFF 
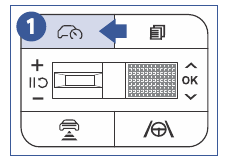
Press the Driving Assist button  to turn on Smart Cruise Control. The speed will be set to the current speed on the instrument cluster.
Setting Up Speed
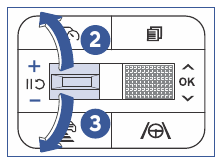
Toggle switch + UP to Set / Increase the cruise control speed. Toggle switch - DOWN
  to Set / Decrease the cruise control speed.
Setting Vehicle Distance 
Press the Vehicle distance button  to Set and Maintain the vehicle distance without pressing the accelerator or brake pedal. Each time the button is pressed, the vehicle distance changes as follows:

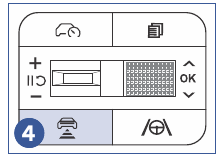
Instrument Cluster SCC Status
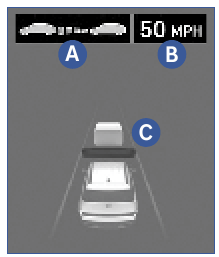
- Selected distance level
- Set speed
- Whether there is a vehicle ahead and the target vehicle distance
To Temporary Cancel SCC 

Press the  button or depress the brake pedal.
Resuming Smart Cruise Control
To resume Smart Cruise Control after the function was temporarily canceled, operate the +, - or a switch.
NOTE: Standard Cruise Control (CC) Operation is similar but will not adjust the vehicle speed. Refer to your Owner's Manual for CC operation.
DRIVE SELECTOR
Depress the brake pedal whenever rotating the gear shift dial or shifting to P. The indicator on the instrument cluster displays the shift position when the Engine Start/Stop button is in the ON position.

P (Park)
Always come to a complete stop before shifting into P (Park). To shift from P (Park), you must depress firmly on the brake pedal and make sure your foot is off the accelerator pedal. The gear must be in P (Park) before turning the engine OFF.
")
Shift-lock System
For your safety, the automatic transmission has a shift-lock system which prevents shifting the gear from P (Park) or N (Neutral) to R (Reverse) or D (Drive) unless the brake pedal is depressed.

Shifting Gears
To shift the gear from P (Park) or N (Neutral) to R (Reverse) or D (Drive):
- Depress and hold the brake pedal.
- Start the engine or place the ignition switch in the ON position.
- Depress the brake pedal and rotate to R (Reverse) or D (Drive).
The surface of the drive selector can get very hot when exposed to direct sunlight, be cautious when shifting gears.
REAR CROSS-TRAFFIC COLLISION-AVOIDANCE ASSIST (RCCA)
")
Rear Cross-Traffic Collision-Avoidance Assist is designed to help detect vehicles approaching from the left and right side while your vehicle is reversing, and warn the driver that a collision is imminent with a warning message and an audible warning. Also, braking is assisted to help prevent a collision.
With the engine on, press Setup button and select Vehicle > Driver Assistance > Parking Safety > Rear Cross-Traffic Safety.
NOTE: When the vehicle is restarted, Rear Cross-Traffic Collision-Avoidance Assist always turn ON.
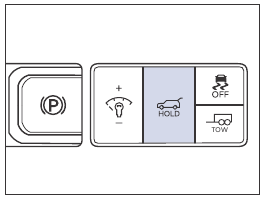
ELECTRIC PARKING BRAKE (EPB)
")
Applying EPB
- Depress and hold the brake pedal
![]()
- Pull up the EPB switch
![]()
- Make sure the Parking Brake warning light
![]() comes ON.
comes ON.


 comes
comes The EPB will automatically be applied when: depressing the brake pedal, engine off while Auto Hold is enabled, parked on a slope, or with the engine off in P (park) but the vehicle still moves a bit.
Manual Release
- Depress and hold the brake pedal
![]()
- Press the EPB switch
![]()
- Make sure the Parking Brake warning light
![]() goes OFF.
goes OFF.

 goes
goes Automatic Release
With the engine running, depress the brake pedal and shift out of P (Park) or N (Neutral) to R (Reverse) or D (Drive). Make sure the doors, hood, and trunk are closed and the seat belt is fastened.
NOTE: Please see the owner's manual for additional details.
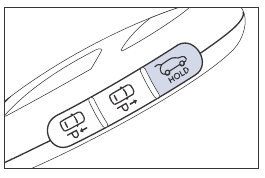
AUTO HOLD

The Auto Hold feature assists in steep hill areas. It holds the brake DRIVE MODE until the accelerator pedal is pressed. Auto Hold maintains the vehicle in a standstill even though the brake pedal is not depressed after driver brings the vehicle to a complete stop by depressing the brake pedal.
- Press the AUTO HOLD switch.
![]()
Auto Hold indicator illuminates WHITE on instrument cluster. - Stop the vehicle by pressing the brake pedal.
![]()
The brakes will remain engaged even if the brake pedal is released. - The brakes will release when the accelerator pedal is pressed with transmission in D, R or manual mode.
![]()


To cancel the AUTO HOLD operation, press the AUTO HOLD switch again.
REAR VIEW MONITOR (RVM)
Rear View Monitor displays the area behind your vehicle to help with safe parking or driving. RVM uses Wide-Rear View Camera.
")
To turn ON the Rear View Monitor press the Parking/View button  while the gear is in P (Park), D (Drive) or N (Neutral).
While the vehicle is on, in the infotainment system, you can change Rear View Monitor Display Contents by pressing the SETUP button selecting Display > Camera Settings > Display Contents.
In the Display Contents , you can change settings for:
Extended Rear View Monitor - if is selected, parking Guide Lines is displayed in the rear view area of the infotainment system screen.
Rear View Parking Guidelines - if selected, the rear view parking Guide Lines and Rear Top View Guide Lines will be displayed at the rear view area of the infotainment system screen. PARKING DISTANCE WARNING PDW (if equipped)
PARKING DISTANCE WARNING PDW
(if equipped)

Forward / Side / Reverse Parking Distance Warning uses the front, side, and rear ultrasonic sensors to help detect and warns you if a person, animal, or object is within a certain distance when your vehicle is stopped or driving at low speed.
To use Parking Distance Warning Auto On, press the SETUP button , and select Vehicle> Driver Assistance > Parking Safety > Parking Distance Warning Auto On in the infotainment system.
Press the Parking Safety button  to turn ON Forward/Reverse PDW. When the gear is shift to R (Reverse), PDW automatically turns ON (Parking Safety button indicator is ON ).
REMOTE SMART PARKING ASSIST (RSPA)
(if equipped)
Remote Smart Parking Assist uses the front, front side, rear side, and rear ultrasonic sensors to help detect parking spaces and control vehicle steering, speed, gear shifts, and help enter and exit parking spaces remotely from outside your vehicle.
Remote Smart Parking and Remote Operation function may be operated from outside the vehicle using the smart key.
")
Inside Vehicle Functions
Parking/View button
Press and hold the Parking/View button  to turn on Remote Smart Parking Assist. Also, Forward/Reverse Parking Distance warning
  will automatically turn ON.
Parking Safety button
Press the Parking Safety button  while Remote Smart Parking Assist is operating to end Remote Smart Parking Assist operation.
Smart Key Functions
Remote Start button 
Press the Remote Start button after the door is locked with the vehicle OFF to start the vehicle remotely. Press the Remote Start button while Remote Smart Parking or Remote Operation function is operating to end function operation.
Forward button  and Backward button
When using the Remote Operation function , the vehicle moves in the direction of the button while the button is pressed.
Remote Operation
Remote Operation operates in the following order:
- Getting ready to remotely move forward and backward
- Remotely moving forward and backward
- Getting ready to remotely move forward and backward
METHOD 1: USING THE FUNCTION WITH VEHICLE OFF
- Within a certain range from the vehicle press the door lock
![]() button on the smart key to lock all doors.
button on the smart key to lock all doors. - Press and hold the Remote Start
![]() button within 4 seconds until the vehicle starts.
button within 4 seconds until the vehicle starts.


METHOD 2: USING THE FUNCTION WITH VEHICLE ON
- Park the vehicle in front of the space where you want to use Remote Operation function, and shift the gear to P (Park).
- Press and hold the Parking/View
![]() button to turn on Smart Parking Assist. A message " Under Remote Control " will appear on the infotainment system.
button to turn on Smart Parking Assist. A message " Under Remote Control " will appear on the infotainment system. - Get out of the vehicle with the smart key , close all doors and liftgate.

- Remotely moving forward and backward


- Press and hold one of the Forward
![]() or Backward
or Backward ![]() button on the smart key.
button on the smart key.
 or
or 
- Remote Smart Parking Assist will automatically control the steering wheel, vehicle speed and gearshift. The vehicle will move in the direction of the button pressed.
- While Remote Operation function is operating, if the you let the button go, the vehicle will stop and function control will pause. The function will start operating again when the button is pressed and held again.
- Hold down the Forward
![]() or Backward
or Backward ![]() button until the vehicle reaches the target location.
button until the vehicle reaches the target location. - When Remote Operation is done, get in the vehicle with the smart key or press the Remote Start
![]() button on the smart key from outside the vehicle.
button on the smart key from outside the vehicle. - The message will appear on the infotainment system. The vehicle will automatically shift to P (Park) and engage the parking brake.
- When the Remote Start
![]() button is pressed, the vehicle will turn OFF. If the driver is in the vehicle, the vehicle will retain ON position.
button is pressed, the vehicle will turn OFF. If the driver is in the vehicle, the vehicle will retain ON position.

NOTE: Please see the owner's manual for additional details.
DRIVER ASSISTANCE SYSTEM SENSORS
*IF EQUIPPED

The Driver Assistance system on your vehicle uses cameras and sensors to help detect potential hazards in the vicinity of your vehicle.
Scan the QR code to view more
FORWARD ATTENTION WARNING

CAMERAS
- Front view camera
- Wide-front view camera*
- Wide-side view camera*
- Wide-rear view camera
- In-cabin camera*
ULTRASONIC SENSORS
- Front ultrasonic sensors
- Front side ultrasonic sensors*
- Rear ultrasonic sensors
- Rear side ultrasonic sensors*
RADARS
- Front radar
- Front corner radar*
- Rear corner radar
Scheduled Maintenance for normal usage
| Drive Belts *1 | Inspect First | 48,000 mi. | or 72 mos. |
| Inspect Add'l | 8,000 mi. | or 12 mos. | |
| Engine Oil and Filter *2 * 3 | Replace | 8,000 mi. | or 12 mos. |
| Fuel Additives *4 | Add | 8,000 mi. | or 12 mos. |
| Air Cleaner Filter | Inspect | 8,000 mi. | or 12 mos. |
| Replace | 24,000 mi. | or 36 mos. | |
| Air Intake Hose | Inspect | 8,000 mi. | or 12 mos. |
| Spark Plugs *5 | Replace | 48,000 mi. | |
| Vapor Hose, Fuel Filler Cap, Fuel Tank | Inspect | 16,000 mi. | or 24 mos. |
| Fuel Tank Air Filter | Inspect | 16,000 mi. | or 24 mos. |
| Fuel Lines, hoses, connections | Inspect | 16,000 mi. | or 24 mos. |
| Engine Coolant | Replace First | 120,000 mi. | or 120 mos. |
| Replace Add'l | 24,000 mi. | or 24 mos. | |
| Battery Condition | Inspect | 8,000 mi. | or 12 mos. |
| Brake lines, hoses and connections | Inspect | 8,000 mi. | or 12 mos. |
| Parking Brake | Inspect | 16,000 mi. | or 24 mos. |
| Brake Fluid | Inspect | 8,000 mi. | or 12 mos. |
| Replace | 48,000 mi. | or 48 mos. | |
| Disc brakes and pads | Inspect | 8,000 mi. | or 12 mos. |
| Steering gear rack, linkage and boots | Inspect | 32,000 mi. | or 48 mos. |
| Driveshaft | Inspect | 16,000 mi. | or 24 mos. |
| Rotate tires (incl. tread wear inspection) | Rotate | 8,000 mi. | or 12 mos. |
| Suspension mounting bolts | Inspect | 8,000 mi. | or 12 mos. |
| Air Conditioner Refridgerant | Inspect | 8,000 mi. | or 12 mos. |
| Air Conditioner Compressor | Inspect | 8,000 mi. | or 12 mos. |
| Cabin Air Filter | Replace | 16,000 mi. | or 24 mos. |
| Vacuum Hose | Inspect | 8,000 mi. | or 12 mos. |
| Dual Clutch Transmission Fluid *6 | Inspect | 32,000 mi. | or 48 mos. |
| Transfer case oil (4WD) *6 | Inspect | 32,000 mi. | or 48 mos. |
| Rear differential oil (4WD) *6 | Inspect | 32,000 mi. | or 48 mos. |
| Propeller shaft (4WD) | Inspect | 16,000 mi. | or 24 mos. |
| Exhaust Pipe nad Muffler | Inspect | 8,000 mi. | or 12 mos. |
*1 The drive belt should be replaced when cracks occur or tension is reduced excessively.
*2 Requires <API SN PLUS (or above) Full synthetic> grade engine oil. If a lower grade engine oil (mineral type, semi-synthetic, lower grade spec, etc.) is used, replace the engine oil and engine oil filter as indicated in maintenance under severe usage conditions.
*3 Never add any additives to the engine oil. Engine oil additives can change the properties of engine oil and may cause serious engine failure.
*4 If TOP TIER Detergent Gasoline is not available, one bottle of additive is recommended. Additives are available from your authorized HYUNDAI dealer along with information on how to use them. Do not mix other additives.
*5 For your convenience, it can be replaced prior to it's interval when you do maintenance of other items.
*6 Dual Clutch Transmission fluid, transfer case oil, and rear differential oil should be changed anytime they have been submerged in water.
*See Owner's Manual for details regarding Severe Usage maintenance recommendations.
Looking For more detailed information? This Quick Reference Guide does not replace your vehicle's Owner's Manual. If you require additional information or are unsure of a specific issue, we recommend that you always refer to the vehicle's Owner's Manual or contact your authorized Hyundai dealer. The information contained in this Quick Reference Guide is correct at the time of printing; however, specifications and equipment can change without notice. No warranty or guarantee is being extended in this Quick Reference Guide, and Hyundai reserves the right to change product specifications and equipment at any time without incurring obligations. Some vehicles are shown with optional equipment.
Roadside Assistance I 1-800-243-7766
Consumer Affairs I 1-800-633-5151
SiriusXM Radio ® I 1-800-967-2346
Bluelink ® I 1-855-2BLUELINK I 1-855-225-8354
Documents / Resources
References
![hyundaihowtos.com]() Hyundai How-Tos
Hyundai How-TosAndroid Auto Help
![www.hyundaiusa.com]() Hyundai Vehicle Owner Privacy Policy
Hyundai Vehicle Owner Privacy Policy![www.myhyundai.com]() Welcome to MyHyundai | MyHyundai
Welcome to MyHyundai | MyHyundai![myhyundai.com]() Welcome to MyHyundai | MyHyundai
Welcome to MyHyundai | MyHyundai

Download manual
Here you can download full pdf version of manual, it may contain additional safety instructions, warranty information, FCC rules, etc.
Advertisement


Need help?
Do you have a question about the SANTA FE 2025 and is the answer not in the manual?
Questions and answers