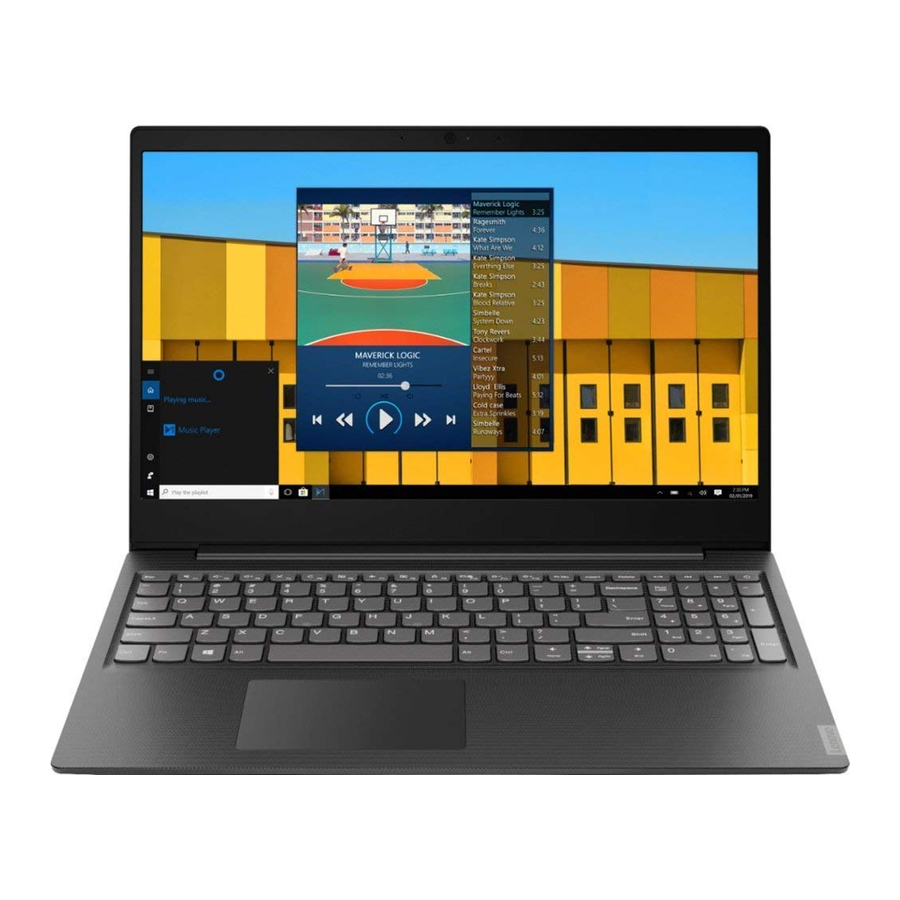
Lenovo IdeaPad S145 Series (81VB0001LM) Manual
- User manual (68 pages) ,
- Setup manual (8 pages) ,
- User manual (66 pages)
- Also fits for
- Ideapad s145
- 81vb0001lm
Advertisement
- 1 About this guide
- 2 Meet your product
- 3 Get started with your device
- 4 Explore your device
- 5 Frequently asked questions
- 6 Help and support
-
7
Important safety information
- 7.1 Safety notices
- 7.2 Important information about using your product
- 7.3 Conditions that require immediate action
- 7.4 Service and upgrades
- 7.5 Power cords and power adapters
- 7.6 Extension cords and related devices
- 7.7 Plugs and outlets
- 7.8 Power supply statement
- 7.9 External devices
- 7.10 General battery notice
- 7.11 Heat and product ventilation
- 7.12 Electrical current safety information
- 7.13 Liquid crystal display notice
- 7.14 Using headphones or earphones
- 7.15 Choking hazard notice
- 7.16 Plastic bag notice
- 7.17 Glass parts notice
- 7.18 Static electricity prevention
- 8 Accessibility and ergonomic information
- 9 Documents / Resources
About this guide
- This guide applies to Lenovo product model(s) listed below. Illustrations in this guide may look slightly different from your product model.
| Model name | Machine Type (MT) |
| Lenovo BS145-15IGM | 81V9 |
| Lenovo BS145-15IWL | 81V8 |
| Lenovo IdeaPad S145-14API | 81UV |
| Lenovo IdeaPad S145-14AST | 81ST |
| Lenovo IdeaPad S145-14IGM | 81MW, 81SB |
| Lenovo IdeaPad S145-14IKB | 81VB |
| Lenovo IdeaPad S145-14IML | 81N1 |
| Lenovo IdeaPad S145-14IWL | 81MU |
| Lenovo IdeaPad S145-14IIL | 81W6 |
| Lenovo IdeaPad S145-15API | 81UT, 81V7 |
| Lenovo IdeaPad S145-15AST | 81N3, 81SA |
| Lenovo IdeaPad S145-15IGM | 81MX, 81WT |
| Lenovo IdeaPad S145-15IKB | 81VD, 81XM |
| Lenovo IdeaPad S145-15IML | 81N2 |
| Lenovo IdeaPad S145-15IWL | 81MV, 81S9 |
| Lenovo IdeaPad S145-15IIL | 81W8, 82DJ |
- This guide may contain information about accessories, features, and software that are not available on all models.
- This guide contains instructions that are based on the Windows 10 operating system. These instructions are not applicable if you install and use other operating systems.
- Microsoft makes periodic feature changes to the Windows operating system through Windows Update. As a result, the operating system related instructions may become outdated. Refer to Microsoft resources for the latest information.
Meet your product
Front

| Capture or record sound and voice. |
| Take pictures or record videos by clicking Camera from the Start menu. If you use other apps that support photographing, video chatting, and video conference, the camera starts automatically when you enable the camera- required feature from the app. |
| If the light is on, the camera is in use. |
| Send and receive radio waves for the wireless LAN/Bluetooth module. Note: The antennas are not visible from the outside of the computer. |
| Display text, graphics, and videos. |
Top

14-inch models
| Dissipate internal heat. |
| Enter characters and interact with programs. Note: The keyboard also includes hotkeys and function keys for changing settings and performing tasks quickly. |
| Perform finger touch and all the functions of a traditional mouse. |

15-inch models
| Dissipate internal heat. |
| Enter characters and interact with programs. Note: The keyboard also includes hotkeys and function keys for changing settings and performing tasks quickly. |
| To enable or disable the numeric keypad, press the Num Lock key. Note: If the Num Lock key light is on, the numeric keypad is in use. |
| Perform finger touch and all the functions of a traditional mouse. |
Bottom

| Play sound. |
Left

| Connect to the ac power adapter. |
| Indicate whether the computer is connected to ac power. White: connected to ac power (battery power 91%–100%) Amber: connected to ac power (battery power 1%–90%) Off: not connected to ac power |
| Connect to devices with HDMI input such as a TV or a display. |
| Connect USB-compatible devices, such as a USB keyboard, USB mouse, USB storage device, or USB printer. |
| Connect USB-compatible devices, such as a USB keyboard, USB mouse, USB storage device, or USB printer. |
| Indicate the status of the computer. White (solid on): The computer is on (battery power 21%-100%). White (fast blinking): The computer is on (battery power 1%-20%). White (slow blinking): The computer is in sleep mode. Off: The computer is off or in hibernation mode. |
Right

| When the computer is off, press this button to start System Recovery or the BIOS setup utility, or to enter the boot menu. |
| Connect headphones or a headset with a 3.5-mm (0.14-inch), 4-pole plug to listen to the sound from the computer. Note: The conventional microphone is not supported. |
| Insert SD card for data access or storage. |
Features and specifications
Note: Specifications might change without notice. Some specifications are model specific and might not apply to the model that you purchased.
| Dimensions |
|
| ac power adapter |
|
| Battery pack |
|
| Microprocessor | To view the microprocessor information of your computer, right-click the Start button and then click System. |
| Memory |
|
| Storage device |
|
| Display | Display size:
Display resolution:
|
| Keyboard |
|
| Connectors and slots |
|
| Security features |
|
| Wireless features |
|
| Others |
|
* for selected models
Note: The battery capacity is the typical or average capacity as measured in a specific test environment. Capacities measured in other environments may differ but are no lower than the rated capacity (see product label).
Statement on USB transfer rate
Depending on many factors such as the processing capability of the host and peripheral devices, file attributes, and other factors related to system configuration and operating environments, the actual transfer rate using the various USB connectors on this device will vary and will be slower than the data rate listed below for each corresponding device.
| USB device | Data rate (Gbit/s) |
| 3.2 Gen 1 | 5 |
| 3.2 Gen 2 | 10 |
| 3.2 Gen 2 × 2 | 20 |
Operating environment
Maximum altitude (without pressurization)
3048 m (10 000 ft)
Temperature
- At altitudes up to 2438 m (8000 ft)
- Operating: 5°C to 35°C (41°F to 95°F)
- Storage: 5°C to 43°C (41°F to 109°F)
- At altitudes above 2438 m (8000 ft)
- Maximum temperature when operating under the unpressurized condition: 31.3°C (88°F)
Note: When you charge the battery, its temperature must be no lower than 10°C (50°F).
- Maximum temperature when operating under the unpressurized condition: 31.3°C (88°F)
Relative humidity
- Operating: 8% to 95% at wet-bulb temperature 23°C (73°F)
- Storage: 5% to 95% at wet-bulb temperature 27°C (81°F)
Get started with your device
Get started with Windows 10
Learn the basics of Windows 10 and start working with it right away. For more information about Windows 10, see the Windows help information.
Windows account
You must create at least one account to use the Windows operating system. It can be either a local account or a Microsoft account.
Local accounts
A local account is created on a particular Windows-enabled device and it can only be used on that device. It is recommended that you set a password for each local account to prevent unauthorized access to the device.
Microsoft accounts
A Microsoft account is a user account that you use to sign in to Microsoft software and services. If you use Microsoft services like OneDrive, Outlook.com, Xbox Live, Office 365, and Skype, you might already have one. If you don't have it, you can create one for free.
There are two main benefits of using a Microsoft account:
- Sign in only once. If you use a Microsoft account to sign in to Windows 10, you don't need to sign in again to use OneDrive, Skype, Outlook.com, and other Microsoft services.
- Settings can be synced. If you use your Microsoft account to sign in to multiple Windows-enabled devices, certain Windows settings can be synced among the devices.
Switch between a local and a Microsoft account
If you are using a local account to sign in to Windows 10, you can switch to use a Microsoft account instead.
- Open the Start menu and select Settings ➙ Accounts
- Select Sign in with a Microsoft account instead
- If you already have a Microsoft account, enter the account name and password to sign in. Otherwise, select Create one to create a new Microsoft account
Note: The device must have Internet access the first time you use a Microsoft account on that device.
If you want to switch back to use a local account, open the Start menu and select Settings ➙ Accounts ➙ Sign in with a local account instead.
Add additional user accounts
Your user account must be of the "Administrator" type to add additional user accounts to Windows.
Add additional user accounts if you need to share your computer with family members or other users.
- Open the Start menu and select Settings ➙ Accounts ➙ Family & other users.
- Select Add someone else to this PC.
Note: To add family members, you need to sign in with a Microsoft account. - Set the user name and password for the user account.
Windows desktop

| Change account settings, lock the computer, or sign out of the current account. |
| Open the Documents folder, a default folder to save your received files. |
| Open the Pictures folder, a default folder to save your received pictures. |
| Open Settings. |
| Shut down, restart, or put the computer into sleep mode. |
| Open the Start menu. |
| Enter what you are looking for in the search box and get search results from your computer and the Web. |
| Display all opened apps and switch between them. |
| Display notifications and status of some features. |
| Display power status and change battery or power settings. |
| Connect to an available wireless network and display the network status. When connected to a wired network, the icon changes to  |
| Display the latest notifications from apps and provide quick access to some features. |


Open the Start menu
- Click the Start button.
- Press the Windows logo key on the keyboard.
Open Control Panel
- Open the Start menu and select Windows System ➙ Control Panel.
- Use Windows Search.
Open an app
- Open the Start menu and select the app you want to open.
- Use Windows Search.
Lenovo Vantage and Lenovo PC Manager
Lenovo Vantage and Lenovo PC Manager is software developed by Lenovo. Using the software, you can:
- View product information
- View warranty and support information
- Run hardware scan and diagnose problems
- Change hardware settings
- Update Windows, drivers, and UEFI/BIOS
Lenovo Vantage or PC Manager may be pre-installed on your computer. To open it, enter the software name in Windows Search and select the matched result.
Note: If Lenovo Vantage is not pre-installed, you can download it from Microsoft Store.
Connect to networks
Your computer helps you connect to the world through a wired or wireless network.
Connect to Wi-Fi networks
If your computer includes a wireless adapter, you can connect your computer to Wi-Fi networks.
- Click the network icon in the Windows notification area. A list of nearby networks is displayed.
Note: If no network is displayed, check to ensure that the airplane mode is not turned on. - Select a network and click Connect. Provide security key if prompted.
Note: The network key is usually managed by the network administrator.
Forget a Wi-Fi network
Windows saves a list of Wi-Fi networks you have connected to, along with their passwords and other settings. By doing this, your computer is automatically connected when it is in the range of a previously connected network. However, if the network password has been changed, you need to forget the network in order to enter a new password.
- Select Start ➙ Settings ➙ Network & Internet ➙ Wi-Fi.
- Click Manage known networks.
- Click the network name and click Forget.
Turn airplane mode on and off
Airplane mode is a convenient setting to turn all wireless communications of your computer on and off. You may need to turn it on when boarding an airplane.
- Click the action center icon in the Windows notification area.
- Click the Airplane mode icon to turn it on or off.
Note: Click Expand if you cannot find the airplane mode icon.
Interact with your device
Keyboard hotkeys
Some keys on the keyboard are printed with icons. These keys are called hotkeys and can be pressed alone or in combination with the Fn key to access certain Windows functions or settings quickly. The functions of hotkeys are symbolized by the icons printed on them.
| Hotkey | Function |
 | Mute/Unmute sound. |
 | Decrease/Increase system volume. |
 | Mute/Unmute the microphone. |
 | Reload Web pages or refresh the screen. |
 | Enable/Disable the touchpad. |
 | Turn airplane mode on and off. |
 | Enable/Disable the integrated camera. |
 | Lock the screen. |
 | Switch display devices. |
 | Increase/Decrease screen brightness. |
 | Play or pause playback of media. |
 | Go to the next media file in the playlist or folder. |
 | Go to the previous media file in the playlist or folder. |
Hotkey mode
Some hotkeys share keys with function keys (F1 to F12). The hotkey mode is a UEFI/BIOS setting that changes how hotkeys (or function keys) are used.
| Hotkey mode setting | How to use hotkeys | How to use function keys |
| Disabled | Hold down the Fn key and press one of the hotkeys. | Press the function keys directly. |
| Enabled | Press the hotkeys directly. | Hold down the Fn key and press one of the function keys. |
Note: Hotkeys that do not share keys with function keys are not affected by the hotkey mode setting. They should always be used with the Fn key.
Explore your device
Manage power
Use the information in this section to achieve the best balance between performance and power efficiency.
Check the battery status
The battery status icon  or
or  is in the Windows notification area. You can check the battery status, view the current power plan, and access battery settings quickly.
Click the battery status icon to display the percentage of battery power remaining and change the power mode. A warning message is displayed when the battery is low.
Charge the battery
When the remaining battery power is low, charge your battery by connecting your computer to ac power.
The battery is fully charged in about two to four hours. The actual charging time depends on the battery capacity, the physical environment, and whether you are using the computer.
Battery charging is also affected by its temperature. The recommended temperature range for charging the battery is between 10°C (50°F) and 35°C (95°F).
Note: To maximize the life of the battery, the computer does not start recharging the battery if the remaining power is greater than 95%.
Check the battery temperature
You can check the battery temperature in Lenovo Vantage or Lenovo PC manager.
- Open Lenovo Vantage.
- Click Hardware Settings ➙ Power.
- Locate the Power Status section and then click Show Details to view the battery temperature.
Note: If you're using Lenovo PC Manager, select System hardware ➙ Battery.
Set power button behavior
By default, pressing the power button puts the computer to sleep mode. However, you can change the power button behavior in Windows Control Panel.
- Right-click the battery status icon in the Windows notification area.
- Select Power Options ➙ Choose what the power button does.
Change or create a power plan
A power plan is a set of power saving settings. You can choose a pre-defined power plan or you can create your own plans.
- Right-click the battery status icon in the Windows notification area.
- Select Power Options ➙ Change plan settings.
Change settings in UEFI/BIOS setup utility
This section introduces what is UEFI/BIOS and the operations you can perform in its setup utility.
What is UEFI/BIOS setup utility
UEFI/BIOS is the first program that runs when a computer starts. UEFI/BIOS initializes hardware components and loads the operating system and other programs. Your computer may include a setup program (setup utility) with which you can change certain UEFI/BIOS settings.
Open the UEFI/BIOS setup utility
- Turn on or restart the computer.
- When the Lenovo logo appears on the screen, press F2 repeatedly.
Note: For computers with hotkey mode enabled, press Fn + F2.
Change the startup sequence
You may need to change the startup sequence to allow the computer to start from another device or a network location.
- Open the UEFI/BIOS setup utility.
- Navigate to the Boot menu.
- Follow on-screen instructions to change the order of devices under Boot Priority Order.
Note: You can also change startup sequence temporarily without opening the setup utility. To do so, start the computer. When the Lenovo logo appears, press F12 (or Fn + F12) repeatedly.
Change hotkey mode
- Open the UEFI/BIOS setup utility.
- Select Configuration ➙ Hotkey Mode and press Enter.
- Change the setting to Disabled or Enabled
- Select Exit ➙ Exit Saving Changes
Enable or disable always-on
For some Lenovo computers with always-on connectors, the always-on function can be enabled or disabled in the UEFI/BIOS setup utility.
- Open the UEFI/BIOS setup utility.
- Select Configuration ➙ Always On USB and press Enter
- Change the setting to Disabled or Enabled
- Select Exit ➙ Exit Saving Changes
Note: You may also enable or disable always-on in Lenovo Vantage or Lenovo PC Manager if it is pre- installed on your computer.
Set passwords in UEFI/BIOS setup utility
This section introduces the types of passwords that you can set in the UEFI (Unified Extensible Firmware Interface) or BIOS (Basic Input/Output System) setup utility.
Password types
You can set various types of passwords in the UEFI/BIOS setup utility.
| Password type | Pre-requisite | Usage |
| Administrator password | No | You must enter it to start the setup utility. |
| User password | The administrator password must be set. | You can use the user password to start the setup utility. |
| Master hard disk password | No | You must enter it to start the operating system. |
| User hard disk password | The master hard disk password must be set. | You can use the user hard disk password to start the operating system. |
Notes:
- All passwords set in the setup utility consist of alphanumeric characters only.
- If you start the setup utility using the user password, you can only change a few settings.
Set administrator password
You set the administrator password to prevent unauthorized access to the UEFI/BIOS setup utility.
Attention: If you forget the administrator password, a Lenovo authorized service personnel cannot reset your password. You must take your computer to a Lenovo authorized service personnel to have the system board replaced. Proof of purchase is required and a fee will be charged for parts and service.
- Open the UEFI/BIOS setup utility.
- Select Security ➙ Set Administrator Password and press Enter
- Enter a password string that contains only letters and numbers and then press Enter
- Enter the password again and press Enter
- Select Exit ➙ Exit Saving Changes
Next time you start the computer, you must enter the administrator password to open the setup utility. If Power on Password is enabled, you must enter the administrator password or the user password to start the computer.
Change or remove administrator password
Only the administrator can change or remove the administrator password.
- Open the UEFI/BIOS setup utility using the administrator password
- Select Security ➙ Set Administrator Password and press Enter
- Enter the current password
- In the Enter New Password text box, enter the new password
- In the Confirm New Password text box, enter the new password again.
Note: If you want to remove the password, press Enter in both text boxes without entering any character. - Select Exit ➙ Exit Saving Changes.
If you remove the administrator password, the user password is also removed.
Set user password
You must set the administrator password before you can set the user password.
The administrator of the setup utility might need to set a user password for use by others.
- Open the UEFI/BIOS setup utility using the administrator password
- Select Security ➙ Set User Password and press Enter
- Enter a password string that contains only letters and numbers and then press Enter. The user password must be different from the administrator password
- Enter the password again and press Enter
- Select Exit ➙ Exit Saving Changes
Enable power-on password
If the administrator password has been set, you can enable power-on password to enforce greater security.
- Open the UEFI/BIOS setup utility
- Select Security ➙ Power on Password and press Enter.
Note: The administrator password must be set in advance - Change the setting to Enabled.
- Select Exit ➙ Exit Saving Changes
If power-on password is enabled, a prompt appears on the screen every time you turn on the computer. You must enter the administrator or user password to start the computer.
Set hard disk password
You can set a hard disk password in the setup utility to prevent unauthorized access to your data.
Attention: Be extremely careful when setting a hard disk password. If you forget the hard disk password, a Lenovo authorized service personnel cannot reset your password or recover data from the hard disk. You must take your computer to a Lenovo authorized service personnel to have the hard disk drive replaced. Proof of purchase is required and a fee will be charged for parts and service.
- Open the UEFI/BIOS setup utility
- Select Security ➙ Set Hard Disk Password and press Enter.
Note: If you start the setup utility using the user password, you cannot set hard disk password - Follow on-screen instructions to set both master and user passwords.
Note: The master and user hard disk passwords must be set at the same time - Select Exit ➙ Exit Saving Changes
If the hard disk password is set, you must provide the correct password to start the operating system.
Change or remove hard disk password
- Open the UEFI/BIOS setup utility
- Select Security
- Change or remove the hard disk password
To change or remove master password, select Change Master Password and press Enter.
Note: If you remove the master hard disk password, the user hard disk password is also removed.
To change user password, select Change User Password and press Enter.
Note: The user hard disk password cannot be removed separately. - Select Exit ➙ Exit Saving Changes.
Reset or restore Windows
This section introduces the recovery options of Windows 10. Ensure that you read and follow the on-screen recovery instructions.
Attention: The data on your computer might be deleted during the recovery process. To avoid data loss, make a backup copy of all the data that you want to keep.
Windows 10 recovery options
Windows 10 provides several options for you to restore or reset your computer. The following table helps you decide which option to choose if you are having problems with Windows.
| Problem | Option |
| Your computer is not working well after installing apps, drivers, or updates. | Restore to a system restore point. |
| Your computer is not working well and you don't know what causes the problem. | Reset your computer. |
| You want to recycle or donate your computer. | Reset your computer. |
| Windows cannot start properly. | Use a recovery drive to restore or reset your computer. |
Windows System Restore
System Restore is a tool included in Windows 10. It monitors changes to Windows system files and saves system state as a restore point. If your computer does not work well after installing apps, drivers, or updates, you can revert your system to a previous restore point.
Note: If you revert your system to a previous restore point, personal data is not affected.
System Restore creates restore points:
- automatically (when it detects changes to Windows system files)
- at regular intervals (if set up by the user)
- at any time (if initiated manually by the user)
Note: In order for System Restore to create restore points, system protection must be turned on for the system drive.
Create a system restore point manually
You can use Windows System Restore to create a restore point at any time.
- In the Windows 10 search box, enter Create a restore point and select the matched result.
- Select the System Protection tab and then select Create.
Note: System protection must be turned on for the system drive (typically with drive letter C) before you can create restore points. Select a drive and then select Configure to turn on or disable system protection.
Restore from a system restore point
- In Windows 10 search box, enter Recovery and select the matched result
- Select Open System Restore ➙ Next
- Select a restore point and then select Next ➙ Finish
Note: You may select Scan for affected programs to check which program and driver installation is associated with a particular restore point.
Reset Windows
If Windows is not running well as usual, you can choose to reset it.
- Open the Start menu and then select Settings ➙ Update & Security ➙ Recovery.
- Under Reset this PC, click Get started.
- Choose either Keep my files or Remove everything.
Attention: Back up personal data before choosing Remove everything. - Follow on-screen instructions to complete the reset process.
Create a recovery drive
Use a USB drive (not supplied) to create a Windows recovery drive. If Windows will not start, you can use the recovery drive to restore or reset Windows.
Notes: Most USB drives utilize the Type-A connector. If your computer does not include a USB Type-A connector, you have two options:
- Purchase and use a USB drive with the Type-C connector, or
- Purchase and use a USB Type-C to Type-A adapter
- In the Windows 10 search box, enter Create a recovery drive and select the matched result.
- Make sure Back up system files to the recovery drive is selected and then select Next.
- Plug a USB drive into your computer, select it, and then select Next ➙ Create.
Attention: Previous files on the drive will be deleted. Back up personal files before using it to create a recovery drive.
When the recovery drive is created, you may see a Delete the recovery partition from your PC option. If you want to free up drive space on your computer, select it and then select Delete. Otherwise, select Finish.
Use a recovery drive to restore or reset Windows
If Windows cannot start, you can use a recovery drive (created in advance) to restore or reset Windows.
- Connect the recovery drive to your computer; restart your computer and set it to start from the recovery drive.
Note: For computers without a USB Type-A connector, you may need to purchase and use an adapter (USB Type-C to Type-A) to use a recovery drive. - On the Choose an option screen, select Troubleshoot
- Choose a recovery option
Select Advanced Options ➙ System Restore to restore your computer to a system restore point.
Or select Recover from a drive to reset your computer.
Note: If you did not select the Back up system files to the recovery drive option when creating the recovery drive, Recovery from a drive is not available.
Attention: All personal files created on your computer will be deleted after recovering from the drive.
Frequently asked questions
How do I open the Control Panel |
|
How should I turn off my device | Open the Start menu and select Power ➙ Shut down. |
How do I partition my storage drive | Refer to https://support.lenovo.com/solutions/ht503851 |
What should I do if my device stops responding | Press and hold the power button until the computer turns off. Then restart the computer. |
| What should I do if I spill liquid on the computer? |
 Do not try to drain out the liquid by turning over the computer. If your computer has keyboard drainage holes on the bottom, the liquid will be drained out through the holes. |
| Where can I get the latest device drivers and UEFI/BIOS? |
|
Help and support
Self-help resources
Use the following self-help resources to learn more about the computer and troubleshoot problems.
| Resources | How to access? |
Use Lenovo Vantage or Lenovo PC Manager to:
|
|
Product documentation:
|
|
Lenovo Support Web site with the latest support information of the following:
| Visit https://support.lenovo.com |
| Windows help information |
|
Call Lenovo
If you have tried to correct the problem yourself and still need help, you can call Lenovo Customer Support Center.
Before you contact Lenovo
Record product information and problem details before you contact Lenovo.
| Product information | Problem symptoms and details |
|
|
Note: The product name and serial number can usually be found on the bottom of the computer, either printed on a label or etched on the cover.
Lenovo Customer Support Center
During the warranty period, you can call Lenovo Customer Support Center for help.
Telephone numbers
For a list of the Lenovo Support phone numbers for your country or region:
- Go to https://pcsupport.lenovo.com/supportphonelist for the latest phone numbers.
- Refer to the Safety and Warranty Guide that comes with your computer.
Note: Phone numbers are subject to change without notice. If the number for your country or region is not provided, contact your Lenovo reseller or Lenovo marketing representative.
Purchase additional services
During and after the warranty period, you can purchase additional services from Lenovo at https://www.lenovo.com/services.
Service availability and service name might vary by country or region.
Important safety information
Safety notices
This information can help you safely use your computer. Follow and retain all information included with your computer. The information in this document does not alter the terms of your purchase agreement or the Limited Warranty. For more information, see "Warranty Information" in the Safety and Warranty Guide that comes with your computer.
Customer safety is important. Our products are developed to be safe and effective. However, personal computers are electronic devices. Power cords, power adapters, and other features can create potential safety risks that can result in physical injury or property damage, especially if misused. To reduce these risks, follow the instructions included with your product, observe all warnings on the product and in the operating instructions, and review the information included in this document carefully. By carefully following the information contained in this document and provided with your product, you can help protect yourself from hazards and create a safer computer work environment.
Note: This information includes references to power adapters and batteries. In addition, some products (such as speakers and monitors) ship with external power adapters. If you have such a product, this information applies to your product. In addition, computer products contain a coin-sized internal battery that provides power to the system clock even when the computer is unplugged, so the battery safety information applies to all computer products.
Important information about using your product
Ensure that you follow the important tips given here to get the most use and enjoyment out of your computer. Failure to do so might lead to discomfort or injury, or cause the computer to fail.
 Protect yourself from the heat that your computer generates.
When your computer is turned on or the battery is charging, the base, the palm rest, and some other parts may become hot. The temperature they reach depends on the amount of system activity and the level of charge in the battery.
Extended contact with your body, even through clothing, could cause discomfort or even a skin burn.

- Avoid keeping your hands, your lap, or any other parts of your body in contact with a hot section of the computer for any extended time.
- Periodically take hands from using the keyboard by lifting your hands from the palm rest.
Protect yourself from the heat generated by the ac power adapter.
When the ac power adapter is connected to an electrical outlet and your computer, it generates heat.
Extended contact with your body, even through clothing, may cause a skin burn.
- Do not place the ac power adapter in contact with any part of your body while it is in use.
- Never use it to warm your body.
- Do not wrap the cords around the ac power adapter while in use.
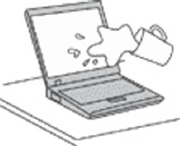
 Prevent your computer from getting wet.
To avoid spills and the danger of electrical shock, keep liquids away from your computer.
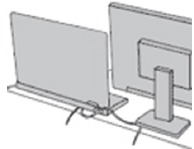
Protect the cables from being damaged.
Applying strong force to cables may damage or break them.
Route communication lines, or the cables of an ac power adapter, a mouse, a keyboard, a printer, or any other electronic device, so that they cannot be walked on, tripped over, pinched by your computer or other objects, or in any way subject to treatment that could interfere with the operation of your computer.
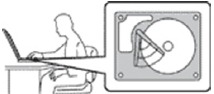
Protect your computer and data when moving it.
Before moving a computer equipped with a hard disk drive, do one of the following:
- Turn it off.
- Put it in sleep mode.
- Put it in hibernation mode.
This helps to prevent damage to the computer, and possible loss of data.
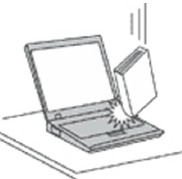
Handle your computer gently.
Do not drop, bubmp, scratch, twist, hit, vibrate, push, or place heavy objects on your computer, display, or external devices.
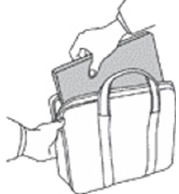
Carry your computer carefully.
- Use a quality carrying case that provides adequate cushioning and protection.
- Do not pack your computer in a tightly packed suitcase or bag.
- Before putting your computer in a carrying case, make sure that it is off, in sleep mode, or in hibernation mode. Do not put a computer in a carrying case while it is turned on.
Conditions that require immediate action
Products can become damaged due to misuse or neglect. Some product damage is serious enough that the product should not be used again until it has been inspected and, if necessary, repaired by an authorized servicer.
As with any electronic device, pay close attention to the product when it is turned on.
On very rare occasions, you might notice an odor or see a puff of smoke or sparks vent from your product. Or you might hear sounds like popping, cracking, or hissing. These might merely mean that an internal electronic component has failed in a safe and controlled manner. Or, they might indicate a potential safety issue. Do not take risks or attempt to diagnose the situation yourself. Contact the Customer Support Center for further guidance. For a list of Service and Support phone numbers, see the following Web site:
https://pcsupport.lenovo.com/supportphonelist
Frequently inspect your computer and its components for damage or wear or signs of danger. If you have any question about the condition of a component, do not use the product. Contact the Customer Support Center or the product manufacturer for instructions on how to inspect the product and have it repaired, if necessary.
In the unlikely event that you notice any of the following conditions, or if you have any safety concerns with your product, stop using the product and unplug it from the power source and telecommunication lines until you can speak to the Customer Support Center for further guidance.
- Power cords, plugs, power adapters, extension cords, surge protectors, or power supplies that are cracked, broken, or damaged.
- Signs of overheating, smoke, sparks, or fire.
- Damage to a battery (such as cracks, dents, or creases), discharge from a battery, or a buildup of foreign substances on the battery.
- A cracking, hissing, or popping sound, or strong odor that comes from the product.
- Signs that liquid has been spilled or an object has fallen onto the computer product, the power cord, or power adapter.
- The computer product, power cord, or power adapter has been exposed to water.
- The product has been dropped or damaged in any way.
- The product does not operate normally when you follow the operating instructions.
Note: If you notice these conditions with a product (such as an extension cord) that is not manufactured for or by Lenovo, stop using that product until you can contact the product manufacturer for further instructions, or until you get a suitable replacement.
Service and upgrades
Do not attempt to service a product yourself unless instructed to do so by the Customer Support Center or your documentation. Only use a Service Provider who is approved to repair your particular product.
Note: Some computer parts can be upgraded or replaced by the customer. Upgrades typically are referred to as options. Replacement parts approved for customer installation are referred to as Customer Replaceable Units, or CRUs. Lenovo provides documentation with instructions when it is appropriate for customers to install options or replace CRUs. You must closely follow all instructions when installing or replacing parts. The Off state of a power indicator does not necessarily mean that voltage levels inside a product are zero. Before you remove the covers from a product equipped with a power cord, always ensure that the power is turned off and that the product is unplugged from any power source. If you have any questions or concerns, contact the Customer Support Center.
Although there are no moving parts in your computer after the power cord has been disconnected, the following warnings are required for your safety.
![]()
Keep fingers and other parts of your body away from hazardous, moving parts. If you suffer an injury, seek medical care immediately.
Avoid contact with hot components inside the computer. During operation, some components become hot enough to burn the skin. Before you open the computer cover, turn off the computer, disconnect power, and wait approximately 10 minutes for the components to cool.

After replacing a CRU, reinstall all protective covers, including the computer cover, before connecting power and operating the computer. This action is important to help prevent unexpected electrical shock and help ensure the containment of an unexpected fire that could happen under extremely rare conditions.
![]()
When replacing CRUs, be cautious of sharp edges or corners that might cause injury. If you suffer an injury, seek medical care immediately.
Power cords and power adapters

Use only the power cords and power adapters supplied by the product manufacturer.
The power cords shall be safety approved. For Germany, it shall be H03VV-F, 3G, 0.75 mm2, or better. For other countries, the suitable types shall be used accordingly.
Never wrap a power cord around a power adapter or other object. Doing so can stress the cord in ways that can cause the cord to fray, crack, or crimp. This can present a safety hazard.
Always route power cords so that they will not be walked on, tripped over, or pinched by objects.
Protect power cords and power adapters from liquids. For instance, do not leave your power cord or power adapter near sinks, tubs, toilets, or on floors that are cleaned with liquid cleansers. Liquids can cause a short circuit, particularly if the power cord or power adapter has been stressed by misuse. Liquids also can cause gradual corrosion of power cord terminals and/or the connector terminals on a power adapter, which can eventually result in overheating.
Ensure that all power cord connectors are securely and completely plugged into receptacles.
Do not use any power adapter that shows corrosion at the ac input pins or shows signs of overheating (such as deformed plastic) at the ac input pins or anywhere on the power adapter.
Do not use any power cords where the electrical contacts on either end show signs of corrosion or overheating or where the power cord appears to have been damaged in any way.
To prevent possible overheating, do not cover the power adapter with clothing or other objects when the power adapter is plugged into an electrical outlet.
Extension cords and related devices
Ensure that extension cords, surge protectors, uninterruptible power supplies, and power strips that you use are rated to handle the electrical requirements of the product. Never overload these devices. If power strips are used, the load should not exceed the power strip input rating. Consult an electrician for more information if you have questions about power loads, power requirements, and input ratings.
Plugs and outlets
If a receptacle (power outlet) that you intend to use with your computer equipment appears to be damaged or corroded, do not use the outlet until it is replaced by a qualified electrician.
Do not bend or modify the plug. If the plug is damaged, contact the manufacturer to obtain a replacement.
Do not share an electrical outlet with other home or commercial appliances that draw large amounts of electricity; otherwise, unstable voltage might damage your computer, data, or attached devices.
Some products are equipped with a three-pronged plug. This plug fits only into a grounded electrical outlet. This is a safety feature. Do not defeat this safety feature by trying to insert it into a non-grounded outlet. If you cannot insert the plug into the outlet, contact an electrician for an approved outlet adapter or to replace the outlet with one that enables this safety feature. Never overload an electrical outlet. The overall system load should not exceed 80 percent of the branch circuit rating. Consult an electrician for more information if you have questions about power loads and branch circuit ratings.
Be sure that the power outlet you are using is properly wired, easily accessible, and located close to the equipment. Do not fully extend power cords in a way that will stress the cords.
Be sure that the power outlet provides the correct voltage and current for the product you are installing.
Carefully connect and disconnect the equipment from the electrical outlet.
Power supply statement
Never remove the cover on a power supply or any part that has the following label attached.

Hazardous voltage, current, and energy levels are present inside any component that has this label attached. There are no serviceable parts inside these components. If you suspect a problem with one of these parts, contact a service technician.
External devices
Do not connect or disconnect any external device cables other than Universal Serial Bus (USB) and 1394 cables while the computer power is on; otherwise, you might damage your computer. To avoid possible damage to attached devices, wait at least five seconds after the computer is shut down to disconnect external devices.
General battery notice

Batteries supplied by Lenovo for use with your product have been tested for compatibility and should only be replaced with approved parts. A battery other than the one specified by Lenovo, or a disassembled or modified battery is not covered by the warranty.
Battery abuse or mishandling can cause overheating, liquid leakage, or an explosion. To avoid possible injury, follow these instructions:
- Do not open, disassemble, or service any battery.
- Do not crush or puncture the battery.
- Do not short-circuit the battery, or expose it to water or other liquids.
- Keep the battery away from children.
- Keep the battery away from fire.
Stop using the battery if it is damaged, or if you notice any discharge or the buildup of foreign materials on the battery leads.
Store the rechargeable batteries or products containing rechargeable batteries at room temperature, with batteries charged to approximately 30%–50% of the full capacity. We recommend that the batteries be charged at least once per year to prevent over-discharging.
Do not put the battery in trash that is disposed of in landfills. When disposing of the battery, comply with local ordinances or regulations.
Heat and product ventilation
Computers, ac power adapters, and many accessories can generate heat when turned on and when batteries are charging. Notebook computers can generate a significant amount of heat due to their compact size. Always follow these basic precautions:
![]()
When your computer is turned on or the battery is charging, the base, the palm rest, and some other parts may become hot. Avoid keeping your hands, your lap, or any other part of your body in contact with a hot section of the computer for any extended length of time. When you use the keyboard, avoid keeping your palms on the palm rest for a prolonged period of time. Your computer generates some heat during normal operation. The amount of heat depends on the amount of system activity and the battery charge level. Extended contact with your body, even through clothing, could cause discomfort or even a skin burn. Periodically take breaks from using the keyboard by lifting your hands from the palm rest; and be careful not to use the keyboard for any extended length of time.- Do not operate your computer or charge the battery near flammable materials or in explosive environments.
- Ventilation slots, fans and/or heat sinks are provided with the product for safety, comfort, and reliable operation. These features might inadvertently become blocked by placing the product on a bed, sofa, carpet, or other flexible surface. Never block, cover, or disable these features.
![]()
When the ac power adapter is connected to an electrical outlet and your computer, it generates heat. Do not place the adapter in contact with any part of your body while using it. Never use the ac power adapter to warm your body. Extended contact with your body, even through clothing, may cause a skin burn.

For your safety, always follow these basic precautions with your computer:
- Keep the cover closed whenever the computer is plugged in.
- Regularly inspect the outside of the computer for dust accumulation.
- Remove dust from vents and any perforations in the bezel. More frequent cleanings might be required for computers in dusty or high-traffic areas.
- Do not restrict or block any ventilation openings.
- Do not operate your computer inside furniture, as this might increase the risk of overheating.
- Airflow temperatures into the computer should not exceed 35°C (95°F).
Electrical current safety information
Electric current from power, telephone, and communication cables is hazardous.
To avoid a shock hazard:
- Do not use your computer during a lightning storm.
- Do not connect or disconnect any cables or perform installation, maintenance, or reconfiguration of this product during an electrical storm.
- Connect all power cords to a properly wired and grounded electrical outlet.
- Connect properly wired outlets to any equipment that will be attached to this product.
- Whenever possible, use one hand only to connect or disconnect signal cables.
- Never turn on any equipment when there is evidence of fire, water, or structural damage.
- Disconnect the attached power cords, battery, and all the cables before you open the device covers, unless instructed otherwise in the installation and configuration procedures.
- Do not use your computer until all internal parts enclosures are fastened into place. Never use the computer when internal parts and circuits are exposed.
Connect and disconnect cables as described in the following procedures when installing, moving, or opening covers on this product or attached devices.
To connect:
- Turn everything OFF.
- First, attach all cables to devices.
- Attach signal cables to connectors.
- Attach power cords to outlets.
- Turn devices ON.
To disconnect:
- Turn everything OFF.
- First, remove power cords from outlets.
- Remove signal cables from connectors.
- Remove all cables from devices.
The power cord must be disconnected from the wall outlet or receptacle before installing all other electrical cables connected to the computer.
The power cord may be reconnected to the wall outlet or receptacle only after all other electrical cables have been connected to the computer.
During electrical storms, do not perform any replacement and do not connect the telephone cable to or disconnect it from the telephone outlet on the wall.
Liquid crystal display notice
The liquid crystal display (LCD) is made of glass, and rough handling or dropping the computer can cause the LCD to break. If the LCD breaks and the internal fluid gets into your eyes or on your hands, immediately wash the affected areas with water for at least 15 minutes; if any symptoms are present after washing, get medical care.
Note: For products with mercury-containing fluorescent lamps (for example, non-LED), the fluorescent lamp in the liquid crystal display (LCD) contains mercury; dispose of according to local, state, or federal laws.
Using headphones or earphones

Excessive sound pressure from earphones and headphones can cause hearing loss. Adjustment of the equalizer to maximum increases the earphone and headphone output voltage and the sound pressure level. Therefore, to protect your hearing, adjust the equalizer to an appropriate level.
Excessive use of headphones or earphones for a long period of time at high volume can be dangerous if the output of the headphone or earphone connectors do not comply with specifications of EN 50332-2. The headphone output connector of your computer complies with EN 50332-2 Sub clause 7. This specification limits the computer's maximum wide band true RMS output voltage to 150 mV. To help protect against hearing loss, ensure that the headphones or earphones you use also comply with EN 50332-2 (Clause 7 limits) for a wide band characteristic voltage of 75 mV. Using headphones that do not comply with EN 50332- 2 can be dangerous due to excessive sound pressure levels.
If your Lenovo computer came with headphones or earphones in the package, as a set, the combination of the headphones or earphones and the computer already complies with the specifications of EN 50332-1. If different headphones or earphones are used, ensure that they comply with EN 50332-1 (Clause 6.5 Limitation Values). Using headphones that do not comply with EN 50332-1 can be dangerous due to excessive sound pressure levels.
Choking hazard notice

CHOKING HAZARD – Product contains small parts.
Keep away from children under three years.
Plastic bag notice
Plastic bags can be dangerous. Keep plastic bags away from babies and children to avoid danger of suffocation.
Glass parts notice
Some parts of your product may be made of glass. This glass could break if the product is dropped on a hard surface or receives a substantial impact. If glass breaks, do not touch or attempt to remove it. Stop using your product until the glass is replaced by trained service personnel.
Static electricity prevention
Static electricity, although harmless to you, can seriously damage computer components and options. Improper handling of static-sensitive parts can damage the part. When you unpack an option or CRU, do not open the static-protective package containing the part until the instructions direct you to install it.
When you handle options or CRUs, or perform any work inside the computer, take the following precautions to avoid static-electricity damage:
- Limit your movement. Movement can cause static electricity to build up around you.
- Always handle components carefully. Handle adapters, memory modules, and other circuit boards by the edges. Never touch exposed circuitry.
- Prevent others from touching components.
- When you install a static-sensitive option or CRU, touch the static-protective package containing the part to a metal expansion-slot cover or other unpainted metal surface on the computer for at least two seconds. This reduces static electricity in the package and your body.
- When possible, remove the static-sensitive part from the static-protective packaging and install the part without setting it down. When this is not possible, place the static-protective packaging on a smooth, level surface and place the part on it.
- Do not place the part on the computer cover or other metal surface.
Accessibility and ergonomic information
This chapter provides information about accessibility and ergonomics.
Accessibility information
Lenovo is committed to providing users who have hearing, vision, and mobility limitations with greater access to information and technology. This section provides information about the ways these users can get the most out of their computer experience. You also can get the most up-to-date accessibility information from the following Web site:
https://www.lenovo.com/accessibility
Keyboard shortcuts
The following list contains keyboard shortcuts that can help make your computer easier to use.
Note: Depending on your keyboard, some of the following keyboard shortcuts might not be available.
- Windows logo key + U: Open Ease of Access Center
- Right Shift for eight seconds: Turn on or turn off Filter Keys
- Shift five times: Turn on or turn off Sticky Keys
- Num Lock for five seconds: Turn on or turn off Toggle Keys
- Left Alt+Left Shift+Num Lock: Turn on or turn off Mouse Keys
- Left Alt+Left Shift+PrtScn (or PrtSc): Turn on or turn off High Contrast
For more information, go to https://windows.microsoft.com/, and then search using any of the following keywords: keyboard shortcuts, key combinations, shortcut keys.
Ease of Access Center
Ease of Access Center on the Windows operating system enables you to configure your computers to suit their physical and cognitive needs.
To access Ease of Access Center:
- Go to Control Panel and view by Category.
- Click Ease of Access ➙ Ease of Access Center.
- Choose the appropriate tool by following the on-screen instructions.
Ease of Access Center mainly includes the following tools:
- Magnifier
Magnifier is a useful utility that enlarges the entire screen or part of the screen so that you can see the items better. - Narrator
Narrator is a screen reader that reads what is displayed on the screen aloud and describes events such as error messages. - On-Screen Keyboard
If you prefer to type or enter data into your computer using a mouse, joystick, or other pointing device instead of a physical keyboard, you can use On-Screen Keyboard. On-Screen Keyboard displays a visual keyboard with all the standard keys. You can select keys using the mouse or another pointing device, or you can tap to select the keys if your computer supports multi-touch screen. - High Contrast
High Contrast is a feature that heightens the color contrast of some text and images on your screen. As a result, those items are more distinct and easier to identify. - Personalized keyboard
Adjust keyboard settings to make your keyboard easier to use. For example, you can use your keyboard to control the pointer and make the keyboard easier to type certain key combinations. - Personalized mouse
Adjust mouse settings to make your mouse easier to use. For example, you can change the pointer appearance and make your mouse easier to manage windows.
Speech Recognition
Speech Recognition enables you to control your computer by voice.
You can use verbal instructions to control the keyboard and mouse. With verbal instructions, you can start programs, open menus, click objects on the screen, dictate text into documents, and write and send e-mails.
To use Speech Recognition:
- Go to Control Panel and view by Category.
- Click Ease of Access ➙ Speech Recognition.
- Follow the on-screen instructions.
Screen-reader technologies
Screen-reader technologies are primarily focused on software program interfaces, help systems, and various online documents. For additional information about screen readers, see the following:
- Using PDFs with screen readers:
https://www.adobe.com/accessibility.html?promoid=DJGVE - Using the JAWS screen reader:
https://www.freedomscientific.com/Products/Blindness/JAWS - Using the NVDA screen reader:
https://www.nvaccess.org/
Screen resolution
You can make the text and images on your screen easier to read by adjusting the screen resolution of your computer.
To adjust the screen resolution:
- Right-click a blank area on the desktop and then click Display settings ➙ Display.
- Follow the on-screen instructions.
Note: Setting a resolution too low might prevent some items from fitting on the screen.
Customizable item size
You can make the items on your screen easier to read by changing the item size.
- To change the item size temporarily, use the Magnifier tool in Ease of Access Center.
- To change the item size permanently:
- Change the size of all the items on your screen.
- Right-click a blank area on the desktop and then click Display settings ➙ Display.
- Change the item size by following the on-screen instructions. For some applications, your configuration might not take effect until you sign out and then sign in again.
- Change the size of the items on a Web page. Press and hold Ctrl, and then press the plus-sign key (+) to enlarge or the minus-sign key (–) to reduce the text size.
- Change the size of the items on the desktop or a window.
Note: This function might not work on some windows.
If your mouse has a wheel, press and hold Ctrl, and then scroll the wheel to change the item size.
- Change the size of all the items on your screen.
Industry-standard connectors
Your computer provides industry-standard connectors that enable you to connect assistive devices.
Documentation in accessible formats
Lenovo provides electronic documentation in accessible formats, such as properly tagged PDF files or HyperText Markup Language (HTML) files. Lenovo electronic documentation is developed to ensure that visually impaired users can read the documentation through a screen reader. Each image in the documentation also includes adequate alternative text so that visually impaired users can understand the image when they use a screen reader.
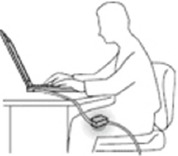
Ergonomic information
Good ergonomic practice is important to get the most from your personal computer and to avoid discomfort. Arrange your workplace and the equipment you use to suit your individual needs and the kind of work that you perform. In addition, use healthy work habits to maximize your performance and comfort when using your computer.
Working in the virtual office might mean adapting to frequent changes in your environment. Adapting to the surrounding light sources, active seating, and the placement of your computer hardware, can help you improve your performance and achieve greater comfort.
This example shows someone in a conventional setting. Even when not in such a setting, you can follow many of these tips. Develop good habits, and they will serve you well.

General posture: Make minor modifications in your working posture to deter the onset of discomfort caused by long periods of working in the same position. Frequent short breaks from your work also help to prevent minor discomfort associated with your working posture.
Display: Position the display to maintain a comfortable viewing distance of 510 mm to 760 mm (20 inches to 30 inches). Avoid glare or reflections on the display from overhead lighting or outside sources of light. Keep the display screen clean and set the brightness to levels that enable you to see the screen clearly. Press the brightness control keys to adjust display brightness.
Head position: Keep your head and neck in a comfortable and neutral (vertical, or upright) position.
Chair: Use a chair that gives you good back support and seat height adjustment. Use chair adjustments to best suit your comfort posture.
Arm and hand position: If available, use chair arm rests or an area on your working surface to provide weight support for your arms. Keep your forearms, wrists, and hands in a relaxed and neutral (horizontal) position. Type with a soft touch without pounding the keys.
Leg position: Keep your thighs parallel to the floor and your feet flat on the floor or on a footrest.
What if you are traveling?
It might not be possible to observe the best ergonomic practices when you are using your computer while on the move or in a casual setting. Regardless of the setting, try to observe as many of the tips as possible. Sitting properly and using adequate lighting, for example, helps you maintain desirable levels of comfort and performance. If your work area is not in an office setting, ensure to take special note of employing active sitting and taking work breaks. Many product solutions are available to help you modify and expand your computer to best suit your needs. You can find some of these options at https://www.lenovo.com/accessories. Explore your options for docking solutions and external products that provide the adjustability and features that you want.
Questions about vision?
The visual display screens of notebook computers are designed to meet the highest standards. These visual display screens provide you with clear, crisp images and large, bright displays that are easy to see, yet easy on the eyes. Any concentrated and sustained visual activity can be tiring. If you have questions on eye fatigue or visual discomfort, consult a vision-care specialist for advice.
Documents / Resources
References
SupportPhoneList - Lenovo Support US
![www.lenovo.com]() Lenovo Services | Lenovo US
Lenovo Services | Lenovo US![www.lenovo.com]() Product Accessibility | Regulatory Compliance | Lenovo US
Product Accessibility | Regulatory Compliance | Lenovo USExperience the Power of AI with Windows 11 OS, Computers, & Apps | Microsoft Windows
![www.nvaccess.org]() NV Access
NV Access![www.lenovo.com]() Lenovo Accessories & Software - Shop Now | Lenovo US
Lenovo Accessories & Software - Shop Now | Lenovo USYour request has been blocked. This could be due to several reasons.
![support.microsoft.com]() Microsoft Support
Microsoft Support![www.lenovo.com]() Lenovo Services | Lenovo US
Lenovo Services | Lenovo US
Download manual
Here you can download full pdf version of manual, it may contain additional safety instructions, warranty information, FCC rules, etc.
Advertisement


Need help?
Do you have a question about the IdeaPad S145 Series and is the answer not in the manual?
Questions and answers