Advertisement
DOWNLOAD THE DEFEND APP
VISIT YOUR APP STORE TO DOWNLOAD


INTRODUCTION
WHAT'S IN THE BOX
- (1) Security Camera
- (1) Instruction Manual
- (1) Mount
WHAT YOU WILL NEED
- Power Drill or Mounting Strap
- (12) AA Batteries Required - Lithium Batteries recommended in colder temperatures
- Optional Full-size SD card - Class 10, U3, 16GB-32GB
RECOMMENDED ACCESSORIES
(NOT INCLUDED)

VIEW AND PURCHASE ALL ACCESSORIES AT TACTACAM.COM
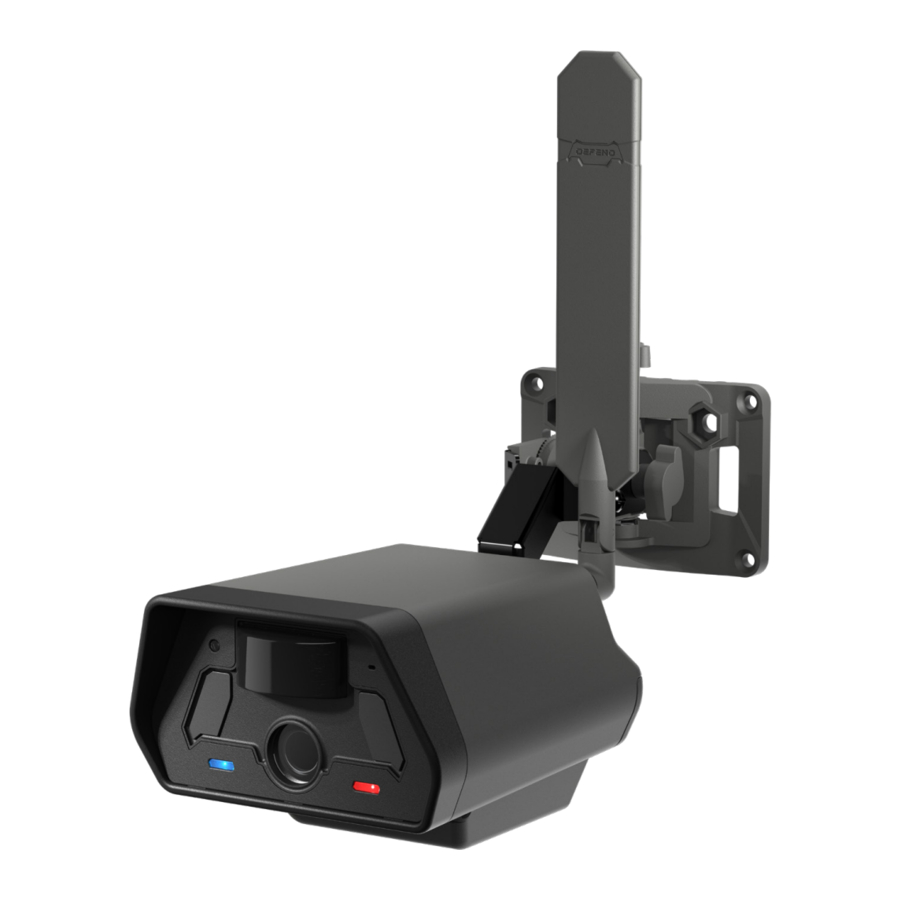
OVERVIEW

- Antenna
- Motion Sensor
- Day/Night Sensor
- Microphone
- Camera Lens
- Device Status Indicator
- Device Signal Indicator
- Mount
- Test Button
- Reset Button
- Power Button
- Mount Attach
- Solar Panel/DC Power Port
- USB-C Port
- Battery Door Latch
BUTTONS

| CAMERA CONTROLS | ||
| Key Name | When In | Key Function |
| Power Key | Off Mode | Press 1s to power on device to setup mode |
| Work Mode | Press 1s to enter setup mode | |
| Setup Mode | Press 1s to power off device | |
| Test Button | Setup Mode | Short press 1s to capture picture and send to server |
| Work Mode | Short press 1s to boot device and capture picture and send to server | |
| Reset Button | Setup Mode | Long press 10s to perform factory reset |
*Upon startup, the device will enter Setup Mode for two minutes and automatically enter Work Mode after.
LIGHTS

| INDICATOR GUIDE | |||
| LED NAME | COLOR | INDICATION | DESCRIPTION |
| STATUS | GREEN | POWER ON | When first powered on, the GREEN LED turns on before changing BLUE |
| LOW BATTERY | When the battery is low, the GREEN LED will stay on in WORK mode. In SETUP mode, both the GREEN and BLUE LED's will be on. | ||
| POWER OFF | The GREEN LED blinks 3 times as the device powers of from SETUP mode. | ||
| BLUE | SETUP MODE | The BLUE LED indicates SETUP mode status. After going into WORK mode, the BLUE LED will turn off. | |
| SIGNAL | RED | CELLULAR CONNECTION | Upon connection to the cellular network while in SETUP mode, the RED LED will blink at 1-sec intervals. It will turn off in WORK mode. |
| GREEN | BLUETOOTH STATUS | Brief GREEN LED when using Bluetooth to achieve Wi-Fi pairing. | |
| BLUE | Wi-Fi STATUS | BLUE LED blinks with 1s intervals when device Wi-Fi is connected to phone. | |
SETTING UP THE UNIT
- Ensure the Pre-Installed Antenna is Snug and Secure.
- Optional: Install a Class 10 U3 SD Card Up to 32GB.
- Install 12 AA Batteries or Optional Power Accessories.
- Open the battery compartment. Ensure AA batteries are oriented correctly in the battery trays. If using a Rechargeable Battery for Defend Cam (sold separately), fully charge it before installation.
NETWORK SELECTION
Automatic Network Selection
Pre-installed SIM Card: The Defend cam is equipped with a pre-installed SIM card inside the camera. Upon activation, the camera automatically searches to determine the strongest network signal between multiple carriers, ensuring reliable service in diverse environments.
Auto-Carrier Selection: Every time the camera is powered on, it undergoes Auto-Carrier Selection to ensure it connects to the optimal network available at that moment.
SETTING UP YOUR ACCOUNT
If this is the first Defend camera you will be activating, please create an account through the mobile app or on the Defend Web Portal at www.defendcellcam.com. Once the account is created, select a subscription plan to be able to receive images to your app. On Apple devices, you must purchase a plan through the Web Portal. If you already have a Defend account with ACTIVE cameras, you can simply log in to your app and add your new camera.

DOWNLOADING THE APP
In your Apple App Store or Google Play Store, download the Defend by Tactacam app and sign in using the same TactaID account email and password you created on the web portal.
ADD THE UNIT TO THE APP
- Once on the Home page, click on the left-side menu icon.
- From the menu, click the "+ Add a Camera" option.
- Choose an existing subscription plan and and select your camera model
- The app will prompt you to scan the QR code located inside the battery door of the camera.
![]()
- Follow the in-app prompts to activate your Defend camera.

PAIRING YOUR DEVICE TO YOUR PHONE THROUGH WI-FI
You can automatically change and apply the camera settings when your phone is connected to the camera's Wi-Fi. This will not work unless you are next to the camera.

- Turn Defend to SETUP mode.
- When the Signal light is blinking blue, it is ready to pair to your phone or tablet.
- In the app go to the Account page and click "Connect to Defend Wi-Fi".
- Follow the in-app instructions. You can also manually connect in your phone's Wi-Fi settings, select "Defend" and enter the password (DEFEND2024). This Wi-Fi password is case sensitive, no spaces.
- See preview on phone screen
- Red line on preview is point of focus
- To send test picture, press "Test" button on camera
Also available in the app while connected to Wi-Fi:
- Instantly apply setting changes from the app
- Formatting SD card, which may be necessary if you purchased a non-Tactacam branded SD card.
REMOTELY CHANGE THE DEVICE SETTINGS FROM THE APP
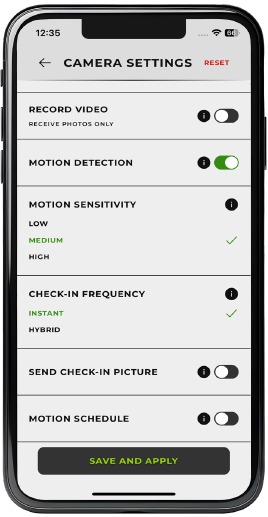
From the Cameras page, choose the camera you want to view and select "Camera Settings" from the menu. Make sure to select "Save and Apply" when done to save your changes.
SENDING A TEST PICTURE
- When the signal is acquired and the camera is in setup mode, there will be a blinking red light on the connectivity light (right light). Then, press the test button on the back and check your Defend app to make sure the photo was sent. This could take a minute to transmit through the network.


SETTINGS / SPECIFICATIONS
| FEATURE | SPEC |
| Image, Video, and Motion Detection | |
| Camera Mode | Photo only or Photo + Video |
| Image Resolution | Up to 4k |
| Video Resolution | Up to 1080p, 30FPS |
| Video Duration | Up to 30 seconds |
| Picture Format | .jpg |
| Video Format | .mp4 |
| Camera Field of View | 60 deg. |
| Motion Detection Distance | Up to 100 ft. |
| Day/Night Mode | Daytime: Color, Nighttime: B+W |
| IR Range | Up to 100 ft. |
| IR Flash | Low-Glow IR LED |
| Trigger Speed | 0.5 Seconds |
| Storage | |
| Internal eMMC | 8 GB |
| SD Card (Optional) | Up to 32 GB, Class 10, U3 |
| SD Card Loop | Yes |
| Controls | |
| Operating Keys | (2) 1x Power button; 1 x Test Button |
| Status Indicator | 1 LED for Status, 1 LED for Signal |
| Power | |
| Battery | 12x AA |
| Rechargeable (Optional) | 5200 mAh Li-Ion (sold separately) |
| External | 12 V, 2 A |
BEST PRACTICES
PROPER UNIT PLACEMENT
- Location and placement is critical for optimal camera performance.
- See image for ideal installation configuration. (See Below)

- Installation tips:
- Optimal installation height ~8-10 feet with slight downward angle (10 degrees)
- Avoid placing in direct sunlight when possible
- Avoid aiming at active backgrounds (busy streets, moving branches, etc.)
- Adjust motion sensitivity setting to best fit your environment

BATTERIES AND DEVICE PERFORMANCE
- 12x AA name-brand alkaline or lithium batteries are recommended.
- Lithium will offer the longest battery life, especially in cold weather.
- If connecting the Tactacam External Solar Panel (sold separately), the AA batteries would act as a backup power source.
TROUBLESHOOTING
DEVICE SENDS PICTURES OF NOTHING
Motion sensors Motion sensors (PIR sensors) are actually heat sensors. They "trigger" when detecting a heat differential across the sensor. This is why on a hot and windy day, people get false triggers. People and animals are not the only objects that will trigger your camera; vegetation and precipitation can act as a moving target as well.
- Be sure to clear any low hanging tree branches, brush, and weeds from the camera field of view.
- Motion sensitivity recommendations:
- Set to High, and decrease sensitivity if you're getting too many false triggers.
DEVICE STOPS TAKING IMAGES OR WON'T TAKE IMAGES
- Make sure your batteries have sufficient power and the camera is on.
- If using a non-Tactacam brand SD card, connect via Wi-Fi and format the SD card.
INTERNAL CONDENSATION ON LENS
The Defend is IP66 rated. This means the camera is water resistant against powerful jets. The only way the Defend Cam can get condensation in or behind the lens is if the antenna is not screwed in all the way, or if there is dirt or debris on the battery door seal. Follow these at home instructions to alleviate this issue if need be:
- Pull the SD card out and let the camera sit open for 3-4 days, in an area where there is circulating air (fan or vent).
- You can also put in a sealed container with rice for 24 hours to draw out the moisture.
- Clean the seal well and tighten your antenna.
- Place back in the field.
For any warranty issues or questions on how to best watch over your property with Defend:
CALL 218-282-5650
OR
EMAIL SUPPORT@TACTACAM.COM
1668 Jordan West Rd. | Decorah, Iowa 52101 | www.tactacam.com
Documents / Resources
References
Download manual
Here you can download full pdf version of manual, it may contain additional safety instructions, warranty information, FCC rules, etc.
Advertisement

Need help?
Do you have a question about the DEFEND and is the answer not in the manual?
Questions and answers