Advertisement
- 1 Introduction
- 2 Hardware Introduction and Setup
- 3 Installation Safety Instructions
-
4
Features and Settings
- 4.1 Wi-Fi Settings
- 4.2 Wi-Fi Unified Band Settings
- 4.3 WPS
- 4.4 DHCP IPv4 Settings
- 4.5 MAC Reservation
- 4.6 MAC Filter
- 4.7 Ethernet Settings
- 4.8 Network Mode Settings
- 4.9 APN Settings
- 4.10 Parental Control
- 4.11 DMZ
- 4.12 IP Filter
- 4.13 Port Forwarding
- 4.14 SIP ALG
- 4.15 UPnP
- 4.16 Restart/Restore to Factory Defaults
- 5 Documents / Resources
Introduction
Presentation
The product is a 5G wireless gateway device for multiple users in household or small office environments providing FWA services, enabling users to access Internet various through physical Ethernet port or Wi-Fi (IEEE 802.11b/g/n/a/ac/ax).
With this document we are giving you an introduction about hardware introduction, software features and how to configure this device.
Prerequisite
Using OPPO 5G CPE T1a would require a minimum of:
- Power socket;
- A 4FF SIM card with data plan service from Network Operator;
- User terminals (e.g. Desktop Computer, Smart Pad, Smartphone, etc.)
Hardware Introduction and Setup
Hardware Introduction
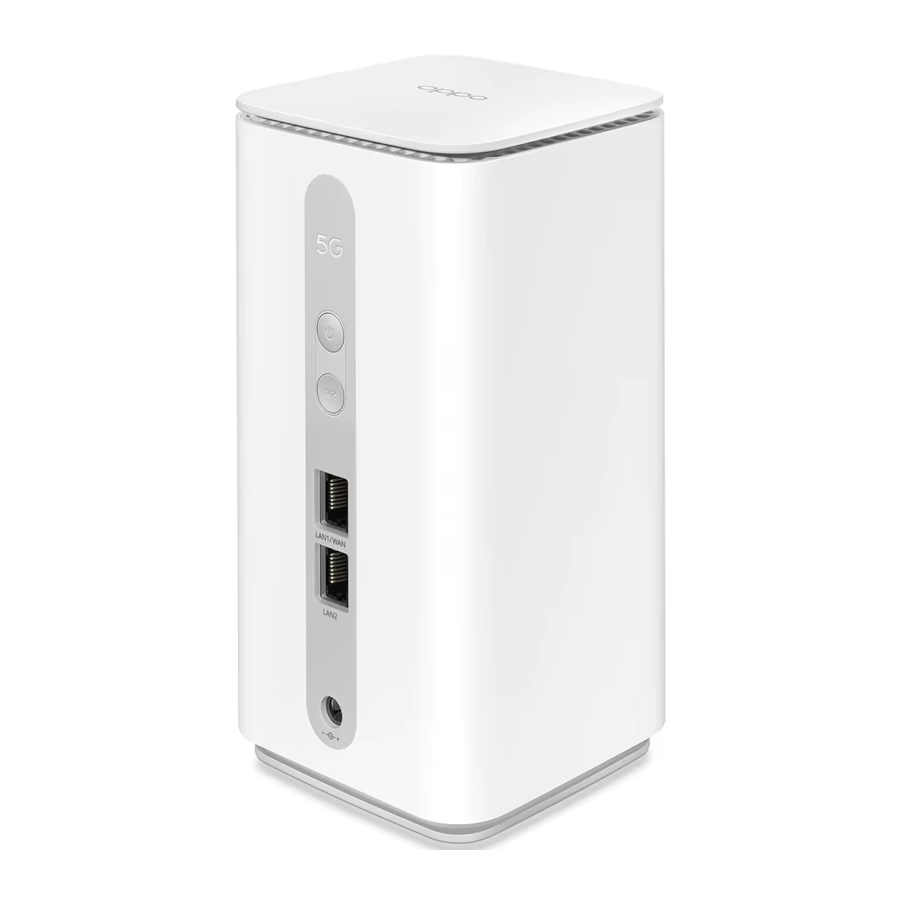
Appearance
Please check the T1a's appearance as below:

Buttons and Interfaces
Side View:

Bottom View:

| Button/Interface | Description |
| Power ON/OFF Button | Long Press for 3 seconds to turn ON/OFF T1a. |
| WPS Button | Long Press for 3 seconds to turn ON WPS,short press to turn OFF WPS. Once WPS is turning on, it automatically turns off until a device is successfully connected or 2 mins without any connection. |
| GE Port*2 (RJ45) | 1 LAN port and 1 LAN/WAN port. Can be connected with user terminal devices. |
| Power Adapter Port | Can be connected through a power adapter. |
| RESET Button | Insert in and gently applying pressure until 5G/4G/Wi-Fi LEDs flash three times. |
| SIM CARD | Nano-SIM(4FF) card slot. |
LEDs
LED indicators:

| LEDs | Description |
| 5G indicator | Refers to 5G working status:
|
| 4G indicator | Refers to 4G working status:
|
| Wi-Fi indicator | Refers to Wi-Fi working status:
|
| Power indicator |
|
Setup Guidance
Setup the Network
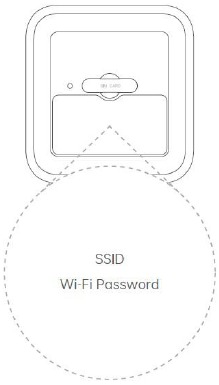
Step 1: Prepare a nano-SIM card.

Step 2: Open the SIM card slot at the bottom and insert in SIM card as shown in the following figure.

Step 3: Connect your CPE to a power source. The CPE then automatically powers on and searches for an available network.

Step 4: Wait until the power-on initialization ends. If the 4G or 5G indicator is on, the CPE has successfully connected to a network.
How to Connect to Network via CPE
Approach 1:
Connect your device to the CPE via Wi-Fi. For the default Wi-Fi name (SSID) and default Wi-Fi password, see the label attached to the bottom of the CPE.
Approach 2:
Connect your device to the CPE via a network cable. If your device requires a wired connection (e.g. a computer), connect it to a LAN port at the rear of the CPE via a network cable.

Installation Safety Instructions
- Power supply source
| No | Description |
| 1 | Do not cover T1a's main adapter. |
| 2 | Never open the power adapter unit; this can expose you to fatal danger. |
| 3 | T1a comes with its own power adapter. Do not use another adapter. |
| 4 | This class II adapter does not need to be grounded (earthed). The connection to the electrical power supply network should comply with the indications given on the label. |
| 5 | Use a readily accessible power outlet located near T1a. |
| 6 | Arrange the power supply cord in such a way as to avoid any accidental power cut to the T1a. |
| 7 | The T1a is designed to be connected to a GG (ground-to-ground) or GN (ground to neutral) type power supply network. |
| 8 | T1a is not designed to be connected to an electrical installation with IT type diagram (neutral connected to ground through an impedance). |
| 9 | Protection against short-circuits and leaks between the phase, neutral and ground should be provided by the building's electrical installation. The power supply circuit for this equipment should be fitted with 16 A overcurrent protection and differential protection. |
| 10 | Connect T1a to the power supply unit via a readily accessible wall socket ensuring electrical power cutting. |
- Location conditions
By choosing an appropriate location, you will preserve the longevity of the device. Ensure that the selected location has the following characteristics:
| No | Description |
| 1 | Install and use the T1a inside a building. |
| 2 | The room temperature must not exceed 40°C. |
| 3 | T1a can be placed on a desktop. |
| 4 | Do not expose T1a to strong sunlight or place it near a substantial source of heat. |
| 5 | Do not place T1a in an environment where it could be subjected to considerable steam condensation. |
| 6 | Do not expose T1a to splashes of water. |
| 7 | Do not cover the T1a casing. |
| 8 | Do not use the T1a or its peripherals for outdoor transmissions. |
- Maintenance
| No | Description |
| 1 | Never open the casing. This has to be done only by qualified personnel approved by your supplier. |
| 2 | If T1a need to disassemble and repair, then the disassembled damaged structural parts can't be used. |
| 3 | Do not use liquid or aerosol cleaning agents. |
- Use Conditions
| No | Description |
| 1 | Do not use T1a at an angle, let alone tip it over or upside down. |
| 2 | Do not place any other objects on top of T1a when it is running. |
| 3 | Do not use corrosive chemicals to wipe T1a case. |
| 4 | Do not block the upper and lower openings of T1a. |
| 5 | Do not touch the T1a interface with any part of your body when it is running, such as Network port, Phone port, etc. |
Features and Settings
Wi-Fi Settings
Wi-Fi Name and Password Settings
Go to Wi-Fi Settings -> Basic:

On this page, users may change the settings of 2.4GHz Wi-Fi and 5GHz Wi-Fi respectively.
The following table describes the values of Wi-Fi settings:
| Field | Action |
| Wi-Fi Name | An ID identifies which Wi-Fi user is configuring. |
| Encryption Mode |
|
| Wi-Fi Password | A password for certain Wi-Fi connection. |
Advanced Settings
Go to Wi-Fi Settings -> Advanced:

On this page, users may change the settings of 2.4GHz Wi-Fi or 5GHz Wi-Fi respectively.
The following table describes the values of Wi-Fi settings:
| Field | Action |
| 2.4GHz – Tx Power | User may change settings of 2.4GHz antenna Tx power. |
| 2.4GHz – Channel | User may set 2.4GHz Wi-Fi channel to Auto mode or a specific channel. |
| 2.4GHz – Channel Width |
|
| 2.4GHz – Mode | User may change Wi-Fi mode of 2.4GHz. |
| |
| 5GHz - Tx Power | User may change settings of 5GHz antenna Tx power. |
| 5GHz - Channel | User may set 5GHz Wi-Fi channel to Auto mode or a specific channel. |
| 5GHz – Channel Width |
|
| 5GHz - Mode | User may change Wi-Fi mode of 5GHz.
|
Guest Wi-Fi
Go to Wi-Fi Settings -> Guest Wi-Fi:

On this page, user may enable or disable and change settings for Guest Wi-Fi.
The following table describes the values of Wi-Fi settings:
| Field | Action |
| 2.4GHz/5GHz Wi-Fi | A drop-down menu for users to choose band for Guest Wi-Fi:
|
| Enable Guest Wi-Fi | A checkbox for user to choose whether to enable or disable Guest Wi-Fi. |
| Wi-Fi Name | An ID identifies which Wi-Fi user is configuring for Guest Wi-Fi. |
| Encryption Mode |
|
| Wi-Fi Password | A password for Guest Wi-Fi connection. |
Wi-Fi Unified Band Settings
Feature Introduction
T1a supports to combine 2.4GHz and 5GHz Wi-Fi into a Unified Band.
Higher priority to use 5 GHz Wi-Fi band over 2.4 GHz band when signal strength is equal to increase connection speed.
Feature Settings
Go to Wi-Fi Settings -> Basic:

By clicking on the toggle of Unified Band Settings, user may change Wi-Fi mode successfully after Wi-Fi restart.
WPS
Feature Introduction
WPS refers to Wi-Fi Protected Setup, which is supported by T1a. The point of the protocol is to allow users who know little of wireless security and may be intimidated by the available security options to set up Wi-Fi Protected Access, as well as making it easy to pair new wireless clients to an existing network without entering long passphrases.
WPS Settings
Settings on WebUI:
Go to Wi-Fi Settings -> Advanced:

After turning on WPS Settings, user may click the button START WPS to activate the feature. By activating WPS Connection on user terminal, user would connect device to CPE successfully through Wi-Fi.
DHCP IPv4 Settings
Feature Introduction
DHCP is a network management protocol supported by T1a. T1a, works as a DHCP server, assigns unique IP address to its connected DHCP clients, which refers to user terminals. In the absence of a DHCP server, a device that needs an IP address must be manually assigned a static address by a network administrator.
Feature Settings
Go to LAN -> DHCP IPv4:

On this page, user may change configurations of DHCP feature. The following table describes the meanings or values of each field:
| Field | Action |
| IP Address | The IP address for LAN/Wi-Fi DHCP host. |
| Start IP | The IP address for DHCP clients start from. |
| End IP | The IP address for DHCP clients end from. |
| Lease Time | Valid period for an IP of DHCP client.
|
| DNS | DNS mode:
|
MAC Reservation
Feature Introduction
T1a supports configuration of the Media Access Control (MAC) address to allow certain user terminal assigned by a specific IP address through DHCP.
Feature Settings
Go to LAN -> MAC Reservation:

On this page, user can check the information and status for each connected devices in the list. Edit and delete operations are support for each item respectively.
By clicking the button of ADD, a window would pop up to be filled for user to add new items.

The following table describes the meanings or values of each field:
| Field | Action |
| IP Address | The IP address reserved for certain user terminal. |
| MAC Address | The MAC address for user terminal. |
MAC Filter
Feature Introduction
T1a supports configuration of the Media Access Control (MAC) address to restrict network access.
Feature Settings
Go to LAN -> MAC Filter:

On this page, user may check the list of rules already set for MAC Filter. Edit and delete operations are support for each item respectively.
| Field | Action |
| MAC Filter | User may turn on/off MAC Filter. |
| Filter Policy | User may change the settings of filter policy to be as below:
|
By clicking the button of ADD, a window would pop up to be filled for user to add new items.

The following table describes the meanings or values of each field:
| Field | Action |
| MAC Filter | The permission of either Allow or Deny.
|
| MAC Address | The MAC address for user terminal. |
Ethernet Settings
Feature Settings
Go to LAN -> Ethernet Settings

On this page you may change the protocol settings for WAN/LAN port.
The following table describes the meanings or values of each field:
| Field | Action |
| Connection Mode |
|
Network Mode Settings
Feature Introduction
Go to Advanced Settings -> Network Settings:

On this page, user may change the mode of data roaming and also do network mode configuration as well.
The following table describes the meanings or values of each field:
| Field | Action |
| Data Roaming | User is able to turn on/off data roaming device capability. |
| Network Mode |
|
APN Settings
Feature Settings
Go to Advanced Settings -> Network Settings:

On this page, user may check the APN list. Enable/Disable, edit, delete operations are supported by end users.
By clicking ADD button, user is able to add new items through a pop up window.

The following table describes the meanings or values of each field:
| Field | Action |
| Profile Name | APN Profile name |
| APN | APN name |
| APN Type | Configure the type of APN |
| Username | Username for APN |
| Password | Password for APN. |
| Authentication |
|
Parental Control
Feature Introduction
T1a supports Parental Control which is used to restrict user terminals connection by configuring allow or deny rules within a certain period of time.
Feature Settings
Go to Advanced Settings -> Parental Control:

On this page, user is able to check all the parental control rules in the list. Enable/Disable, edit, delete operations are supported by end users.
Click ADD button:

The following table describes the meanings or values of each field:
| Field | Action |
| Rule | User may choose to Allow or Deny within a time period. |
| MAC Address | The MAC address for user terminal. |
| Schedule | A date for the rule taking effect. (Chosen days turn green.) |
| Start Time | Start time for the rule. |
| End Time | End time for the rule. |
DMZ
Feature Introduction
DMZ is supported by T1a that lets user access the server you selected directly via the Internet without going through the "firewall."

Feature Settings
Go to Advanced Settings -> DMZ:

Here through WebUI, user may configure the functionality of DMZ.
IP Filter
Feature Introduction
IP Filter is a feature provides firewall services allowing an administrator to restrict user access to certain website.
Feature Settings
Go to Advanced Settings -> IP Filter:

On this page, users may change the settings of IP Filter. The following table describes the meanings or values of each field:
| Field | Action |
| IP Filter | User may choose turn IP Filter ON/OFF. |
| Filter Policy | User may set the policy of IP Filter to be either ALLOW or DENY. |
| IP Filter List | A list of IP Filter shown to user. User make do following operations on the list.
|
Click ADD button to go to a window adding IP Filter items:

The following table describes the meanings or values of each field:
| Field | Action |
| WAN IP Address | IP address of WAN side restriction. |
| Protocol |
|
| WAN Port | Range of WAN Port. |
| LAN IP Address | LAN side IP Address. |
| LAN Port | Range of LAN Port. |
Port Forwarding
Feature Introduction
T1a supports Port Forwarding which is used in network devices and redirects a communication request from one address and port number combination to another while the packets are traversing a network gateway, such as a router or firewall.
Feature Settings
Go to Advanced Settings -> Port Forwarding:

On this page through WebUI, user may configure the functionality of Port Forwarding.
SIP ALG
Feature Introduction
SIP ALG stands for Application Layer Gateway and is supported by T1a. Its purpose is to prevent some of the problems caused by router firewalls by inspecting voice service traffic.
Feature Settings
Go to Advanced Settings -> SIP ALG:

On this page through WebUI, user may turn the functionality of SIP ALG ON/OFF.
UPnP
Feature Introduction
T1a supports UPnP which is a set of networking protocols that permits user devices, such as personal computers, printers, and mobile devices to seamlessly discover each other's presence on the network and establish functional network services.
Feature Settings
Go to Advanced Settings -> UPnP:

On this page through WebUI, user may turn the functionality of UPnP ON/OFF.
Restart/Restore to Factory Defaults
Feature Settings
Go to Advanced Settings -> Maintenance -> Reboot/Restore:

Here users may click to choose Restart the device or Restore the device to factory default.
Documents / ResourcesDownload manual
Here you can download full pdf version of manual, it may contain additional safety instructions, warranty information, FCC rules, etc.
Advertisement

Need help?
Do you have a question about the 5G CPE T1a and is the answer not in the manual?
Questions and answers