Table of Contents
Advertisement
Advertisement
Table of Contents

Related Manuals for Samsung HT-TXQ120K


Summary of Contents for Samsung HT-TXQ120K
- Page 1 Instruction Manual DIGITAL HOME CINEMA SYSTEM HT-TXQ120K COMPACT DIGITAL AUDIO...
-
Page 2: Safety Warnings
Safety Warnings Precautions This symbol indicates “dangerous voltage” inside the CAUTION product that presents a risk of electric shock or RISK OF ELECTRIC SHOCK. DO NOT OPEN personal injury TO REDUCE THE RISK OF ELECTRIC SHOCK, This symbol indicates important instructions DO NOT REMOVE REAR COVER (or BACK). -
Page 3: Table Of Contents
Specifi cations ..............71 Customized TV Screen Display Fast Playback ..............33 Slow Playback ...............33 The HT-TXQ120K allows you to select your favorite image during JPEG and DVD playback and set it as your Skipping Scenes/Songs ..........34 background wallpaper. Repeat Playback ............35... -
Page 4: Dvd-Audio Compatible
Notes on Discs Disc Recording Format DVD (Digital Versatile Disc) offers fantastic audio and video, thanks to Dolby Digital surround sound and MPEG-2 video compression technology. Now you can enjoy these realistic effects in the home, as if you were in a movie theater or concert hall. This product does not support Secure (DRM) Media files. -
Page 5: Description
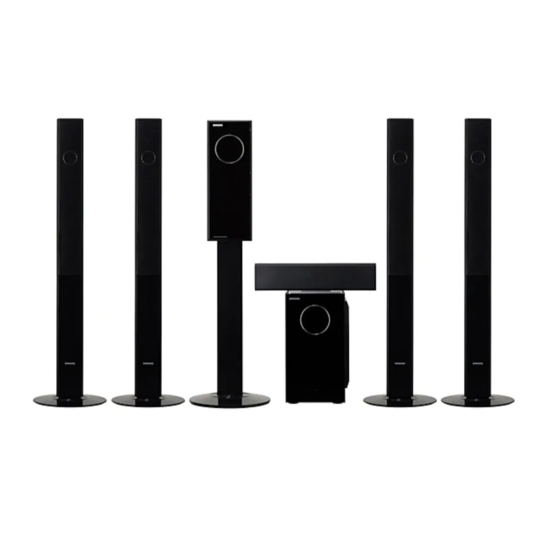
Description Subwoofer Main unit <FRONT> <REAR> <FRONT> <REAR> SPEAKERS OUT FRONT R CENTER FRONT L ASC IN REAR R REAR L KARAOKE MIC RADIO ANT. MIC 1 MIC 2 COMPONENT OUT SYSTEM CONNECTOR WIRELESS AUX IN VIDEO OUT Standby indicator FM 75Ω... -
Page 6: Remote Control
Description (Con’t) Remote Control Insert Remote Batteries Remove the battery cover in the direction of the arrow. TV button DVD RECEIVER button Insert two 1.5V AAA batteries, paying attention to the correct polarities POWER button (+ and –). Number (0~9) buttons Replace the battery cover. -
Page 7: Speaker Installation
Installing the DVD player Speaker Installation How to Install the Speaker and the Stand Mount the stand on the stand base and tighten 4 STAND screws on the bottom side of the stand base. Loosen 2 screws at the bottom of the back cover. STAND BASE Turn the stand upside down and mount it on the Detach the back cover by lifting it up. -
Page 8: Connecting The Speakers
Connecting the Speakers Before moving or installing the product, be sure to turn off the power and disconnect the power cord. Rear of Subwoofer Rear of Main unit SPEAKERS OUT FRONT R CENTER FRONT L ASC IN REAR R REAR L KARAOKE MIC RADIO ANT. -
Page 9: Connecting The Wireless Receiving Amplifi Er
Connecting the Wireless Receiving Amplifier (Con’t) To connect the rear speakers wirelessly, you have to purchase the wireless receiving module and TX card from your Samsung retailer. Connecting the Main Unit and Subwoofer When you have Purchased the Wireless Receiving Module (SWA-3000) -
Page 10: Connecting The Video Out To Your Tv
Connecting the Wireless Receiving Amplifier Connecting the Video Out to your TV (Con’t) Resetting the Wireless Receiving Module Choose one of the three methods for connecting to a TV. Reset the system if a communication failure occurs, or if the Link indicator (blue LED) on the wireless receiver does not light up and the "REAR CHECK"... -
Page 11: Connecting The Hdmi In/Out
Connecting the HDMI IN/OUT HDMI Function HDMI Audio ON/OFF function HDMI (High-Defi nition Multimedia Interface) is a digital interface that enables transmitting digital video and audio over a single cable. In addition, it enables you to enjoy multi-channel digital audio. The audio signals transmitted over the HDMI Cable can be toggled ON/OFF. -
Page 12: Connecting Audio From External Components
Connecting Audio from External Components Connecting the FM Antenna FM Antenna (supplied) SPEAKERS OUT FRONT R CENTER FRONT L ASC IN REAR R REAR L KARAOKE MIC RADIO ANT. MIC 1 MIC 2 COMPONENT OUT SYSTEM CONNECTOR WIRELESS SPEAKERS OUT AUX IN VIDEO OUT FRONT R CENTER FRONT L... -
Page 13: Before Reading The User's Manual
Before Reading the User's Manual Before Using Your Home Theater To Operate your Samsung TV and the Home Theater with the HT-TXQ120 Remote Control Make sure to check the following terms before reading the user manual. The DVD Home Theater's remote can be used to control Samsung TVs. -
Page 14: Disc Playback
Disc Playback SACD (Super Audio CD) Playback You can listen to high quality multi-channel sound that exceeds regular CD playback. Load a disc vertically into the Disc Insert Hole. Insert a disc so that the label side facing forward. Load the SACD disc. Playback starts automatically. -
Page 15: Mp3/Wma-Cd Playback
MP3/WMA-CD Playback JPEG File Playback Data CDs (CD-R, CD-RW) encoded in MP3/WMA format can be played. Images captured with a digital camera or camcorder, or JPEG fi les on a PC can be stored on a CD and then played back with this Home Theater. -
Page 16: Divx Playback
DivX Playback The functions on this page apply to DivX disc playback. Subtitle Display Skip Forward/Back Press the SUBTITLE button. Each time you press the button, your selection will toggle between <SUBTITLE (1/N, 2/N During playback, press the #,$ button..)>... -
Page 17: Using The Playback Function
Using the Playback Function Displaying Disc Informatio Checking the Remaining Time You can view disc playback information on the TV screen. Press the REMAIN button. For checking the total and remaining time of a title or chapter being played. Press the INFO button. Each time the button is pressed, the display changes as follows: Each time the Remain button is pressed TITLE ELAPSED... -
Page 18: Skipping Scenes/Songs
Using the Playback Function (Con’t) Skipping Scenes/Songs Repeat Playback Repeat playback allows you to repeatedly play a chapter, title, track (song), or directory (MP3 fi le). Press the #‚$ button. Press the REPEAT button. Each time the button is pressed during playback, the previous or next chapter, track or directory (file) will be played. -
Page 19: A-B Repeat Playback
Using the Playback Function (Con’t) A-B Repeat Playback Angle Function You can repeatedly play back a designated section of a DVD. This function allows you to view the same scene in different angles. Press the INFO button twice. Press the INFO button. Press the Cursor ►... -
Page 20: Bonus Group
Using the Playback Function (Con’t) Audio Language Selection Function Bonus Group Press the INFO button twice. Some DVD-Audio discs have an extra ‘bonus’ group that requires a 4-digit key number to access. See the disc packaging Press the Cursor ▲,▼button or numeric buttons to select the desired for details and the-key number. -
Page 21: Moving Directly To A Scene/Song
Using the Playback Function (Con’t) Moving Directly to a Scene/Song Using the Disc Menu You can use the menus for the audio language, subtitle language, profi le, etc. DVD menu contents differ from disc to disc. In Stop mode, press the MENU button. Press the Cursor ▲,▼... -
Page 22: Playing Media Files Using The Usb Host Feature
Playing Media Files using the USB Host Feature You can enjoy media fi les such as pictures, movies and music saved in an MP3 player, USB memory or digital camera Compatible Devices in high quality video with 5.1 channel home theater sound by connecting the storage device to the USB port of the home theater. -
Page 23: Settings
Settings Setting the Language Setting TV Screen type OSD(On-Screen Display) language is set to English by default. Depending on your TV type (Wide Screen or conventional 4:3), you can select the TV's aspect ratio. In Stop mode, press the MENU button. In Stop mode, press the MENU button. -
Page 24: Setting Parental Controls (Rating Level)
Press the MENU button to exit the setup screen. ▼ Press the Cursor button to move to <Setup> and then press the • ORIGINAL : Select this to set the Samsung Logo image as your wallpaper. MOVE ENTER RETURN EXIT •... -
Page 25: Dvd Playback Mode
Settings (Con’t) DVD Playback Mode SACD Playback Mode Some DVD-Audio discs contain DVD-Video as well as DVD-Audio. If the SACD is a HYBRID disc, you can play the disc in CDDA MODE as well. To play back the DVD-Video portion of the DVD-Audio disc, set the unit to DVD-Video mode. Press the EJECT button and then press the MENU button. -
Page 26: Setting The Delay Time
Settings (Con’t) Setting the Delay Time Setting the Test Tone If the speakers cannot be placed at equal distances from the listening position, you can adjust the delay time of the audio Use the Test Tone feature to check the speaker connections. signals from the center and rear speakers. -
Page 27: Setting The Audio
Settings (Con’t) Setting the Audio Setting the DRC (Dynamic Range Compression) You can adjust the balance and level for each speaker. This feature balances the range between the loudest and quietest sounds. You can use this function to enjoy Dolby Digital sound when watching movies at low volume at night. -
Page 28: Dolby Pro Logic Ii Mode
Settings (Con’t) Dolby Pro Logic II Mode Dolby Pro Logic II Effect You can select the desired Dolby Pro Logic II audio mode. This function works only in Dolby Pro Logic MUSIC mode. Press the 2 PL II MODE button. Press the 2 PL II MODE button to select <MUSIC>... -
Page 29: Auto Sound Calibration Setup
Auto Sound Calibration Setup This function is available only for DVD/CD playback. Connect the auto sound calibration microphone to the auto sound Auto Sound Calibration calibration input connector on the subwoofer. By setting the auto sound calibration function just once when you relocate or install the unit, you can have the unit automatically recognize the distance between speakers, levels between channels, and frequency characteristics to create Place the auto sound calibration microphone at the listener's position. -
Page 30: Live Surround Mode
Live Surround Mode Super 5.1 Virtual Headphone Function You can reproduce a 2-channel sound source, such as CD, and radio broadcast, in 5.1-channel surround sound. Use headphones (3.5 ) (not supplied) for private listening pleasure. You can enjoy dynamic sound effects similar to that of 5.1 channel surround sound using conventional stereo headphones. -
Page 31: Listening To Radio
Listening to Radio About RDS broadcasting Remote Control Using the RDS (Radio Data System) to receive FM stations Press the TUNER button to select the FM band. RDS allows FM stations to send an additional signal along with their regular program signals. For example, the stations Tune in to the desired station. -
Page 32: Convenient Functions
About RDS broadcasting Convenient Functions (Con’t) PTY (Program Type) indication and PTY-SEARCH function Sleep Timer Function One of the advantages of the RDS service is that you can locate a particular kind of program from the preset channels by You can set the time that the Home Theater will shut itself off. specifying the PTY codes. -
Page 33: Operating A Tv With The Remote Control
00, 15, 16, 17, 40, 43, 46, 47, 48, 49, 59, Curtis Mates 59, 61, 63 Samsung control will work on a Samsung TV by default. 60, 98 Sanyo 19, 61, 65 02, 03, 04, 15, 16, 17, 18, 19, 20, 21, 22,... -
Page 34: Troubleshooting
Symptom Check/Remedy or if the instruction below does not help, turn off the unit, disconnect the power cord, and contact the nearest authorized dealer or Samsung Electronics Service Center. • Disc is rotating but no Is the TV power on? •... -
Page 35: Cautions On Handling And Storing Discs
Cautions on Handling and Storing Discs Language Code List Small scratches on the disc may reduce sound and picture quality or cause skipping. Enter the appropriate code number for the initial settings “Disc Audio”, “Disc Subtitle” and/or “Disc Menu” (See page 44). Be especially careful not to scratch discs when handling them. -
Page 36: Usb Host Feature Supported Products
165W(3Ω) Coolpix 2200 Nikon Digital Camera Iriver H320 Iriver 20G HDD MP3 Player AMPLIFIER Coolpix 3500 Nikon Digital Camera YH-920 Samsung 20G HDD MP3 Player Frequency range 20Hz~20KHz Coolpix 3700 Nikon Digital Camera YP-T7 Samsung MP3 Player S/N Ratio 70dB... - Page 37 Contact SAMSUNG WORLD WIDE If you have any questions or comments relating to Samsung products, please contact the SAMSUNG customer care centre. Region Country Customer Care Center Web Site...