Advertisement
- 1 General description
- 2 What do the icons on the display mean
- 3 What is my unit telling me
- 4 How do I charge my appliance
- 5 How do I use my appliance and the attachments
- 6 How do I clean my appliance and the attachments
- 7 How do I connect my unit and smartphone
- 8 How do I replace the shaving heads
- 9 Ordering accessories
- 10 Troubleshooting
- 11 Further guidance
- 12 Removal of built-in rechargeable battery
- 13 Important safety information
- 14 Documents / Resources
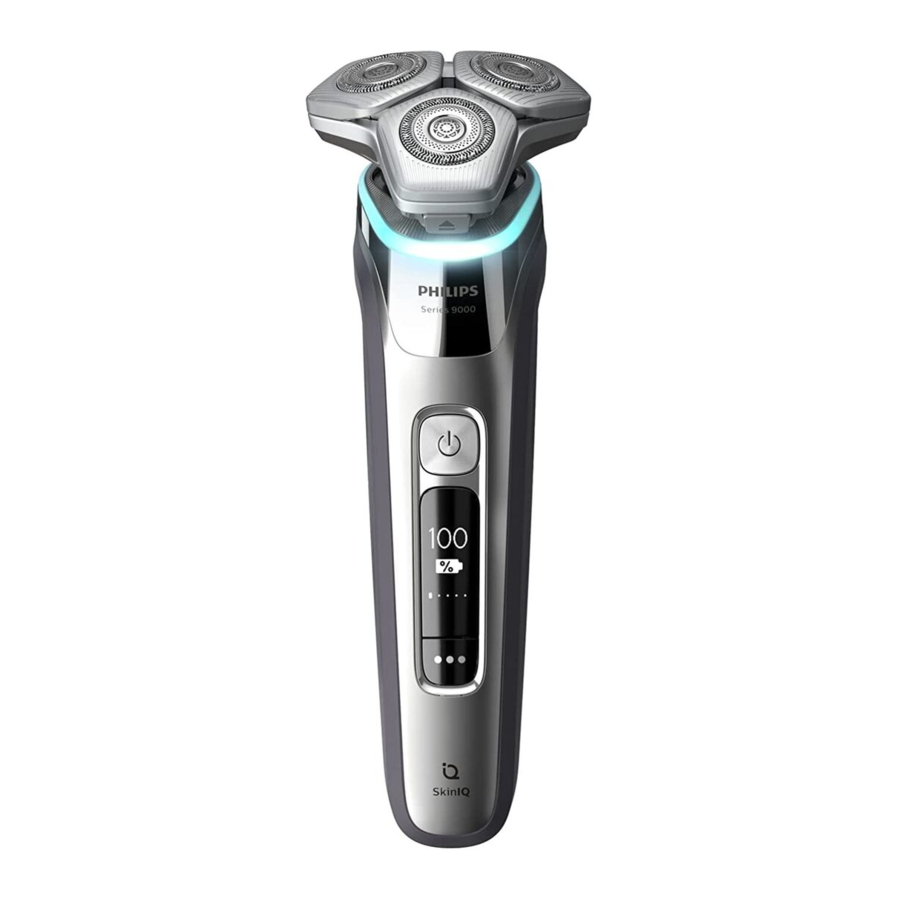
General description

- Pop-up trimmer
- Trimmer release slide
- Shaving unit
- Shaving unit release button
- On/off button
- Menu button
- Socket for small plug
- Charging stand
- Supply unit
- Small plug
- Pouch
- Philips Quick Clean Pod Cartridge
- Quick Clean Pod
- Cleaning brush
- Length settings
- Click-on beard styler attachment
- Comb for beard styler attachment
Note: The accessories supplied may vary for different products. The box shows the accessories that have been supplied with your appliance.
What do the icons on the display mean
![]()
![]()
![]()
What is my unit telling me
When your device is switched on
During your shave, you receive feedback on how much pressure you are applying via the light ring at the top of your shaver handle.
The light ring on the handle lights up in various colors during your shave to give you feedback on how much pressure you are exerting. These are the default settings:

- When you don't apply enough pressure, the light ring lights up blue.
- When you apply the correct amount of pressure, the light ring lights up green.
- When you apply too much pressure, the light ring lights up orange.
When your shaver is switched on, you can customize the type of pressure feedback you receive.
- Switch on the shaver.
![]()
- Press the menu button to toggle through the pressure feedback options. The table below shows what pressure feedback you receive with each option.
![]()


| Too little pressure is being applied | The right amount of pressure is being applied | Too much pressure is being applied | |
Full pressure feedback | The light ring lights up blue | The light ring lights up green | The light ring lights up orange |
Partial pressure feedback | No feedback | No feedback | The light ring lights up orange |
No pressure feedback | No feedback | No feedback | No feedback |
Note: Pressure feedback is only available when the shaving head is attached to the handle.
When your device is switched off
Main menu
While your shaver is switched off, you can also toggle through the four menu functions by pressing the menu button.
- Remaining battery charge
This menu item shows the remaining battery charge.
![]()
- Motion Control sensor
This menu item shows the motion feedback from your last shave.
![]()
- Travel lock
From this menu item, you can lock and unlock your shaver by pressing and holding the menu button for 3 seconds. When you are going to travel, you can lock the shaver to prevent it from accidentally switching on. When the travel lock is activated, Bluetooth will be switched off automatically and your shaver will be in energy saving mode.
![]()
- Bluetooth
From this menu item, you can unpair your shaver and smartphone.
For information about the benefits of pairing your shaver and smartphone, see 'Benefits of connecting your unit to the app'.
Note: Make sure your smartphone is equipped with Bluetooth 4.2 or higher.
This shaver is equipped with Bluetooth higher to connect to the app. When you have 4.2 and paired your shaver and smartphone, Bluetooth on your shaver is switched on automatically, even when the shaver is switched off. This allows your shave data to be synced later so you don't need to take your smartphone with you when you shave.
Note: You can switch off Bluetooth on your shaver by activating the travel lock.
![]()


Post-shave feedback
(this feature can be activated via the app)
Once this feature is activated via the app, you can see the post-shave feedback on pressure and motion from your shave on the handle directly after you finish shaving and switch off your shaver.
Pressure Guard sensor feedback
When your shaving pressure can be improved, the Pressure Guard sensor icon displays with an exclamation mark.
- The pressure you applied during the shave was too high.
![]()
- The pressure you applied during the shave was too low.
![]()


Motion Control sensor feedback
- When your shaving motion can be improved, the Motion Control sensor icon displays with an exclamation mark.
![]()

Perfect Routine feedback
- When both the pressure and the motion applied during the shave is perfect, the Perfect Routine icon displays with a check mark.
![]()

How do I charge my appliance
Note: This appliance is waterproof. It is suitable for use in the bath or shower and for cleaning under the tap. For safety reasons, the appliance can therefore only be used without cord.
- Charge the appliance before you use it for the first time and when the remaining battery charge indicates that the battery is almost empty.
- Charging takes approx. 1 hour.
- Quick Charge: After approx. 5 minutes of charging, the battery contains enough energy for one full shave. When the battery is charged to 10%, you can complete one full shave.
- When the appliance is fully charged it has a cordless operating time of up to 60 minutes.
Note: You cannot use the appliance while it is charging.
Charging with the supply unit
- Make sure that the appliance is switched off.
- Insert the small plug into the appliance and put the supply unit in the wall socket.
![]()
- While the appliance is charging, an animation appears on the display showing the progress.
- When the appliance is fully charged, the battery percentage shows 100% and the battery icon shows the battery being full.
- After charging, remove the supply unit from the wall socket and pull the small plug out of the appliance.

Unplug for use symbol
The 'unplug for use' symbol displays to remind you to disconnect the appliance from the wall socket and remove the small plug from the appliance before you switch it on.

Charging in the charging stand

- Make sure the appliance is switched off.
- Put the small plug in the charging stand and put the supply unit in the wall socket.
- Place the appliance in the charging stand.
How do I use my appliance and the attachments

Always check the appliance and all accessories before use. Do not use the appliance or any accessory if it is damaged, as this may cause injury. Always replace a damaged part with one of the original type.
Shaving
You can use this appliance either wet or dry, or even under the shower. For a wet shave, apply some water and shaving foam or gel to your skin and rinse the shaving heads under the tap with warm water before following the steps below.
- Switch on the appliance.
- Move the shaving heads over your skin in circular movements (see 'Main menu') to catch all hairs growing in different directions. Make sure each shaving head is fully in contact with the skin. Exert gentle pressure for a close, comfortable shave.
Note: Do not press too hard, as this can cause skin irritation. When you apply too much pressure, the orange light ring lights up (see 'What is my unit telling me').
![]()


Note: If you are shaving with gel or foam, rinse the shaving unit regularly during your shave to ensure that it continues to glide smoothly over your skin.
Note: Make sure you rinse all foam or shaving gel off the appliance
- Use the narrow sides of the shaving unit to shave in hard-to-reach areas such as along your jawline and under your nose.
![]()
- Switch off and clean the appliance after each use.
Note: Make sure you rinse all foam or shaving gel off the appliance.

When you are finished shaving and switch off your shaver you can also receive feedback about your overall shave on the handle. You can activate this feature via the app (see 'How do I connect my unit and smartphone?').
In the menu on your shaver, you can view the motion feedback from your last shave (see 'Motion Control sensor'). You can personalize your feedback settings, see more detailed feedback and get personalized advice via the app.
Skin adaptation period
Your first shaves may not bring you the result you expect and your skin may even become slightly irritated. This is normal. Your skin needs time to adapt to any new shaving system.
Follow the advice provided by the app and shave regularly (at least 3 times a week) with this shaver for a period of 3-4 weeks to allow your skin to adapt to the new shaver.
Cleaning reminder
When you switch off the appliance, the cleaning reminder is displayed to remind you to clean the appliance (see 'How do I clean my appliance and the attachments').

- Clean the appliance and attachments after each use to prevent clogging and damage (see 'How do I clean my appliance and the attachments').
- Clean the shaving heads thoroughly once a month or when the appliance does not shave as well as it used to.
Trimming
You can use the trimmer to groom your sideburns and moustache.
- Push the trimmer release slide downwards to open the trimmer.
![]()
- Switch on the appliance.
- Hold the trimmer perpendicular to the skin and move the appliance downwards while you exert gentle pressure.
![]()
- You can also use the trimmer under your nose.
![]()
- Switch off the appliance and clean the trimmer after each use to prevent clogging and damage (see 'How do I clean my appliance and the attachments?').
- Close the trimmer.


Using the click-on attachments
Note: The accessories supplied may vary for different products. The box shows the accessories that have been supplied with your product.
Note: When the beard styler is attached to the handle, the motion and pressure feedback is switched off automatically.
Using the beard styler attachment with comb
You can use the beard styler attachment with the comb attached to style your beard at one fixed setting or at different length settings. You can also use it to pre-trim any long hairs before shaving for a more comfortable shave.
The hair length settings on the beard styler attachment correspond to the remaining hair length after cutting and range from 1 to 5 mm.
- Twist the shaving head or other attachment to remove it from the handle and press the beard styler attachment onto the handle.
![]()
- Slide the comb straight into the guiding grooves on both sides of the beard styler attachment.
![]()
- Press the length selector and then push it to the left or right to select the desired hair length setting.
![]()
- Switch on the appliance.
- Move the appliance upwards while you exert gentle pressure. Make sure the front of the comb is in full contact with the skin.
![]()
- Switch off the appliance and clean the attachment after use.


Using the beard styler attachment without comb
You can use the beard styler attachment without the comb to contour your beard, moustache, sideburns or neckline to a length of 0.5 mm.
- Pull the comb off the beard styler attachment.
Note: Grab the comb in the center to pull it off the beard styler attachment. Do not pull at the sides of the comb
![]()
- Switch on the appliance.
- Hold the beard styler attachment perpendicular to the skin and move the appliance downwards while you exert gentle pressure.
![]()
- Switch off the appliance and clean the attachment after use.


Storage
Note: We advise you to let the appliance and its attachments dry before you store them for the next use.
- Store the appliance in the pouch (if supplied).
- Put the protection cap (if supplied) on the shaver to protect it from dirt accumulation.
- Alternatively, store the appliance on the charging stand (if supplied) or in the Philips Quick Clean Pod (if supplied).
How do I clean my appliance and the attachments
How do I use the Quick Clean Pod
What does the icon on my Quick Clean Pod mean
| Icon | Behavior | Meaning |
 | Becomes visible on the Quick Clean Pod | The Quick Clean Pod Cartridge needs to be replaced (see 'How do I use the Quick Clean Pod'). |
Preparing the Quick Clean Pod for use
- Twist and remove the top of the Quick Clean Pod.
![]()
- Twist the lid off of the Quick Clean Pod Cartridge.
![]()
- Lift the tab on the seal and pull it by the corner to remove the seal from the Quick Clean Pod Cartridge.
![]()
- Press the small circular piece on the handle of the Quick Clean Pod Cartridge to break the snap hook on the handle.
![]()
- Place the Quick Clean Pod Cartridge into the Quick Clean Pod.
![]()
- Put the top of the Quick Clean Pod back onto the base and turn it clockwise until you hear a click.
![]()


Do not tilt the Quick Clean Pod to prevent leakage.
Using the Quick Clean Pod
Note: If you use the shaver with shaving foam, shaving gel or pre-shave products, thoroughly rinse the shaving heads before you use the Quick Clean Pod (see 'How do I clean my appliance and the attachments').
Always shake excess water off the shaver before you place it in the Quick Clean Pod.
- Place the shaver upside down into the Quick Clean Pod. While switched on, the shaver automatically detects that it is in the Quick Clean Pod.
![]()
- Switch on the shaver to start the cleaning program.
Each cleaning program takes approximately one minute. During the cleaning program the remaining time is displayed as a countdown clock on the handle. - Let the shaver air-dry completely in the Quick Clean Pod before storing it.

Replacing the Quick Clean Pod Cartridge

Replace the Quick Clean Pod Cartridge immediately when the cartridge replacement icon on the Quick Clean Pod becomes visible or follow the table below.
| Frequency of use | Cycles | When to replace the Quick Clean Pod Cartridge |
| Every day | About 30 | Every month |
| A few times per week | About 20 | Every 2 months |
| Every week | About 13 | Every 3 months |
| Every month | About 3 | Every 3 months |
- Twist and remove the top of the Quick Clean Pod.
![]()
- Lift the Quick Clean Pod Cartridge out of the Quick Clean Pod by the handle.
![]()
- Pour any remaining fluid down a drain and recycle the empty cartridge in accordance with local waste regulations.
![]()
- Place a new Quick Clean Pod Cartridge into the Quick Clean Pod.
Scan the QR code to the left or visit www.philips.com/cleaning-cartridge to order replacement Quick Clean Pod Cartridges.


Clean the appliance and the attachments after each use for optimal performance.
Cleaning the shaver under the tap
Clean the shaver after each use to prevent clogging and damage.
Never dry the shaving unit with a towel or tissue, as this may damage the shaving heads.
While rinsing the shaving unit, water may drip out of the base of the shaver. This is a normal occurrence.
- Switch on the shaver.
- Rinse the shaving unit under a warm tap.
![]()
- Switch off the shaver. Press the release button to open the shaving unit.
![]()
- Rinse the hair chamber under a warm tap.
![]()
- Rinse the shaving head holder under a warm tap.
![]()
- Carefully shake off excess water and let the shaving head holder air-dry completely.
- Close the shaving unit.
![]()


Thorough cleaning
We advise you to clean the shaving heads thoroughly once a month or when the shaver does not shave as well as it used to.
- Make sure that the appliance is switched off and disconnected from the wall socket.
- Press the release button on the shaving unit and pull the shaving head holder off the shaving unit.
![]()
- Rinse the hair chamber and shaving head holder under the tap.
![]()
- Remove the shaving heads. For detailed instructions, see 'How do I replace the shaving heads'.
Note: Do not clean more than one cutter and guard at a time, since they are all matching sets. If you accidentally put a cutter in the wrong shaving guard, it may take several weeks before optimal shaving performance is restored. - Clean the cutter and guard under the tap.
![]()
- Shake off excess water.
- Put the shaving heads back into the shaving unit. For detailed instructions, see 'How do I replace the shaving heads'.
- Insert the hinge of the shaving head holder into the slot in the top of the shaving unit and close the shaving unit.
![]()


Cleaning the pop-up trimmer
Clean the trimmer after each use to prevent clogging and damage.
Never dry the trimmer teeth with a towel or tissue, as this may damage the trimmer teeth.
- Make sure that the appliance is switched off and disconnected from the wall socket.
- Push the trimmer release slide down to open the pop-up trimmer.
![]()
- Switch on the appliance and rinse the pop-up trimmer with warm water.
![]()
- After cleaning, switch off the appliance.
- Carefully shake off excess water and let the popup trimmer air dry.
- Close the trimmer.


Cleaning the click-on attachments
Never dry the trimmer or beard styler attachments with a towel or tissue, as this may damage the trimming teeth.
The accessories supplied may vary for different products. The box shows the accessories that have been supplied with your product.
Cleaning the beard styler attachment
Clean the beard styler attachment after each use.
- Pull the comb off the beard styler attachment.
Note: Grab the comb in the center to pull it off the beard styler attachment. Do not pull at the sides of the comb
![]()
- Rinse the cut hairs off the cutting unit with lukewarm water.
![]()
- Rinse the cut hairs off the comb.
- Remove the cutting unit from the beard styler attachment. By pushing the cutting unit from the beard styler attachment you can remove any hairs that have accumulated inside the beard styler. You can also rinse the back of the cutting unit.
![]()
- Rinse cut hairs out of the beard styler attachment.
![]()
- Carefully shake off excess water and leave the comb, cutting unit and beard styler attachment to air-dry before next use.
Never dry the cutting unit with a towel or tissue, as this may damage the trimming teeth. - When the cutting unit is dry attach it to the beard styler attachment.
![]()
- When the comb is dry, re-attach it to the beard styler.
![]()


How do I connect my unit and smartphone
Benefits of connecting your device to the app
You can use the app for a variety of personalization and coaching options such as:
- Real-time motion and pressure feedback and guidance
- Synchronizing your shave data and tracking your shave history
- Improving your shave routine and reducing shaving-related skin issue
- Recommendations on style
- Customization of post-shave feedback
- Personalized advice
Pair the unit and smartphone
The app is compatible with a wide range of iPhone and Android smartphones.
More information is available at
www.philips.com/MyShaver9000-app

- Download the app.
- Make sure Bluetooth on your smartphone is switched on.
![]()
- Switch on the shaver to activate Bluetooth.
![]()
- Open the app and follow the instructions to start the pairing process.
- Once paired, the shaver and app connect automatically when the app is open and Bluetooth on your phone is switched on.
![]()


Synchronize your shaves
This shaver stores your shave data so you don't need to take your smartphone with you when you shave or want to check your shave data at a later stage.
When the data storage is almost full, you receive a notification reminding you to synchronize your shaves. To prevent data loss, synchronize the shaver with the app (see 'How do I connect my unit and smartphone').
- Make sure your phone is close to the shaver and open the app.
- The app connects automatically and synchronizes your last shaves.
Unpair the device and smartphone
You can pair your shaver with only one smartphone at a time. To unpair your shaver from your smartphone (e.g. when you get a new smartphone), follow these steps:
Unpair the shaver
- Toggle through the menu items by pressing the menu button until you reach the Bluetooth menu (the fourth menu).
![]()
- Press and hold the menu button until you are presented with a cross and check mark selection.
![]()
- Select the check mark by pressing the menu button again to unpair your shaver.
Note: When your shaver is successfully unpaired, you see the Bluetooth icon on your shaver handle shown to the left.
![]()


Unpair your smartphone
- Go to the settings on your smartphone and select Bluetooth.
- Tap on the name of the shaver.
- Tap 'forget' or 'unpair'.
Note: The unpairing procedure may vary by smartphone. Please check your smartphone manual for more information.
How do I replace the shaving heads
For maximum shaving performance, we advise you to replace the shaving heads every two years.
Replace damaged shaving heads immediately.
Always replace the shaving heads with original Philips shaving heads.
Replacing the shaving heads
- Switch off the shaver.
- Press the release button on the shaving unit and pull the shaving head holder off the shaving unit.
![]()
- Turn the retaining rings anticlockwise and remove them. Place them aside in a safe place.
![]()
- Remove the shaving heads from the shaving head holder.
Discard the used shaving heads immediately to avoid mixing them with the new shaving heads.
![]()
- Place new shaving heads in the holder.
![]()
- Place the retaining rings back onto the shaving heads and turn them clockwise to reattach the retaining rings.
![]()
- Each retaining ring has two recesses that fit exactly into the projections of the shaving head holder. Turn the ring clockwise until your hear a click to indicate that the ring is fixed.
![]()
- Each retaining ring has two recesses that fit exactly into the projections of the shaving head holder. Turn the ring clockwise until your hear a click to indicate that the ring is fixed.
- Insert the hinge of the shaving head holder into the slot in the top of the shaving unit and close the shaving unit.
![]()


Ordering accessories
To buy accessories or spare parts, visit www.philips.com/parts-and-accessories or go to your Philips dealer. You can also contact the Philips Consumer Care Center in your country.
The following accessories and spare parts are available:
- SH91 Philips shaving heads
- CC12 Cleaning cartridge 2-pack
- CC13 Cleaning cartridge 3-pack
- CC16 Cleaning cartridge 6-pack
Note: The availability of the accessories may differ by country.
Troubleshooting
This chapter summarizes the most common problems you could encounter with the appliance. If you are unable to solve the problem with the information below, visit www.philips.com/support for a list of frequently asked questions or contact the Consumer Care Center in your country.
| Shaver | ||
| Problem | Possible cause | Solution |
| I cannot connect the unit | You have not downloaded the app. | Download the app. |
| Your shaver and smartphone are not paired yet. | Pair your shaver and smartphone following the instructions in the app. | |
| The first pairing attempt failed. | Unpair your shaver and smartphone and try pairing them again. | |
| Your smartphone cannot find your shaver. | Make sure your smartphone is equipped with Bluetooth 4.2 or higher. | |
| Make sure Bluetooth is activated on your smartphone and that the travel lock is switched off on your shaver. | ||
| Make sure that your smartphone is within one meter of your shaver to enable a Bluetooth connection. | ||
| Make sure your shaver is charged. | ||
I want to use the device without the app | You do not have to connect your shaver to your smartphone before each shave. The shaver works fine without the app, although you will not experience the same benefits. To get personalized shaving tips, just make sure that you connect it at least once every 20 shaves to synchronize your shave data (see 'Synchronize your shaves'). | |
| The appliance does not work when I press the on/off button | The appliance is still attached to the wall socket. For safety reasons, the appliance can only be used without cord. | Unplug the appliance and press the on/off button to switch on the appliance. |
| The rechargeable battery is empty. | Recharge the battery. | |
| The travel lock is activated. | Press the menu button for 3 seconds to deactivate the travel lock. | |
| The shaving unit is soiled or damaged to such an extent that the motor cannot run. | Clean the shaving heads thoroughly or replace them. | |
| The appliance does not shave as well as it used to | The shaving heads are damaged or worn. | Replace the shaving heads. |
| Hairs or dirt obstruct the shaving heads. | Clean the shaving heads thoroughly. | |
Water is leaking from the bottom of the appliance | During cleaning, water may collect between the inner body and the outer shell of the appliance. | This is normal and not dangerous because all electronics are enclosed in a sealed power unit inside the appliance. |
| Philips Quick Clean Pod | ||
| Problem | Possible cause | Solution |
| My shaver isn't clean after using the Philips Quick Clean Pod | You removed the shaver before the cleaning program was finished. | Leave the shaver in the Philips Quick Clean Pod for the full cleaning program. Each cleaning program takes approximately 1 minute. The cleaning icon goes out when the cleaning program is finished. |
| The Philips Quick Clean Pod Cartridge needs to be replaced. | Replace the Philips Quick Clean Pod Cartridge. | |
| The Philips Quick Clean Pod is tilted. | Place the Philips Quick Clean Pod on a flat surface. | |
My Philips Quick Clean Pod does not switch on | The Philips Quick Clean Pod is powered by the motor of the shaver. | Place the shaver into the Philips Quick Clean Pod. Switch on the shaver. |
| The shaver is connected to the wall socket. | Disconnect the shaver from the supply unit. | |
| The shaver battery is empty. | Charge the shaver before using the Philips Quick Clean Pod. | |
My Philips Quick Clean Pod is overflowing | You regularly use the Philips Quick Clean Pod after rinsing the shaver but not shaking off excess water. | Shake off excess water after rinsing the shaving heads each time before putting the shaver into the Philips Quick Clean Pod. |
| You shaved with shaving gel or foam and did not rinse the shaver before using the Philips Quick Clean Pod. | Rinse the shaving heads thoroughly before using the Philips Quick Clean Pod. | |
Further guidance
For more guidance and videos on your S9000 shaver, scan the QR code below or visit
www.philips.com/myS9000shaver

Removal of built-in rechargeable battery
The built-in rechargeable battery must only be removed by a qualified professional when the appliance is discarded. Before removing the battery, make sure that the appliance is disconnected from the wall socket and that the battery is completely empty.
Take any necessary safety precautions when you handle tools to open the appliance and when you dispose of the rechargeable battery.
When you handle batteries, make sure that your hands, the product and the batteries are dry.
To avoid accidental short-circuiting of batteries after removal, do not let battery terminals come into contact with metal objects (e.g. coins, hairpins, rings). Do not wrap batteries in aluminum foil. Tape battery terminals or put batteries in a plastic bag before you discard them.
- Twist the shaving head to remove it from the handle.
![]()
- Remove the screw from the bottom of the shaver handle with a flat-head or torx 6 screwdriver.
![]()
- Insert a flat-head screwdriver in between the front panel and the trimmer and tilt until the front panel is released. Bend the front panel forward.
![]()
- Insert a flat-head screwdriver in between the power unit and backshell to release the snap connections.
![]()
- Slide the power unit out of the body.
![]()
- Bend the 8 snap hooks aside.
![]()
- Remove the display of the power unit with a flat-head screwdriver.
![]()


Important safety information
Only use the product for its intended purpose. Read this important information carefully before you use the product and its batteries and accessories, and save it for future reference. Misuse can lead to hazards or serious injuries. Accessories supplied may vary for different products.
- Keep the supply unit and the charging stand dry.
![]()
- This shaver is waterproof. It is suitable for use in the bath or shower and for cleaning under the tap. For safety reasons, the shaver can therefore only be used without cord.
![]()
- Do not modify the supply unit.
- This appliance can be used by children aged from 8 years and above and persons with reduced physical, sensory or mental capabilities or lack of experience and knowledge if they have been given supervision or instruction concerning use of the appliance in a safe way and understand the hazards involved. Children shall not play with the appliance. Cleaning and user maintenance shall not be made by children without supervision.
- Unplug the appliance before cleaning it with water.
- Do not use a damaged appliance. Replace damaged parts with new Philips parts.
- Only use cold or lukewarm water to clean the appliance.
- Because of hygiene, only one person should use the appliance.
- Never use compressed air, scouring pads, abrasive cleaning agents or aggressive liquids to clean the appliance.
- Always place the cleaning system on a stable, level and horizontal surface to prevent leakage.
- Always make sure the cartridge compartment is closed before you use the cleaning system.
- When the cleaning system is ready for use, do not move it to prevent leakage of cleaning fluid.
- Water may drip from the socket at the bottom of the shaver when you rinse it. This is normal and not dangerous because all electronics are enclosed in a sealed power unit inside the shaver.
- Do not use the supply unit in or near wall sockets that contain an electric air freshener to prevent irreparable damage to the supply unit.
- Remove piercings, jewelry, glasses etc. before using the appliance.
- Be careful when handling your smartphone near water and in moist environments.
- Radio waves may impair the operation of pacemakers and other medical devices. Consult your phycisian for advice and keep the appliance at least 20 cm away.
- Only use original Philips accessories or consumables. Only use detachable supply unit HQ8505.
- Charge, use and store the product at a temperature between 5°C and 35°C.
- Keep product and batteries away from fire and do not expose them to direct sunlight or high temperatures.
- If the product becomes abnormally hot or smelly, changes color or if charging takes longer than usual, stop using and charging the product and contact Philips.
- Do not place products and their batteries in microwave ovens or on induction cookers.
- Do not open, modify, pierce, damage or dismantle the product or battery to prevent batteries from heating up or releasing toxic or hazardous substances. Do not short-circuit, overcharge or reverse charge batteries.
- If batteries are damaged or leaking, avoid contact with the skin or eyes. If this occurs, immediately rinse well with water and seek medical care.


Philips Quick Clean Pod Cartridge fluid
- Keep out of reach of children.
- Do not swallow.
- In case of eye contact, rinse with plenty of water.
Electromagnetic fields (EMF)
This Philips appliance complies with all applicable standards and regulations regarding exposure to electromagnetic fields.
Radio Equipment Directive
- S9000 series appliances are equipped with Bluetooth class 2.
- The frequency band in which the Bluetooth on S9000 series appliances operates is 2.4 GHz.
- The maximum radio frequency power radiated in the frequency band in which the S9000 series appliances operate is less than 20 dBm.
- This equipment has been so constructed that the product complies with the requirement of Article 10(2) as it can be operated in at least one EU Member State as examined and the product is compliant with Article 10(10) as it has no restrictions on putting into service in all EU member states.
To fully benefit from the support that Philips offers, register your product at www.philips.com/welcome or via the app.
Documents / Resources
References
![www.philips.com]() Compare Philips Norelco Shaver Replacement Blades
Compare Philips Norelco Shaver Replacement Blades![www.philips.com]() Philips GroomTribe App - Improve your Shaving routine with the new GroomTribe App | Phillips
Philips GroomTribe App - Improve your Shaving routine with the new GroomTribe App | Phillips![www.philips.com]() Parts & accessories | Philips
Parts & accessories | Philips![www.philips.com]() Philips Customer Service Support - Home | Philips
Philips Customer Service Support - Home | Philips![www.philips.com]() Register your Shaver S9000 | Philips
Register your Shaver S9000 | Philips![www.philips.com]() Product registration | Philips
Product registration | Philips
Download manual
Here you can download full pdf version of manual, it may contain additional safety instructions, warranty information, FCC rules, etc.
Download Philips 9000 Series, S9987/59, S9982/54, S9986/50 Manual
Advertisement


Need help?
Do you have a question about the 9000 Series and is the answer not in the manual?
Questions and answers