ACU-RITE PRO+ 06014 (06014RM) - 5-in-1 Weather Sensor Manual
- Instruction manual (8 pages)
Advertisement
Package Contents
- 5-in-1 PRO+ Weather Sensor
- Mounting Hardware
- Sensor Mounting Bracket
- Instruction Manual
Features & Benefits

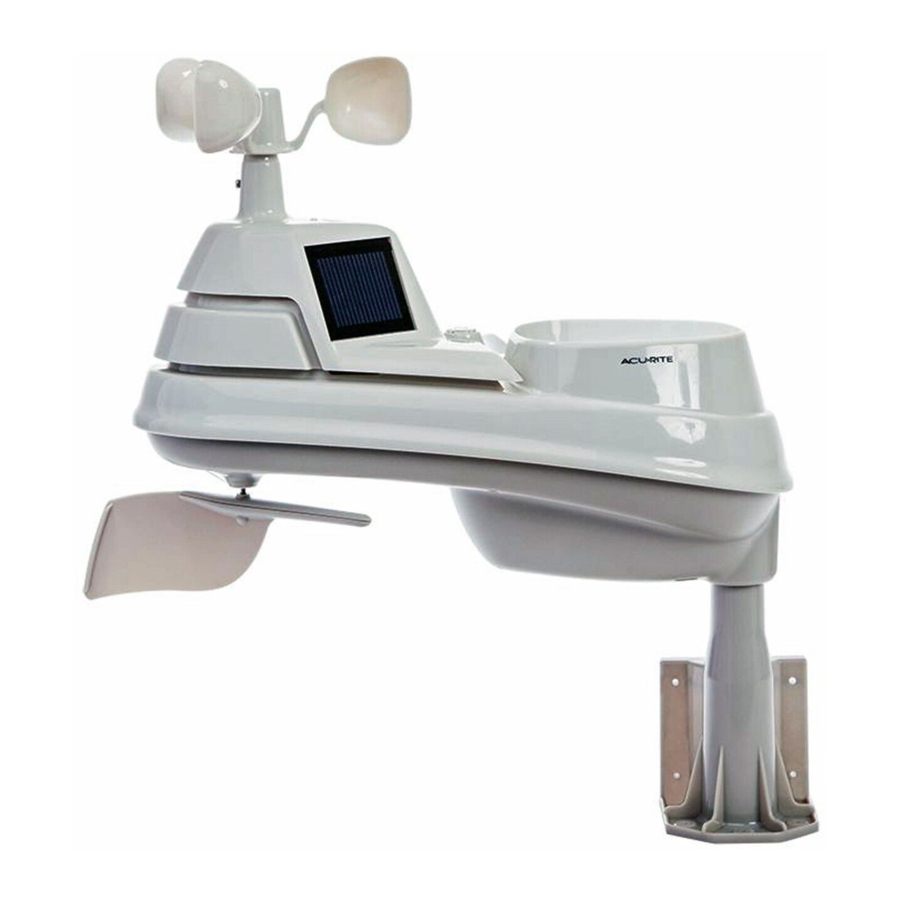
5-in-1 SENSOR
- Rainfall Collector Funnel
- Solar Cell Panel
Converts sunlight into power to run internal aspirating fan.
Internal Aspirating Fan (not shown)
Draws ambient air into sensor to reduce solar radiation heating, resulting in more accurate temperature measurement. - A-B-C Switch
ID code that must match display's A-B-C switch to ensure units synchronize. - Battery Compartment
- Temperature & Humidity Sensors (internal)
- Mounting Point
- Wind Speed Anemometer
- Wind Direction Vane
- Mounting Bracket
- Mounting Hardware
Includes 5 anchors & the following screws:
| Qty | Diameter | Length |
| 5 | #4 | 3/4" |
| 1 | #4 | 1/2" |
| 1 | #6 | 1/2" |
- Debris Filter
Pre-installed to prevent debris from entering the rain gauge.
SETUP
5-in-1 Sensor Setup

- Set the A-B-C Switch
Locate the A-B-C switch inside the battery compartment. Set the A-B-C switch to A, B or C. You must select the same letter choice for both the sensor and the companion unit (not included) in order for the units to synchronize. - Install or Replace Batteries
Batteries MUST be installed for this product to operate. AcuRite recommends high quality alkaline or lithium batteries for the best product performance. Heavy duty or rechargeable batteries are not recommended.
The 5-in-1 sensor requires lithium batteries in low temperature conditions. Cold temperatures can cause alkaline batteries to function improperly. Use lithium batteries in the 5-in-1 sensor for temperatures below -4ºF / -20ºC. - Remove Rain Gauge Stabilizer
Locate and remove the rain gauge stabilizer (plastic tab) taped into the bottom of the sensor. The rain gauge will not function until this is removed.
Placement for Maximum Accuracy
AcuRite sensors are sensitive to surrounding environmental conditions. Proper placement of both the display and the sensor are critical to the accuracy and performance of this product.
5-in-1 Sensor Placement

The 5-in-1 sensor is designed to remain outdoors all year long. Choose an open location with no obstructions above or around the sensor for the most accurate measurements.
Important Placement Guidelines
Display and sensor must be within 330 feet (100 meters) of each other.
MAXIMIZE WIRELESS RANGE
Place units away from large metallic items, thick walls, metal surfaces, or other objects that may limit wireless communication.
PREVENT WIRELESS INTERFERENCE
Place units at least 3 feet (.9 m) away from electronic devices (TV, computer, microwave, radio, etc.).
LOCATE AWAY FROM HEAT SOURCES
Position sensor away from heaters, air conditioners, chimneys, exhaust vents, asphalt and concrete (surfaces that radiate heat).
LOCATE AWAY FROM HUMIDITY SOURCES
Avoid installing the sensor near pools, spas, or other bodies of water. Water sources may impact humidity accuracy.
LOCATE AWAY FROM SPRINKLER HEADS
DO NOT install the sensor where it will be sprayed by a sprinkler system. This may force water inside the sensor.
LOCATE AWAY FROM WIND & RAIN OBSTRUCTIONS
DO NOT mount the sensor with obstructions around it. Consider a location that is a wide open area, with few structures around to ensure accurate wind measurement.
View Video:

Visit us online to view installation photos and video, or learn more about AcuRite technology: www.AcuRite.com/5in1
5-in-1 Sensor Installation Guidelines
INSTALLATION HEIGHT
Mount the sensor at a minimum height of 5 feet (1.5 meters) off the ground, in an open area. Higher is better for wind measurements - the National Weather Service recommends 33 feet (10 meters) high!
MOUNTING OPTIONS
The included mounting bracket is designed to screw directly onto wooden posts or surfaces that are 2"x 4" or larger. The sensor can also be mounted directly to 3/4" steel pipe (available at hardware stores and home centers).
SOLAR CELL INSTALLATION
Install the sensor with the solar cell facing SOUTH. This ensures the cell receives as much sun as possible and orients wind direction.
5-in-1 Sensor Installation

- Fasten mounting base (included) to a post or pole (not included) using the 4 longer screws included in the hardware bag.
- Insert the mounting base into the hole on the bottom of the sensor.
- Make sure the arrows on the top of the sensor are pointed in the proper direction and the bubble level is centered. The solar cell should be facing south to properly orient the wind direction.
- Fasten the sensor into the mounting base using the 2 shorter screws included in the hardware bag.
The 5-in-1 sensor is now ready to use.
Basic Setup is Complete
The 5-in-1 sensor will now synchronize with the display. It may take a few minutes for synchronization to complete. If both or one of the units appear to be functioning improperly, please refer to the troubleshooting section.
Calibrate the Rain Gauge
The rain gauge on the 5-in-1 sensor can be calibrated to improve accuracy.
Items Needed: 5-in-1 sensor, companion unit, plastic cup, pin, screw driver
- First, ensure 5-in-1 sensor is perfectly level using built-in bubble level.
- Use compatible companion unit or AcuRite software to monitor during calibration.
- Make a pin hole in the bottom of a plastic cup. Hold the cup over the rain gauge and fill it with exactly 1 cup (8oz) of water, allowing the water to drip into the rain gauge. You should hear the internal buckets tip and see water drain through the rain gauge.
- A few seconds after each bucket tip, the companion unit displays rainfall in approximately 0.01" or more increments.
- The cup of water should take more than 20 minutes to empty; a quicker period will result in inaccurate calibration. Try to simulate a normal steady rainfall. When cup is empty of water, companion unit should register 1.06"
Tips
- There should be nearly an equal number of water drops (about 25 water drops) between bucket tips. If not, adjust the calibration screws on the bottom of the 5-in-1 sensor until an equal number of water drops are tipping the buckets.
Adjustment
If the rain gauge doesn't register close to 1.06", make an EQUAL adjustment to the two calibration screws on the bottom of the 5-in-1 sensor. Turning screws clockwise increases rainfall; counter clockwise decreases rainfall.
- To adjust the rainfall reading by 2% turn both screws 1/8 of a turn.
- To adjust the rainfall reading by 4% turn both screws 1/4 of a turn.
- To adjust the rainfall reading by 8% turn both screws 1/2 of a turn.
Watch the video at www.AcuRite.com/5in1
Specifications
| TEMPERATURE RANGE | Outdoor: -40ºF to 158ºF; -40ºC to 70ºC |
| HUMIDITY RANGE | Outdoor: 1% to 99% |
| WIND SPEED | 0 to 99 mph; 0 to 159 kph; 0 to 86 knots |
| WIND DIRECTION INDICATORS | 16 points |
| RAINFALL | 0.01 inches (0.25 mm) and up |
| WIRELESS RANGE | 330 ft / 100 m depending on home construction materials |
| OPERATING FREQUENCY | 433 MHz |
| POWER | 4 x AA alkaline or lithium batteries |
| DATA REPORTING | Wind Speed: 18 second updates; Direction: 30 second updates Outdoor temperature & humidity: 36 second updates |
Customer Support
AcuRite customer support is committed to providing you with best-in-class service.
For assistance, please have the model number of this product available and contact us in any of the following ways: (877) 221-1252
Visit us at www.AcuRite.com
- Installation Videos
- Replacement Parts
- Support User Forum
- Instruction Manuals
- Register your Product
- Submit Feedback & Ideas
PRODUCT REGISTRATION
Register online to receive 1 year warranty protection
www.AcuRite.com
Questions?
Contact Customer Support at (877) 221-1252
or visit www.AcuRite.com.
Documents / Resources
References
Download manual
Here you can download full pdf version of manual, it may contain additional safety instructions, warranty information, FCC rules, etc.
Download ACU-RITE PRO+ 06014 (06014RM) - 5-in-1 Weather Sensor Manual
Advertisement


Need help?
Do you have a question about the PRO+ 06014 and is the answer not in the manual?
Questions and answers