D-Link DP-301P+ User Manual
Pocket size print server
Hide thumbs
Also See for DP-301P+:
- Quick installation manual (20 pages) ,
- Manual (150 pages) ,
- Datasheet (2 pages)
Table of Contents
Advertisement
Advertisement
Table of Contents

Related Manuals for D-Link DP-301P+


Summary of Contents for D-Link DP-301P+
- Page 1 D-Link DP-301P+ Pocket Size Print Server Manual Building Networks for People...
-
Page 2: Table Of Contents
Contents Package Contents ................3 Introduction....................4 Setting up the DP-301P+ ..............8 Getting Started ..................10 Using the Web Configuration ............... 11 TCP/IP Printing for Windows XP ............18 TCP/IP Printing for Windows 2000 ............26 TCP/IP Printing for Windows 98SE/Me ..........34 Unix/Linux Printing ................45 Setting up AppleTalk or LPR Printing in MAC OS X ......46 Setting up AppleTalk Printing in MAC OS 9 .........51 Networking Basics ................54... -
Page 3: Package Contents
Package Contents Contents of Package: D-Link DP-301P+ Pocket Size Print Server Manual and Warranty on CD Printed Quick Installation Guide If any of the above items are missing, please contact your reseller. System Requirements: A computer with an installed Ethernet adapter... -
Page 4: Introduction
Introduction The D-Link DP-301P+ Print Server is a pocket size print server that connects to your Ethernet/Fast Ethernet network anywhere you wish to locate printer services. The DP-301P+ manages the flow of print files from workstations or file servers to connected printers, delivering print jobs to printers much faster than a file server or a PC acting as a print server. -
Page 5: External Features
The DP-301P+ offers extraordinary flexibility, operating with all major network operating systems and protocols: TCP/IP UNIX LPR/LPD (HP-UX, Sun OS, Solaris, SCO, UnixWare, IBM AIX) Windows NT/2000, Windows 95/98SE/Me, Windows XP NetWare 5.x NDPS LPR Remote Printing NetBEUI Windows NT/2000/XP, Windows 95/98SE/Me, Windows for Workgroups, Microsoft LAN Manager, IBM LAN Server AppleTalk Mac OS EtherTalk... -
Page 6: Rear Panel
Rear Panel LAN Port LEDs Power LAN Port - Network Cable Connector The print server’s rear panel features a LAN port for connection to Ethernet/Fast Ethernet cabling (which should be CAT5 twisted-pair cable). The port supports the NWay protocol, allowing the print server to automatically detect or negotiate the transmission speed of the network. -
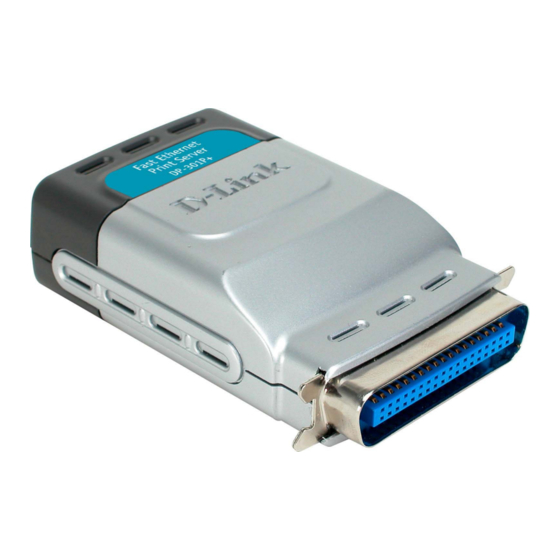
Page 7: Front Panel
Front Panel Parallel Port Connector The front panel of the print server features the parallel port connector. Plug this connector directly into the parallel port on your network printer. There is no need for a parallel port cable between the print server and your network printer. -
Page 8: Setting Up The Dp-301P
Setting up the DP-301P+ Installing the Print Server WARNING: Configuration problems may result if the print server is powered up without first establishing its network connection. Follow this procedure to avoid complications at the configuration stage. Confirm proper operation of the printers to be connected to the DP-301P+. When you have confirmed proper operation of the printer, switch its power OFF. - Page 9 Indicator Test Immediately upon power-up, (Power) and LPT indicators will illuminate steadily in green for several seconds. Then the LPT indicator will become dark while (Power) indicator remains steady. Irregularity of any indicator during this test indicates that there is a problem with the indicators themselves. Circuit Tests The circuit tests immediately follow the indicator test.
-
Page 10: Getting Started
Getting Started Below is a sample network using the DP-301P+. The DP-301P+ has a built- in Web-based management feature that allows users to easily configure and manage multiple print queues through TCP/IP. For a list of printers that are compatible with the DP-301P+, please see the Appendix in this manual. -
Page 11: Using The Web Configuration
Using the Web Configuration Open your Web browser and type http://192.168.0.10 in the address box, and press Enter. This set of numbers is the default IP address of your print server. Please note that the PC’s IP address must correspond with the Print Server’s IP address in the same segment for the two devices to communicate. - Page 12 Using the Web Configuration (continued) Home System Status and Printer Status The Home tab displays the system information, providing general information regarding the print server. Click on the Refresh button to acquire the most updated information. Once a printer is connected to the print server, the Printer Status will be displayed.
- Page 13 Using the Web Configuration (continued) Configuration The Configuration window will display the settings required to configure the DP- 301P+ Print Server. Consult your printer’s manual for the PJL (Printer Job Lan- guage) and print speed supported on your printer. Click Save on the bottom of the configuration page to ensure the settings are updated and saved.
- Page 14 Using the Web Configuration (continued) Network...
- Page 15 Using the Web Configuration (continued) Network (continued) TCP/IP Protocol IP Address: The default IP address is 192.168.0.10 Subnet Mask: The default subnet mask is 255.255.255.0 Default Gateway: Enter the IP address of the default gateway (router). IP Assignment: Manually Assign: Select this option when you manually input the IP address in the field above.
- Page 16 Using the Web Configuration (continued) Tools Print Test: To print a test page, click Test. Reset: Click YES to reset the print server to its factory default settings. The print server will then restart. You will lose all the user-defined settings and you will need to reconfigure the print server.
- Page 17 Using the Web Configuration (continued) Help Click on the link in the window to access D-Link’s support website. D-Link’s support website will provide the most up to date information on your DP-301P+ Print Server. Please check the website regularly for product and firmware updates.
-
Page 18: Tcp/Ip Printing For Windows Xp
IP address should be 192.168.0.x, where x is a value between 1-254, excluding 10.) See Networking Basics: Assigning a Static IP Address in this manual to find out how to change an IP address. D-Link DP-301U http://192.168.0.10... - Page 19 TCP/IP Printing for Windows XP (continued) At the Configuration window, write down the Port Name for future reference. You will need this information later in the configuration process.
- Page 20 TCP/IP Printing for Windows XP (continued) When you select TCP/IP Protocol at the Network window, the screen below appears. (We recommend that you keep the default settings as shown.) If you need to make changes, make sure to click Save after you have made the changes.
- Page 21 TCP/IP Printing for Windows XP (continued) Go to Start > Settings > Printers and Faxes > Add a Printer. Click Next.
- Page 22 TCP/IP Printing for Windows XP (continued) Select Local Printer. Deselect Automatically detect and install my Plug and Play printer. Click Next. Select Create a new port. At the pull-down menu, highlight Standard TCP/IP Port. Click Next. Click Next.
- Page 23 TCP/IP Printing for Windows XP (continued) Type in the IP address of the print server (i.e. 192.168.0.10). The Port Name will automatically be filled in. Select Standard. Click Next. Click Finish.
- Page 24 TCP/IP Printing for Windows XP (continued) Highlight the printer, as shown. If the desired printer is not on the list, click Have Disk and insert the printer driver disk that came with your printer to install the printer drivers. Click Next. At this screen, you can input a name for the printer.
- Page 25 TCP/IP Printing for Windows XP (continued) Epson Stylus Epson Stylus COLOR 740 ESC/P2 Click Finish.
-
Page 26: Tcp/Ip Printing For Windows 2000
TCP/IP Printing for Windows 2000 Open the Web browser, and type the IP address of the DP-301P+ http://192.168.0.10 )into the Location or Address field. Press Enter. Note: The PC’s IP address must be in the same subnet as the print server’s IP address for the two devices to communicate. - Page 27 TCP/IP Printing for Windows 2000 (continued) At the Configuration window, write down the Port Name for future reference. You will need this information later in the configuration process.
- Page 28 TCP/IP Printing for Windows 2000 (continued) When you select TCP/IP Protocol at the Network window, the screen below appears. (We recommend that you keep the default settings as shown.) If you need to make changes, make sure to click Save after you have made the changes.
- Page 29 TCP/IP Printing for Windows 2000 (continued) Go to Start > Settings > Printers Double-click on the Add Printer icon. Click Next.
- Page 30 TCP/IP Printing for Windows 2000 (continued) Select Local Printer. Click Next. Select Create a new port at the pull-down menu, highlight Standard TCP/IP Port. Click Next.
- Page 31 TCP/IP Printing for Windows 2000 (continued) Click Next. Type in the IP address of the print server in the Printer Name or IP Address field. The Port Name field will automatically be filled in. Click Next. Select Standard. Click Next.
- Page 32 TCP/IP Printing for Windows 2000 (continued) Click Finish. Highlight the printer, as shown. If the desired printer is not on the list, click Have Disk and insert the printer driver disk that came with your printer to install the printer drivers. Click Next.
- Page 33 TCP/IP Printing for Windows 2000 (continued) Select Do not share this printer. Click Next. Select Yes to print a test page. Click Next. Click Finish. The printer is now ready for printing with Windows 2000 on your network.
-
Page 34: Tcp/Ip Printing For Windows 98Se/Me
TCP/IP Printing for Windows 98SE/Me Open the Web browser, and type the IP address of the DP-301P+ (http://192.168.0.10) into the Location or Address field. Press Enter. Note: The PC’s IP address must be in the same subnet as the print server’s IP address for the two devices to communicate. - Page 35 TCP/IP Printing for Windows 98SE/Me (continued) At the Configuration window, write down the Port Name for future reference. You will need this information later in the configuration process. The Port Name shown here is only an example.
- Page 36 TCP/IP Printing for Windows 98SE/Me(continued) When you select TCP/IP Protocol at the Network window, the screen below appears. (We recommend that you keep the default settings as shown.) If you need to make changes, make sure to click Save after you have made the changes.
- Page 37 TCP/IP Printing for Windows 98SE/Me (continued) Go to Start > Settings > Control Panel. Double-click on Network. The screen shown at the right will appear. Click Add. Highlight Client. Click Add.
- Page 38 TCP/IP Printing for Windows 98SE/Me (continued) At this window, click Have Disk. Insert the DP-301P+ CD-ROM into your CD-ROM drive. Select the letter representing the CD-ROM drive on your computer from the pull-down menu. Double-click on the folder lpr. 3. Highlight lpr.inf. 4.
- Page 39 TCP/IP Printing for Windows 98SE/Me (continued) Click OK. You should now be back to the Network Properties Page. Highlight LPR for TCP/IP Printing. Click Properties.
- Page 40 TCP/IP Printing for Windows 98SE/Me (continued) Click Add Port. Type in the IP address of the DP-301P+. Make sure the Port Name is accu- rate. (The Port Name at right is just an example.) PS-116688-P1 Click OK. The Port Name and IP address will be displayed.
- Page 41 TCP/IP Printing for Windows 98SE/Me (continued) Click OK. Windows will ask for a restart. Click Yes.
- Page 42 TCP/IP Printing for Windows 98SE/Me (continued) Once your computer has rebooted, click on Start > Settings > Printers > Add Printer When the Add Printer Wizard screen appears, click Next. Select Network Printer. Click Next. Type in the path, if you know it, or click Browse.
- Page 43 TCP/IP Printing for Windows 98SE/Me (continued) At the next screen, browse for the printer port. Highlight the port as shown. (The Port Name in this window is just an example.) PS-116688-P1 Click OK. If the network path is not specified, type in the IP address of the DP-301P+ and the Port Name.
- Page 44 TCP/IP Printing for Windows 98SE/Me (continued) Select Yes to print a test page. Click Finish. Go to Start > Settings > Printers Check to see that your printer is installed.
-
Page 45: Unix/Linux Printing
Unix/Linux Printing Please refer to the PS Admin Manual on the CD included with your DP-301P+ purchase for information on setting up the print server in Unix/Linux. -
Page 46: Setting Up Appletalk Or Lpr Printing In Mac Os X
Setting up Apple Talk or LPR Printing in Mac OS X Note: Mac OS printing is supported by PostScript printers only! With Mac OS X you can use AppleTalk or LPR printers using IP protocols for printing through print servers. Follow the instructions below to set up the print server. After attaching the print server to your network using the directions provided in the Quick Installation Guide, change the IP address of your Macintosh to access the print server’s Web configuration. - Page 47 Setting up Apple Talk or LPR Printing in Mac OS X (continued) The default IP address of the print server is 192.168.0.10. Manu- ally change your IP address to 102.168.0.x, where x is any number be- tween 1 and 254 (except 10 which is the IP address of the print server.) The IP...
- Page 48 Setting up Apple Talk or LPR Printing in Mac OS X (continued) To print, open a document and select File > Print from the menu. Select Edit Printer List from the Printer dialog box. Click Add Printer...
- Page 49 Setting up Apple Talk or LPR Printing in Mac OS X (continued) Select the printing protocol preferred, AppleTalk or LPR Printers using IP. In this example, AppleTalk has been PS - 1123D6-U1 Laserwriter PS-116688-P1 selected. AppleTalk protocol: After selecting AppleTalk the Port PS-116688-P1 PS - 1123D6-U1 Laserwriter...
- Page 50 Setting up Apple Talk or LPR Printing in Mac OS X (continued) LPR Printers using IP protocol: When you select LPR Printers using IP Proto- col, this window will ap- pear. Type the IP address of the PS-116688-P1 PS-1123D6 - U1 print server into the LPR Printer’s Address field.
-
Page 51: Setting Up Appletalk Printing In Mac Os 9
Setting up Apple Talk Printing in Mac OS 9 Note: Mac OS printing is supported for PostScript printers only! The AppleTalk network protocol is used with computers using the Macintosh operating system. It can be used for network communications over standard Ethernet or Fast Ethernet using the EtherTalk transport, or over a proprietary LocalTalk transport. -
Page 52: Printing From Mac Os Client Workstations
Printing from Mac OS Client Workstations The exact procedure for selecting a PostScript printer connected to your print server may vary slightly, depending on what printer driver version you are using. The procedure described below assumes you are using the LaserWriter 8. To choose a printer connected to your print server as your Mac OS workstation’s default printer, Open the chooser by selecting Chooser from the Apple menu. - Page 53 Printing from Mac OS Client Workstations (continued) If you have not previously set this printer as the default, your computer will prompt you for a PostScript Printer Description file. Choose Select PPD. Select the appropriate printer description file for your printer. Click Open.
-
Page 54: Networking Basics
Networking Basics Using the Network Setup Wizard in Windows XP In this section you will learn how to establish a network at home or work, using Microsoft Windows XP. Note: Please refer to websites such as http://www.homenethelp.com http://www.microsoft.com/windows2000 for information about networking computers using Windows 2000, Me or 98SE. - Page 55 Networking Basics (continued) Please follow all the instructions in this window: In this window, select the best description of your computer. If your computer connects to the Internet through a gateway/router, select the second option as shown. Click Next.
- Page 56 Networking Basics (continued) Enter a Computer description and a Computer name (optional.) Click Next. Enter a Workgroup name. All computers on your network should have the same Workgroup name. Click Next.
- Page 57 Networking Basics (continued) Please wait while the Network Setup Wizard applies the changes. When the changes are complete, click Next. Please wait while the Network Setup Wizard configures the computer. This may take a few minutes.
- Page 58 Networking Basics (continued) In this window, select the best option. In this example, Create a Network Setup Disk has been selected. You will run this disk on each of the computers on your network. Click Next. Insert a disk into the Floppy Disk Drive, in this case drive A.
- Page 59 (continued) Networking Basics Please wait while the Network Setup Wizard copies the files. Please read the information under Here’s how in the screen below. After you com- plete the Network Setup Wizard you will use the Network Setup Disk to run the Network Setup Wizard once on each of the computers on your network.
- Page 60 Networking Basics (continued) The new settings will take effect when you restart the computer. Click Yes to re- start the computer. You have completed configuring this computer. Next, you will need to run the Net- work Setup Disk on all the other computers on your network. After running the Network Setup Disk on all your computers, your new wireless network will be ready to use.
- Page 61 Networking Basics (continued) How to assign a Name to your computer To name your computer, please follow these directions in Windows XP: Click Start (in the lower left corner of the screen). Right-click My Computer. Select Properties and click. Select the Computer Name tab in the System Properties window.
- Page 62 Networking Basics (continued) How to assign a Name to your Computer In this window, enter the Computer name. Select Workgroup and enter the name of the Workgroup. All computers on your network must have the same Workgroup name. Click OK. How to find your IP Address in Windows XP The adapter-equipped computers in your network must be in the same IP ad- dress range.To verify the IP address of the adapter, please do the following:...
- Page 63 Networking Basics (continued) How to find your IP Address in Windows XP This window will appear. Click the Support tab. Click Close. Assigning a Static IP Address in Windows XP/2000 Note: Many gateways/routers will automatically assign IP addresses to the com- puters on the network, using DHCP (Dynamic Host Configuration Protocol) technology.
- Page 64 Networking Basics (continued) Assigning a Static IP Address in Windows XP/2000 Double-click Network Connections. Right-click Local Area Connections. Double-click Properties.
- Page 65 Networking Basics (continued) Assigning a Static IP Address in Windows XP/2000 Click Internet Protocol (TCP/IP). Click Properties. Select Use the following IP address in the Internet Protocol (TCP/IP) Properties window. Input your IP address and subnet mask. (The IP addresses on your network must be within the same range.
-
Page 66: Technical Specifications
Technical Specifications Printer Connection Printer Port: Parallel port Bidirectional Communication: Hewlett-Packard PJL (Printer Job Language) standard for bi-directional communication. Network Connection Network Standards: IEEE 802.3 10Base-T Ethernet Network Data Transfer Rate: 10/100 Mbps (megabits per second) Network Connector: RJ-45 connector for 10Base-T Category 5 twisted-pair connection Network Protocols Ethernet Frame Types: 802.2, 802.3, Ethernet II, SNAP (auto-switching) Transport Protocols: TCP/IP, NetBEUI, AppleTalk/EtherTalk, LPR... -
Page 67: Contacting Technical Support
Support You can find software updates and user documentation on the D-Link website. D-Link provides free technical support for customers within the United States and within Canada for the duration of the warranty period on this product. U.S. and Canadian customers can contact D-Link technical support through our website, or by phone. -
Page 68: Warranty
Warranty Period from the date of original retail purchase. If a material defect is incapable of correction, or if D-Link determines in its sole discretion that it is not practical to repair or replace the defective Hardware, the price paid by the original purchaser for the defective Hardware will be refunded by D-Link upon return to D-Link of the defective Hardware. - Page 69 Canada) D-Link may reject or return any product that is not packaged and shipped in strict compliance with the foregoing requirements, or for which an RMA number is not visible from the outside of the package. The product owner agrees to pay D-Link’s reasonable handling and return shipping charges for any product that is not packaged...
- Page 70 LIABILITY OF D-LINK UNDER THIS WARRANTY IS LIMITED TO THE PURCHASE PRICE OF THE PRODUCT COVERED BY THE WARRANTY. THE FOREGOING EXPRESS WRITTEN WARRANTIES AND REMEDIES ARE EXCLUSIVE AND ARE IN LIEU OF ANY OTHER WARRANTIES OR REMEDIES, EXPRESS, IMPLIED OR STATUTORY.
-
Page 71: Registration
Registration Register your D-Link product online at http://support.dlink.com/register/... -
Page 72: Appendix: Dp-301P+ Printer Compatibility List
Appendix: DP-301P+ Printer Compatibility List The Canon Printer The Fujitsu Printer Canon BJC-255SP Fuji 10V, 14V Canon BJ-330 Fuji DL-700 Canon BJC-600, 620 Fuji DL-3800 Canon BJC-2000SP The HP Printer/Plotter Canon BJC-4100, 4300, 4500, 4550 HP Portable Canon BJC-6000, 6500 HP LaserJet III Canon BJC-7000 HP LaserJet 4P, 4L, 4V... - Page 73 Appendix: DP-301P+ Printer Compatibility List (continued) The Lexmark Printer Other Printers Brother HL-1260 Lexmark 4039 10R CD T120 Lexmark 5700 Lexmark Optra Color 45 Citizen GSX-230 Futek 84+ Lexmark Optra C710 OKI ML-391 Lexmark Optra E, E+, E310 Lexmark Optra K1220 OKIdata OL-400 Olivetti JP450 Lexmark Optra M410, M412...
Need help?
Do you have a question about the DP-301P+ and is the answer not in the manual?
Questions and answers