
Related Manuals for Reolink RLC-843WA


Summary of Contents for Reolink RLC-843WA
- Page 1 Q S G 1 _ A _ E N Item No. : W437 Quick Start Guide Apply to: RLC-843WA @ R e o l i n kTe c h h t t p s ://re o l i n k . c o m...
-
Page 2: Table Of Contents
Contents What's in the Box What's in the Box Camera Introduction Connection Diagram Camera Power Adapter* Pack of Screws Ethernet Cable Set up the Camera Mount the Camera Troubleshooting Specification Mounting Surveillance Reset Needle Quick Start Guide Notification of Compliance Template Sticker 4.5M Power* Extention Cable NOTE:... -
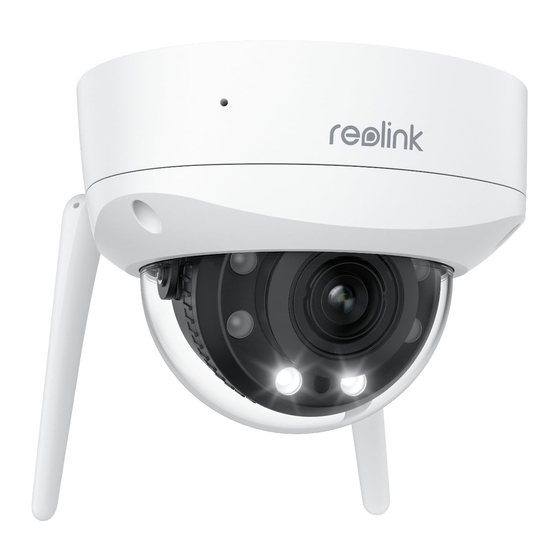
Page 3: Camera Introduction
Camera Introduction microSD Card Slot *Loosen the screws with a screwdriver (not included) to access the microSD Built-in Mic card slot Mount Reset Button IR LEDs * Press and hold the reset button for 5s with a pin to restore factory settings. Lens Spotlights Speaker... -
Page 4: Connection Diagram
Connection Diagram Set up the Camera Before initial setup, follow the steps below to connect your camera. Download and launch the Reolink App or Client software, and follow the 1. Connect the camera to a LAN port on your router with an Ethernet onscreen instructions to finish initial setup. cable. 2. Use the power adapter to power on the camera. -
Page 5: Mount The Camera
Mount the Camera Install the Camera Installation Tips Put the mounting template on the ceiling and drill holes at the • Do not face the camera towards any light sources. indicated locations, then insert • Do not point the camera towards a glass window. Or, it may result in the drywall anchors. -
Page 6: Troubleshooting
• Please check whether the DC adapter is working or not. If you have an- other 12V DC power adapter which is working, please use another power Align the arrows and the notch adapter and see if it works. according to the diagram. 0° 1. Arrows on camera base If these won’t work, contact Reolink Support at https://support.reolink. 2. Notch on camera module com/. 3. Arrow on camera top Infrared LEDs Stop Working If the Infrared LEDs of your camera stop working, please try the following solutions: Attach the dome cover to the • Enable infrared lights on Device Settings page via Reolink App/Client. -
Page 7: Specification
Notification of Compliance settings again. If these won’t work, contact Reolink Support at https://support.reolink. com/. FCC Compliance Statement This device complies with Part 15 of the FCC Rules. Operation is subject Picture is not Clear to the following two conditions: (1) this device may not cause harmful interference, and (2) this device must accept any interference received, If the picture from the camera is not clear, please try the following solu- including interference that may cause undesired operation. - Page 8 Simplified EU Declaration of Conformity (2) This device must accept any interference, including interference that may cause undesired operation of the device. Reolink declares that this device is in compliance with the essential L’ émetteur/récepteur exempt de licence contenu dans le présent requirements and other relevant provisions of Directive 2014/53/EU and appareil est conforme aux CNR d’Innovation, Sciences et Développement...
- Page 9 WiFi Operating Frequency Terms and Privacy OPERATING FREQUENCY : Use of the product is subject to your agreement to the Terms of Service 2.4 GHz EIRP < 20dBm and Privacy Policy at reolink.com. Keep out of reach of children. 5 GHz EIRP < 20dBm 5.8GHz EIRP < 14dBm Technical Support The functions of Wireless Access Systems including Radio Local If you need any technical help, please visit our official support site and...
Need help?
Do you have a question about the RLC-843WA and is the answer not in the manual?
Questions and answers