Table of Contents
Advertisement
Quick Links
Advertisement
Table of Contents

Summary of Contents for icomera Moovbox M220
- Page 1 Moovbox M220 Quick Start Guide...
- Page 2 Your rights to the software are governed by the ac- companying software licence agreement. Every effort has been made to ensure that the information in this manual is accurate. Icomera is not responsible for print- ing or clerical errors. Icomera AB Vikingsgatan 3 SE 411 04 Göteborg...
-
Page 3: Table Of Contents
Contents Contents Introducing the Moovbox M220 Getting Started Unpacking the Moovbox ..... Power Supply ...... -
Page 4: Introducing The Moovbox M220
Introducing the Moovbox M220 The Moovbox M220 from Icomera is a rugged mobile broadband gateway that deliv- ers commercial-class Wi-Fi access, Ethernet connectivity and GPS tracking over a range of carrier-class backhaul networks. Designed for mounting inside vehicles or temporary locations that require broadband... -
Page 5: Getting Started
12-36V DC Molex power input, or via a Power-over-Ethernet (PoE) adapter. Use only an Icomera recommended M220 PoE as listed below. If you are unsure of what type of power source you should use, or do not have access to either, please contact your supplier. -
Page 6: Pci Express Mini Card Wan Modem
CHAPTER 2. GETTING STARTED M220 100-240v to 18V DC UK Power over Ethernet Adaptor (SKU 3000000049) M220 100-240v to 18V DC EU Power over Ethernet Adaptor (SKU 3000000050) 2.3 PCI Express Mini Card WAN Modem To enable your Moovbox to connect to the Internet you will need a PCI express mini card WAN modem and an active cellular data subscription. -
Page 7: Installing Wan Modems And Sims
Carefully lift the top chassis from the lower chassis, and place to one side. Insert modem 1 into the upper slot on the Icomera add-on board; WAN 1. Insert the modem in at a 45 degree angle and push the back down towards the board (See Figure 2.1). - Page 8 Your installation should look like Figure 2.2. Figure 2.2: Modem connectors Insert the SIM card(s) in the slots next to the WAN modems. Remember WAN 1 is the upper slot on the Icomera add-on board and WAN 2 is the lower slot...
- Page 9 CHAPTER 2. GETTING STARTED on the mother board. Lift the SIM card holder as shown below and insert the SIM card with the contacts facing down. Close the SIM card holder and slide to lock (see Figure 2.3). Figure 2.3: Inserting the SIM card Gently refit the top chassis and replace the six screws you removed earlier, making sure not to overtighten them.
-
Page 10: Attaching The Antennas
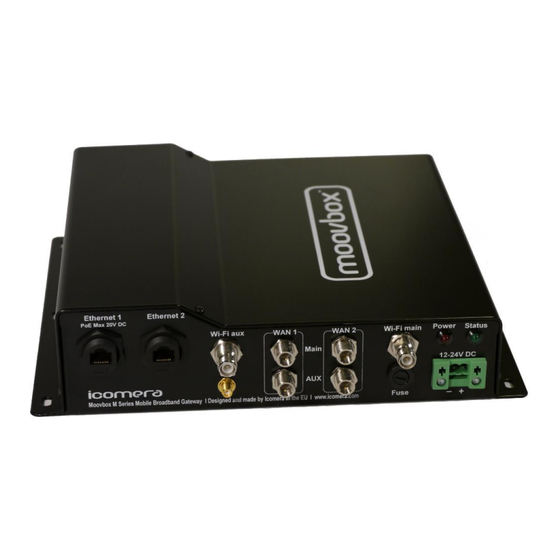
CHAPTER 2. GETTING STARTED 2.7 Attaching the antennas Wi-Fi aux antenna WAN 1 main antenna WAN 2 main antenna Wi-Fi main antenna GPS antenna WAN 1 aux antenna WAN 2 aux antenna Figure 2.5: Antenna connectors Wi-Fi Your Moovbox is supplied with one 3dBi omnidirectional antenna (a second for di- versity is available from you supplier SKU 3000000001) which should provide good coverage for most in-vehicle and in-building deployments. -
Page 11: Choosing A Power Supply
SMA plug 2.8 Choosing a power supply The Moovbox M220 can be powered either via the ‘Ethernet 1 / PoE’ port using a Power-over-Ethernet power supply , or via the green 12-36VDC Molex power input. -
Page 12: Turning On Your Moovbox
If you are intending to permanently install the Moovbox in a vehicle, then you should plan to wire the 12-36VDC connector into the vehicle’s electrical system. Many of Icomera’s Channel Partners are professionally qualified to perform these installations for you, including mounting antennas and running cables, with minimal visual impact. - Page 13 CHAPTER 2. GETTING STARTED The Moovbox is configured via a secure web application called MoovAdmin which resides on the Moovbox. To log into MoovAdmin: Launch your Javascript-enabled web browser. https://192.168.0.10/ In the browser’s address field, type . Ensure you specify HTTPS and not HTTP otherwise you will not connect. Press Enter.
-
Page 14: Using Moovadmin To Configure The Cellular Modem
CHAPTER 2. GETTING STARTED 2.11 Using MoovAdmin to configure the cellular modem Having connected to the Moovbox, you should see the MoovAdmin status screen as illustrated above. If your device did not ship with a preconfigured modem already installed, you’ll need to set up the Moovbox to work with your own. To configure the modem: In the Configuration menu (upper left) choose Device Settings. -
Page 15: Moovmanage And Gps Tracking (Moovtrac)
2.12 MoovManage and GPS tracking (MoovTrac) The Moovbox M220 features a built-in GPS receiver that, with an appropriate GPS antenna attached, ‘samples’ the position of the device every 5 seconds. These coor- dinates are cached and then transmitted from the Moovbox over the cellular network to Icomera’s data center every thirty seconds. -
Page 16: Setting Up A Captive Portal
CHAPTER 2. GETTING STARTED Figure 2.8: GPS status in MoovAdmin 2.13 Setting up a Captive Portal By default, the Moovbox ships with the Ethernet and Wi-Fi interfaces routed to the WAN modem on a two bridge groups; Ethernet on ‘Default’ and Wi-Fi on ‘Access Point’. - Page 17 CHAPTER 2. GETTING STARTED Figure 2.9: Captive portal options in MoovAdmin Choose Configuration > Bridge Groups, and check the settings look like those shown in Figure 2.10. Choose Administration > Save & Reboot to store the changes. Further information about configuring the MoovManage captive por- tal can be found in the MoovManage Reference Guide.
-
Page 18: Vehicle Installation
Vehicle Installation The Moovbox delivers mobile broadband connectivity to vehicles large and small. This section will help you understand how to optimize your in-vehicle Moovbox instal- lation. 3.1 Choosing a suitable location for your equipment To get the best out of your Moovbox when planning an in-vehicle deployment, you need to consider: Positioning of the Moovbox unit for security and accessibility Proximity of power source... - Page 19 CHAPTER 3. VEHICLE INSTALLATION Moovbox The Moovbox should be installed in a location where its safe from unwanted casual tampering yet accessible for servicing. This can vary considerably between different types of vehicle. In a car probably the best location is in the boot/trunk. However in larger commercial vehicles finding the right spot will depend on the specific design of the interior.
- Page 20 WAN reception should be adequate with dash or window- mount antennas. Icomera recommends a roof-mount antenna, please contact your supplier for available options. Note: If you are only installing WAN backhaul and not GPS, then you have some flexibility in your choice of antenna location.
- Page 21 (requiring a hole to be drilled in the metal roof) often nets the best result, as the antenna is then outside and fitted on metal groundplane for optimal reception (B). Note: Contact your supplier for more information about professional installations, as many Icomera Channel Partners are qualified to design your Moovbox deployment.
-
Page 22: Troubleshooting
Troubleshooting If you’re having problems with your Moovbox, this section may help you resolve them. 4.1 I can’t connect to the Moovbox to configure it Once you’ve powered up the Moovbox, you should be able to connect to it via https: Ethernet by opening any Javascript-enabled web browser and going to //192.168.0.10/... -
Page 23: I Can Get Internet Access But No Gps Lock
CHAPTER 4. TROUBLESHOOTING Check to see if the green Status light is illuminated. If it is not, this means the Moovbox is unable to establish a PPP connection with your carrier. Ensure you have carrier coverage in your area by looking at the coverage maps avail- able online from your carrier.
Need help?
Do you have a question about the Moovbox M220 and is the answer not in the manual?
Questions and answers