
Related Manuals for Fagor FWD612IT


Summary of Contents for Fagor FWD612IT
- Page 1 Manual de instalación y uso de la lavadora-secadora Manuel d’installation et d’utilisation de le lave-linge séchant Manual de instalação e utilização da máquina de lavar-secar Washer-dryer installation and operation manual...
- Page 2 To avoid the risk of fire, electric shocks, injury or damage when using your washing machine, please take the following precautions: This washing machine comes with a Do not climb onto the machine or stand manual that includes operating, maintenance on the open hatch door.
-
Page 3: Washing Machine
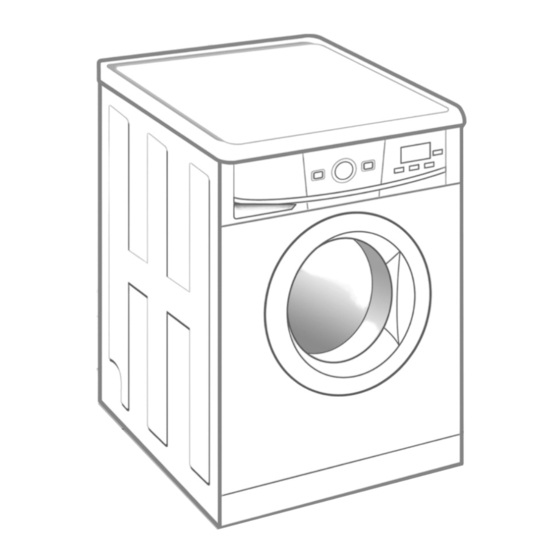
Power cord Work top Control panel Detergent dispenser Drain hose Stainless steel drum Hatch Accesible filter (behind kickplate) Kickplate Adjustable feet ACCESSORIES Water inlet hose. -
Page 4: Installation And Assembly
Loosen and remove the 3 blocking screws. c Cover the holes with the plastic covers you have just removed. Do not throw the blocking screws away. You may need to move the... - Page 5 CONNECTION TO THE MAINS WATER SUPPLY The water supply hose is inside the drum: a Connect the bent end of the hose to the threaded inlet of the electrovalve located at the rear of the washing machine. b Connect the other end of the hose to the water intake.
-
Page 6: Electrical Connection
This will reduce the noise level and prevent it from moving during use. Do not bring the feet too far out, you will achieve better stability. You need to use a spanner for the models that have a nut. - Page 7 Your washing machine may be fitted underneath a kitchen worktop. If you need to remove the washing machine’s worktop, for safety reasons you need to fit a protection plate which you can obtain from your Dealer or Technical Assistance Service.
-
Page 8: Sorting The Clothes
This improves the washing action and also aids the correct distribution of the garments in the drum when spin-drying, and the washing machine will therefore be quieter. It is a good idea to put small garments in a wash bag. Cold... -
Page 9: Using Detergent And Additives
Your washing machine’s detergent Wash Fabric softener Prewash dispenser has three compartments. b Put the detergent or additive into the detergent dispenser before starting the wash programme. c Liquid detergents may also be used in this washing machine. An optional... -
Page 10: Selecting Wash And Dry Programme
The time will appear on the display, increasing each time the drying time button is pressed. If you select a wash + dry option, the load must not be over 4 kg. (1.5 kg. for delicate wash programmes). - Page 11 When you select the programme, the following information will be displayed: 1 Wash and dry programme phases: Wash Rinse Spin-drying 2 Spin speed 3 Programme nº (for a few seconds) and then programme duration.
-
Page 12: Programmes Table
YES NO Synthetic/Delicate Wool/wool mix Cotton/cotton mix Spin-drying Synthetic/Delicate Wool/wool mix Normal dry Cotton/Linen Delicate dry Synthetic/mixed fabrics Cotton/cotton mix Drain/End Synthetic/Delicate Wool/wool mix Programme for wash and energy consumption assessment in accordance with standard EN60456, press intensive wash button. - Page 13 Normal dry 1,8/27 1,2/26 Delicate dry Drain and end of programme. 0,00/0 Takes programme to final position NOTE: the KWh and litre consumptions and programme durations may vary depending on the type and amount of clothes, mains water pressure, etc.
-
Page 14: Spin Speed Selection
On non-display models the LED will light up. c No spin Select Press the spin button again to get to the no spin option. A programme without a final spin. It is used to prevent creasing when washing special fabrics. -
Page 15: Time Delay
ADDITIONAL FUNCTIONS using the appliance TIME DELAY Time delay selection button A delay of up to 24 hours can be selected. The delay must be selected after choosing the wash programme. To select the hours of delay, press the clock button. -
Page 16: Block Function
Select BLOCK FUNCTION Block function selection The lock function ensures that the programme will not be affected if any buttons are pressed. It is used when children could press the buttons, etc. The block function should be activated after Select the wash programme has been selected together with all its options. -
Page 17: Power Cuts
If you find that the clothes are not properly continue to run from where it left off (it has wrung out, try spin-drying them again after several hours of memory). The same will having distributed the clothes more evenly in happen if the ON/OFF button is pressed. -
Page 18: Maintenance And Cleaning
MAINTENANCE After each wash, leave the door open for a while to allow the air to circulate freely inside the machine. From time to time, depending on the hardness of your water, it is recommendable to run a full wash cycle using a decalcifying product. -
Page 19: Cleaning The Filter/Outside
Remove the kickplate by pulling gently on its edges and turning it downwards, to release the clips. If you do not have access from the side, insert a small screwdriver into the three slots at the top of the kickplate, in order to get leverage and release the clips. -
Page 20: Safety And Troubleshooting
This may be due to the following: PROBLEMS Check the door is properly shut. Why won’t the washing The washing machine is not plugged into the mains or machine start? there is no voltage in the mains supply. The Start/Pause button has not been pressed. - Page 21 Why doesn’t the washing Indicator F01, no water coming in, this may be due to a cut in the water supply, a tap turned off or a blocked machine take in water? water inlet filter. The possible solutions are as follows: wait for the water supply to be reconnected, turn on the tap, or remove the water inlet hose and clean the filter.
- Page 22 One of them is that the washing machine cannot has finished? be opened until it is certain that the drum is quite still. This is why the hatch cannot be opened for 2 minutes. Why doesn’t the remaining...
-
Page 23: Environmental Warnings
It can be taken, free of charge, to a specific waste collection centre, run by your local authority, or For further information, contact dealers who provide this service. - Page 24 Fagor Electrodomésticos, S.Coop. Apartado 49 Tel. (943) 71 91 00 / 01 Fax (943) 79 68 81 Bº San Andrés, 18 20500 MONDRAGÓN (Guipúzcoa) www.fagor.com e-mail: info@fagor.com 05/06 LJ6A028P1...
Need help?
Do you have a question about the FWD612IT and is the answer not in the manual?
Questions and answers