Table of Contents
Advertisement
Advertisement
Table of Contents

Related Manuals for Fagor 8025 T CNC


Summary of Contents for Fagor 8025 T CNC
- Page 1 CNC 8025 T, TS New Features (Ref. 0107 in)
- Page 2 If the number of the source program does not exist, or there is already a program in memory with the same number as the new one or if there is not enough when copying the new program , the CNC will issue a message indicating the cause.
- Page 3 O58 / O59 Positive / negative 4th axis limits When the PLCI activates one of this outputs while the axis is moving in the same direction, the CNC stops the axes and the spindle and it displays an axis-travel-limit-overrun error.
- Page 4 This feature is available. When using this feature, access to the editor mode at the CNC depends on the status of PLCI output O26, as well as on the current conditions (protected memory, number of the program to be locked).
- Page 5 4th axis and the Live Tool will no longer be available. The feedback inputs will be used as follows: A1 - X axis; A2 - Z axis handwheel; A3 - Z axis; A4 - 3rd axis or "C" axis; A5 - Spindle; A6 - X axis handwheel The handwheels will be operative when selecting the JOG mode.
- Page 6 * Press the push-button on the rear of the handwheel. The CNC selects the first axis and it highlights it. * By pressing the button again, the next axis is selected and so on, rolling over from the last axis to the first one.
- Page 7 CANCEL TOOL OFFSET DURING A TOOL CHANGE From this version on, it is possible to execute a "T.0" type block inside the subroutine associated with the tool to cancel the tool offset. This lets move to a particular position without the need for cumbersome calculations.
- Page 8 P623(1) = 1It is affected by the Feedrate override. FEEDBACK FACTOR. From this version on, there is a new machine parameter to set the resolution of an axis having an encoder and a leadscrew. P819 Feedback factor for the X axis...
- Page 9 FAGOR 8025/8030 CNC Models: T, TG, TS OPERATING MANUAL Ref. 9701 (in)
- Page 10 It includes the necessary information for new users as well as advanced subjects for those who are already familiar with this CNC product. It may not be necessary to read this whole manual. Consult the list of "New Features and Modifications" which will indicate to you the chapters and sections describing them.
-
Page 11: Table Of Contents
3.1.6. Tool inspection ....................... 20 3.1.7. CNC reset ........................21 3.1.8. Display and deletion of the Messages sent by the FAGOR PLC 64......21 3.2. Mode 2: PLAY-BACK ....................22 3.2.1 Selection of the operating mode PLAY-BACK ............. 22 3.2.2. - Page 12 Entering an M value ......................33 3.5.5.4. Entering an T value ......................33 3.5.6 Measurement and loading of the tool dimensions in the offset table ......34 3.5.7. Operation of the CNC as a readout ................. 35 3.5.8. Change of measuring units ....................35 3.5.9.
- Page 13 Section Page 3.6.5. Display and search of memorized subroutines programmed in the CNC memory ..42 3.6.6. Program selection ......................42 3.6.7. Program creation ......................42 3.6.7.1. Unassisted programming ....................43 3.6.7.2. Modification and deletion of a block ................44 3.6.7.3.
- Page 14 COMPARISON TABLE LATHE MODEL FAGOR 8025/8030 CNCs...
- Page 15 Tool length compensation .................. Leadscrew backlash compensation ..............Leadscrew error compensation ................DISPLAY CNC text in Spanish, English, French, German and Italian ........ Display of execution time ................... Piece counter ...................... Graphic movement display and part simulation ..........Tool tip position display ..................
- Page 16 Spindle speed (S) ....................Spindle speed in rpm (G97) .................. Constant Surface Speed (G96) ................S value limit when working at constant surface speed (G92) ......Tool and tool offset selection (T) ................. Activate "C" axis in degrees (G14) ...............
- Page 17 TG TS COMPENSATION Tool radius compensation (G40,G41,G42) ............Loading of tool dimensions into internal tool table (G50, G51) ......CANNED CYCLES Pattern repeat (G66) ..................... Roughing along X (G68) ..................Roughing along Z (G69) ..................Straight section turning (G81) ................
- Page 18 P618(5,6,7,8) The 2nd home searching feedrate is set by Installation Manual Section 4.7 machine parameter P807...P810 New resolution values 1, 2, 5 and 10 for sine-wave Installation Manual Section 4.1 feedback signals P619(1,2,3,4) Access to PLCI registers from the CNC...
- Page 19 Software Version: 4.1 and newer FEATURE MODIFIED MANUAL AND SECTION Bell-shaped ACC./DEC. Installation Manual Section 4.8 It is now possible to enter the sign of the Installation Manual Section 4.4 leadscrew backlash for each axis P620(1,2,3,4) Independent axis movement execution Programming Manual...
- Page 20 INTRODUCTION Introduction - 1...
-
Page 21: Safety Conditions
- Nearby High Voltage power lines - Etc. Ambient conditions The working temperature must be between +5° C and +45° C (41ºF and 113º F) The storage temperature must be between -25° C and 70° C. (-13º F and 158º F) Introduction - 3... - Page 22 It carries two fast fuses of 3.15 Amp./ 250V. to protect the mains AC input. All the digital inputs and outputs are protected by an external fast fuse (F) of 3.15 Amp./ 250V. against over voltage and reverse connection of the power supply.
-
Page 23: Material Returning Terms
If not available, pack it as follows: 1.- Get a cardboard box whose three inside dimensions are at least 15 cm (6 inches) larger than those of the unit. The cardboard being used to make the box must have a resistance of 170 Kg (375 lb.). - Page 24 Is directed to the machine builder or person in charge of installing and starting up the PLCI. DNC-PLC Manual Is directed to people using the optional communications software: DNC-PLC. FLOPPY DISK Manual Is directed to people using the Fagor Floppy Disk Unit and it shows how to use Introduction - 6...
- Page 25 MANUAL CONTENTS The operating manual consists of the following chapters: Index Comparison table of FAGOR models: 8025 M CNCs New Features and modifications. Introduction Safety conditions. Material returning conditions. FAGOR documentation for the 8025 M CNC. Manual contents. Overview Front panel of the 8025 M CNC...
-
Page 26: Overview
This manual contains the information required for the proper operation of the CNC. It describes the controls fitted on both the keyboard and the front panel. Also the CNC operating modes and the information displayed on the screen are explained. 8025/8030 CNC OPERATING MANUAL... -
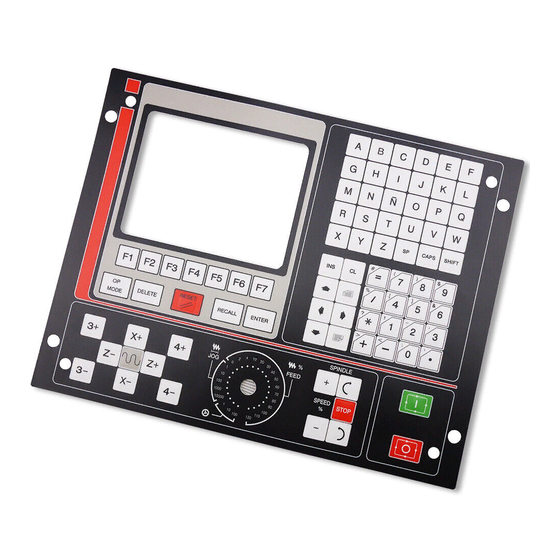
Page 27: Front Panel 8025/30 Cnc
ENTER. Allows information to be entered in the CNC memory, etc. RECALL. To access a program, a block within a program,etc. OP MODE. Allows a list of operating modes to be displayed on the screen. It is a previous step to accessing any of them. - Page 28 CL. To delete characters one by one during the editing process, etc. INS. Key which allows characters to be inserted during the edition of a program block. Arrow keys for moving cursor. Page up and page down keys. SP. Reserves a space between characters of a comment.
-
Page 29: Control Panel For The 8030 Cnc
Switch (M.F.O.), which allows a % variation of the programmed feedrate and to choose the different ways of working in the JOG MODE (continuous, incremental, electronic handwheel). Spindle operating keys. Allow the spindle to be put into OPERATION and to STOP it, in the JOG mode. The keys allow a % variation of the programmed turning speed of the spindle during operation. -
Page 30: Monitor/Keyboard/Control Panel For The 8025 Cnc
ENTER. Allows information to be entered in the CNC memory, etc. RECALL. To access a program, a block within a program,etc. OP MODE. Allows a list of operating modes to be displayed on the screen. It is a previous step to accessing any of them. - Page 31 M functions, etc. CL. To delete characters one by one during the editing process, etc. INS. Key which allows characters to be inserted during the edition of a program block. Arrow keys for moving the cursor. Page up and page down keys.
-
Page 32: Selection Of Colors
2.4. SELECTION OF COLORS Whenever the CNC is fitted with a COLOR MONITOR, it is possible to choose the set of colors one wishes to appear on the screen. Colors are selected by means of the designation of values to the Machine Parameter P611 bits (8) and (7). -
Page 33: Operating Modes
TEACH-IN : - Creation and execution of a block without entering it into memory. - Creation, execution and entering of a block into memory; thus a program is created while being executed block by block. DRY RUN : To check programs before actual execution of the first part. - Page 34 - Input of values for leadscrew error compensation. - Operate with the PLC. By means of these operating modes it is possible to program the CNC, produce parts in a continuous run, work block by block and work manually. Sequence for obtaining these operating modes: - Press OP MODE: The list of 10 modes will appear on the screen.
-
Page 35: Mode: Automatic (Continuous Cycle) / 1 Mode: Single Block
- Press 0/1 key : The standard display corresponding to this operating mode appears; i.e. in the upper left-hand section of the screen the message AUTOMAT/SINGLE BLOCK followed by the number of the program P —— and the number of the first block to be executed N ——. -
Page 36: Selection Of The First Block To Be Executed
3.1.1.3. Selection of the first block to be executed Once a program has been selected, the number of the first block to be executed appears to the right of the program number. If you wish to begin with a different block, the following procedure should be followed:... -
Page 37: Cycle Start
3.1.1.5. Cycle Start - Press . Once the program and block number have been selected, just press this key to execute the program in AUTOMATIC or the block in SINGLE BLOCK. . If the program contains any conditional block it will be executed when the relevant input is activated (see INSTALLATION AND START-UP MANUAL). -
Page 38: Changing The Operating Mode
3.1.1.7. Changing the operating mode It is possible, at any time during the execution of a cycle in AUTOMATIC mode, to switch to SINGLE BLOCK mode or vice versa. To do so: - Press OP MODE. The listing of operating modes will appear on the screen. -
Page 39: Standard Display Mode
Underneath and at the same level as COMMAND, the Programmed S value, multiplied by the %, on the same level as ACTUAL, the real S value and at the same level as TO GO (RPM) or (M/MIN). -
Page 40: Following Error Display Mode
The axis following error is displayed, as well as the programme number, the block number, the status of the G, M, T, S and F functions, as well as PLC messages, if any, comments and the meaning of the function keys, are also displayed. -
Page 41: Subroutine Status, Clock And Parts Counter Display Mode
The CLOCK which indicates in hours, minutes and seconds the operation time of the CNC in the AUTOMATIC, SINGLE BLOCK, TEACH IN and DRY RUN modes. When the running of a program is interrupted or finished, the counting of the clock is also interrupted. -
Page 42: Graphics Display Mode
This counter increments one unit every time the CNC runs the M30 function or the M02 function. To reset the parts no. counter the DELETE key must be pressed and then the function key [PART COUNT], this counter being displayed on the screen. -
Page 43: Plc/Lan Mode
SINGLE BLOCK mode remain active. 3.1.4. PLC/LAN mode. When the [PLC] function key is pressed, access is gained to the main menu of the PLC and the LOCAL AREA NETWORK without any need for stopping the execution of the program. -
Page 44: Verification And Modification Of The Values Of The Tool Offset Table Without Stopping The Cycle
The values of the offset which has been called will appear on the screen. Underneath and to the right, the letter I will appear. If it is wished to modify the value of the I on the table, the amount which it is wished to add or subtract is keyed in. -
Page 45: Tool Inspection
3.1.6. Tool inspection. If during the running of a program it is wished to inspect or change a tool, the procedure to follow is indicated below: a) Press The programme being run will be interrupted and on the upper right-hand side of the screen the message INTERRUPTED shall appear. -
Page 46: Cnc Reset
The CNC operates with the FAGOR PLC and the latter sends messages for display on the CNC, it is possible to access to a table of messages which are active at that moment. The CNC always displays the message with most priority, if there is more than one active message, the sign will be highlighted (displayed in reverse video). -
Page 47: Mode 2: Play-Back
This method of programming is basically the same as the EDITOR mode, except with regard to programming the values of the coordinates. It allows the machine to be operated manually and the coordinate values reached to be entered as program coordinates. The execution of a program requires the following steps: 3.2.1. -
Page 48: Creating A Program
ENTER key is pressed, the coordinates of the point according to the 3 active axes at that moment will be stored in memory. In order to activate an axis which is not active at that time, the key of the corresponding axis (X,Y,Z,W,V) must be pressed. -
Page 49: Mode 3: Teach-In
3.3.1. Selection of the operating mode - Press OP MODE - Press key 3 The meaning of the function keys to operate in this mode will appear on the screen. 3.3.2. Locking/Unlocking of memory Same as section 3.6.2. in EDITING mode (6). -
Page 50: Deletion Of A Block
3.3.7. Creation of a program Same as section 3.6.7. in EDITING mode (6) except that the block may be executed before pressing ENTER. To do this: - Press . The CNC executes the block. - If it is correct, it may be recorded in memory by pressing ENTER. -
Page 51: Mode 4: Dry Run
3.4. MODE 4: DRY RUN This operating mode is used for testing a program in a dry run before producing the first part. 3.4.1. Execution of a program The execution of a program requires the following steps: 3.4.1.1. Selection of the operating mode DRY RUN (4) - Press OP MODE - Press key 4. -
Page 52: Selection Of Execution Mode
- Key-in the number of the block whose execution in Dry Run mode is desired including the execution of this block. If this block includes the definition in a canned cycle, it will only be executed until it is positioned at the starting point in the cycle. -
Page 53: Selection Of The Program To Be Executed
Same as section 3.1.1.6. 3.4.1.7. Change of operation mode At any time during the execution of a cycle in the DRY RUN operating mode, it can be switched to the operating modes AUTOMATIC or SINGLE BLOCK. To do this: - Press OP MODE: The operating mode list will appear. -
Page 54: Display Modes
3.4.2. Display modes Same as section 3.1.2. except BACKGROUND EDITING which is not available. Regardless of the form of execution selected, the CNC will always examine the program as it executes it and will indicate possible programming errors. If during the execution of a program in DRY RUN mode we change to AUTOMATIC or... -
Page 55: Mode 5: Jog
3.5.1. Selection of the JOG operating mode (5) - Press OP MODE - Press key 5 The coordinates of the axes, the S value and the number of the active tool will appear on the screen in large characters. 8025/8030 CNC OPERATING MANUAL... -
Page 56: Search For Machine Reference Axis By Axis
3.5.2. Search for machine reference axis by axis - Once the JOG operating mode is displayed, press the key corresponding to the axis to be referenced. In the lower lefthand side of the screen X,Z will appear according to the key pressed. -
Page 57: Jogging The Axes
3.5.4.1. Continuous movement - Front panel (M.F.O.) switch in any position of the % FEEDRATE zone. - According to the axis and the direction in which it is desired to move, the JOG key corresponding to this axis must be pressed: - As established by means of the machine-parameter: . -
Page 58: Entering F, S, M And T
3.5.5. Entering F,S, M and T The required values of F,S, M and T may be entered in this operating mode. The last three will depend on the value of the P603 parameter, bits 5,6,7. 3.5.5.1. Entering an F value... -
Page 59: Measurement And Loading Of The Tool Dimensions In The Offset Table
. Press the function key [TOOL MEASUREMENT] . Press X. . Key in the dimension of the part according to the X axis. This value will be in radii or diameters, depending on how the machine is working. . Press ENTER. -
Page 60: Operation Of The Cnc As A Readout
Once the JOG operating mode is selected, if the external MANUAL input is activated, the CNC acts as a readout. In this case, the machine has to be moved by means of external controls and the analog signals must be generated outside the CNC.The S and M functions may be entered in this form of operation. -
Page 61: Handwheel Operation
(X1,X10,X100). It should be borne in mind that if we wish to move an axis at a speed of over G00 corresponding to this axis, the CNC will assume this as maximum, ignoring additional pulses. -
Page 62: Measuring And Loading Of Tool Offsets With A Probe
JOG mode, the tool dimensions can be quickly measured and loaded with a probe. To do this, a tool measuring probe must be installed with its sides parallel to the axes and in an established position on the machine. -
Page 63: Spindle Operating Keys
2- Select the tool to be measured by keying in: Txx.xx START. 3- Move the tool with the JOG keys up to a position close to the probe side to be touched. 4- Press the key of the axis to be measured (X or Z). -
Page 64: Mode 6: Editing
3.6.1. Selection of the EDITOR (6) operating mode - Press OP MODE - Press key 6 The meaning of the function keys to operate in the MODE will appear on the screen. 3.6.2. Locking/Unlocking of memory - Press [LOCK/UNLOCK MEMORY]. CODE appears on the screen: - Key in: MKAI1 to lock the memory. -
Page 65: Deletion Of A Complete Program
- Press DELETE. The message DELETE PROGRAM appears on the screen. - Key in the number of the program to be deleted. Check the number. If the number is correct, press ENTER. -
Page 66: Change Of Program Number
- Press ENTER. The screen will then display: NEW: P - Key in the new number allocated to this program. It will be displayed to the right of P. - Press ENTER. The change of number has been completed. If there is no program recorded under the old number, the screen will display: PROGRAM NUMBER: P ——-... -
Page 67: Program Selection
3.6.7. Creating a program If there is a program in the CNC’s memory with the same number as the one to be recorded, there are two methods for recording the new program: - Completely erase the existing program. -
Page 68: Unassisted Programming
The CNC automatically numbers the blocks in multiples of 10. If a different block number is desired, press CL and then: - Key in the block number. It will appear on the lower left-hand side of the screen. The blocks may not be correlative. -
Page 69: Modification And Deletion Of A Block
- Key in the block number - Press DELETE. . If during the programming of a block the CNC fails to respond to any key pressed, it means that there is something incorrect in what is being entered. 8025/8030 CNC OPERATING MANUAL... -
Page 70: Assisted Programming
PLAY BACK (2), TEACH-IN (3) or EDITING (6). For this, if, during the writing of a block the [HELP] key is pressed, the cursor which is found in the block to be written will disappear and the screen will display:... -
Page 71: Copying A Program
Once the value has been introduced and in order to be able to continue with the edition of new parameters, it is necessary to press the ENTER key. If it is not required to program any parameter, as long as it is not obligatory to do so, the DELETE key must be pressed. -
Page 72: Mode 7: Peripherals
6 . DNC ON/OFF Atention: To enable any of the operations 0,1,2,3,4 and 5, which are displayed in the PERIPHERALS mode, to be carried out, point 6 (DNC ON/OFF) must be OFF (the highlighted message OFF will be displayed). If the highlighted message displayed is ON, press key 6. -
Page 73: Entering A Program From The Fagor Cassette/Recorder (0)
- Press the 0 key. The screen will display: PROGRAM NUMBER: P - Key in the number of the program to be received in. If 99999 is entered, the CNC gets ready to accept machine-parameters, the decoded M’s functions table and the table of leadscrew compensation parameters. -
Page 74: Transmission Errors
- If the numbering of the blocks of the program transferred is correct: PROGRAM NUMBER: P —— RECEIVED That means that the CNC carries out a syntactic test of the program. If there is any programming error the relevant error code and the affected block are displayed and the program is loaded completely. - Page 75 - Press [CONTINUE]. We return to the status of section 3.7.1. or, - Press OPERATE MODE. The operating mode menu will appear: b) There is a program with the same number on the tape. When pressing ENTER the screen will display:...
-
Page 76: Entering A Program From A Peripheral Other Than The Fagor Cassette/Recorder
3.7.4. Entering a program from a peripheral other than the FAGOR cassette recorder(2) Same as section 3.7.2. (by means of an FAGOR cassette) except that the 2 key must be pressed and a new error message may appear: MEMORY OVERFLOW This indicates that CNC memory is full. -
Page 77: Fagor Cassette's Directory (4)
3.7.6. FAGOR cassette directory (4) - Press the 4 key. The screen will display: . number of programs on the tape with the number of characters. . number of free characters on the tape. - Pressing [CONTINUE] returns to the status of section 3.7.1. -
Page 78: Interruption Of The Transmission Process
. Advanced DNC system’s status report. To activate the DNC feature, P607(3) must be 1. Also, PERIPHERALS (DNC ON/OFF) mode 6 must show the highlighted message ON. Otherwise, press 6. See DNC manual for more detailed information. In PERIPHERALS operating mode (7), every time RESET is pressed, the CNC returns to power-on conditions. -
Page 79: Mode 8: Tool Offsets And Zero Offsets G53/G59
MODE 8: TOOL OFFSET AND ZERO OFFSETS G53/G59 This is used to enter into the memory the dimensions (length and radius) of up to 100 tools and the values of up to 7 zero offsets (G53-G59). The method of working in this operating mode is as follows: 3.8.1. - Page 80 3.8.3. Entering the dimensions of the tools - Key in the number of the tool. This will appear on the lower left of the screen. - Press X. - Key in the value of the length of the tool. Max. value: +/- 8388.607 mm or +/-330.2599 inch.
-
Page 81: Modification Of Tool Dimensions
- Press ENTER. The modified dimensions are entered into the memory. - If during the programming of a block the CNC fails to respond to any key pressed, it means that there is something incorrect in what is being entered. - Page 82 SHAPE CODES Code Code Code Code Code Code Code P: Tool tip C: Tool centre 8025/8030 CNC OPERATING MANUAL...
- Page 83 Code '4' Code '4' Code '5' Code '3' Code '6' Code '2' Code '7' Code '1' Code '8' Code '8' 8025/8030 CNC OPERATING MANUAL...
-
Page 84: Zero Offsets G53/G59
3.8.6. Zero offsets G53/G59 In the same operation mode (8) if the key G is pressed the screen will display: TOOL OFFSETS/G53-G59 G53 X —— . — Z —— . —- G54 X —— . — Z —— . —- G55 X ——... -
Page 85: Modification Of Zero Offset Values
3.8.6.3. Modification of zero offset values Same as 3.8.5. 3.8.7. Return to the tool offset table When the zero offset table is being displayed, the tool table can be recovered by pressing 3.8.8. Complete deletion of tool offsets or zero table - Key in K,A,I. -
Page 86: Mode 9: Special Modes
3.9. MODE 9: SPECIAL MODES The information on this section is in the INSTALLATION AND START UP MANUAL. 8025/8030 CNC OPERATING MANUAL... -
Page 87: Graphics
If, when executing a program in DRY RUN operation in modes 0,1 or 4, there is a block involving movement plus the function (Tx.x) the relevant path will not be displayed unless the machine is a machining center. -
Page 88: Display Area Definition
Next, the values of the coordinates X, Z must be keyed in from the point at which it is required that it appear in the center of the screen and the value of the width we want it to represent. After keying in each value, the ENTER key must be pressed. -
Page 89: Zooming (Windowing)
3.10.2. Zooming (windowing) The CNC has a ZOOM function by which entire graphics or parts of them can be enlarged or reduced by this feature. To use this ZOOM function the program must be either interrupted or completed. Press the key which corresponds to the view in which the zooming is desired. Then press [ZOOM] and a rectangle identifying the window will be displayed over the existing graphic. -
Page 90: Deletion Of Graphics
3.10.5 Graphic representation in colour (CNC 8030 TS) Whenever only one of the 4 views possible have been selected, every time the Tool (T2) is changed, the path will be drawn in a different color (3 colors). 8025/8030 CNC OPERATING MANUAL... - Page 91 ERROR CODES...
- Page 92 The order in which the part-programs are stored in memory are shown in the part-program directory. If during the execution of a program, a new one is edited, this new one will be placed at the end of the list.
- Page 93 > Not enough free tape or CNC memory to store the part-program. I//K has not been defined for a circular interpolation or thread. An attempt has been made to select a tool offset at the tool table or a non-existent external tool (the number of tools is set by machine parameter).
- Page 94 Function M19 programmed incorrectly. Function G72 programmed incorrectly. It must be borne in mind that if G72 is applied only to one axis, this axis must be positioned at part zero (0 value) at the time the scaling factor is applied.
- Page 95 051 * "C" axis programmed incorrectly There is floppy disk in the FAGOR Floppy Disk Unit or no tape in the cassette reader or the reader head cover is open. Parity error when reading or recording a cassette or a floppy disk.
- Page 96 096 ** Parity error in Z axis parameters. The CNC initializes the RS232C serial line parameters: P0=9600, P1=8, P2=0, P3=1, P605(5)=1, P605(6)=1, P605(7)=1. 097 ** Parity error in 3rd or "C" axis parameters. The CNC initializes the RS232C serial line parameters: P0=9600, P1=8, P2=0, P3=1, P605(5)=1, P605(6)=1, P605(7)=1.
- Page 97 "P729". 117 * The internal CNC information requested by activating marks M1901 thru M1949 is not available. 118 * An attempt has been made to modify an unavailable internal CNC variable by means of marks M1950 thru M1964. Error when writing machine parameters, the decoded M function table and the leadscrew error compen- sation tables into the EEPROM memory.
- Page 98 FAGOR 8025/8030 CNC Models: T, TG, TS PROGRAMMING MANUAL Ref. 9701 (in)
- Page 99 It includes the necessary information for new users as well as advanced subjects for those who are already familiar with this CNC product. It may not be necessary to read this whole manual. Consult the list of "New Features and Modifications" which will indicate to you the chapters and sections describing them.
-
Page 100: Fagor Documentation For The 800M Cnc
6.2.2. G01. Linear interpolation ....................12 6.2.3. G02/G03. Circular interpolation ..................13 6.2.3.1. Circular interpolation in cartesian coordinates by programming the radius ....15 6.2.3.2. G06. Circular interpolation with absolute center coordinates ......... 16 6.3. G04. Dwell ........................18 6.4. - Page 101 6.18. G50. Loading of the values in the tool offset table ............63 6.19. G51. Alteration of the I and K values of the engaged tool ..........64 6.20. G52. Communication with the FAGOR Local Area Network ........65 6.21.
- Page 102 Page 11.9. M41, M42, M43, M44. Spindle range selection ............. 125 11.10. M45. Selection of rotation speed of the live tool and synchronized tool ...... 125 Standard and parametric subroutines ................128 12.1. Identification of a standard subroutine ................129 12.2.
- Page 103 COMPARISON TABLE LATHE MODEL FAGOR 8025/8030 CNCs...
- Page 104 Tool length compensation .................. Leadscrew backlash compensation ..............Leadscrew error compensation ................DISPLAY CNC text in Spanish, English, French, German and Italian ........ Display of execution time ................... Piece counter ...................... Graphic movement display and part simulation ..........Tool tip position display ..................
- Page 105 Spindle speed (S) ....................Spindle speed in rpm (G97) .................. Constant Surface Speed (G96) ................S value limit when working at constant surface speed (G92) ......Tool and tool offset selection (T) ................. Activate "C" axis in degrees (G14) ...............
- Page 106 TG TS COMPENSATION Tool radius compensation (G40,G41,G42) ............Loading of tool dimensions into internal tool table (G50, G51) ......CANNED CYCLES Pattern repeat (G66) ..................... Roughing along X (G68) ..................Roughing along Z (G69) ..................Straight section turning (G81) ................
- Page 107 P618(5,6,7,8) The 2nd home searching feedrate is set by Installation Manual Section 4.7 machine parameter P807...P810 New resolution values 1, 2, 5 and 10 for sine-wave Installation Manual Section 4.1 feedback signals P619(1,2,3,4) Access to PLCI registers from the CNC...
- Page 108 Software Version: 4.1 and newer FEATURE MODIFIED MANUAL AND SECTION Bell-shaped ACC./DEC. Installation Manual Section 4.8 It is now possible to enter the sign of the Installation Manual Section 4.4 leadscrew backlash for each axis P620(1,2,3,4) Independent axis movement execution Programming Manual...
- Page 109 INTRODUCTION Introduction - 1...
- Page 110 - Nearby High Voltage power lines - Etc. Ambient conditions The working temperature must be between +5° C and +45° C (41ºF and 113º F) The storage temperature must be between -25° C and 70° C. (-13º F and 158º F) Introduction - 3...
- Page 111 It carries two fast fuses of 3.15 Amp./ 250V. to protect the mains AC input. All the digital inputs and outputs are protected by an external fast fuse (F) of 3.15 Amp./ 250V. against over voltage and reverse connection of the power supply.
- Page 112 If not available, pack it as follows: 1.- Get a cardboard box whose three inside dimensions are at least 15 cm (6 inches) larger than those of the unit. The cardboard being used to make the box must have a resistance of 170 Kg (375 lb.).
- Page 113 Is directed to the machine builder or person in charge of installing and starting up the PLCI. DNC-PLC Manual Is directed to people using the optional communications software: DNC-PLC. FLOPPY DISK Manual Is directed to people using the Fagor Floppy Disk Unit and it shows how to use Introduction - 6...
- Page 114 MANUAL CONTENTS The Programming manual consists of the following chapters: Index. Comparison table of FAGOR models: 8025 T CNCs New Features and modifications. Introduction Summary of safety conditions. Material returning conditions. FAGOR documentation for the 8025 T CNC. Manual contents...
- Page 115 In the PLAY BACK mode, the axes are shifted manually (Jog) and the coordinates reached are then entered as the program coordinates. In the TEACH IN mode, a block is written and executed and then entered as part of the program.
- Page 116 Comments to be displayed on the CRT must be written between parenthesis ( ). The maximum number of characters which can be written in a comment is 43, parenthesis included. The comment must be written at the end of the block, that is: N4 G.. X.. F.. M.. (comment).
- Page 117 Numerical Controls, using the DNC incorporated in those controls. Several CNC can be connected to the DNC through the RS 232 lines of these computers. The operation mode is interactive, with MENUS which guide the user and simplify the use of this program.
- Page 118 For example: N4 G1 W50 X12 Z35 F550 However, if the 3rd axis is of the C axis type, it is also possible to program circular interpolations G02/G03 with it, as long as the G15 or G16 functions are activated.
- Page 119 Means that only a positive integer (no decimals) of up to four digits may be programmed. A positive value of up to two digits to the left and two to the right of the decimal point may be programmed. Throughout this manual the format corresponding to each function will be enumerated, as well as the meaning of the different parameters used.
- Page 120 This number must be entered at the beginning of the program, before the first block. If the program is entered from an external peripheral, the symbol % is used, followed by the number required and the pressing of LF or RT or both followed by the N of the first block. PROGRAM BLOCKS 5.1.
- Page 121 There are two types of conditional blocks: a) N4 STANDARD CONDITIONAL BLOCK If next to the block number N4 (0-9999), a decimal point (.) is written, the block is characterized as a normal conditional block. That means that the CNC will execute it, only if the relevant external signal (enabling input for conditional blocks) is activated.
- Page 122 The preparatory functions are programmed by means of the letter G followed by two digits (G2). They are always programmed at the start of the block and are used to determine the geometry and operating state of the CNC. 6.1.
- Page 123 : Single block treatment (Modal) G48* : Cancellation of single block treatment : Loading of the values in the tool offset table : Correction of the dimensions of the tool in use : Communication with FAGOR LOCAL AREA NETWORK (Modal) G53-G59 : Zero offsets...
- Page 124 G16, G20, G21, G22, G23, G24, G25, G26, G27, G28, G29, G30, G31, G32, G50, G52, G53, G59, G72, G73, G74 and G92 which have to be alone in a block. If incompatible G functions are programmed in the same block, the CNC assumes the one programmed last.
- Page 125 0% and 100% or is frozen at 100%. The G00 code freezes the tool radius offset (G41, G42). I.e., when it is working with G41 or G42 and G00 is programmed, the radius offset remains ineffective until G01, G02 or G03 is programmed again.
- Page 126 Programming the X axis in diameters. Initial point X40 Z50. N100 G90 G01 X60 Z10 F300 The knob on the front panel of the CNC can be used to vary the programmed feedrate F between 0% and 120% or between 0% and 100%, according to parameter P600(3).
- Page 127 6.2.3. G02/G03. Circular interpolation G02: Clockwise circular interpolation. G03: Counter-clockwise circular interpolation. The movements programmed following G02/G03 are performed in a circular path at the programmed feedrate F. The definitions of clockwise (G02) and counter-clockwise (G03) have been fixed accor- ding to the system of coordinates depicted below (right-hand or dextrogyratory system).
- Page 128 : Distance from the starting point to the arc’s center along Z axis. When a circular interpolation is programmed in G02 or G03, the arc’s center is taken as the new polar origin. Even when the X axis is programmed in diameters, I is always programmed in radius.
- Page 129 180º, the sign will be negative. If P0 is the starting point and P1 is the final point of the arc, for a same value of R, there are four different arcs which pass through both points.
- Page 130 By adding G06 in a block containing a circular interpolation, the coordinates for the center of the arc (I,K) can be given in absolute values. That is, referred to the part’s datum point instead of being referred to the arc’s starting point.
- Page 131 Examples: Let us suppose that programming is in absolute coordinate values (G90) and the X axis one is in diameters. The arcs may be programmed in the following 4 ways: Starting point P0 (X40 Z40) Cartesian coordinates : N4 G02 X100 Z10 I40 K10 Polar coordinates : N4 G02 A194.036 I40 K10...
- Page 132 6.4.1. G05. Round corner (Does not wait for in position) When operating on G05, the CNC starts to execute the next block of the program as soon as the deceleration of the axes programmed in the previous block begins. In other words, the movements programmed in the next block are executed before the machine has reached the exact position programmed in the previous block.
- Page 133 As can be seen in the example, the edges would remain rounded in the case of two mutually perpendicular movements. The difference between the theoretical and actual profiles is a function of the feedrate value. The faster the feedrate, the greater the difference between the theoretical and actual profiles.
- Page 134 6.5. G08. CIRCULAR PATH TANGENT TO PREVIOUS PATH A circular path tangent to the previous path can be programmed by means of G08. Center coordinates (I,K) are not required. Format with cartesian coordinates: N4 G08 X+/-4.3 Z+/-4.3 in mm. N4 G08 X+/-3.4 Z+/-3.4 in inches.
- Page 135 N120 G02 X80 Z30 I20 K0 N130 G03 X110 Z15 I0 K-15 The function G08 is not modal. It can be used every time an arc tangent to the previous path is to be executed. The previous path may be either a straight line or an arc.
- Page 136 G09. ARC PROGRAMMED BY THREE POINTS By means of the G09 function a circular path (arc) may be defined, by programming the end point and an intermediate point (the initial point of the arc is the starting point of the movement).
- Page 137 Example: Programming of the X axis is in diameters. Let us suppose that the starting point is P0(X60 Z70) and the end point of the arc is X120 Z20). The program block to define this arc will be: N4 G09 X120 Z20 I60 K50.
- Page 138 CNC can control the machine’s main leadscrew (C axis). In this way and by means of using a live tool, for example, a milling tool, it is possible to machine a cylindrical or front surface of the part by carrying out linear (G1) and rapid positioning moves (G00).
- Page 139 P613(5)=1. . G14 must be programmed alone in a block. . When the C axis is activated by means of G14, the CNC executes automatically a machine-reference-point search for that axis . When G14 is active, G00 and G01 may be programmed between the C,X,Z axes.
- Page 140 : N4 C+/-4.3 X+/-3.4 Z+/-3.4 When being G14 activated, the following block is executed: N4 G91 G01 C720 F500 The C axis will rotate two full revolutions resetting the count at every revolution and at a feedrate of 500 degrees/minute. Also possible: N4 G91 G01 C720°...
- Page 141 When using G90 with this axis, the sign of the programmed value indicates the rotating direction of the axis; so, if the same value is programmed with two different signs, the final point reached will be the same, but the rotation will be in opposite directions.
- Page 142 . G15 and G16 cancel functions G95 and G96. . G14 must be active when programming either G15 or G16; otherwise, the CNC will display error 51. . When either G15 or G16 are activated, no tool (Txx.xx) programming is possible.
- Page 143 The treatment of the C axis in making a program for machining cylindrical and face surfaces is similar to a linear axis. Therefore, with functions G15 or G16 active, C axis movements are programmed in millimeters or inches and the feed velocity (F4) in millimeters/minute or 0.1 inches/minute in accordance with the measurement system...
- Page 144 MACHINING ON THE CYLINDRICAL SURFACE OF THE PART (main plane When G15 is programmed, in order to convert the programmed values from inches or mm into degrees, the CNC will assume as radius the distance from the tip of the tool to the rotation center line (X0).
- Page 145 G16. MACHINING OF THE FACE OF THE PART (main plane C X) It should be borne in mind that when the G16 function is active, the coordinates of the axes must be programmed like a milling machine, i.e., the machine parameter P11 will not be borne in mind where it is indicated, if the X axis is programmed in Radii or Diameters.
- Page 146 PROGRAMMING THE PREVIOUS PATH Another example of C axis programming in G16 (main plane CX) N10 G14 N20 G0 G90 X0 Z2 N30 Z -9.5 N40 G16 N50 G1 G91 C10 X20 F500 N60 X30 N70 C-20 N80 X-30 N90 G90 C10 X-20 F0...
- Page 147 Number of the block to which the jump is targeted When the CNC reads such a block, it jumps to the block identified between the N and the first decimal point. Then, it executes the section of the program between the mentioned block and the one identified between the two decimal points as many times as set by the last digit.
- Page 148 G31: Store current program’s datum point. G32: Retrieve datum point stored by G31. By means of the G31 function, it is possible at any time to store the zero point which we are working with and recover it later by means of the G32 function.
- Page 149 Example: Programming of axis X in diameters. Starting point X120 Z120. N110 X60 Z100....... (Approach to the part) N120 G31......... (Keep the origin coordinates) N130 G92 X0 Z0 ....(Zero offset) N140 G01 X0 Z-10 ....(Machining) N150 G02 X0 Z-20 R5 ..(Machining) N160 G25 N130.150.3 ..
- Page 150 Longitudinal frontal and tapered threads can be cut using G33 function. To apply this function it is necessary for the machine to have a rotary encoder in the spindle. G33 is modal, i.e., once programmed it is maintained. It is cancelled by G00, G01, G02, G03, M02, M30, EMERGENCY or RESET.
- Page 151 X+/-3.4 Z+/-3.4 K2.4 (inches) Can be programmed. Nevertheless, both pitch values (I and K) can also be entered to force the CNC to cut the tapered thread with a pitch different from the one the CNC would have calculated. Atention: The following error will normally produce incorrect pitches at the starting and ending points of the threadcut.
- Page 152 EXAMPLES: a) Longitudinal thread Cutting of a longitudinal thread of 5 mm pitch and 2 mm depth. The tool is positioned at X60 Z60 (X in radius). Absolute coordinates N0 G00 G90 X18 Z53 N5 G33 Z7 K5 N10 G00 X60...
- Page 153 Tapered thread Cutting of a tapered thread of 5 mm pitch along Z axis and 2 mm depth. Let us assume that the tool is positioned at X60 Z60 (X in radius). Absolute coordinates G00 G90 X12,75 Z52 G33 X18,25 Z8 K5...
- Page 154 Using G05, different threads can be coupled in a continuous way on the same part. A longitudinal and a tapered thread of 5 mm pitch and 2 mm depth must be coupled. Let us assume the tool is positioned at X60 Z60 (X in radius).
- Page 155 G36 is not modal; i.e. it must be programmed every time a corner rounding is needed. It must be programmed in the same block as the movement whose end must be rounded.
- Page 156 2. Straight-arc rounding Starting point X20 Z60 N100 G90 G01 G36 R10 X80 N110 G02 X60 Z10 I20 K-30 3. Arc-arc rounding Starting point X60 Z90 N100 G90 G02 G36 R10 X60 Z50 R28 N110 X60 Z10 R28 8025/8030 CNC PROGRAMMING MANUAL...
- Page 157 The preparatory function G37 can be used to link two paths tangentially without having to calculate the intersection points. Function G37 is not modal, i.e., it has to be programmed every time two paths are to be linked tangentially. There paths may be straight-straight or straight-arc. The radius, R4.3 in mm or R3.4 in inches, of the entry arc must be programmed following G37.
- Page 158 Let us assume that the starting point is X20, Z60, program: N100 G90 G01 X20 Z30 N110 G03 X40 Z10 R20 In the same example, if we want to program a tangential entry, describing an arc of 5 mm radius, program: N100 G90 G01 G37 R5 X20 Z30...
- Page 159 The preparatory function G38 can be used to link two paths tangentially without having to calculate the intersection points. Function G38 is not modal; i.e., it has to be programmed every time two paths are to be linked tangentially. These paths may be straight-straight or straight-arc.
- Page 160 Let us assume the starting point is X10, Z50. Program: N100 G90 G02 X30 Z30 R20 N110 G01 X30 Z10 In the same example, if we want to program a tangential exit by describing the arc of 5 mm radius, program: N100 G90 G38 R5 G02 X30 Z30 R20...
- Page 161 This function chamfers the corner between two straight lines without the need to calculate the coordinates of the two intersections. G39 is not modal; i.e. it must be programmed every time a chamfering is need. It must be programmed in the same block as the movement whose end must be chamfered.
- Page 162 Tool compensation enables the contour of the part to be programmed directly without taking the dimensions of the tool into account. The CNC automatically calculates the path to be followed by the tool, based on the contour of the part and the tool dimensions stored in the tool table.
- Page 163 G41 operates as G42 and vice versa. The CNC has a table of up to 32 tool offsets comprising for each tool length (X,Z,I,K) and radius (R) values plus location codes (F). The compensation values must be stored in the tool offsets mode (8).
- Page 164 LOCATION CODES Code "0" and "9" Each axis orientation is selected by P600(1) as described on page 48 Code "1" Code "7" Code "2" Code "6" Code "3" Code "5" P600(1)=1 P600(1)=0 P : Tool tip C : Tool nose radius center...
- Page 165 Note: Graphics always displays the theoretical tool tip (or the part surface when in dry run theoretical path) also mode (0, 1, 2). Code 4 Code 4 Code 5 Code 3 Code 6 Code 2 Code 7 Code 1 Code 8...
- Page 166 Either the block in which G41/G42 is programmed or a previous block must include programming of function Txx.xx (Txx.00- Txx.32) to select from the tool table the correction value to be applied. If no tool is selected, the CNC assumes the value T00.00. Atention: Tool radius compensation selection (G41/G42) can only be carried out when G00 or G01 (rectilinear movements) is active.
- Page 167 Compensated path Programmed path C.P. P.P. C.P. P.P. C.P. P.P. 8025/8030 CNC PROGRAMMING MANUAL...
- Page 168 P.P. C.P. C.P. P.P. C.P. P.P. C.P. P.P. 8025/8030 CNC PROGRAMMING MANUAL...
- Page 169 6.15.2. Operating with tool radius compensation The graphs below illustrate the various paths followed by a tool controlled by a CNC programmed with radius compensation. Compensated path Programmed path C.P. P.P. C.P. P.P. 8025/8030 CNC PROGRAMMING MANUAL...
- Page 170 Compensated path Programmed path C.P. P.P. P.P. C.P. 8025/8030 CNC PROGRAMMING MANUAL...
- Page 171 Compensated path Programmed path C.P. P.P. C.P. P.P. 8025/8030 CNC PROGRAMMING MANUAL...
- Page 172 Compensated path Programmed path C.P. P.P. C.P. P.P. 8025/8030 CNC PROGRAMMING MANUAL...
- Page 173 When a change from G01,G02,G03 to G00 is detected by the CNC, the tool is positioned tangent to the line perpendicular to the path at the final point of the block previous to the one in which G00 is programmed.
- Page 174 Compensated path Programmed path C.P. P.P. C.P. P.P. C.P. P.P. 8025/8030 CNC PROGRAMMING MANUAL...
- Page 175 P.P. C.P. P.P. C.P. P.P. C.P. C.P. P.P. 8025/8030 CNC PROGRAMMING MANUAL...
- Page 176 As of the execution of function G47, the CNC executes all the blocks which come next as if it were a single block. This single block treatment is carried out until it is cancelled by means of the G48 function. In this way, with the G47 function active in the SINGLE BLOCK operation, these will be executed in continuous cycle until the G48 function is executed, i.e., the execution will not stop when a block is finished but will continue by...
- Page 177 Programming this way, the following aspects must be taken into account: - When X or Z both are programmed without programming (I,K), the lengths (X,Z) are replaced in the table by the new values and the relevant wear offset values, I or K or both are reset.
- Page 178 6.19. G51. ALTERATION OF THE I AND K VALUES OF THE ENGAGED TOOL By means of the G51 function the I,K values of the tool engaged may be artificially altered but the values recorded in the table are not affected.
- Page 179 6.20. G52. COMMUNICATION WITH THE FAGOR LOCAL AREA NETWORK The communication between the CNC and the rest of the LAN NODES is carried out to registers in complement to two. These registers may be double (D) or single (R). Next, the different command formats are described.
- Page 180 Let us suppose that the NODE 7 of the LAN is a FAGOR CNC 82 connected as slave and its X and Y axes are to be positioned at the X100, Y50 point. The block to be executed by the CNC will be: G52 N7 = (X100 Y50) e) Process synchronization between LAN NODES.
- Page 181 7 different zero offsets can be selected by functions G53,G54,G55,G56,G57,G58 and G59. The values of these offsets are stored in the CNC memory after the tool dimensions table and are referred to the machine reference zero. The values can be entered in operation mode 8 via the keyboard or by program, using codes G53-G59.
- Page 182 According to the value assigned to the machine parameter P619(7) there are two cases: Case 1) P616(4)=0 A block like N4 G5? is used to carry out a zero offset on the current program, according to the values stored in the G5? position of the zero offset table (G53-G59).
- Page 183 Example: The tool is located in X200 Z530. X axis in radius and the machine-reference point is X0 In the G53/G59 table we will enter: G53 X0 Z340 G54 X0 Z170 G55 X0 Z0 The programming of the theoretical path will be:...
- Page 184 (G54..G59) plus the value indicated in position G59 on the table. It does not affect G53. If P616(4)=0 In this case, the zero offset which is applied to each axis will be the value indicated on the table. 6.22. G65.
- Page 185 6.24. G72. SCALING Code G72 allows the machining of parts of similar shape but different size using the same program. G72 must be programmed alone in a block. Format: N4 G72 K2.4 N4 : Block number G72 : Scaling code K2.4: Value of scaling factor...
- Page 186 X axis and then the Z axis. b) One or two axes referencing (Z X). If machine reference search is required in an order other than the above, G74 is programmed, followed by the axes in the required order.
- Page 187 Probes are basically simple switches provided with a high level of sensitivity. When the probe touches a surface, a signal is sent to the CNC of the machine, and the position of the axes are automatically recorded. In the case of machine tool applications, this same signal acts on the control of the machine until an adequate, precise and rapid positioning of the tool or part is obtained.
- Page 188 It is used in lathes and machining centers for final adjustments of tools where the probe has a fixed measuring position and the tools are brought close to the probes. It is also used in digitizing systems.
- Page 189 100%) nor the movement of the axes will be displayed until the probe signal is received. If the axes arrive in position before the probe pins the part the CNC will give error code 65 if so decided by machine parameter. After executing this block, the values of the different axes can be allocated to parameters.
- Page 190 P6: Table number of the tool to be calibrated GENERAL CONSIDERATIONS . If any parameter that corresponds to a cycle is not programmed, the CNC will assume the latest value assigned to that parameter. The cycles do not modified the calling parameters (which can be used in later cycles) but do alter the contents of parameters P70 to P99.
- Page 191 BASIC OPERATION The movements of the axes during a probing cycle are: Approach It is executed in rapid mode G00 from the starting point of the cycle to a safety distance P3 away from the theoretical value. Probing It is executed at a feedrate determined by P4 until the CNC receives the probe signal. If before moving a maximum distance of 2P3 the CNC has not received the probe signal, error 65 will be displayed and all axes will be stopped.
- Page 192 The exit conditions of all probing cycles are: G00, G07,G40,G90 The type of probe used in this cycles may be either one located in a fixed position on the machine (used to calibrate the tools) or one placed on the turret (used to measure parts).
- Page 193 N0. TOOL CALIBRATION CYCLE To execute this cycle, a probe must be placed in a fixed position on the machine and with its sides parallel to the axes. The CNC must know this position on each axis and with respect to the machine-reference- zero.
- Page 194 8025/8030 CNC PROGRAMMING MANUAL...
- Page 195 The tool movements depending on its location code are described below. 8025/8030 CNC PROGRAMMING MANUAL...
- Page 196 The correction values I and K are set to zero. Also, Parameters P93 and P95 will indicate: P93 = Real length minus theoretical length of the tool on the X axis (in radius). P95 = Real length minus theoretical length of the tool on the Z axis.
- Page 197 N1. PROBE CALIBRATION CYCLE This cycle is used to calibrate the sides of the probe which is placed in a fixed position on the machine and used to calibrate the different tools. The approximate values of the sides of the probe are given to the CNC by entering them in the machine parameters P902, P903, P904, P905.
- Page 198 Machine-parameter P904 = P92 - 40 Machine-parameter P905 = P92 To run the probing cycles N2, N3, N4, and N5 described next, a probe will be used placed on the tool turret. The probe must be previously calibrated, by means of N0 probing cycle, for example, and its dimensions entered in the pertinent tool table.
- Page 199 8025/8030 CNC PROGRAMMING MANUAL...
- Page 200 P90 = Real value measured on the X axis. P93 = Measurement error. The values of P90 will be in radius or diameters depending on the setting of the machine- parameter P11. The values of P93 will always be in diameters.
- Page 201 = Theoretical Z value of the point to be probed = Safety distance = Probing feedrate Once the cycle is ended, The CNC’s parameter table will show: P92 = Real value measured on the Z axis. P95 = Measurement error.
- Page 202 With this cycle, besides doing everything described before for the part measurement cycle for the X axis (N2), The CNC will correct the I value of the corrector number specified by This correction will only take place when the measurement error (P93/2) is equal to or greater than the tolerance specified by P5.
- Page 203 Digitizing consists of memorizing the coordinates from a guided sweep of the probe on the model. This is done at the speed allowed by the probe. The data which is obtained is used later during the milling stage. This method has the following advantages: * Machining can be done at the maximum speed allowed by the machine tool.
- Page 204 Less time is needed for the digitizing stage. It can be used in large machines, even though the axis which moves the probe is very heavy, as it is not submitted to continuous rocking movements which could damage its mecha- nism.
- Page 205 (via DNC). If the new program is going to be loaded into the CNC, a block of the type G76 P5 must be previously written. But if the new program is to be sent directly to a computer a block of the type G76 N5 must be previously written.
- Page 206 N101 X14.853 Z154.37 M7 N102 G0X14 Z20 M5 It is necessary to program all five digits of the program number in blocks of type G76 P5 or G76 N5 The CNC must be in DNC ON (operating mode 7) in order to load the new program into a computer (see DNC manual).
- Page 207 Each probe involves a family of tips with different ball radii for multiple applications. The diameter of the ball of the needle or tip should be the same as the tool used in subsequent machining.
- Page 208 Points are read with the combination of the preparatory functions of the CNC: - Function G75 allows the reading and acceptance of the points by the CNC. - The G76 function allows these to be stored in the CNC itself, if the contents are less than 32 Kb, or in a computer.
- Page 209 CNC will indicate error 65. c) With the aid of a block which contains the G76 function a block can be generated which will be sent automatically, either to the CNC memory or to a computer via DNC.
- Page 210 The programs stored in the computer can be modified with any text editor which generates ASCII characters, as if they were texts. In this way we can modify the depth of the run, work rate, etc., or program machining conditions in the first 100 blocks reserved for this.
- Page 211 6.27.5. Examples of using G76. 1. Example G76: PATTERN DIGITIZING Creation of a program by copying the points of a part with a measuring probe (G75). Calling parameters: P0 = Minimum Z value to sweep. P1 = Maximum Z value to sweep.
- Page 212 P4=K— P5=K— P6=K— N40 P8=P1F2P0 P9=P8F4P6 P10=F12P9 P9=F11P10 N50 G26 N80 N60 P9=P10F1K1 P6=P8F4P9 ....(P6=step Z, P9=No. of steps on Z) N80 P11=Z P13=X P8=P4F2K1 ....(P8=X limit for G75) N90 G0 G5 G90 XP5 ZP0 N100 P14=K0 ..........
- Page 213 N— X— Z— Etc. If the machining must be done in various passes, the program will have to be executed applying successive zero-offsets or changes in tool length compensation. All preparatory functions (square corner, scaling factor) that will affect the whole program can be defined in a previous block.
- Page 214 FUNCTION IS KNOWN. This is a parametric program which, when executed, will calculate the different points of an ellipse and load them into a new program by means of G76 for later machining. The calling parameters are the following: = Half the long axis (A).
- Page 215 Let us suppose that the tool’s starting point is X27 Z43 and the X axis is programmed in radius. The calculation program is P761, shown below: N20 G76 P00098 N30 P0=K37 P1=K22 P3=K90 P20=K-0.5 N40 P4=F7P3 P5=F8P3 P6=P0F3P4 P7=P1F3P5 N50 G76 G0 G5 XP7 ZP6 (ellipse’s starting point)
- Page 216 6.28. G90 G91. ABSOLUTE AND INCREMENTAL PROGRAMMING The programming of the coordinates of a point, may be carried out, either in absolute coordinates G90 or in incremental coordinates G91. When operating on G90, the coordinates of a point programmed, are referred to the point of the coordinate origin.
- Page 217 Starting point P0(X40 Z40) Absolute programming G90 N100 G90 G02 X100 Z10 I40 K10 N100 G90 G02 X100 Z10 R41.231 Incremental programming G91 N100 G91 G02 X60 Z-30 I40 K10 N100 G91 G02 X60 Z-30 R41.231 8025/8030 CNC PROGRAMMING MANUAL...
- Page 218 S VALUE AT CONSTANT SURFACE SPEED G96 Function G92 can be used to preselect any value on the axes of the CNC, which involves being able to shift the coordinate origin. It can also set the max. Spindle speed, when operating on G96 (constant surface speed).
- Page 219 Setting of max. spindle S value when working at Constant Surface Speed (G96). By means of the block N4 G92 S4 the max. spindle speed is limited to the value set by S4 (in rpm). The CNC calculates at all times the spindle rpm required to achieve the programmed constant surface speed in meters/minute or feet/minute.
- Page 220 6.31. G94. FEEDRATE F IN mm/min (inches/min) When the code G94 is programmed, the CNC assumes that the values entered by F4 are in mm/minute (inches/10 minutes). G94 is modal; i.e. it remains active until G95,M02,M30, EMERGENCY or RESET, are programmed.
- Page 221 CNC assumes as part diameter the one at the end of this movement. If the first movement after G96 is made in G01, G02 or G03, the CNC assumes as part diameter, the value at the time G96 is executed.
- Page 222 4th +/- 3rd+/-3.4 X+/-3.4 Z+/-3.4 In other words, the axis coordinate values are programmed by the letters which correspond to the 4th and 3rd axes, i.e., W,Y,C, defined in the machine parameter, as well as the letters X,Z followed by the coordinate values.
- Page 223 7.1.2. Rotary axis By means of machine parameters it is possible to determine whether the 4th axis or the 3rd axis or both, are Rotary or Linear. Likewise, should they be a Rotary axis it is possible to define whether they are a Rollover Axis or not (programming between +/- 360 degrees).
- Page 224 4th axis If the 4th axis is rotary P615(1)=1 and parameter P615(2) is set to 0 a max. value of +/- 8388.607 degrees can be programmed both in absolute coordinates G90 and relative coordinates G91. Lower limits can be set by the machine parameters.
- Page 225 . In inches: R+/-3.4 A+/-3.3 R being the value of the radius and A the value of the angle (A in degrees), referred to the polar center. When turning on and after M02,M30 EMERGENCY or RESET, the CNC takes the point X0 Z0 as polar origin.
- Page 226 Example 1: X in diameters In absolute coordinate values G90 N100 G93 I80 K50 ....Presetting of polar origin N110 G01 G90 R30 A270 ..P0 N120 R28.284 A225 ....P1 N130 R40 A180 ......In incremental coordinate values G91 N100 G93 I80 ....
- Page 227 Example 2. Let us suppose that the starting point is X40 Z50.7 In absolute coordinate values G90 N100 G90 G02 A198.435 I30 K-10 N100 G93 I100 K40 N110 G90 G02 A198.435 In incremental coordinate values G91 N100 G91 G02 A-90 I30 K-10...
- Page 228 Example 3: X in radius In absolute coordinate values G90 N10 G00 X0 Z5 N20 G93 G01 F1000 R11.11803 A63.4349 N30 G93 R14.1421 A45 N40 G93 R30.4138 A9.4623 N50 M30 8025/8030 CNC PROGRAMMING MANUAL...
- Page 229 (X,Z) are the coordinates of the final point P2. The CNC calculates automatically the coordinates of P1. Let us suppose that the starting point is P0 (X40 Z50) and the X axis is in diameters. N100 A135 A153.435 N110 X100 Z10...
- Page 230 7.4. ANGLE AND ONE CARTESIAN COORDINATE A point on the main plane can also be defined by the exit angle of the path in the previous point and one cartesian coordinate of the point which is to be defined. Let us suppose that the starting point is P0 (X20 Z80) and the X axis in diameter.
- Page 231 In the definition of the points by two angles or one angle and one coordinate value, it is possible to insert roundings, chamfers, tangential entries and exits. Starting point P0 (X20 Z80) N100 G01 G36 R10 A116 A180 N110 G39 R5...
- Page 232 The programmed feedrate can be varied between 0% and 120% or between 0% and 100% according to P600(3) by means of the knob on the front panel of the CNC as long as it is not executing a threading operation with any of the functions G33, G86, G87 during probing movements (G57).
- Page 233 The spindle speed is programmed directly in rev/min. by means of code S4. Any value may be programmed between S0 and S9999; i.e. between 0 and 9999 rev/ min. This value is limited by the max. speed permitted by the machine; this limit is set by a machine parameter.
- Page 234 - Tool number. The two digits to the left of the decimal point may have any value between 00 and 99. This value is used for selecting the required tool in the case of a machine with automatic turret, and may be limited to a value lower than 99 according to the machine parameter.
- Page 235 LOCATION CODES Refer to section 6.15 on page 48 to Code review the axis orientation, parameter P600(1) will advise you which set of tables to use. Code Code Code Code Code Code P600(1)=1 P600(1)=0 P: Tool tip C: Tool center...
- Page 236 Code '4' Code '4' Code '5' Code '3' Code '6' Code '2' Code '7' Code '1' Code '8' Code '8' P600(1)=1 P600(1)=0 8025/8030 CNC PROGRAMMING MANUAL...
- Page 237 In assigning a decoded output to an miscellaneous functions, a decision is also made as to whether it is to be performed at the beginning or at the end of the block in which it is programmed.
- Page 238 (reversion to initial state). It also acts as an M05. As in the case of M00, it is recommended that this function be set so that it is executed at the end of the block in which it is programmed.
- Page 239 Programming format: N4 M45 S+/-4 S+/-4 defines the direction and rotation speed of the live tool. The +/- sign defines the direction of turn, with S+4, it will turn in one direction and with S-4 will turn in the opposite direction.
- Page 240 = number of blades x K factor. Another way to say it is to deal with a second spindle by means of which, and by synchronizing the speeds of the heads, we can transfer the part from one spindle to the other.
- Page 241 CNC will display error 71. Nothing else can be programmed in the block whether is format a) or b). To stop the rotation of the live tool in either case M45 S0 or only M45 must be programmed. c) Machine parameters associated with the synchronized or live tool.
- Page 242 STANDARD and PARAMETRIC subroutines A subroutine is a part of a program which is suitably identified and can be called in for execution from any position in a program. A subroutine may be called in several times from different positions in the program or from different programs.
- Page 243 N10 X20 N15 P0=P0 F1 P1 N20 G24 A subroutine (standard or parametric) must always end with a block of the form: N4 G24. : Block number G24 : End of subroutine No other additional information can be programmed in that block.
- Page 244 : Subroutine call N2.2 : The two figures to the left of the decimal point identify the number of the subroutine called in (00-99). The two figures on the right of the decimal point indicate the number of times the subroutine is to be repeated (00-99).
- Page 245 : Block number G23 : Defines the start of a parametric subroutine : It identifies the parametric subroutine (it may be any number between 00 and 99). Atention: Two parametric subroutines with the same number cannot co- exist in the CNC’s memory, even if they are included in different programs.
- Page 246 : Call for parametric subroutine N2.2 : The two figures to the left of the decimal point identify the number of the parametric subroutine called in (00-99). The two figures to the right of the decimal point indicate the number of times the parametric subroutine is to be repeated (00-99).
- Page 247 From a main program or from a subroutine (standard or parametric) it is possible to call in a subroutine, from this a second subroutine, from the second a third, and so on up to a maximum of 15 levels of nesting. Each level may be repeated 255 times.
- Page 248 OPERATIONS WITH PARAMETERS The CNC has 255 parameters (P0-P254) with which the programming of parametric blocks can be performed as well as different types of operations and jumps within a program. Parametric blocks can be written in any part of the program.
- Page 249 There are parameters whose value depends on the status of the CNC. P100. PARAMETER INDICATING THE FIRST TIME. This parameter takes the value of 0, every time a program is run for the first time. P101. PARAMETER INDICATING OPERATING MODE The value of this parameter, is defined by operating mode active in the CNC.
- Page 250 P1 takes the theoretical value of the actual position of the Y axis. h) N4 P1 = R P1 takes value 1 if the machine parameter P11 (rad/diameter) is in radii and vale 2 is in diameters. i) N4P1 = T P1 takes the actual value of the clock (execution time) in hundredths of a second.
- Page 251 X coordinate with respect to the machine zero, always in millimeters, without taking into consideration the units of measure which are being used (mm or inches). If any of the axes are ROTARY, the value taken by the parameter will always be in degrees.
- Page 252 Example: N4 P1 = P2 F1 P3 P1 takes the value of the addition of P2 and P3, i.e. P1= P2 + P3. N4 P1 = P2 F1 K2 can also be programmed, i.e. P1 takes the value of P2 + 2. he letter K identifies a constant for...
- Page 253 N4 P1 = F7 P2 —> P1 = Sine P2 The angle has to be programmed in degrees. N4 P1 = F7 K5 —> P1 = Sen 5 degrees F8 Cosine N4 P1 = F8 P2 —> P1 = Cos P2 N4 P1 = F8 K75 —>...
- Page 254 N4 P1 = F11 P2 If P1 = P2 the if zero jump flag is activated If P1 => P2 the if => jump flag is activa- ted If P1 < P2 the if < jump flag is activated N4 P1 = F11 K6 can also be program- med.
- Page 255 Example: P1 = F19 K3 is not valid. N4 P1 = F20 P2 P1 takes the value of the memory address of the block before the one at P2. F20 does not accept a constant as operand. Example: P1 = F20 K4 is not valid.
- Page 256 Example: P1 = F21 K2 is not valid. N4 P1 = F22 P2 P1 takes the value of the K coordinate in the block previous to the one defined by P2. F22 does not accept a constant as operand. Example: P1 = F22 K3. is not valid.
- Page 257 Parameter P15 takes the Z value of the tool table in the position 16. Example b) N4 P13 = F25 P34 Parameter P13 takes the Z value of the tool table in the position indicated by parameter P34. This function can be programmed in two different ways: Example a) N4 P6 = F26 K32 Parameter P6 takes the F value of the tool table in the position 32.
- Page 258 P17 takes the I value of the position 10 in the tool table. Example b) N4P19 = F28 P63 P19 takes the I value of the tool table position indicated by parameter 63. This function can be programmed in two different ways: Example a) N4 P15 = F29 K27 P15 takes the K value of the position 27 in the tool table.
- Page 259 P11=P25F31H(8) - Constants P19=K2F32K5 The value of constant H must be given in hexadecimal code, integer, positive and with 8 characters maximum, i.e., from 0 to FFFFFFFF and cannot form part of the first operand. F30 - AND Example: N4 P1 = P2 F30 P3...
- Page 260 These functions do not affect the jump indicators. N4P1 = F34P2 P1 takes the value of the 3rd axis which appears in the block with the address P2. F34 does not accept operating constant. Example: P1 = F34K2 Is not valid.
- Page 261 Example: G00 X100 N5 Y50 N10 G25 N50 N15 X50 N20 Y70 N50 G01 X20 When the block 10 is reached, the CNC jumps to block 50 and then the program continues until it is finished. 8025/8030 CNC PROGRAMMING MANUAL...
- Page 262 N20 X0 N25 G25 N0.20.8 N30 M30 When block 25 is reached the CNC will jump to block 0 and will execute 8 times the section N0-N20. On completion of this, it will go to block 30. 8025/8030 CNC PROGRAMMING MANUAL...
- Page 263 If the result of an operation is greater than or equal to zero, flag 2 is not activated. If, in a comparison, the first operand is smaller than the second, flag 2 is activated. If, in a comparison, the first operand is greater than or equal to the second flag 2 is not activated.
- Page 264 G26 Conditional jump/call if = 0 When the CNC reads a block with the code G26, if the condition = 0 is met, it jumps to the block indicated by N4 or N4.4.2; if the condition = 0 is not met the CNC will disregard this block.
- Page 265 G27 Conditional jump/call if not equal to 0 When the CNC reads a block with G27, if the condition is not 0 is met, it jumps to the block identified by N4 or N4.4.2, if the condition is not 0 is not met the CNC will disregard this block.
- Page 266 G29 Conditional jump/call if equal or greater When the CNC reads a block with G29, if the condition of equal or greater is met, it jumps to the block identified by N4 or N4.4.2. If the condition of equal or greater is not met, the CNC will disregard this block.
- Page 267 N120 P4=P1 ........(X=X initial) N130 P4=P4 F1 P3 P4=F11 P2 N140 G28 N160 N150 P4=P2 N160 P5=P4 F3 P4 P5 = P5 F3 P0 P5 = F16 P5 N170 G01 XP4 ZP5 ....... (movement block) N180 P4 = F11 P2 N190 G27 N130...
- Page 268 If starting point is X2000 Z3000 and the following arc is programmed: G03 X3774.964 Z1000 I-7000 K-8000, the CNC will generate error 33 because the radius is greater than 8388 mm. Parametric programming can be used to overcome this limitation.
- Page 269 Subroutines flow chart: 8025/8030 CNC PROGRAMMING MANUAL...
- Page 270 SUBROUTINE N98 N00 G23 N98 N01 P90=X P91=Y ..............(Takes point valu) P96=P90 F1 P2 P97=P91 F1 P3 ........(Calculates center) P92=P2 F6 P3 ..............(Calculates radius) P98=P2 F4 P3 P93=F10 P98 ......... (Calculates angle ) P98=P91 F2 P97 P98=F11 K0 ........
- Page 271 This subroutine can be used to perform any arc with radius greater than 8388.607 mm both clockwise and counterclockwise. The program to execute the arc previously defined will be: Programming of X axis in radius N10 P0=3774.964 P1=K1000 P2=K-7000 P3=K-8000 P4=K100 P5=K0.5 N20 G1 G41 X2000 Z3000 T1.1...
- Page 272 G88 - Grooving (X axis) G89 - Grooving (Z axis) Atención: The canned cycles do not alter the call parameters which can be used in subsequent cycles, although they alter the contents of the parameters P70 to P99. If the value of a parameter is a constant, when programming canned cycles, it is necessary to key-in K after =.
- Page 273 Max. step. It must be greater than zero or error code 3 will be displayed. According to P12 it will be identified as step along X or Z axis. The real step calculated by the CNC will be equal or smaller than the max. step.
- Page 274 X axis and P5 as max. step along X axis. If it is greater than 45 degree, P4 will be taken as residual stock on the Z axis and P5 as max. step along Z axis.
- Page 275 The following points should be borne in mind when programming this canned cycle: The definition of the pattern must not include point A because it is identified by P0 and P1. The machining conditions (feedrate, spindle rotation, etc.) must be programmed before calling the cycle.
- Page 276 Example G66: X in diameters. N100 — N110 G90 G00 G42 X150 Z115 N120 G66 P0=K0 P1=K85 P4=K20 P5=K5 P7=K1 P8=K1 P9=K100 P12=K40 P13=K200 P14=K290 N130 G40 X160 Z135 N140 M30 N200 G36 R5 X50 Z85 N210 X50 Z70 N220 X40 Z60...
- Page 277 Absolute Z coordinate value of the starting point A. Max. depth of cut per pass (radius). It must be greater than zero or error code 3 will be displayed. The real step calculated by the CNC will be equal or smaller than the max.
- Page 278 P10: This parameter must be assigned a value other than "0" in order for the CNC to carry out a final roughing pass prior to the finishing pass. P13: Number of the first block to define the pattern. P14: Number of the last block to define the pattern. It must be greater than P13.
- Page 279 The pattern can be made up of straight lines and arcs. All the blocks of pattern definition will be programmed with cartesian coordinates being mandatory to program the two axes in absolute, otherwise, the CRT will display error 21. If arcs are included in the definition, they must be programmed with the center’s I,K...
- Page 280 Example G68. N100 — N110 G42 G00 X120 Z0 N120 G68 P0=K0 P1=K-10 P5=K2 P7=K0.8 P8=K0.8 P9=K100 P13=K200 P14=K250 N130 G40 X130 Z10 N140 M30 N200 G03 X40 Z-30 I-6 K-26 N210 G01 X40 Z-40 N220 G02 X80 Z-60 I25 K5...
- Page 281 Coordinate X value of the starting point (A) in radius or diameters. Coordinate Z value of the starting point (A). Max. step. It must be greater than zero or error code 3 will be displayed. The real step calculated by the CNC will be smaller or equal to the max. step.
- Page 282 P10: This parameter must be assigned a value other than "0" in order for the CNC to carry out a final roughing pass prior to the finishing pass. P13: Number of the first block to define the pattern. P14: Number of the last block to define the pattern. It must be higher than P13 or error code 13 will be displayed.
- Page 283 The pattern can be made up of straight lines and arcs. All the blocks of pattern definition will be programmed with cartesian coordinates being mandatory to program the two axes in absolute, otherwise, the CRT will display error 21. If arcs are included in the definition, they must be programmed with the center’s I,K...
- Page 284 Example G69. N190 — N200 G41 G0 X90 Z-5 N210 G69 P0=K80 P1=K-80 P5=K2 P7=K0.8 P8=K0.8 P9=K100 P13=K300 P14=K340 N220 G40 X100 Z0 N230 M30 N300 G01 X80 Z-60 N310 G03 X60 Z-50 I5 K15 N320 G01 X40 Z-40 N330 G03 X10 Z-25 I5 K20...
- Page 285 X coordinate value of the point B (radius or diameters). Z coordinate value of point B. Max. step. It must be greater than zero or error code 3 will be displayed. The real value calculated by the CNC will be smaller or equal to the max. step.
- Page 286 Finishing stock allowance along the Z axis. It must be greater or equal to zero or error code 3 will be displayed. Feedrate of the finishing pass. If it is zero, there will be no finishing pass. If it is negative, error code 3 will be displayed.
- Page 287 X coordinate value of point B (radius or diameters). Z coordinate value of point B. Max. step. It must be greater than zero or error code 3 will be one displayed. The real step calculated by the CNC will be smaller or equal to the max. step.
- Page 288 Finishing stock allowance along the Z axis. It must be greater or equal to zero or error code 3 will be displayed. Feedrate of the finishing pass. If it is zero there will be no finishing pass. If it is negative, error code 3 will be displayed.
- Page 289 Max. pass. The CNC will execute the minimum number of equal passes, smaller than P5 until the total depth, defined by P4, is reached. If it is equal to or smaller than zero, error code 3 will be displayed.
- Page 290 P15: Dwell. It identifies the value in seconds of the dwell at the bottom of the hole. If it is negative, error code 3 will be displayed. P16: It indicates the incremental value of the G00 movement after each pass. If it is zero, this movement will be executed up to the A’point.
- Page 291 X coordinate value of point B (radius or diameters). Z coordinate value of point B. Max. step. It must be greater than zero or error code 3 will be displayed. The real step calculated by the CNC will be smaller or equal to the max. step.
- Page 292 Finishing stock allowance along the Z axis. It must be greater or equal to zero or error code 3 will be displayed. Feedrate of the finishing pass. If it is zero there will be no finishing pass. If it is negative, error code 3 will be displayed.
- Page 293 X coordinate value of point B (radius or diameters). Z coordinate value of point B. Max. step. It must be greater than zero or error code 3 will be displayed. The real step calculated by the CNC will be smaller or equal to the max. step.
- Page 294 Finishing stock allowance along the Z axis. It must be greater or equal to zero or error code 3 will be displayed. Feedrate of the finishing pass. If it is zero there will be no finishing pass. If it is negative, error code 3 will be displayed.
- Page 295 Absolute Z value of the final point of the thread. Depth of the thread (in radius). If will have a positive value in external threads and a negative one in internal threads. If it is zero error code 3 will be displayed.
- Page 296 If it is negative, error code 3 will be displayed. If it is different from zero, the section CB’ is a tapered thread whose pitch along Z axis is P10. If it is zero, the section CB’ is executed in G00 (X only while Z decelerates).
- Page 297 Absolute Z coordinate value of the final point of the thread (B). Depth of the thread. It will have a position value when the cutting takes place towards the negative direction of the Z axis and viceversa. If it is zero, error code 3 will be displayed.
- Page 298 Angle of the tool’s nose. It makes the starting points of the successive passes to be at a P12/2 angle with the Z axis. Do not forget to adjust the tool angle by 1/2° if you want each pass to shave the thread wall.
- Page 299 X coordinate value of point B (radius or diameters). Z coordinate value of point B. Tool nose’s width. It must be greater than zero or error code 3 will be displayed. The real step calculated by the CNC will be smaller than the tool’s width.
- Page 300 The exit conditions of the cycle and G00,G07,G40 and G90. If the groove’s depth is zero, code 3 will be displayed. If the width of the groove is smaller than the tool nose’s width, error code 3 will be displayed. If the position of the tool is not correct to execute the cycle, error code 4 will be displayed.
- Page 301 X coordinate value of point B (radius or diameters). Z coordinate value of point B. Tool nose’s width. It must be greater than zero, or error code 3 will be displayed. The real step calculated by the CNC will be smaller than the tool’s width.
- Page 302 3 will be displayed. If the width of the groove is smaller than the tool nose’s width, error code 3 will be displayed. If the position of the tool is not correct to execute the cycle, error code 4 will be displayed.
- Page 303 ERROR CODES...
- Page 304 The order in which the part-programs are stored in memory are shown in the part-program directory. If during the execution of a program, a new one is edited, this new one will be placed at the end of the list.
- Page 305 > Not enough free tape or CNC memory to store the part-program. I//K has not been defined for a circular interpolation or thread. An attempt has been made to select a tool offset at the tool table or a non-existent external tool (the number of tools is set by machine parameter).
- Page 306 Function M19 programmed incorrectly. Function G72 programmed incorrectly. It must be borne in mind that if G72 is applied only to one axis, this axis must be positioned at part zero (0 value) at the time the scaling factor is applied.
- Page 307 051 * "C" axis programmed incorrectly There is floppy disk in the FAGOR Floppy Disk Unit or no tape in the cassette reader or the reader head cover is open. Parity error when reading or recording a cassette or a floppy disk.
- Page 308 096 ** Parity error in Z axis parameters. The CNC initializes the RS232C serial line parameters: P0=9600, P1=8, P2=0, P3=1, P605(5)=1, P605(6)=1, P605(7)=1. 097 ** Parity error in 3rd or "C" axis parameters. The CNC initializes the RS232C serial line parameters: P0=9600, P1=8, P2=0, P3=1, P605(5)=1, P605(6)=1, P605(7)=1.
- Page 309 "P729". 117 * The internal CNC information requested by activating marks M1901 thru M1949 is not available. 118 * An attempt has been made to modify an unavailable internal CNC variable by means of marks M1950 thru M1964. Error when writing machine parameters, the decoded M function table and the leadscrew error compen- sation tables into the EEPROM memory.
Need help?
Do you have a question about the 8025 T CNC and is the answer not in the manual?
Questions and answers