Pioneer DJM-400 - CDJ-400 Package Operating Instructions Manual
Operating instructions
Hide thumbs
Also See for DJM-400 - CDJ-400 Package:
- Operating instructions manual (76 pages) ,
- Service manual (92 pages)
Table of Contents
Advertisement
Quick Links
Advertisement
Table of Contents

Related Manuals for Pioneer DJM-400 - CDJ-400 Package


Summary of Contents for Pioneer DJM-400 - CDJ-400 Package
-
Page 1: Operating Instructions
DJ MIXER DJM-400 Operating Instructions... - Page 2 In some countries or regions, the shape of the power plug and power outlet may sometimes differ from that shown in the explanatory drawings. However the method of connecting and operating the unit is the same.
-
Page 3: Table Of Contents
The auto talk-over function automatically reduces track volume when microphone input is detected. 6 Other functions ¶ A control cable can be used to connect the unit to a Pioneer DJ CD player, thus allowing playback to be linked to operation of the fader (“fader start play”). -
Page 4: Connections
17. Power inlet (AC IN) Use to connect ground wires from analog players. This is not a safety grounding terminal. Use the accessory power cord to connect to an AC power outlet of the proper voltage. 7. Channel 1 CONTROL connector 18. -
Page 5: Connecting Inputs
CONNECTIONS Always turn off the power switch and disconnect the power plug from its outlet when making or changing connections. Headphones CONNECTING INPUTS The front panel PHONES jack can be used to connect headphones with a Ø6.3 mm stereo phone plug. -
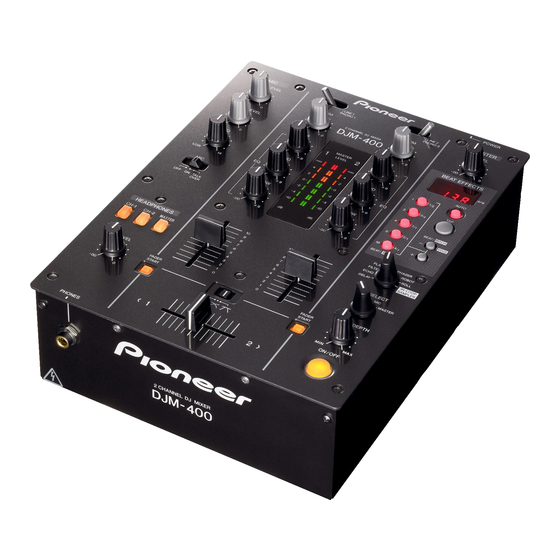
Page 6: Names And Functions Of Parts
1 Channel 1 input selector switch 11 Cross fader selector switch CD 1: Select whether or not to use the cross fader, and to select from two The CD input connectors (line level input) are selected. types of curve response. - Page 7 NAMES AND FUNCTIONS OF PARTS 26 Microphone equalizer control dial (EQ) Beat effect section Use to adjust the tone of microphones 1 and 2. When rotated fully clockwise, attenuation of low-range sound is maximized. When 15 BPM display rotated fully counterclockwise, attenuation of high-range sound is Displays the current track tempo as Beats Per Minute (BPM).
-
Page 8: Mixer Operations
2. Set the MIC switch to [ON] or [TALK OVER]. 3. Use the TRIM dial to adjust the input level. ¶ When the switch is set to [TALK OVER], if a sound is input to 4. Use the channel equalizer dials (HI, MID, LOW) to adjust the AUX connectors, the output for all sources other than the the tone. -
Page 9: Fader Start Function
4. Set the CD player to the desired cue point, and engage cue point standby. ¶ If a cue point has already been set, it is not necessary to set the CD player to standby at the cue point. 5. At the instant you wish to start playback, move the cross FADER fader lever. -
Page 10: Effect Functions
BPM. By changing the parameters for each In units of 1/1, 2/1, 4/1, 8/1 or 16/1 beat, 1 cycle of flanger effect effect, a wide variety of new effects can be produced. By using the is produced quickly and easily. -
Page 11: Producing Beat Effects
4. Press one of the BEAT/BANK buttons to select the beat to PRODUCING BEAT EFFECTS which you wish to synchronize the effect. ¶ Values can be selected from [1/2, 3/4, 1/1, 2/1, 4/1] or [1, 2, 4, 8, 16]. (The multiple differs depending on the effect. See page 10 for details.) BEAT EFFECTS ¶... -
Page 12: Effect Parameters
EFFECT FUNCTIONS (IN-LOOP SAMPLER/EFFECT PARAMETERS) 6 Rotate the LEVEL/DEPTH dial to adjust the sound balance 5. At the point you wish to sample record, press one of the non-lighted BEAT/BANK buttons. between source and sample. ¶ Lighted BEAT/BANK buttons have already been recorded, and... -
Page 13: Troubleshooting
The measured BPM value is different from the value published differences in BPM detection methods. with the CD. Static electricity or other external interference may cause the unit to malfunction. To restore normal operation, turn the power off and then on again. -
Page 14: Specifications
PHONO/LINE input connectors Power consumption ..............13 W RCA pin jacks .................. 2 Operating temperature ....+5 °C to +35 °C (+41 °F to +95 °F) CD input connectors Operating humidity ....5 % to 85 % (without condensation) RCA pin jacks .................. 2 Weight ................ -
Page 15: Block Diagram
BEAT Mono/Stereo detect EFFECTS H.P Mix [MIC] [MIC] Convert MIC 2 CH1 CUE H.P out L MIC ON/OFF Mono/Stereo Convert CH2 CUE MIC OFF/ON MIC 1 H.P out R Master CUE MIC out MIC 2 MIC/AUX Headphone CUE Headphone out... - Page 16 Electronic Industries Association’s Consumer Level Example Electronics Group want you to get the most out of your equipment by playing it at a safe level. One that Quiet library, soft whispers lets the sound come through loud and clear without...
Need help?
Do you have a question about the DJM-400 - CDJ-400 Package and is the answer not in the manual?
Questions and answers