
Related Manuals for Rexton Reach R-Li 80


Summary of Contents for Rexton Reach R-Li 80
- Page 1 Reach R-Li 80 Reach R-Li T 80 RECHARGEABLE HEARING AIDS USER GUIDE 2 (INSTRUCTIONS FOR USE) hearing.rexton.com...
- Page 2 CAUTION It is important to read this user guide and the user guide 1 (safety manual) thoroughly and completely. Follow the safety information to avoid damage or injury.
- Page 3 This user guide is valid for: Hearing aids: Reach R-Li 80 Reach R-Li T 80 Charger: Travel Charger Intended use / Intended purpose Hearing aids are intended to improve the hearing of hearing impaired persons. Diagnosis and prescription of a hearing aid must be performed by hearing health specialists, e.g.
-
Page 4: Table Of Contents
Content Welcome Your hearing aids Hearing aid type Getting to know your hearing aids Components and names Controls Hearing programs Daily use Turning on and off Switching to standby mode Adjusting the volume Changing the hearing program Charging with the Travel Charger Turning the charger on or off ... - Page 5 Maintenance and care Hearing aids Ear pieces Professional maintenance Important safety information Safety information on lithium-ion rechargeable batteries Safety information for hearing aids Safety information for charger Further information Accessories Operating, transport, and storage conditions Technical data of the power supply adapter Disposal information Symbols Troubleshooting for hearing aids ...
-
Page 6: Welcome
Welcome Thank you for choosing our hearing aids to accompany you through everyday life. Like anything new, it may take you a little time to become familiar with them. This guide, along with support from your Hearing Care Professional, will help you understand the advantages and greater quality of life your hearing aids offer. -
Page 7: Your Hearing Aids
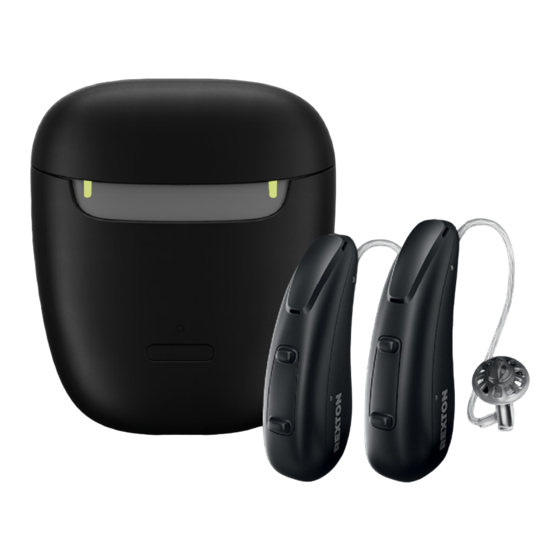
Your hearing aids This user guide describes optional features that your hearing aids may or may not have. Ask your Hearing Care Professional to indicate the features that are valid for your hearing aids. Hearing aid type Your hearing aids are a RIC (Receiver-in-Canal) model. The receiver is placed within the ear canal and connected to the hearing aid via a receiver cable. -
Page 8: Getting To Know Your Hearing Aids
Getting to know your hearing aids It is recommended to familiarize yourself with your new hearing aids. With the hearing aids in your hand try using the controls and note their location on the hearing aid. This will make it easier for you to feel and press the controls while wearing the hearing aids. - Page 9 Travel Charger ➊ ➎ Removable silicone lining Push button ➋ ➏ Charging slots Power port ➌ ➐ Hearing aid LEDs USB power cable ➍ ➑ Charger LED Power adapter You can use the following standard ear pieces: Standard ear pieces Size Sleeve 3.0 Vented/Closed/ Power...
-
Page 10: Controls
Custom-made ear pieces Earmold 3.0 Controls With the rocker switch you can, for example, switch hearing programs. The Hearing Care Professional has programmed your desired functions to the rocker switch. Rocker switch function Press briefly: Program up/down Volume up/down TV stream on/off Press for about 2 seconds: Program up/down Volume up/down... -
Page 11: Hearing Programs
Hearing programs Read more in section "Changing the hearing program". Daily use To assure comfortable and easy use of your hearing aids they are equipped with an onboard control element. In addition, we offer an app for Android as well as iPhones which makes handling your devices even easier. - Page 12 Inserting a hearing aid: For Sleeves, take care that the bend of the Sleeve is in line with the bend of the receiver cable. See following illustrations: Correct: Incorrect: Hold the receiver cable at the bend closer to the ear piece. Carefully push the ear piece in ➊...
- Page 13 CAUTION Risk of injury! Always wear the receiver cable with an ear piece. Make sure that the ear piece is completely attached. CAUTION Risk of injury! Insert the ear piece carefully and not too deeply into the ear. ■ It may be helpful to insert the right hearing aid with the right hand and the left hearing aid with the left hand.
- Page 14 The optional retention strand helps to securely retain the ear piece in your ear. To attach the optional retention strand: Concha Lock Sleeve 3.0 Align the Concha Lock Sleeve 3.0 with the receiver as shown in the picture. Then slide the Concha Lock Sleeve 3.0 over the receiver so that it fits securely.
- Page 15 To position the retention strand: Bend the retention strand and position it carefully into the bottom of the bowl of your ear (refer to the picture). Removing a hearing aid: Lift the hearing aid and slide it ➊ over the top of your ear If your hearing aid is equipped with a custom shell or a mold, remove it by pulling the small...
-
Page 16: Turning On And Off
CAUTION Risk of injury! In very rare cases the ear piece could remain in your ear when removing the hearing aid. If this happens, have the ear piece removed by a medical professional. Clean and dry your hearing aids after usage. Read more in section "Maintenance and care". - Page 17 Via rocker switch: Turning on: Press and hold the lower part of the rocker switch until the startup melody starts to play. Release the rocker switch while the melody is playing. The default volume and hearing program are set. Turning off: Press and hold the lower part of the rocker switch for several seconds.
-
Page 18: Switching To Standby Mode
Switching to standby mode Via remote control, you can switch your hearing aids to standby mode. This mutes the hearing aids. When you leave standby mode, the previously used volume and hearing program are set. Note: ■ In standby mode, the hearing aids are not turned off completely. -
Page 19: Changing The Hearing Program
An optional signal can indicate the volume change. Once the maximum or minimum volume has been reached, you may hear an optional signal tone. Changing the hearing program Depending on the listening situation, your hearing aids automatically adjust their sound. Your hearing aids may also have several hearing programs which allow you to change the sound, if needed. -
Page 20: Charging With The Travel Charger
Charging with the Travel Charger NOTICE Use of incompatible parts poses a risk of malfunction. Use only the power supply and country specific adapter that is provided with the charger. Use only the USB cable that is provided with the device. -
Page 21: Turning The Charger On Or Off
Turning the charger on or off When the charger is connected to an electrical outlet, it is automatically turned on and cannot be turned off. During mobile charging, press and hold the button for 5 seconds to turn the charger on or off. ■ When the charger turns on, the status of the hearing aids and the status of the charger’s internal battery are displayed for 7 seconds. - Page 22 Status description No LED light: No hearing aid is in the charger, a hearing aid is not placed correctly, or the charger is discharged. Flashing green LED light: Charging in progress. Solid green LED light: Hearing aid is fully charged. Red LED light blinks 3 times in 2 seconds: Error Read more in section “Troubleshooting”.
- Page 23 Charging tips You may have some questions on how to best charge your hearing aids. Read the questions and answers below. If you have more questions, your Hearing Care Professional will help you. How often do I need to charge the hearing aids? We recommend charging the hearing aids daily, even if the power cell is not empty.
- Page 24 What if I intend not to use the hearing aids for several days or longer? ■ Short-term storage (up to several days): Turn off your hearing aids via the push button or place them in the powered charger. The charger must be connected to the power supply or fully charged.
- Page 25 What should I pay attention to when charging? The hearing aids and charger must be clean and dry. Observe the operation conditions in section “Operating, transport, and storage conditions”. Avoid charging at high ambient temperatures, as this can shorten the life span and capacity of the power cell.
-
Page 26: Special Listening Situations
S pecial listening situations On the phone When you are on the phone, hold the telephone receiver slightly above your ear. The hearing aid and telephone receiver have to be aligned. Turn the receiver slightly so that the ear is not completely covered. -
Page 27: Audio Streaming With Iphone
Audio streaming with iPhone Your hearing aids are Made for iPhone hearing aids. This means you can get phone calls and listen to music from your iPhone directly into your hearing aids. Additionally, your hearing aids may offer hands-free calling with compatible iPhone and iPad devices. For more information about compatible iOS devices, pairing, audio streaming and other useful functions, contact your Hearing Care Professional. -
Page 28: Audio Induction Loops (Reach R-Li T Only)
Audio induction loops (Reach R-Li T only) Some telephones and public places like theatres offer the audio signal (music and speech) via an audio induction loop. With this system, your hearing aids can directly receive the desired signal – without distracting noise in the environment. -
Page 29: Maintenance And Care
Maintenance and care To prevent damage it is important that you take care of your hearing aids and follow a few basic rules, which will soon become a part of your daily routine. Hearing aids Cleaning Your hearing aids have a protective coating. However, if not cleaned regularly you may damage the hearing aids or cause personal injury. - Page 30 Drying You can use conventional products to dry your hearing aids. Ask your Hearing Care Professional for recommended drying products and for individual instructions on when to dry your hearing aids. Storage ■ Short-term storage (up to several days): Turn off your hearing aids via the rocker switch or place them in the powered charger.
-
Page 31: Ear Pieces
Observe the storage conditions in section "Operating, transport and storage conditions". Ear pieces Cleaning Cerumen (ear wax) may accumulate on the ear pieces. This may affect sound quality. Clean the ear pieces daily. For all types of ear pieces: Clean the ear piece right after removal with a soft and... - Page 32 Exchanging Exchange standard ear pieces approximately every three months. Replace them sooner if you notice cracks or other changes. The procedure for exchanging standard ear pieces depends on the type of ear piece. In section "Components and names", your Hearing Care Professional has marked your type of ear piece.
-
Page 33: Professional Maintenance
Professional maintenance Your Hearing Care Professional can perform a thorough professional cleaning and maintenance. Custom-made ear pieces and wax filters should be exchanged as needed by your Hearing Care Professional. Ask your Hearing Care Professional for your individual recommendation of maintenance intervals and for support. -
Page 34: Important Safety Information
Important safety information Safety information on lithium-ion rechargeable batteries WARNING A lithium-ion rechargeable battery is permanently built into your device. Incorrect use of the device can cause the lithium-ion rechargeable battery to burst. Risk of injury, fire or explosion! Follow the safety instructions for lithium-ion rechargeable battery in this section. - Page 35 WARNING Observe the operating conditions. Pay special attention to protect your device from extreme heat (e.g. fire, microwave oven, induction oven or other high induction fields) and sunlight. Charge your hearing aids only with an approved charger. Ask your Hearing Care Professional for support.
-
Page 36: Safety Information For Hearing Aids
WARNING Replacement and repair have to be performed by a professional. Therefore: Do not repair or replace the lithium-ion rechargeable battery yourself. In the unlikely event of a lithium-ion rechargeable battery bursting or exploding, keep all combustible materials away. In any of the above cases, return your device to the Hearing Care Professional. - Page 37 WARNING Note that any unauthorized changes to the product may cause damage to the product or cause injury. Use only approved parts and accessories. Ask your Hearing Care Professional for support. Do not modify this product without authorization from the manufacturer. If this product is modified, appropriate inspection and testing must be conducted to ensure safe use of the product.
- Page 38 WARNING Choking hazard! Your device contains small parts which can be swallowed. Keep hearing aids, batteries and accessories out of reach of children and mentally disabled persons. If parts have been swallowed consult a physician or hospital immediately. NOTICE Charging systems may interfere with measuring devices and electronic equipment.
- Page 39 Product safety for charger NOTICE Protect your device from extreme heat. Do not store it in direct sunlight. NOTICE Protect your devices from high humidity. NOTICE Do not dry your devices in the microwave oven. NOTICE Do not drop. Internal components may get damaged.
-
Page 40: Further Information
Further information Accessories You can use a smartphone app to control your hearing aids remotely (available in many countries). This app allows you to adjust your hearing aids from your smartphone and even personalize your hearing experience. Consult your Hearing Care Professional for further information. - Page 41 During extended periods of transport and storage, please observe the following conditions: Storage Transport Temperature 10-25°C -20-60°C (recommended) (50-77°F) (-4-140°F) Temperature 10-40°C -20-60°C (maximum range) (50-104°F) (-4-140°F) Relative humidity 20-80% 5-90% (recommended) Relative humidity 10-80% 5-90% (maximum range) Atmospheric 700-1060 hPa 700-1060 hPa pressure Note that you have to charge the hearing aids at...
- Page 42 Charger: Operating conditions Temperature 10-35°C / 50-95°F Relative humidity 20-75% Atmospheric pressure 700-1060 hPa During extended periods of transport and storage, please observe the following conditions: Storage Transport Temperature 10-40°C / -20-60°C / 50-104°F -4-140°F Relative humidity 10-80% 5-90% Atmospheric 700-1060 hPa 700-1060 hPa pressure...
-
Page 43: Technical Data Of The Power Supply Adapter
Technical data of the power supply adapter Input voltage: 100-240 V AC Input current: 0.5 A Input frequency: 50-60 Hz Output voltage: 5 V DC Output current: Disposal information To avoid environmental pollution, do not throw power cells or devices into household trash. Recycle or dispose of packaging, power cells and devices according to local regulations. - Page 44 Symbols on the device or packaging CE compliance label, confirms compliance with certain European Directives, refer to section "Conformance information". EMC and radio communications compliance label Australia, refer to section "Conformance information". Indicates the legal manufacturer of the device. Do not dispose of the device with general domestic waste.
- Page 45 Symbols on the device or packaging Atmospheric pressure during transportation. Read more in section "Operating, transport and storage conditions". Medical device. Use of the Made for Apple badge means that an accessory has been designed to connect specifically to the Apple product(s) identified in the badge and has been certified by the developer to meet Apple performance standards.
-
Page 46: Troubleshooting For Hearing Aids
Troubleshooting for hearing aids Problem and possible solutions Sound is weak. ■ Increase the volume. ■ Charge the hearing aid. ■ Clean or exchange the ear piece. Hearing aid emits whistling sounds. ■ Reinsert the ear piece until it fits securely. ■ Decrease the volume. ■ Clean or exchange the ear piece. -
Page 47: Troubleshooting For The Charger
Troubleshooting for the charger Problem and possible solutions No LED lights are on. ■ Check if the power supply is connected correctly. LEDs are pulsing orange. Charger has reached the temperature limit and is now in a cooling phase. Charging is resumed after cooling down (about 15 minutes). ■... - Page 48 Problem and possible solutions Hearing aid's LED is blinking red. An error in the hearing aid has occured. ■ Take the respective hearing aid out of the charger and disconnect the charger from the power supply. ■ Contact your Hearing Care Professional for support.
-
Page 49: Important Information
Important information Conformance information for charger The CE mark indicates conformity with the following European directives and regulations: ■ 2017/745 concerning medical devices. ■ 2011/65/EU RoHS concerning the restriction of hazardous substances The CE mark indicates conformity with certain European directives and regulations. -
Page 50: Country-Specific Information
Country-specific information USA and Canada Certification information for hearing aids with wireless functionality: Reach R-Li T, Reach R-Li ■ HVIN: RFM003 ■ Contains FCC ID: 2AXDT-RFM003 ■ Contains IC: 26428-RFM003... -
Page 51: Service And Warranty
Service and warranty Serial numbers Hearing aid Receiver unit Left: Right: Service dates Warranty Date of purchase: Warranty period in months: Your Hearing Care Professional... - Page 52 Legal Manufacturer, hearing aid charger WSAUD A/S WSAUD A/S Nymøllevej 6 Nymøllevej 6 3540 Lynge 3540 Lynge Denmark Denmark 0123 Document No. 05685-99T02-7600 EN-US Order/Item No. 210 367 11 Master Rev02, 04.2024 www.wsaud.com © 05.2024, WSAUD A/S. All rights reserved www.rexton.com...
Need help?
Do you have a question about the Reach R-Li 80 and is the answer not in the manual?
Questions and answers