Advertisement
Quick Links
Advertisement

Related Manuals for Seaga The ideal vendor


Summary of Contents for Seaga The ideal vendor
- Page 1 Operator’s Manual CDN V8...
- Page 2 January 2023 NOTE: IF YOU HAVE ANY QUESTIONS REGARDING THE MACHINES OR FOR PARTS AND SERVICE PLEASE CALL DIRECTLY TO (416)-299-6262, ASK FOR: IDG TECHNICAL MON. – FRI. 9:00 A.M. TO 4:00 P.M. EST. VERY IMPORTANT: PLACE ALL ORDERS BY PHONE OR EMAIL: service@fomtechnical.com OR SEND BY MAIL (INCLUDING NAME, ADDRESS, PHONE #) “SEE FULL ORDERING INSTRUCTIONS BELOW”...
-
Page 3: Manufacturer's Warranty
Manufacturer is not liable for any incidental, consequential or other damages of any kind whatsoever, directly or indirectly, arising from the use of the equipment whether based upon theories of contract negligence or tort. Seaga Manufacturing, Inc. 700 Seaga Drive Freeport, IL 61032... -
Page 4: Important Notices
• Do not load your vendor with disfigured or damaged cans. Machine Specifications Height Width Depth Weight Selections Capacity 36” (914 mm) 32” (813 mm) 12.5” (317.5 mm) 195 lbs. (88.45 kg) 68 x (12 oz. cans) The ideal vendor Operators Manual... -
Page 5: Technical Service
Dear Operator Note: CONCEALED DAMAGE, if any must be reported to the freight carrier within 48 hours. Inspect your shipment promptly. Do not unpack or set up in a frozen garage or workspace. Note: Always test a Machine thoroughly for 2 to 3 days and vend 2 to 3 of each product to be sure the Machine is working properly before it is put into a commercial location. - Page 6 Machine. These labels are packed in the supplies box with the Manual. Also, it is a good idea to tape your “Business Card” or a label “For Service call ………” on the side of the ideal vendor C. Always go back the very next day after you have installed your Machine on a brand-new location to check the Machine to verify everything is okay.
- Page 7 Machines delivery system. Your Shipment will be packed in a “Standard Set” (Each set consists of 2 The ideal vendor™ & 1 Snack Cabinet) per skid depending on how many machines are in your package. It is recommended to keep a box or two and the plastic bags to repack the Machines, if needed.
- Page 8 Unpacking Your Shipment Cont’d Now disconnect the 3 cables connected to the FrigiDeck refrigeration system, slide it out and place it upright position, securely on the floor. Now, with the help of a helper, lift and place the empty Cooler on top of the Snack Cabinet and secure it with the 4 screws provided from underneath the top of the Snack Cabinet.
- Page 9 Surge Protector: It is important that you plug in the Black Power Cord of your Machines to a “Surge Protector” with “Noise Protection” (Use the 6 plug “No Cord” Block Type). It just makes good sense to do this due to the significant value of your “The ”.
- Page 10 (Page 12 & 13) Indoor Use Only: The ideal vendor is designed for indoor use only. It should not ever be set up in a frozen garage as the cans would freeze and severely damage your Machine. It should never be set up outside even if you have a roof over it to protect it from the rain;...
- Page 11 How Do You Approach the Wholesaler? Make sure when you visit that you take your Business Card. Quite often people go into wholesalers right off the street trying to buy wholesale for personal needs. Please remember this so that you don’t feel bad if they are trying to screen you it’s normal.
- Page 12 Installation of Bracket on Wall When possible, install your Machine on a wall, if a wall is not suitable use the Snack Cabinet. Installation is just a simple bracket. (Fig 3 page 21) It should only take 15 to 20 minutes to set up. This will improve your Machine safety, stability and the permanence at your location.
- Page 13 Installation of Bracket on Wall Cont’d Use care to always measure exactly for 16” centers and be sure that the reading is not false such as a water pipe or power cable in the wall. Note: older buildings (before 1960) may have 24” stud centers. If you have a garage wall or an available basement wall, we recommend you do a test set up at home first to familiarize yourself with installation before attempting any commercial location.
- Page 14 Filling Snack Cabinet There are several general principals to follow when filling the Machine to be sure of successful vending. Each time you slide out or return a shelf for loading, carefully inspect the shelf cable at the back right corner to make sure it is not snagged or jammed as that could damage the cable itself or the wire connections to the motors at the back of the shelf.
-
Page 15: Recommended Products
EIGHT (120-127) SELECTIONS AND MIDDLE HAS FOUR (131-137) SELECTIONS AND BOTTOM HAS FOUR (141-147) SELECTIONS. COLD DRINK SELECTIONS. 17 Item Sleeve Coke Classic (can) 17 Item Sleeve Diet Coke (can) 17 Item Sleeve Sprite (can) 17 Item Sleeve Ginger Ale (can) The ideal vendor Operators Manual... - Page 16 Cold Drink Selections COKE DIETCOKE SPRITE GINGER ALE Classic Notes: 1. For a Natural Food Mix Call Local Health Food Distributors to inquire about Items, Sizes and Prices. It is not necessary to entirely fill a machine when setting up a New Location. NOTE: IN COLD DRINK MACHINE THERE ARE ONLY FOUR SELECTIONS AND IN EACH SELECTION 17 CANS CAN BE LOADED Top Shelf Standard BARS/GUMS/MINTS 9 Item...
-
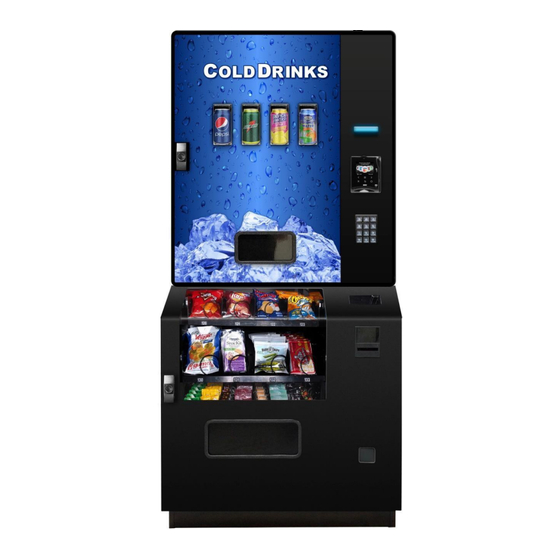
Page 17: Machine Overview
Machine Overview Figure A – The ideal vendor Exterior Baked-on Powder Coat Finish High Security Handle Lock Interchangeable Magnetic Art Panel High Strength Plexi Can Display LCD Display Credit / Debit Card Reader Insulated Cold Drink Push Door Keypad for Selections... - Page 18 Coin Mechanism Bill Acceptor (Optional) Coin Box Snack Cabinet Display Window Bill Acceptor Box Helix Coils Product Trays LED Light Figure D – Snack Cabinet Interior 120 - 127 131 - 137 141 - 147 The ideal vendor Operators Manual...
- Page 19 Photo 2 – Connectors are found loose in the Snack Machine and plug into connectors in photo 1. Photo 3 – An extra MDB Cable for the Optional Bill Acceptor is located in the Snack Cabinet. The ideal vendor Operators Manual...
- Page 20 PHOTO #5 PHOTO #4 PHOTO #6 The ideal vendor Operators Manual...
-
Page 21: Wall Mounting
Figure 3 – Wall Mount Brackets Hooks Screw Holes After bracket is installed, slide Machine down and engage all hooks (8) Figure 4 – Mounting holes Secure with screws after mounted to brackets to lock in place. The ideal vendor Operators Manual... - Page 22 Figure 4.1 – Snack Cabinet Bracket Installation Place Hooks securely on the last Pins from Hooks Pins Fasten the four screws from the Snack Cabinet bottom of Snack Bracket Cabinet into the Cold Drink Machine. The ideal vendor Operators Manual...
- Page 23 Page Left Blank Intentionally The ideal vendor Operators Manual...
-
Page 24: Exterior View
The vending Machine is for operation in an indoor environment only; failure to locate the vendor in a temperature controlled, humidity controlled, dirt and dust free environment voids your warranty. Allow at least 6” of clearance on the right side of the Machine for air circulation to the refrigeration The ideal vendor Operators Manual... -
Page 25: Loading Product
Compressor, Condenser, Condenser Fan, Evaporator, Evaporator Fans, Accumulator or Dryer, and Cooling Relay which controls the cooling inside the Delivery System. The temperature is pre-set at the factory for efficient and effective cooling. The ideal vendor Operators Manual... -
Page 26: Cleaning Condenser
FrigiDeck™ refrigeration chamber. Check the seals for any folds, cracks or tears before re-inserting the FrigiDeck™. A tight seal will cool your FrigiDeck™ more efficiently, decreasing the workload, energy consumption and any condensation. The ideal vendor Operators Manual... -
Page 27: Service Mode Navigation
Use the “*” key on the keypad to “EXIT” without changing or to go back (Previous). Use the “#” key on the keypad to “SAVE”. * = Exit or Next # = Save The ideal vendor Operators Manual... -
Page 28: Price Program
Use the keypad to choose one Selection. Enter the choose and Price) selection. * -Exit, no change #-Save Use number keys on the keypad to set new price, including cents. Press * two times to exit to Sales Mode Price Program The ideal vendor Operators Manual... - Page 29 Press Service Mode Button Motor Count or Error Code ** Selection: (First Selection) Press 9 to test run all 20 motors one by one at a time. *-Stop Press * to exit to Sales Mode 0.00 The ideal vendor Operators Manual...
-
Page 30: Troubleshooting
• Press the “#” key on the keypad to get a temperature reading • Verify that all fans are running • Clean the condenser fins. • Remove your FigiDeck and inspect it for ice built up. The ideal vendor Operators Manual... - Page 31 My display is dead / intermittent, but the rest of the machine appears to be working? Check the gray flat ribbon cable connection between the display and the controller board to ensure the plugs are plugged in securely. The ideal vendor Operators Manual...
- Page 32 Machine Set up Guide PHOTO 1. POWER CORD PASSES FROM THIS GOURMET IN SNACK MACHINE.
- Page 33 PHOTO 2. POWER CORD PLUG COMES INSIDE THE BOTTOM OF THE SNACK MACHINES WHERE TWO MORE CONNECTORS, 14 PINS AND 5 PINS CONNECTORS ARE KEPT LOOSE.
- Page 34 PHOTO 3. ALL THE THREE CONNECTORS WHICH ARE SHOWN IN PHOTO 2, CAN REST ON THIS PLATE AND BE TEMPORARILY SECURED BY DUCT TAPE.
- Page 35 PHOTO 4. PLACE COLD DRINK MACHINE ON TOP OF SNACK MACHINE AND LINE UP ALL THEIR HOLES.
- Page 36 PHOTO 5. ONCE BOTH MACHNES ARE SETUP, CONNECT ALL THE THREE CONNECTORS. POWER CORD AT REAR AND THE BIG AND SMALL IN FRONT UNDER COLD DRINK MACHINE ON RIGHT SIDE WHICH ARE SECURED IN PHOTO 3...
- Page 37 PHOTO 6. ONCE ALL THE THREE CONNECTORS ARE CONNECTED, NOW COIN MECHANISM CAN GET INSTALLED HERE.
- Page 38 PHOTO 7. ONCE THE COIN MECHANISM IS SECURED, CONNECT THE COIN MECHANISM CABLE WHERE ARROW IS POINTING.
- Page 39 PHOTO 8. CASH AND BILL BOX FOUND IN SNACK MACHINE. BILL BOX IS NOT USED AS BILL VALIDATOR IS AN OPTIONAL ACCESSORY FOR PURCHASE.
- Page 40 PHOTO 9. BILL VALIDATOR CAN BE INSTALL HERE AS IT IS AN OPTIONAL ACCESSORY.
- Page 41 PHOTO 10. COIN RETURN ASSEMBLY & BILL VALIDATOR LOCATION FOR INSTALLATION.
- Page 42 PHOTO 11. SLOP FOR COIN CHANGE TO SLIDE DOWN IN ORDER TO GO IN COIN RETURN CHANGE BOX.
- Page 43 PHOTO 12. COIN RETURN BOX LOCATION.
- Page 44 PHOTO 13. COIN RETURN LEVER AND COIN CHUTE.
- Page 45 PHOTO 14. POWER CORD, KEYS AND DROP SENSOR, DELIVERY SYSTEM LOCATION.
- Page 46 PHOTO 15. STOP BAR IN SNACK MACHINE.
- Page 47 PHOTO 16. TRAY MOTOR HARNESS DISCONNECT INFO.
- Page 48 Engage your consumer Promote your business A complete M2M telemetry and cashless payment solution ideally suited for unattended machines in multiple markets One device that accepts all cashless payments and transmits data in real time Debit and Credit Cards Mobile and NFC Payments Prepaid cards and closed environment solutions Swipe, Contact and Contactless QR codes...
- Page 49 JCB - J/Speedy 1.3 Magnetic Stripe ISO 7811 and JIS I Tracks 1,2,3; JIS II Discover D-Pass 1.0 Other Cards Supported NFC, MIFARE, HID-iClass Let Nayax help your business maximize your profits. Contact us today to learn more. The ideal vendor Operators Manual...
- Page 50 VPOS TOUCH All in One www.youtube.com/watch?v=ed2QGyX0LEQ Nayax Payment, Telemetry & Management Solution www.youtube.com/watch?v=UGKn-w9AIdU VPOS TOUCH – Vandalism and Water Resistant www.youtube.com/watch?v=oPQ3GGMJ5kg www.youtube.com/watch?v=LuLG0y-0yE4 Monyx – See Great Features youtube.com/watch?v=VN5Iek4i7ow Monyx – Refunds Monyx – Rewards and Loyalty App www.youtube.com/watch?v=hwILaiIfMy0 What Makes Us Unique www.youtube.com/watch?v=fLJloIDDP4k Car Wash - Best in Class www.youtube.com/watch?v=5T5VzJgSF7g...
Need help?
Do you have a question about the The ideal vendor and is the answer not in the manual?
Questions and answers