Advertisement
PARTS

- Upper Lid
- Removable Upper Plate
- Removable Lower Plate
- Base Unit
- Plate Storage
(Not shown) - Plate Release Buttons

- DO NOT ATTEMPT TO PICK UP WAFFLE MAKER FROM HANDLE. THIS IS NOT INTENDED FOR CARRYING. PLEASE PICK UP FROM THE BASE OF THE UNIT.
- DO NOT LOCK THE UPPER AND LOWER HOUSING WHILE COOKING.
BEFORE FIRST USE
- Read all instructions and important safeguards.
- Remove all packaging materials and check that all items have been received in good condition.
- Tear up all plastic bags and dispose of properly as they can pose a suffocation or choking risk to children.
- Remove the waffle plates and wash with warm soapy water and dry thoroughly before returning to the base.
- Wipe body clean with a damp cloth.
- Open the Waffle Maker, and insert the bottom plate into the bottom housing, inserting the rear portion of the plate first to engage the retention clips, and press until a click is heard. Then Insert the top plate into the top housing, rear edge first, and press upwards until a click is heard.
NOTE. Each plate is individually marked "Belgium", "Classic". Top and Bottom plates are not inter-changeable. Make sure to insert plates in the top and bottom housing with the waffle style name reading left to right. - Your Waffle Maker is now ready for use.
NOTE: Do not use harsh abrasive cleaners, scouring pads or products that are not considered safe to use on ceramic nonstick coatings. If washing in the dishwasher, a slight discoloration to the plates may occur. This is cosmetic only and will not affect performance.
THIS APPLIANCE IS FOR HOUSEHOLD USE ONLY.
GENERAL USAGE
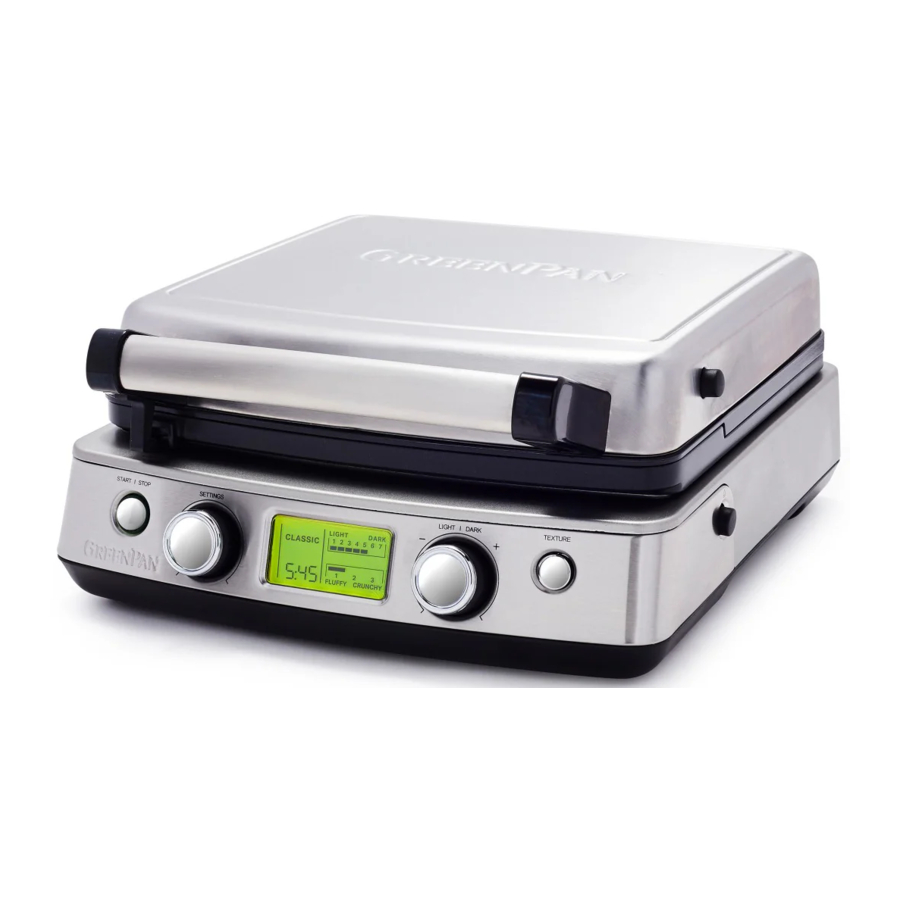
KNOW YOUR CONTROL PANEL

- Start/Stop Button – Starts a function or Stops a cooking cycle
- Settings Dial – Selects the type of waffle (Belgian, Classic, Liege or Custom)
- Light/Dark Dial – Selects the doneness of the waffle
- Texture Button – Selects the texture (Fluffy to Crunchy)
Your Waffle Maker automatically selects a temperature and time once you choose a waffle program. While cooking, the display will count down as time elapses. At the end of the cooking program, three beeps will sound and the timer will resume the previous setting time. The digits blink waiting for the next round of batter. The unit will switch to standby mode (display off) after 10 minutes. If cooking multiple waffles, add new batter within 10 minutes.
OPERATION
Power Operation
- Ensure the waffle plates are correctly placed within the appliance.
- Ensure your Waffle Maker is plugged directly into a grounded wall outlet.
- Do not use an extension cord.
- You will hear a beep and the Waffle Maker will enter standby mode when plugged in (display will remain off), it is now ready for use.
- After plugging in the unit, pressing the Start/Stop button wakes up the LCD with previous selected setting.
- If no action is taken at any time, the Waffle Maker will go to sleep after 10 minutes of inactivity.
Programmed Operation
- Turn setting dial to select the type of waffle. The waffle types scroll among the choices. For best results, be sure that the correct plates are used with the appropriate setting.
- Turn Light/Dark dial to select shading. Turning clockwise increases shading and turning counterclockwise decreases shading.
- Press Texture button to scroll among the levels of texture from 1 to 3.
- As soon as the selection is done, press start/stop button to begin the preheat mode, "PREHEAT" appears on the display. When preheat is complete, a beep will sound and the time digits will start to blink.
- Add batter to the plate and close the lid. Cooking will begin automatically. The digits will stop blinking and countdown will begin. In the rare case that cooking does not automatically begin (such as when making less than a full plate of waffles), the Start/Stop button can be used to initiate the cooking cycle.
- Shading can be adjusted during the cooking cycle as long as the new shading setting is the same or longer than the elapsed time.
- When cooking finishes, the crunch cycle starts, indicated by the blinking crunchiness bar. When time elapses to zero, three beeps sound, indicating the end of the complete cooking cycle.
- Remove the waffle using heat-resistant, nonscratch utensils or tongs.
- If cooking more than one waffle, new batter can be added immediately.
- When done, unplug the Waffle Maker and allow to cool before cleaning.
![]()
Do not lock upper and lower housing while cooking waffles.
Custom Operation
- Turn setting dial to "Custom"
- Turn the light/dark dial to adjust the cooking time in increments of 15 seconds.
- Press the Texture button to accept the cooking time.
- Now, turn the light/dark dial to adjust the shade.
- Press the Texture button to accept the shade.
- The texture setting itself is not available during Custom Operation.
- To begin the preheat mode, press the Start/Stop button.
- When preheat is complete, a beep will sound and "PREHEAT" is no longer on the display.
- Add batter to the plate and close the lid. Cooking will begin automatically, the digits will stop blinking and countdown will begin. In the rare case that cooking does not automatically begin (such as when making less than a full plate of waffles), the Start/Stop button can be used to initiate the cooking cycle.
- When time elapses to zero, three beeps sound, indicating the end of the cooking cycle.
- Remove the waffle using heat-resistant, non-scratch utensils or tongs.
- If cooking more than one waffle, new batter can be added immediately to repeat the program.
- When done, unplug the Waffle Maker and allow to cool before cleaning.
RECIPE SUGGESTION
QUICK AND EASY WAFFLE BATTER
2 cups all-purpose flour
2 tablespoons sugar
1 tablespoon baking powder
½ teaspoon salt
1 ¾ cups reduced fat milk
¹³ cup vegetable oil 2 eggs
Place ingredients in a large mixing bowl. Stir until smooth and allow to rest for 5 minutes before pouring on preheated waffle plates.
Makes 4-6 Belgian and 6-8 Classic waffles.
QUICK TIPS
FOR BEST RESULTS
- Keep Waffle Maker closed while preheating, and wait until preheat mode is complete.
- Allow Waffle Batter to rest for a few minutes before pouring onto hot Waffle Plates
- Add a light coating of cooking oil to the plates prior to the first waffle. Do not use cooking spray or low smoke point oil.
- Waffles are best when made fresh, but can also be frozen for later use (wrap separately) and reheated in toaster or oven
- For evenly sized waffles, pour batter into the center of the waffle plate and spread out to the edges of the plate
- Be careful not to overfill the waffle plates
- Always clean your waffle plates after each use (see below)
CHANGING PLATES
When changing plates, first unplug the unit and make sure it has cooled completely to room temperature. Never attempt to remove waffle plates while still hot.
To remove the waffle plates:
- Open the Waffle Maker. Press the side button on the upper housing to release the top plate with one hand and remove the plate with the other hand. Take care that the plate does not fall out, as it may damage the ceramic nonstick coating.
- Press the side button on the lower housing to release the bottom plate with one hand, and gently lift to remove it with the other hand.
To insert new waffle plates:
- Open the Waffle Maker, and insert a new plate into the bottom housing, inserting the rear portion of the plate first to engage the retention clips, and press until a click is heard.
- Insert a new plate into the top housing, rear edge first, and press upwards until a click is heard.
- Each plate is individually marked "Belgium", "Classic". Top and Bottom plates are not inter-changeable. Make sure to insert plates in the top and bottom housing with the waffle style name reading left to right.
CLEANING AND MAINTENANCE
- Before cleaning, always unplug your Waffle Maker and allow it to cool. See below table for cleaning guidance.
Part Dishwasher & Hand Wash Safe Wipe with Damp Cloth Waffle Plates ![]()
![]()
Base Unit ![]()
![]()
- If you prefer, you can wash the plates with a gentle detergent after removing them from the base.
- Refrain from using scouring pads, powders or chemical detergents on the Waffle Maker.
It is recommended to clean the waffle plates after every use to maintain optimal nonstick performance.


STORAGE
Be sure the plates are completely dry before storing or reinserting into the base unit. Always store the base unit with one set of plates attached. One additional set of plates can be stored underneath the unit using the plate storage feature. To store 1 set of plates pull out the rack on underside of unit toward you.
BEFORE RETURNING YOUR GREENPAN PRODUCT
If you are experiencing problems with your GreenPan Waffle Maker, we suggest that you call GreenPan customer service at 914-372-7777 before returning the product. A representative can confirm whether the product is under warranty and advise on next steps.
If the defective product is to be serviced by someone other than GreenPan's authorized service, please tell the servicer to call our consumer service at 914-372-7777 to ensure that the problem is properly diagnosed, the product is serviced with the correct parts, and the product is still under warranty.
TROUBLESHOOTING
| Issue | Cause | Solution |
Display is blank | If Waffle Maker is plugged in, unit may be in sleep mode. | Check the connection to the wall outlet. Press any button to wake up. If problem persists, try finding a different outlet. |
| Timer does not begin to count down when batter is added | The auto-start function may not detect small amounts of batter, such as when only a partial waffle plate is being used. | We recommend to only make whole waffle plates, or to use the manual Start/Stop button to begin the cooking cycle. |
Waffles are sticking to the plates | Plates are dirty or cooking time may not be long enough. | Increase cooking time to prevent under-done waffles. Add a light coating of oil to the plates before the first waffle. |
Waffles are burning | Cooking time is too long. | Decrease the shade/time settings. |
E1 | Internal Issue | Contact Customer Service for replacement |
E2 | Internal Issue | Contact Customer Service for replacement |
Appliance does not reach shade desired | Poor connection between plates or need for change in settings. | Check if the heating plate is installed correctly. Check for any debris or oil affecting the connection to the plates. Try changing shade and crunch level on product if desired shade is not being reached. If issue persists please contact customer service |
| Appliance heats up but LCD display does not come on after pressing start | Internal Issue | Contact Customer Service for replacement |
| LCD display comes on but appliance does not heat up | Internal Issue | Contact Customer Service for replacement |
Appliance slow to heat up | Poor connection between plates and unit. | Check if the heating plate is installed correctly, check for any debris or oil affecting the connection to the plates. Install the heating plate according to C&U instruction |
| Small scratch mark or dent mark appear on cooking surface | N/A | Chipping is a natural occurrence with Ceramic Non-stick due to the fact that is very hard. If the chip is more than 5mm, please contact customer service. |
| Large Scratch mark or dent mark appear on cooking surface | Normal Use | Contact Customer Service |
Heating plate cannot fix on the product |
|
|
IMPORTANT SAFEGUARDS
When using an electrical appliances, basic safety precautions should always be followed, including the following:
![]()
Read all instructions carefully before first use.- Do not touch hot surfaces. The metal housing will become hot during use. Use handle or knobs.
![]()
To reduce the risk of electric shock, cook only on removable plates.- Use tongs or other heat safe utensils to remove food. Do not lift appliance.
- Close supervision is necessary when any appliance is used by or near children.
- To protect against electrical shock, do not immerse cord, plug, or waffle maker body in water or other liquid.
- Unplug from outlet when not in use and before cleaning. Allow to cool before putting on or taking off parts, and before cleaning the appliance.
- Do not operate any appliance with a damaged cord or plug or after the appliance malfunctions or has been damaged in any manner. Return appliance to the nearest authorized service facility for examination, repair, or adjustment.
- The use of accessory attachments not recommended by the appliance manufacturer may cause injuries.
- Intended for counter top use only as directed.
- Do not use the appliance for other than intended use.
- Do not use outdoors.
- Do not let cord touch hot surfaces or hang over the edge of table or counter.
![]()
Spilled food can cause serious burns. Keep appliance and cord away from children. Never drape cord over edge of counter, never use outlet below counter, and never use with an extension cord.- Prior to first use, please make sure that the electrical rating of the appliance is in conformity with the current electric rating.
- Plug cord into wall outlet. To disconnect, switch appliance off, then remove plug from wall outlet.
- DO NOT place on or near a hot gas or electric burner, or in a heated oven.
- SAVE THESE INSTRUCTIONS
Do not throw away. Read before operating your new GreenPan Waffle Maker. Keep for future reference. - To ensure safe operation and optimum performance, please read the entire Instruction/Care & Use Booklet.
- Extreme caution must be used when moving an appliance containing hot oil or other hot liquids.
- This appliance has a polarized plug (one blade is wider than the other). To reduce the risk of electric shock, this plug is intended to fit into a polarized outlet only one way. If the plug does not fit fully into the outlet, reverse the plug. If it still does not fit, contact a qualified electrician. Do not attempt to modify the plug in any way.


SAVE THESE INSTRUCTIONS FOR
HOUSEHOLD USE ONLY
SPECIAL CORD SET INSTRUCTIONS:
A short power-supply cord is provided to reduce the risks resulting from becoming entangled in or tripping over a longer cord. Longer extension cords may be used if care is exercised. If a long extension cord is used, the marked electrical rating of the extension cord should be at least as great as the electrical rating of the appliance, and the longer cord should be arranged so that it will not drape over the countertop or tabletop where it can be pulled on by children or animals, or tripped over.
Documents / ResourcesDownload manual
Here you can download full pdf version of manual, it may contain additional safety instructions, warranty information, FCC rules, etc.
Advertisement
Need help?
Do you have a question about the 4 SQUARE WAFFLE MAKER and is the answer not in the manual?
Questions and answers