Table of Contents
Advertisement
1714478
10 AMP BATTERY CHARGER
®
This TRAVELLER product has been carefully manufactured to give you dependable
operation. Please read this manual thoroughly before operating your new product, as it
contains the information you will need to become familiar with its features and obtain
optimal performance. Please keep this manual on file for future reference.
USER MANUAL
Advertisement
Table of Contents

Subscribe to Our Youtube Channel
Related Manuals for TRAVELLER 1714478

Summary of Contents for TRAVELLER 1714478
- Page 1 10 AMP BATTERY CHARGER ® This TRAVELLER product has been carefully manufactured to give you dependable operation. Please read this manual thoroughly before operating your new product, as it contains the information you will need to become familiar with its features and obtain optimal performance.
-
Page 2: Table Of Contents
1714478 TABLE OF CONTENTS Safety Connecting Battery Features Operating Instructions Multi - Stage Charging Process Product Maintenance Error Codes Specifications... -
Page 3: Safety
1714478 IMPORTANT SAFETY INFORMATION SAVE THESE INSTRUCTIONS WARNING: Risk of Explosive Gases, Electric Shock or Fire. • Keep out of reach of children. • To reduce the risk of personal or property damage, read and understand all directions and warnings prior to use of this battery charger. - Page 4 1714478 PERSONAL PRECAUTIONS • Remove metal items such as rings, bracelets and necklaces while working with this charger. Lead acid batteries can produce a short circuit high enough to cause burns. • Always wear protective eyewear and gloves when working with batteries. If battery acid comes in contact with your skin or clothing, immediately wash the area with soap and water and get medical attention right away.
- Page 5 1714478 CHARGER LOCATION • Make sure you have adequate space to use this charger. Position the charger as far away from the battery as permitted by DC Cable. • Never place the charger directly above the battery that is being charged; as this may cause the charger to be damaged by gases expelled from the battery.
-
Page 6: Connecting Battery
1714478 CONNECTING BATTERY Note: It is important to determine the battery type (maintenance free or conventional) before use. BATTERY INSTALLED IN VEHICLE 1. Stay clear of moving engine parts. 2. Position the AC/DC cables to reduce the risk of damage by the moving engine parts. - Page 7 1714478 3. Connect the red positive (+) charger clamp to the positive (+) battery post. 4. Place the free end of the battery cable as far away from the battery to be charged as the cables permit and then connect the black negative (-) charger clamp to the free end of the cable.
-
Page 8: Features
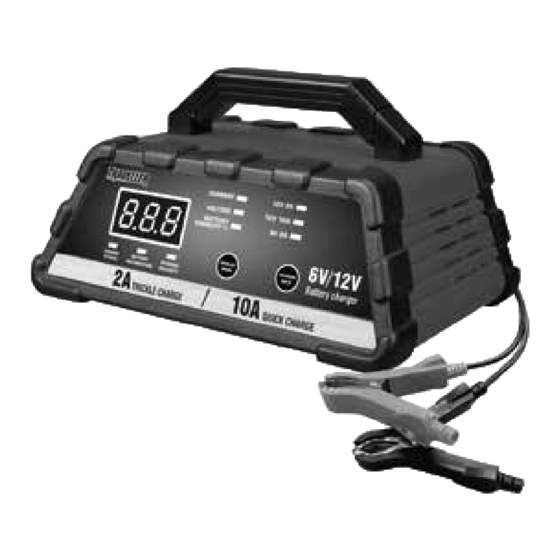
1714478 FEATURES 1. LED Display 6. Display Mode Selection Button 2. 6’ AC Cord 7. Charge Rate Selection Button 3. Charge Status LED 8. Clamps 4. Battery Recondition LED 9. Charge Rate LEDs 5. Reverse Polarity LED 10. Display Mode LEDs... - Page 9 1714478 BATTERY RECONDITIONING When your battery has been unused for long periods of time, the battery will be in a deep discharged state. The battery reconditioning function is to recover the battery from deep discharge and help the battery last longer.
-
Page 10: Multi - Stage Charging Process
1714478 Battery Capacity % – the real-time battery capacity will be displayed. 1. Displays "LO" when battery capacity less than 60% 2. Displays "60%-70%-80%-90%" when battery voltage goes up gradually 3. Displays “FUL" when charger goes into float charge mode... -
Page 11: Product Maintenance
1714478 PRODUCT MAINTENANCE Always unplug and disconnect the charger before performing maintenance on the unit. After each use, use a dry, lint-free cloth to clean battery corrosion and other dirt from the clamp, cords and charger. Ensure that all components are in good working order. - Page 12 FCC STATEMENT Note: This equipment has been tested and found to comply with the limits for a Class B digital device, pursuant to part 15 of the FCC Rules. These limits are designed to provide reasonable protection against harmful interference in a residential installation. This equipment generates, uses and can radiate radio frequency energy and, if not installed and used in accordance with the instructions, may cause harmful interference to radio communications.
Need help?
Do you have a question about the 1714478 and is the answer not in the manual?
Questions and answers
the light for the 6 volt does not come on want to charge 6 volt pos ground
To charge a 6-volt positive ground battery using the TRAVELLER model 1714478:
1. Determine the battery type (e.g., maintenance-free or conventional).
2. Ensure the battery is serviceable and voltage is above the minimum level.
3. Connect the charger clamps as follows:
- Connect the red positive (+) charger clamp to the vehicle chassis or engine block, away from the battery.
- Connect the black negative (–) charger clamp to the battery’s negative terminal.
4. Plug the AC power cord into a properly grounded 120V outlet.
5. Monitor the LED display for charging status.
6. When charging is complete, disconnect in reverse order, staying away from the battery.
Note: Always follow safety precautions and do not face the battery during connection.
This answer is automatically generated
I can't see the LED lights
Whst does a numeral "8" going from right to left across screenean?