dji AVATA 2 User Manual
Hide thumbs
Also See for AVATA 2:
- User manual (10 pages) ,
- Quick start manual (4 pages) ,
- Repair manual (9 pages)
Table of Contents
Advertisement
Advertisement
Table of Contents

Related Manuals for dji AVATA 2


Summary of Contents for dji AVATA 2
- Page 1 User Manual v1.0 2024.04...
- Page 2 Users should only refer to this document and the content thereof as instructions to operate DJI UAV. The document should not be used for other purposes.
-
Page 3: Using The Manual
Download the DJI Fly App Make sure to use DJI Fly during 昀氀ight. Scan the QR code above to download the latest version. • The Android version of DJI Fly is compatible with Android v7.0 and later. The iOS version of DJI Fly is compatible with iOS v11.0 and later. -
Page 4: Download Dji Assistant 2
* For increased safety, 昀氀ight is restricted to a height of 98.4 ft (30 m) and a range of 164 ft (50 m) when not connected or logged into the app during flight. This applies to DJI Fly and all apps compatible with DJI aircraft. -
Page 5: Table Of Contents
Pre-Flight Checklist Flight Operation Basic Flight Operations Taking Off, Braking and Landing Flying Forward and Backward Adjusting Aircraft Orientation Making the Aircraft Ascend or Descend at an Angle Controlling the Gimbal and Camera 2024 DJI All Rights Reserved. ©... - Page 6 DJI Avata 2 User Manual Switching Flight Modes Head Tracking Easy ACRO Slide 180° Drift Flip Video Recording Suggestions and Tips Aircraft Flight Modes Aircraft Status Indicator Return to Home Warnings Trigger Method RTH Procedure Landing Protection Vision System and Infrared Sensing System...
- Page 7 Motion Controller Calibration DJI Fly App Appendix Specifications Compatible Products Updating Firmware Using DJI Fly Using DJI Assistant 2 (Consumer Drones Series) Maintenance Instructions Troubleshooting Procedures Risk and Warnings DJI Avata 2 DJI Goggles 3 Disposal 2024 DJI All Rights Reserved. ...
- Page 8 DJI Avata 2 User Manual Battery Disposal Flight Data Aftersales Information Maintenance Replacing the Foam Padding for Goggles Cleaning and Maintenance of the Goggles © 2024 DJI All Rights Reserved.
- Page 9 Product Pro昀椀le 2024 DJI All Rights Reserved. ©...
-
Page 10: Product Profile
Real View without having to take off the goggles. With DJI Goggles 3 and DJI RC Motion 3 (hereinafter referred to as motion controller), users can easily and intuitively control the aircraft, and enjoy a new and convenient 昀氀ight control experience. -
Page 11: Using For The First Time
Make sure to comply with local regulations when using the goggles. • DJI Goggles 3, DJI RC Motion 3, DJI FPV Remote Controller 3, and all types of ND 昀椀lters are fully compatible with DJI Avata 2. - Page 12 DJI Avata 2 User Manual Remove the gimbal protector. • It is recommended to use the DJI 65W USB-C Charger or other USB Power Delivery chargers with a charging power equal to or greater than 30W. • It is recommended to attach the gimbal protector to protect the gimbal when the aircraft is not in use.
-
Page 13: Preparing Dji Goggles 3
DJI Avata 2 User Manual Preparing DJI Goggles 3 Powering on the Goggles Press the power button once to check the current battery level. Press once, then press and hold for two seconds to power the goggles on or o昀昀. - Page 14 DJI Avata 2 User Manual The table below shows the battery level during charging: LED1 LED2 LED3 LED4 Battery Level 1%-50% 51%-75% 76%-99% 100% • USB-C port spec: USB 2.0 (480 Mbps). The maximum input power is 9V/3A. Wearing the Goggles •...
- Page 15 DJI Avata 2 User Manual 3. Put on the goggles after the devices are powered on. 4. Rotate the headband adjustment knob on the battery compartment to adjust the length of the headband. Rotate clockwise to tighten the headband and counterclockwise to loosen the headband.
- Page 16 Using the Corrective Lenses DJI Goggles 3 supports diopter adjustment from -6.0D to +2.0D. If your vision is in the range of -6.0D to -8.0D, you can install the provided -2.0D Corrective Lenses.
- Page 17 DJI Avata 2 User Manual 1. Detach the original lens frames from the goggles by rotating counterclockwise as shown. +2.0D ~ -6.0D +2.0D ~ -6.0D 2. Take out the -2.0D Corrective Lenses and peel o昀昀 the protective 昀椀lm. Distinguish the left and right lenses via the L and R marks on the bottom.
- Page 18 DJI Avata 2 User Manual Purchasing and Installing Your Own Corrective Lenses If you require astigmatism correction or the diopters of the goggles cannot meet your needs, you can purchase suitable lenses and use the corrective lens frames to install them.
-
Page 19: Preparing Dji Rc Motion 3
DJI Avata 2 User Manual 7. Adjust the diopters of the goggles according to your needs and lock the knobs. • If you usually wear -9.0D glasses, you can purchase a pair of -3.0D lenses, and adjust the diopters of the goggles to -6.0D. Then the overall diopter value will be -9.0D after the self-prepared lenses are installed. -
Page 20: Linking
DJI Avata 2 User Manual Linking The aircraft, goggles, and motion controller are already linked when purchased together as a combo. Otherwise, follow the steps below to link the devices. Make sure that the devices used with the aircraft have been updated to the latest firmware... -
Page 21: Activation
昀氀ight. Activation DJI Avata 2 must be activated before using for the 昀椀rst time. Make sure all devices are linked after powering on the aircraft, goggles, and remote control device. Connect the USB-C port of the goggles to the mobile device, run DJI Fly, and follow the prompts to activate. An internet connection is required for activation. -
Page 22: Updating Firmware
DJI Avata 2 User Manual Updating Firmware A prompt will appear in DJI Fly when new 昀椀rmware is available. Update the 昀椀rmware whenever prompted to ensure optimal user experience. Refer to “Updating Firmware” for more information. © 2024 DJI All Rights Reserved. -
Page 23: Overview
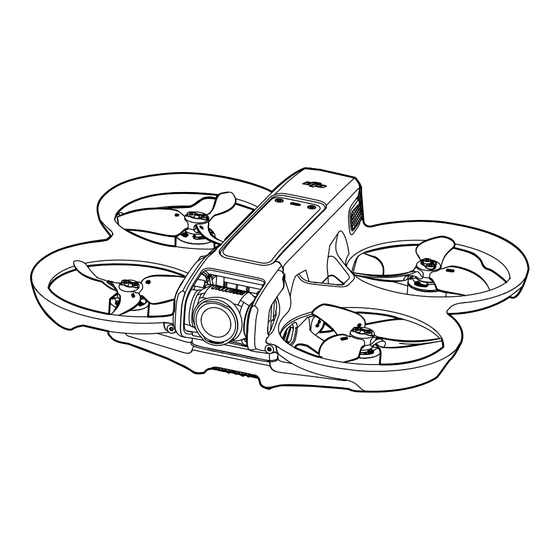
DJI Avata 2 User Manual Overview Aircraft Gimbal and Camera Power Button Propellers Battery Level LEDs Intelligent Flight Battery Motors Aircraft Status Indicator 10. Battery Buckle Infrared Sensing System 11. USB-C Port Downward and Backward Vision System 12. microSD Card Slot... -
Page 24: Dji Rc Motion 3
DJI Avata 2 User Manual DJI RC Motion 3 Accelerator Battery Level LEDs Dial Lock Button USB-C Port Joystick Power Button Mode Button Shutter/Record Button 10. Lanyard Hole © 2024 DJI All Rights Reserved. - Page 25 Flight Safety 2024 DJI All Rights Reserved. ©...
-
Page 26: Flight Safety
Flight Restrictions GEO (Geospatial Environment Online) System The DJI Geospatial Environment Online (GEO) System is a global information system that provides real-time information on flight safety and restriction updates and prevents UAVs from flying in restricted airspace. Under exceptional circumstances, restricted areas can be unlocked to allow flights in. - Page 27 Warning Zones, Enhanced Warning Zones, and Altitude Zones. Users can view such information in real-time in DJI Fly. GEO Zones are speci昀椀c 昀氀ight areas, including but not limited to airports, large event venues, locations where public emergencies have occurred (such as forest 昀椀res), nuclear power plants, prisons, government properties, and military facilities.
-
Page 28: Unlocking Geo Zones
Self-Unlocking is intended for unlocking Authorization Zones. To complete Self-Unlocking, the user must submit an unlocking request via the DJI Fly Safe website at https://昀氀y-safe.dji.com. Once the unlocking request is approved, the user may synchronize the unlocking license through the DJI Fly app. -
Page 29: Flight Environment Requirements
DJI Avata 2 User Manual Flight Environment Requirements DO NOT operate the aircraft in severe weather conditions including wind speeds exceeding 10.7 m/s, snow, thunder and lightning, rain, and fog. Only fly in open areas. Tall buildings and large metal structures may affect the accuracy of the onboard compass and GNSS system. -
Page 30: Operating The Aircraft Responsibly
Make sure the max 昀氀ight altitude, max 昀氀ight distance and RTH altitude are all set properly in the goggles according to the local laws and regulations. 10. Only use genuine DJI parts or DJI-authorized parts. Unauthorized parts may cause system malfunctions and compromise 昀氀ight safety. - Page 31 DJI Avata 2 User Manual 11. Check if the Remote ID is up to date and working. 12. DO NOT 昀氀y over densely populated areas. 2024 DJI All Rights Reserved. ©...
- Page 32 Flight Operation © 2024 DJI All Rights Reserved.
-
Page 33: Flight Operation
Go to Settings > Control > Motion Controller > Flight Control > Motion Controller Instructions. Operate the aircraft by using the lock button, joystick, and accelerator of the DJI Motion Controller 3. Use the lock button to control the takeoff, landing, and braking of the aircraft. -
Page 34: Taking Off, Braking And Landing
DJI Avata 2 User Manual When the accelerator is not pressed, the aircraft will hover. When gently pressing the accelerator to the 昀椀rst stop, you can adjust the aircraft orientation by tilting the motion controller vertically to the left or right. -
Page 35: Flying Forward And Backward
DJI Avata 2 User Manual • If an emergency occurs (such as a collision or the aircraft is out of control) during 昀氀ight, pressing the lock button four times will trigger Stop Motors Mid-昀氀ight, which The Stop Motors Mid-昀氀ight function will will stop the aircraft motors immediately. -
Page 36: Adjusting Aircraft Orientation
DJI Avata 2 User Manual Adjusting Aircraft Orientation Gently press the accelerator to the first stop and simultaneously tilt the top of the motion controller in either direction to make the aircraft rotate. The greater the tilt angle of the motion controller, the faster the aircraft will rotate. -
Page 37: Controlling The Gimbal And Camera
DJI Avata 2 User Manual Controlling the Gimbal and Camera Tilt the motion controller up and down to control the tilt of the gimbal. The tilt of the gimbal changes with the tilt of the motion controller accordingly and is always consistent with the orientation of the motion controller. -
Page 38: Easy Acro
DJI Avata 2 User Manual Easy ACRO Use the motion controller to perform Easy ACRO actions including front 昀氀ip, back昀氀ip, roll, and 180° drift. • For 昀氀ight safety, perform Easy ACRO actions in an open environment. 1. Open the shortcut menu and select Easy ACRO. The aircraft will be in Easy ACRO mode. Easy ACRO includes three actions: Slide, 180°... -
Page 39: Slide
DJI Avata 2 User Manual 2. Use the dial on the motion controller to switch between Easy ACRO actions. 3. When Easy ACRO is enabled, move the joystick to perform di昀昀erent Easy ACRO actions as shown below. Slide Push the joystick up or down to make the aircraft ascend or descend. -
Page 40: Flip
• Easy ACRO cannot be enabled in the following situations: a. When recording video; b. When Head Tracking is enabled; c. When used with DJI FPV Remote Controller 3. • Pay attention to surroundings and make sure there are no obstacles nearby before performing Easy ACRO actions. - Page 41 Aircraft 2024 DJI All Rights Reserved. ©...
-
Page 42: Aircraft
Settings > Control > Beginner Mode. • Manual mode is only supported when using the DJI FPV Remote Controller 3 to operate the aircraft. Throttle stick resistance can also be adjusted. DJI Motion Controller 3 does not support Manual mode. -
Page 43: Aircraft Status Indicator
DJI Avata 2 User Manual • When the 昀氀ight altitude of the aircraft is less than 5 m or when there are obstacles within a radius of 5 m around the aircraft, use caution when enabling Manual mode. The attitude may become unstable when turning the aircraft in Manual mode in the situations mentioned below. -
Page 44: Return To Home
DJI Avata 2 User Manual Return to Home The Return to Home (RTH) function will automatically 昀氀y the aircraft back to the last recorded Home Point. RTH can be triggered in three ways: the user actively triggers RTH, the aircraft has low battery, or the remote control signal or video transmission signal has been lost (Failsafe RTH is triggered). -
Page 45: Rth Procedure
DJI Avata 2 User Manual once to cancel RTH. After exiting RTH, users will regain control of the aircraft. Aircraft low battery When the battery level is low and only su昀케cient to 昀氀y to the Home Point, a warning prompt will appear in the goggles and RTH will be triggered following the prompt. -
Page 46: Vision System And Infrared Sensing System
DJI Avata 2 User Manual 3. If Landing Protection is not operational, the goggles will display a landing prompt when the aircraft descends to 0.25 m. Press and hold the lock button on the motion controller and the aircraft will land. -
Page 47: Detection Range
DJI Avata 2 User Manual Detection Range Backward FOV: 78° (horizontal), 78° (vertical) Downward FOV: 78° (horizontal), 78° (vertical) Precision Measurement Range: 0.3-20 m; Precision Hovering Range: 0.3-10 m. • Pay attention to the 昀氀ight environment. The vision system and infrared sensing system only work in certain scenarios and cannot replace human control and judgment. -
Page 48: Propellers
Use a soft cloth if there is any dirt, dust, or water on the glass of the vision systems and infrared sensing systems. DO NOT use any cleaning product that contains alcohol; c. Contact DJI Support if there is any damage to the glass of infrared sensing system and vision system. Propellers There are two types of propellers, which are designed to spin in di昀昀erent directions. -
Page 49: Attaching And Detaching The Propellers
DJI Avata 2 User Manual Attaching and Detaching the Propellers Attach the marked propellers to the motors of the marked arm, and the unmarked propellers to the motors of the unmarked arm. Use the 1.5mm screwdriver from the aircraft package to mount the propellers. - Page 50 • Propeller blades are sharp. Handle with care. • Only use o昀케cial DJI propellers. DO NOT mix propeller types. • Propellers are consumable components. Purchase additional propellers if necessary. • Make sure to only use the screwdriver from the aircraft package for mounting propellers.
-
Page 51: Intelligent Flight Battery
DJI Avata 2 User Manual Intelligent Flight Battery The aircraft can be used with DJI Avata 2 Intelligent Flight Battery (BWX520-2150-17.76). This battery is a 14.76V, 2150mAh battery that adopts high-energy battery cells and uses an advanced battery management system. -
Page 52: Using The Battery
DJI Avata 2 User Manual 6. Over-discharge protection is enabled and discharging stops automatically to prevent over- discharge when the battery is not in use. Charge the battery to wake it from over-discharge protection before using again. Over-discharge protection is not enabled when the battery is in use. - Page 53 Firmware update failed • If the update fails, reinsert the battery into the aircraft and power on, and retry the firmware update using DJI Assistant 2 (Consumer Drones Series). Refer to the Firmware Update section for more information. 2024 DJI All Rights Reserved. ...
-
Page 54: Charging The Battery
Fully charge the battery before each use. It is recommended to use the charging devices provided by DJI, such as the DJI Avata 2 Two-Way Charging Hub, DJI 65W Portable Charger or other USB Power Delivery chargers. The DJI Avata 2 Two-Way Charging Hub and the DJI 65W Portable Charger are both optional accessories. - Page 55 • When using the charging hub to charge the Intelligent Flight Batteries, it is recommended to use the DJI 65W Portable Charger or a USB Power Delivery charger. When used with the DJI 65W Portable Charger, the charging hub can fully charge one Intelligent Flight Battery in approximately 45 minutes.
- Page 56 DJI Avata 2 User Manual Using the Charging Hub as a Power Bank 1. Insert an Intelligent Flight Battery into the charging hub. Connect an external device via the USB-C port, such as a mobile phone or remote controller. 2. The battery with the lowest power level will be discharged 昀椀rst, followed by the remaining batteries which will be discharged sequentially.
- Page 57 DJI Avata 2 User Manual Status LED Indicator Descriptions Blinking Pattern Description — Solid yellow The charging hub is idle Pulses green Charging the battery or accumulating power All batteries fully charged or are supplying power to — Solid green...
-
Page 58: Gimbal And Camera
DJI Avata 2 User Manual If any of the battery protection mechanisms are activated, unplug the charger, and plug it in again to resume charging. If the charging temperature is abnormal, wait for it to return to normal. The battery will automatically resume charging without the need to unplug and plug the charger again. -
Page 59: Warnings
DJI Avata 2 User Manual • DO NOT add any extra payload other than an official accessory to the gimbal, as this may cause the gimbal to function abnormally or even lead to permanent motor damage. • Make sure to remove the gimbal protector before powering on the aircraft. Make sure to mount the gimbal protector when the aircraft is not in use. -
Page 60: Footage Export
The battery level LEDs blink from inside to out and then turn solid. DJI Fly will prompt users whether to connect to the aircraft or not. - Page 61 DJI Avata 2 User Manual • When the aircraft is connected to DJI Fly using QuickTransfer, the aircraft will be disconnected from the goggles and the remote controller. Connection will be automatically restored after exiting QuickTransfer. If DJI Fly is closed abnormally, connection can only be automatically restored after restarting the aircraft.
-
Page 62: Dji Goggles 3
DJI Goggles 3 © 2024 DJI All Rights Reserved. -
Page 63: Operating The Goggles
DJI Goggles 3 are equipped with two high-performance screens and ultra-low-latency image transmission for use with DJI aircraft, allowing for a real-time aerial First Person View (FPV) experience. DJI Goggles 3 supports the Head Tracking function. With this function, the aircraft and gimbal can be controlled using head movements. -
Page 64: Ar Cursor
DJI Avata 2 User Manual AR Cursor Before takeo昀昀 or when using the lock button to trigger the aircraft to hover, users can use the AR Cursor (the white line with a circle at the end) to interact with the screen of the googles. - Page 65 DJI Avata 2 User Manual Operating the Menu • Using motion controller movements, move the cursor to the arrow on the left side of the screen. Gently press the accelerator to the first stop position, then the cursor will become small and the menu will be opened.
- Page 66 DJI Avata 2 User Manual • Move the cursor to the arrow on the top of the screen, press the accelerator to enter the shortcut menu, and con昀椀gure settings such as Recording or Enhanced Display. • Move the cursor to the arrow on the bottom of the screen, press the accelerator to enter camera settings, and con昀椀gure settings for the parameters of the aircraft camera.
-
Page 67: Goggles Screen
DJI Avata 2 User Manual Goggles Screen FPV View 1. Flight Direction Indicator When controlling the aircraft with the motion controller, the circle indicates the direction in which the aircraft is heading. 2. Storage Information Displays the remaining capacity of the aircraft or goggles storage. -
Page 68: Shortcut Menu
DJI Avata 2 User Manual 7. Video Bitrate Displays the current video bitrate of the liveview. 8. Remote Controller and Image Transmission Signal Strength Displays the signal strength between the aircraft and the remote control device, and the image transmission signal strength between the aircraft and the goggles. -
Page 69: Camera Settings
DJI Avata 2 User Manual Camera Settings Push the 5D button forward from the FPV view to open the camera settings panel and change camera-related parameters. In the parameter panel, push to the right to view and set more parameters. -
Page 70: Goggles Menu
DJI Avata 2 User Manual Goggles Menu Press down the 5D button or push it to the right to open the menu from the FPV view. © 2024 DJI All Rights Reserved. - Page 71 DJI Avata 2 User Manual 1. Status Displays the in-use aircraft model and detailed information of prompt alerts. • Use the switch function in the upper right corner to change the aircraft. • 2. Album Shows the photos or videos stored on the microSD card of the goggles. Select any 昀椀le to preview.
- Page 72 DJI Avata 2 User Manual controller lock button four times. If the switch is disabled, the motors can only be stopped with this action in an emergency, such as if a collision occurs, a motor stalls, the aircraft rolls in the air, or the aircraft is out of control and is ascending or descending quickly.
-
Page 73: Goggles Footage Storage And Export
DJI Avata 2 User Manual Goggles Footage Storage and Export microSD Card Slot Footage Storage The goggles support the installation of a microSD card. After a microSD card is inserted, If Record With is set to both the aircraft and the goggles while the aircraft is recording video the goggles will simultaneously record the 昀氀ight live view displayed on the screen and store it on... -
Page 74: Real View Pip
DJI Avata 2 User Manual Real View PiP DJI Goggles 3 are equipped with binocular cameras, in order for users to view the surrounding environment without removing the goggles. Tap twice firmly on the right side of the goggles, or press twice on the dial of the motion controller to enter Real View. -
Page 75: Wireless Connection With Mobile Device
DJI Avata 2 User Manual 2. Launch DJI Fly app and tap GO FLY in the lower right corner of the screen to enter the liveview. Wireless Connection with Mobile Device 1. Open the shortcut menu, and select Share Liveview to Mobile Device via Wi-Fi. -
Page 76: Panorama/3D Video Playback
DJI Avata 2 User Manual Panorama/3D Video Playback The goggles support playing panoramic videos and 3D videos, bringing you an immersive viewing experience. 1. Import panoramic/3D videos to a microSD card, and insert it into the goggles. 2. Enter the goggles menu and then Album, then select the video 昀椀le to play. - Page 77 DJI Motion Controller 2024 DJI All Rights Reserved. ©...
-
Page 78: Dji Motion Controller
DJI Avata 2 User Manual DJI Motion Controller Operation Powering On/O昀昀 Press the power button once to check the current battery level. Charge before using if the battery level is too low. Press once then press again and hold for two seconds to power the motion controller on or o昀昀. -
Page 79: Button Features
DJI Avata 2 User Manual Button Features Lock Button • Takeoff: Press twice to start the aircraft motors, then press and hold to make the aircraft take off. The aircraft will ascend to approximately 1.2 m and hover. • Landing: While the aircraft is hovering, press and hold to land the aircraft and stop the motors. -
Page 80: Optimal Transmission Zone
DJI Avata 2 User Manual Accelerator The accelerator is used for controlling aircraft orientation and acceleration. There are two stops when pressing the accelerator. Gently press the accelerator, users will feel noticeable resistance when the accelerator reaches the 昀椀rst stop. -
Page 81: Motion Controller Alert
DJI Avata 2 User Manual Motion Controller Alert The remote controller sounds an alert when the battery level is between 6% and 10%. A low battery level alert can be canceled by pressing the power button. A critical battery level alert will sound when the battery level is less than 5% and cannot be canceled The remote controller sounds an alert during RTH, which cannot be canceled. - Page 82 DJI Fly App © 2024 DJI All Rights Reserved.
-
Page 83: Dji Fly App
昀氀ying in a way that is compliant. • The use of the app is subject to DJI Fly Terms of Use and DJI Privacy Policy. These Terms of Use and Privacy Policy limit some of DJI's legal responsibilities. Read them carefully at https://developer.dji.com/policies/. - Page 84 Appendix © 2024 DJI All Rights Reserved.
-
Page 85: Appendix
DJI Avata 2 User Manual Appendix Speci昀椀cations Aircraft Takeo昀昀 Weight Approx. 377 g 185×212×64 mm (L×W×H) Dimensions Max Ascent Speed 6 m/s (Normal mode) 9 m/s (Sport mode) Max Descent Speed 6 m/s (Normal mode) 9 m/s (Sport mode) Max Horizontal Speed... - Page 86 DJI Avata 2 User Manual Shutter Speed Video: 1/8000-1/30 s Photo: 1/8000-1/50 s Max Image Size 4000×2256 (16:9) 4000×3000 (4:3) Still Photography Mode Single shot Photo Format JPEG 4K (4:3): 3840×2880@30/50/60fps Video Resolution 4K (16:9): 3840×2160@30/50/60fps 2.7K (4:3): 2688×2016@30/50/60fps 2.7K (16:9): 2688×1512@30/50/120fps 1080p (4:3): 1440×1080@30/50/120fps...
- Page 87 DJI Avata 2 User Manual Operating Environment Diffuse reflective surfaces with discernible patterns, diffuse re昀氀ectivity > 20% (such as concrete pavement) Adequate lighting (lux > 15, normal indoor lighting conditions) Video Transmission Video Transmission System 1080p@30/50/60/100fps Live View Quality Operating Frequency 2.4000-2.4835 GHz...
- Page 88 Charging Hub Output (power Max 65 W accumulation) Output (charging) Max 17 V Output (USB) 5 V, 2 A Charging Type Three batteries charged in sequence. Compatibility DJI Avata 2 Intelligent Flight Battery © 2024 DJI All Rights Reserved.
- Page 89 DJI Avata 2 User Manual Storage SanDisk Extreme PRO 32GB U3 A1 V30 microSDHC Recommended microSD Lexar Professional 1066x 64GB U3 A2 V30 microSDXC Cards Lexar Professional 1066x 128GB U3 A2 V30 microSDXC Lexar Professional 1066x 256GB U3 A2 V30 microSDXC...
- Page 90 With DJI Avata 2: DJI O4 ...
- Page 91 With DJI Avata 2: Latency 1080p/100fps video transmission quality: latency down to 24 ms 1080p/60fps video transmission quality: latency down to 40 ms When used with DJI Avata 2, DJI Goggles 3 can achieve the Max Transmission following max video transmission distance: Distance...
- Page 92 [4] The 3-hour max operating time was measured at an ambient temperature of 25° C (77° F), screen brightness at 4, connected to the DJI Avata 2 aircraft, video transmission set to 1080p/100fps, Head Tracking o昀昀, Real View o昀昀, and the goggles' battery fully charged and not supplying power to external devices such as smartphones.
-
Page 93: Compatible Products
-10° to 40° C (14° to 104° F) Operating Time Approx. 10 hours * Measured with an ambient temperature of 25° C (77° F), when connected to DJI Avata 2, and in a stationary state. Battery Charging Temperature 0° to 50° C (32° to 122° F) Charging Time Approx. -
Page 94: Updating Firmware
Updating Firmware Use one of the following methods to update the 昀椀rmware: 1. Use the DJI Fly App to update the 昀椀rmware for the entire set of devices including the aircraft, goggles, and remote control device. 2. Use DJI Assistant 2 (Consumer Drones Series) to update the 昀椀rmware for a single device. -
Page 95: Maintenance Instructions
DJI Avata 2 User Manual Maintenance Instructions To avoid serious injury to children and animals, observe the following rule: Small parts, such as cables and straps, are dangerous if swallowed. Keep all parts out of reach of children and animals. -
Page 96: Troubleshooting Procedures
Risk and Warnings DJI Avata 2 When the aircraft detects a risk after powering on, there will be a warning prompt on DJI Fly. Pay attention to the list of situations below. 1. If the location is not suitable for takeo昀昀. -
Page 97: Disposal
If the goggles screen goes off unexpectedly during flight, press the motion controller lock button once to brake the aircraft 昀椀rst, and then initiate RTH manually. After the aircraft is back, check the goggles power level and try to restart the goggles. If the problem persists, contact DJI support. -
Page 98: Flight Data
Flight data including flight telemetry, aircraft status information, and other parameters are automatically saved to the internal data recorder of the aircraft. The data can be accessed using DJI Assistant 2 (Consumer Drones Series). Aftersales Information Visit https://www.dji.com/support to learn more about aftersales service policies, repair services, and support. ©... -
Page 99: Maintenance
DJI Avata 2 User Manual Maintenance Replacing the Foam Padding for Goggles 1. Hold the bottom of the foam padding and remove it gently, as shown below. DO NOT pull the sides when removing the foam padding. Otherwise, the padding •... -
Page 100: Cleaning And Maintenance Of The Goggles
DJI Avata 2 User Manual Cleaning and Maintenance of the Goggles Clean the surface of the goggles with a soft, dry, clean cloth. Use the lens cleaning cloth to clean the lenses in a circular motion from the center to the outer edges. - Page 101 Contact DJI SUPPORT This content is subject to change. https://www.dji.com/avata-2/downloads If you have any questions about this document, please contact DJI by sending a message to DocSupport@dji.com. DJI is a trademark of DJI. Copyright © 2024 DJI All Rights Reserved.
Need help?
Do you have a question about the AVATA 2 and is the answer not in the manual?
Questions and answers